
A downpour of rain shows that making PBO Project Boat Maximus watertight is a priority, so Ali Wood gets some top tips about sealants from experts
I couldn’t wait for my dad to meet Maximus. It was dad who introduced me to sailing as a kid on Compstall Lake in Cheshire.
My earliest memory is watching him and my mum hike out as far as they could on a Mirror dinghy, yelling at me to get on the high side while I ignored them, trailing my arm through the murky water.
My mum gave up soon after that, but dad and I carried on sailing, in everything from GRP cruiser-racers to a trimaran and wooden gaffer.
Dad bought me an RYA Dayskipper course as a graduation present, and watched me head off to Australia to work on charter yachts, before getting a job at his favourite magazine, Practical Boat Owner!
He finally gave up owning a boat last year, so was thrilled to hear that we’d acquired Maximus, a Maxi 84, and would be restoring her and writing a series of articles for PBO.
What’s more, I promised him he wouldn’t have to do any DIY. My husband James and I would be taking on the challenge ourselves.
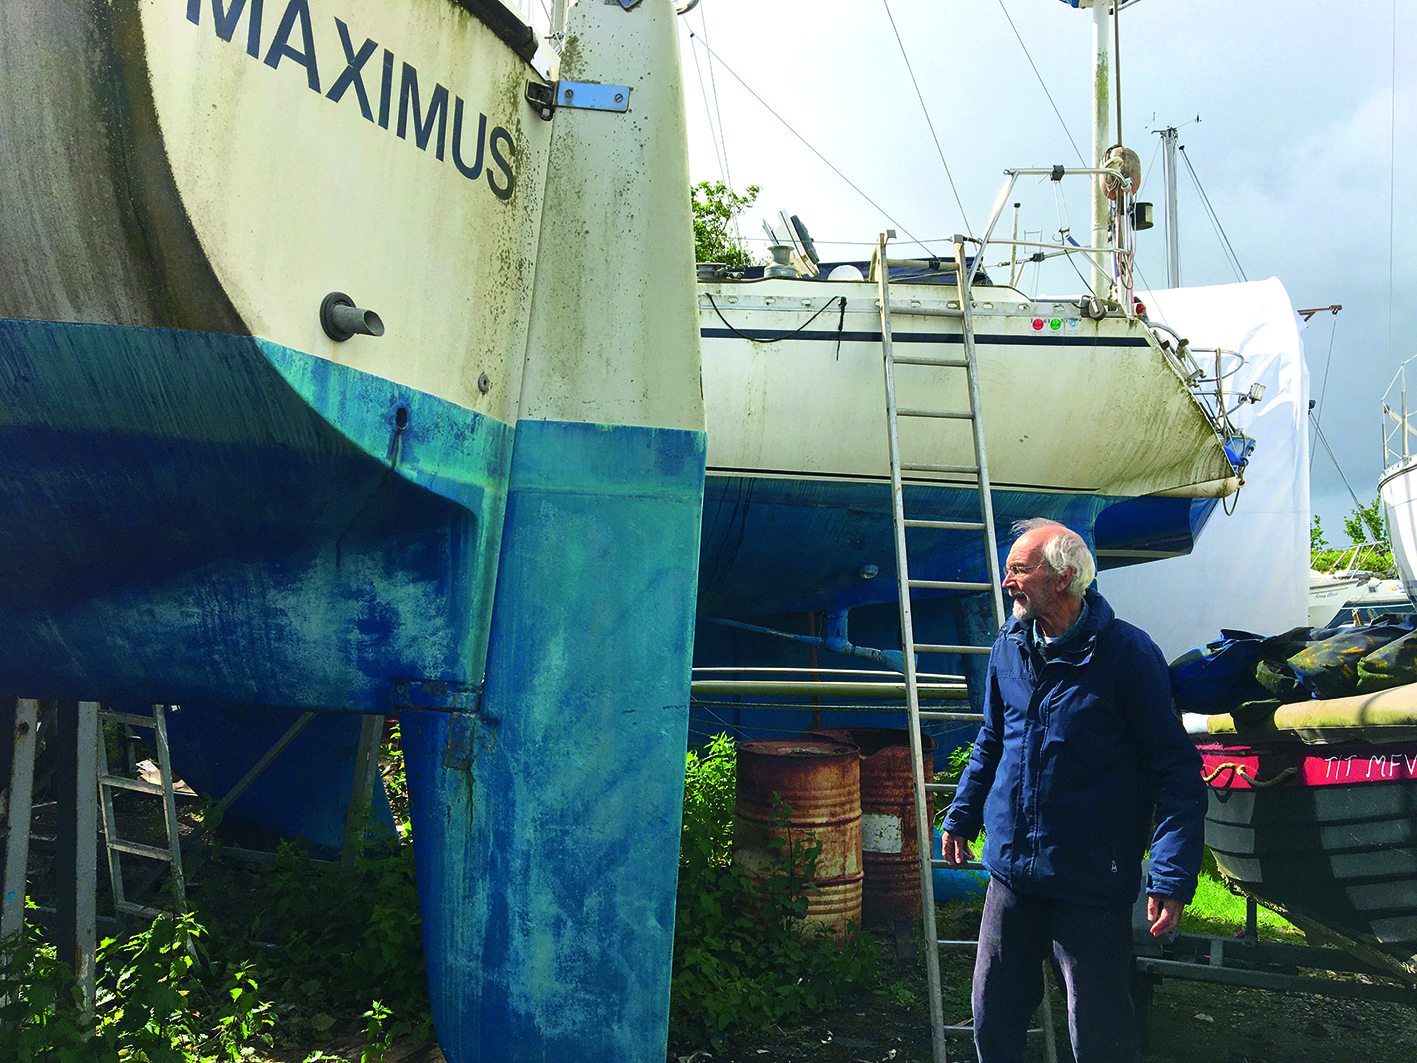
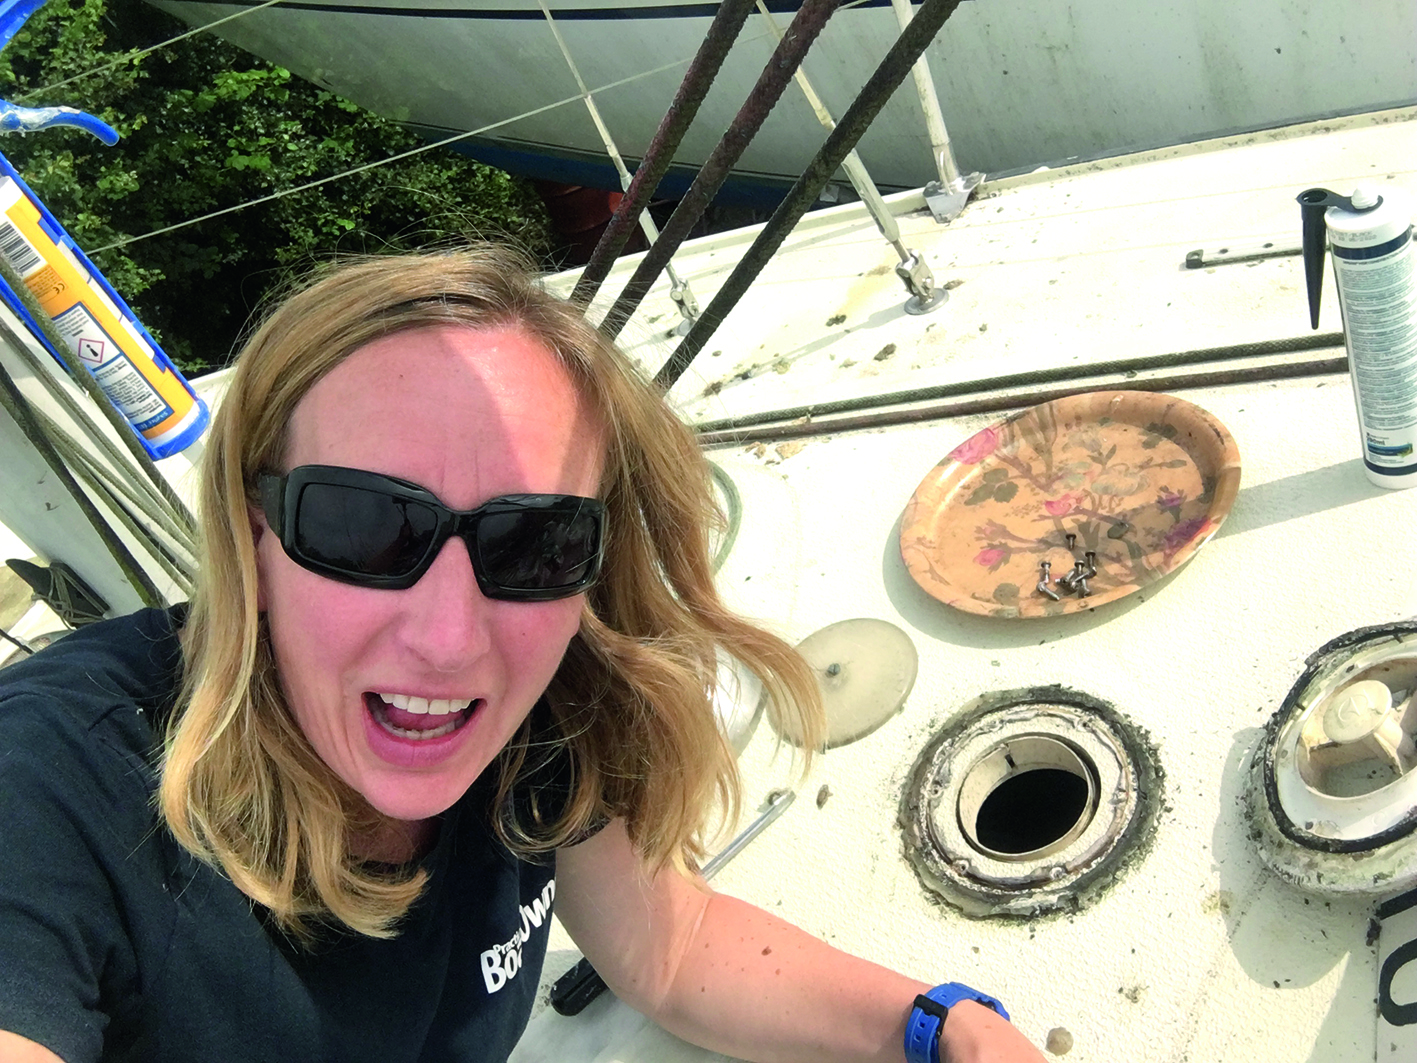
Maximus in the yard
All was looking good the day we drove to Dell Quay in Chichester. The sun was shining, and Maximus was looking decidedly better after her pressure wash (though still in need of a good polish).
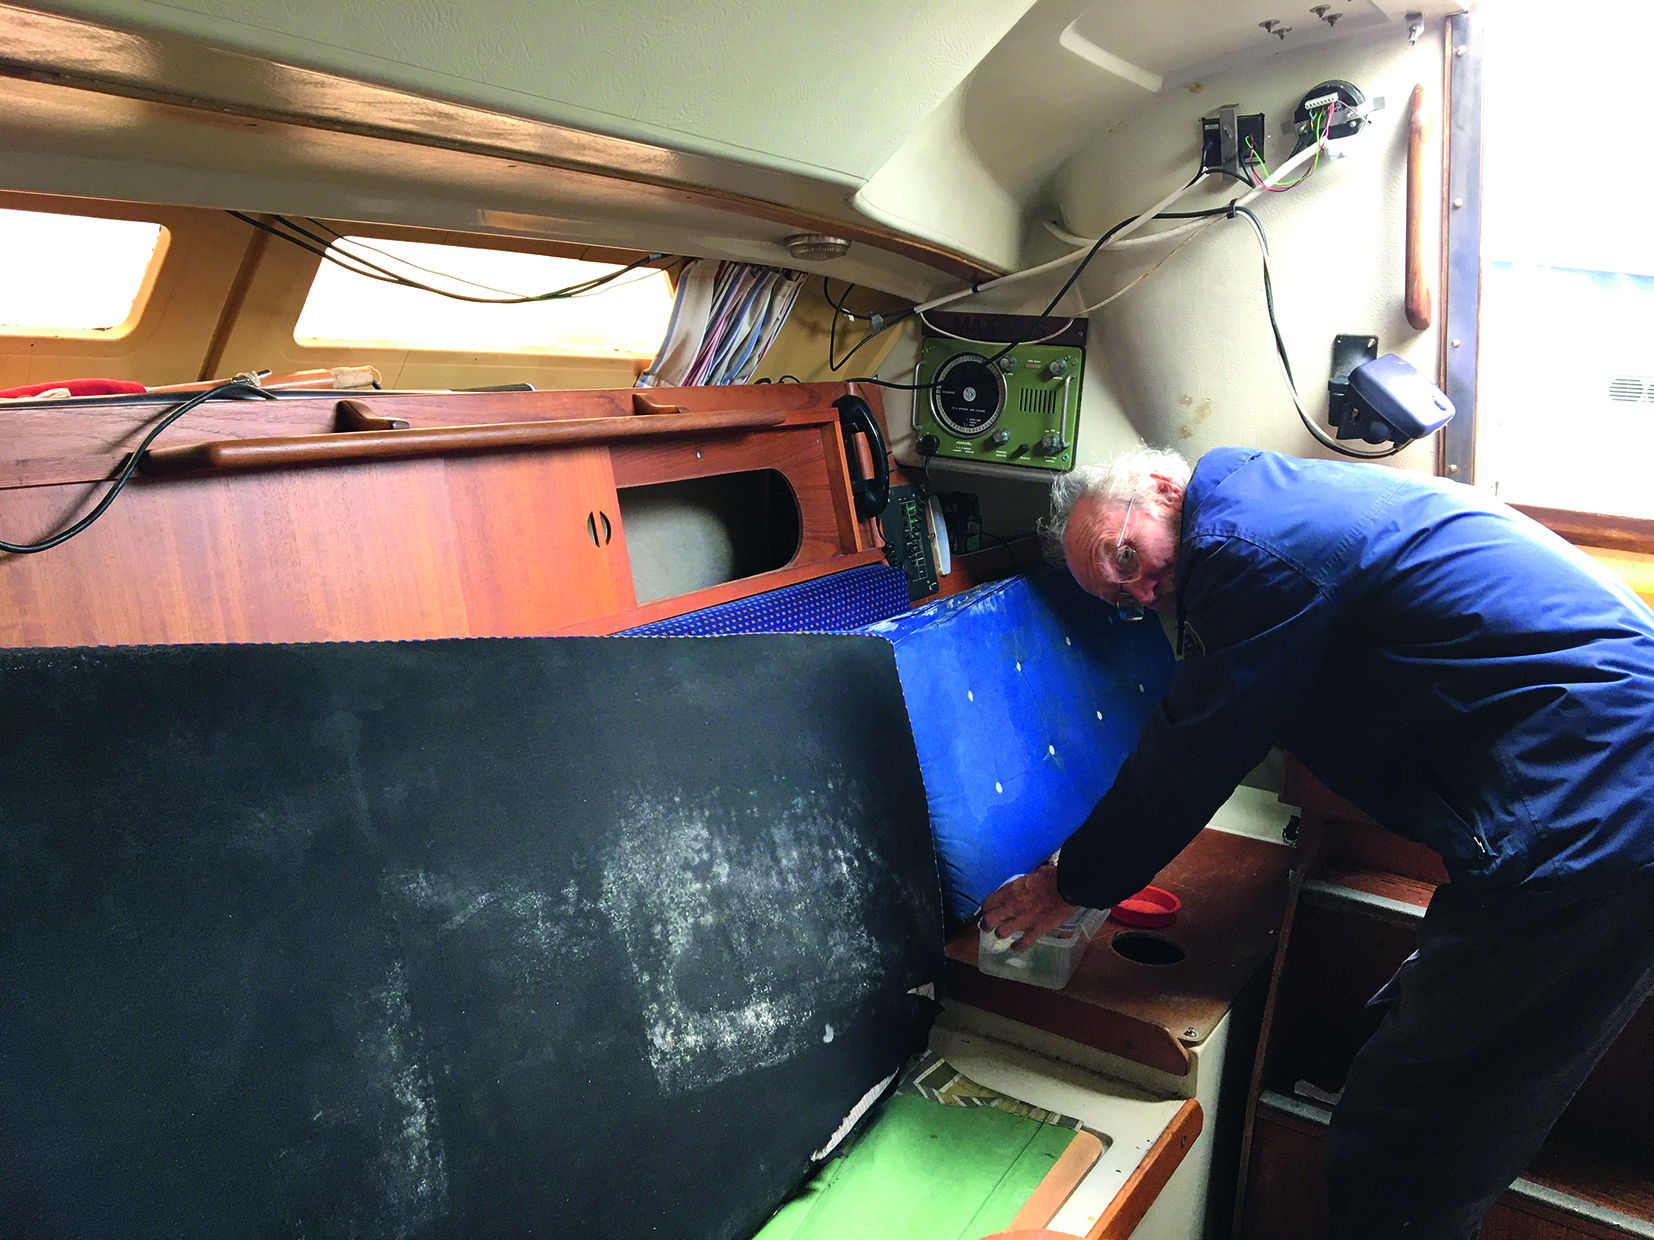
As we emptied the boat, however, we found the lockers 6 -12in deep in standing water. I didn’t hesitate to hand Dad a bucket and sponge – promise broken already!
As we bailed out the forward locker and pilot berth locker, the heavens opened, and we were treated to a demonstration of just how all that lovely brown water had got there.
Article continues below…

Antifouling – when is it time to scrape back? Maximus survey begins…
When is it time to strip back antifouling? The PBO Project Boat survey is underway, and in this video marine…

How to detect gas leaks on boats – a handy tool that could save your life
Detecting gas leaks on boats is important, especially as gas standards on boats were very different 40 years ago. Sadly…

Remember the Sailor vintage marine radio?
Wow! Take a look at this lovely vintage marine radio onboard Maximus, the PBO Project Boat. Marine surveyor Ben Sutcliffe-Davies…
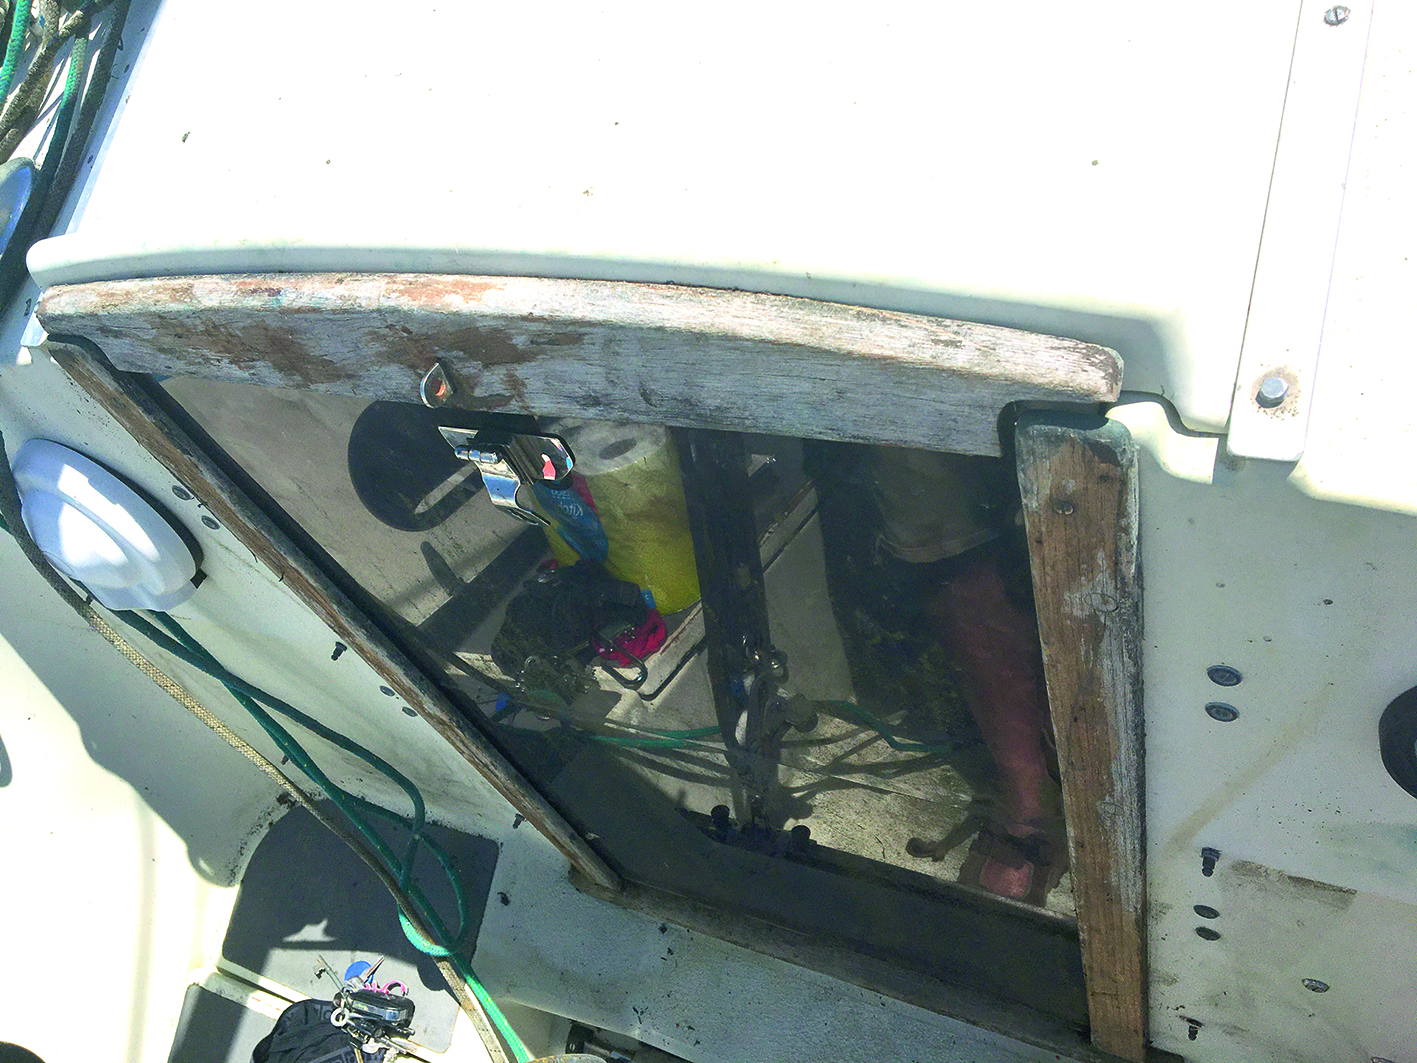
There were obvious leaks through the portholes and companionway and a huge amount of water pouring in from an old heating vent on the port side.

Ali’s husband, James, and dad, Graham

Jet-washing the hull
Leaky windows
Leaky portholes and portlights are common on cruising boats, but there are several things we can try to solve the issue, as we discovered.
In his survey, Ben Sutcliffe-Davies had noted that moisture ingress is common on portlights such as those on Maximus, due to the internal seal abutment.
Also in the pilot berth there was an alloy framed porthole, which was also leaking.
“Keep the seals clean and lubricated,” he advised, “and regularly check the condition of the acrylic glazing sealant”.
You could pick Maximus’s sealant away with your fingers, so it had certainly been damaged by the UV rays.
When I spoke to Laurie Brebner of Marine and Industrial he wasn’t surprised by the condition of the windows.
“Star crazing over time is common with Perspex or acrylic,” he said. “Also, unlike mineral glass, you’ll find they expand and contract in the heat.”
Laurie also suggested they could be leaking through the screw holes.
“Often people use normal caulking, not marine-specific products on windows,” said Laurie.
“These are fine for a short period of time, but you need UV-stable materials, even in our temperate climate.”
Laurie suggested I remove all the old sealant with a perspex scraper with a chiselled edge then rebond it with a product such as Bostik MSR CA.
“The sealant isn’t doing anything in that state,” he added.
“It’s crumbled and flaking, so don’t worry about taking it all away.”
The Bostik is a construction adhesive – a hybrid, neither a polyurethane nor a silicone. It’s applied easily with a standard mastic gun and can be smoothed with a spatula.
“Try that first before taking the windows off,” he advised.
“If they’re the original windows they’ll be quite brittle and you might crack them.”
Laurie also explained that boat windows should have frit UV protective coating – the black dot-matrix you see on car windscreens.
The portlights on Maximus are screwed on
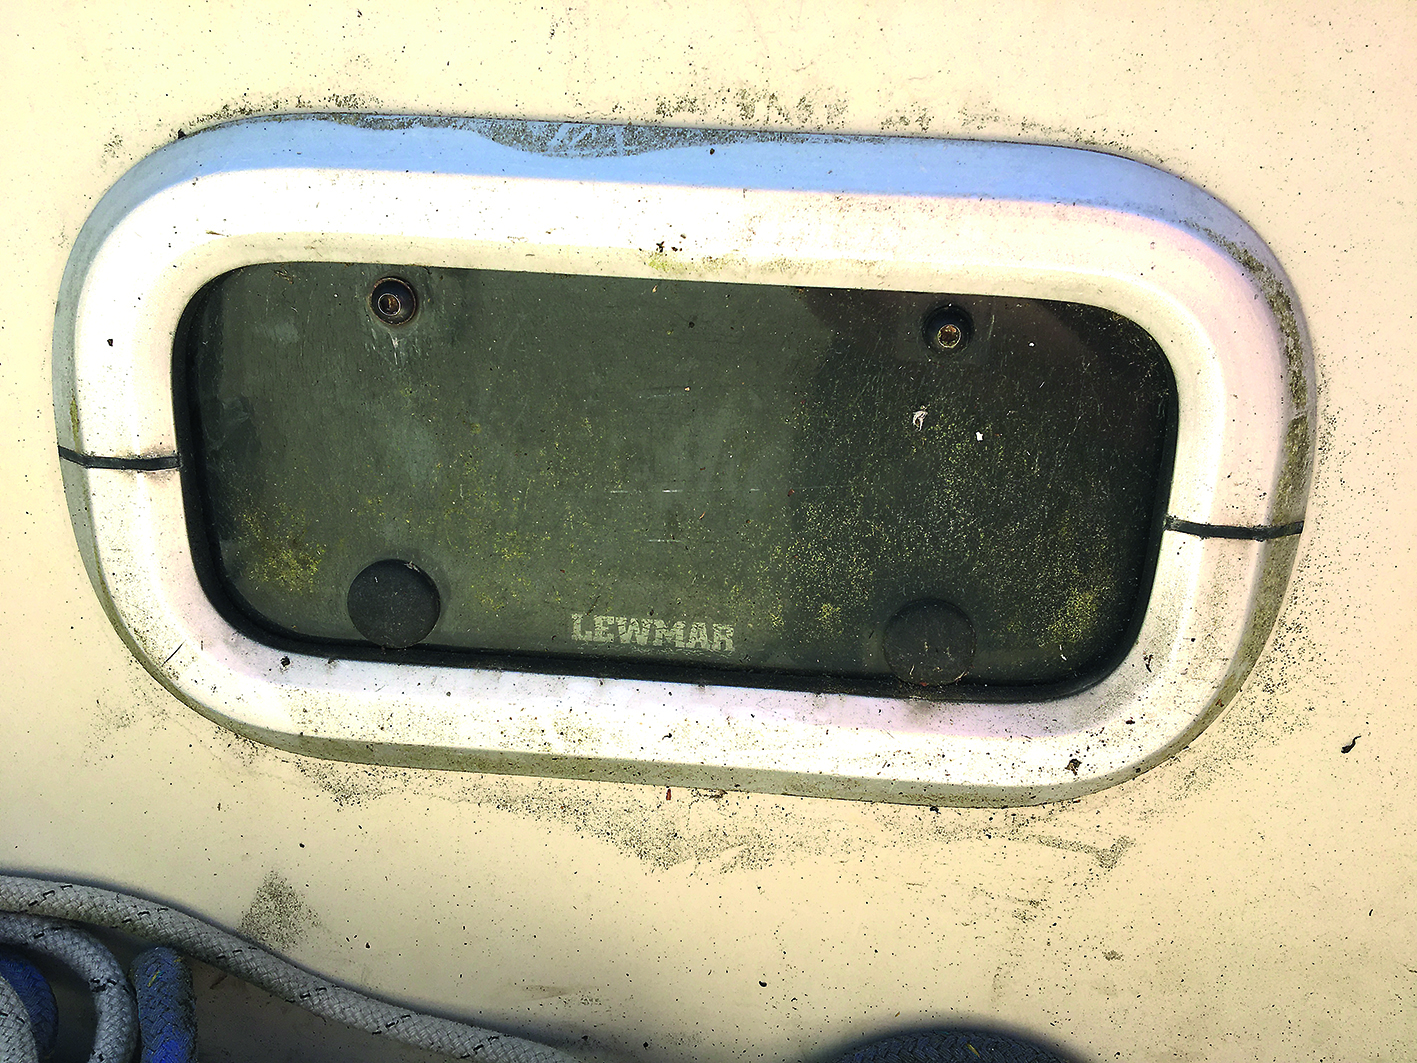
The leaking Lewmar porthole
If they don’t have it, you can buy the film and apply it to stop the refraction from the UV light eating and attacking the sealant and adhesive.
“Where a window is bonded in place with an adhesive and no mechanical fixings the UV frit is essential to protect the adhesive bond line from UV degradation.
“A common misconception is that a black primer (Sika Primer 206G&P or 207) will act as a UV blocker which is not the case.
“Primers are organic and will break down over time under direct UV exposure, so black frit or UV shielding tape is a must.
“Where a window is held in place by mechanical means (screws or a bolted frame) then they require sealing with a UV stable sealant and a frit is not so important,” he said.
I also got some helpful advice from Bristol boat owner Louis Derry at boat-renovation.com, an excellent hands-on website he set up to give advice to other boat owners.
Louis agreed with Laurie that the first thing to do would be to tighten the screws.
“Get someone to hold a hose over the window while you go around each fastener and tighten them up.
“Don’t over-tighten – doing so could crack the perspex.
“Don’t swing on it. Just enough to stop the water ingress.”
Removing boat windows Louis went on to say that if that doesn’t work the window can be removed as follows:
- Undo the fastenings. Lever off the old glazing (don’t lever with metal tools – only plastic) and have someone push from the inside.
- Remove old sealant and prep the area.
- Offer the window back up and place a few fasteners back.
- Draw around the window with a pencil and then use some masking tape to create a border around the window.
- Sikaflex the border of the window and place down, hand-tighten the fasteners but don’t squeeze out all of the sealant.
- Clean up. Wait until the Sikaflex is set and then do a final tighten. You now have an efficient gasket.
Small porthole
As for the porthole with the alloy frame, Louis suggested removing it whole and putting it under a tap.
Does it leak? If so, rebuild it. If not, use the above method as it’s only the bedding that’s leaking not the window itself.
On Louis’s own boat windows he used high-bond 3M tape, but those windows had no mechanical means of being secured so the primary purpose of this was for bonding not sealing.
Maximus has screws so a sealant rather than an adhesive is required.
A helpful neighbour at Dell Quay suggested I try Captain Tolley’s Creeping Crack Cure.
He swears by it, and at £15 for 250ml I figured it’s certainly worth a go.
The penetrating sealant is designed to seek cracks via capillary action that are no bigger than 0.8mm wide.
I’ve ordered a bottle and will try this on the Lewmar porthole after cleaning and lubricating it.
The companionway hatch wasn’t pulling tight over the washboard
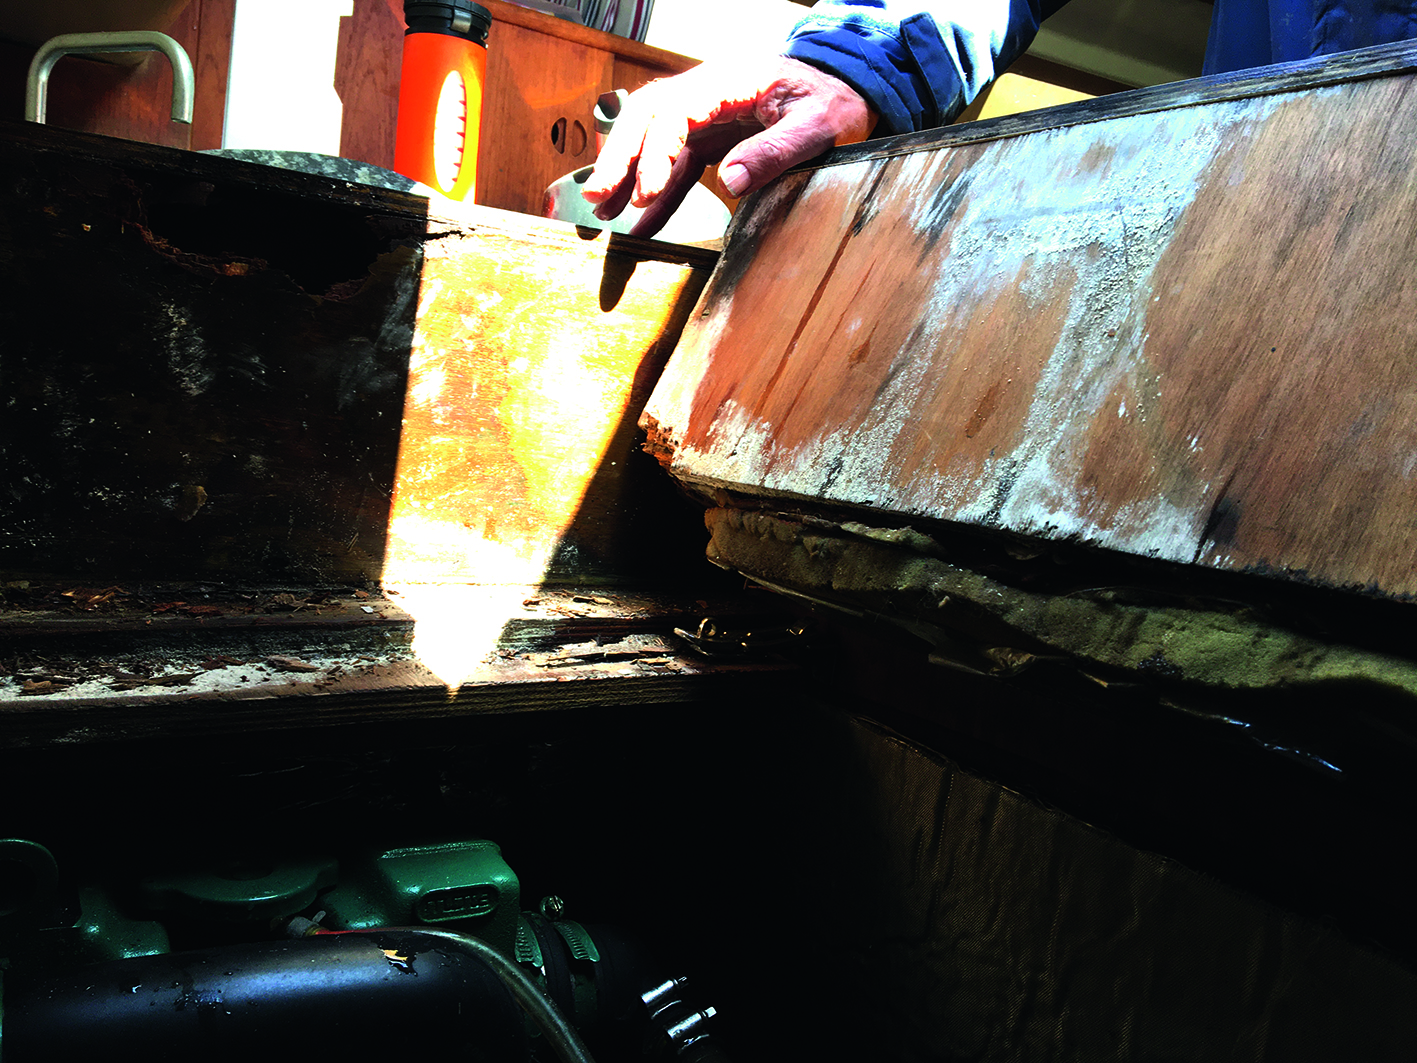
The rotten engine boxing – water had been dripping onto the engine too
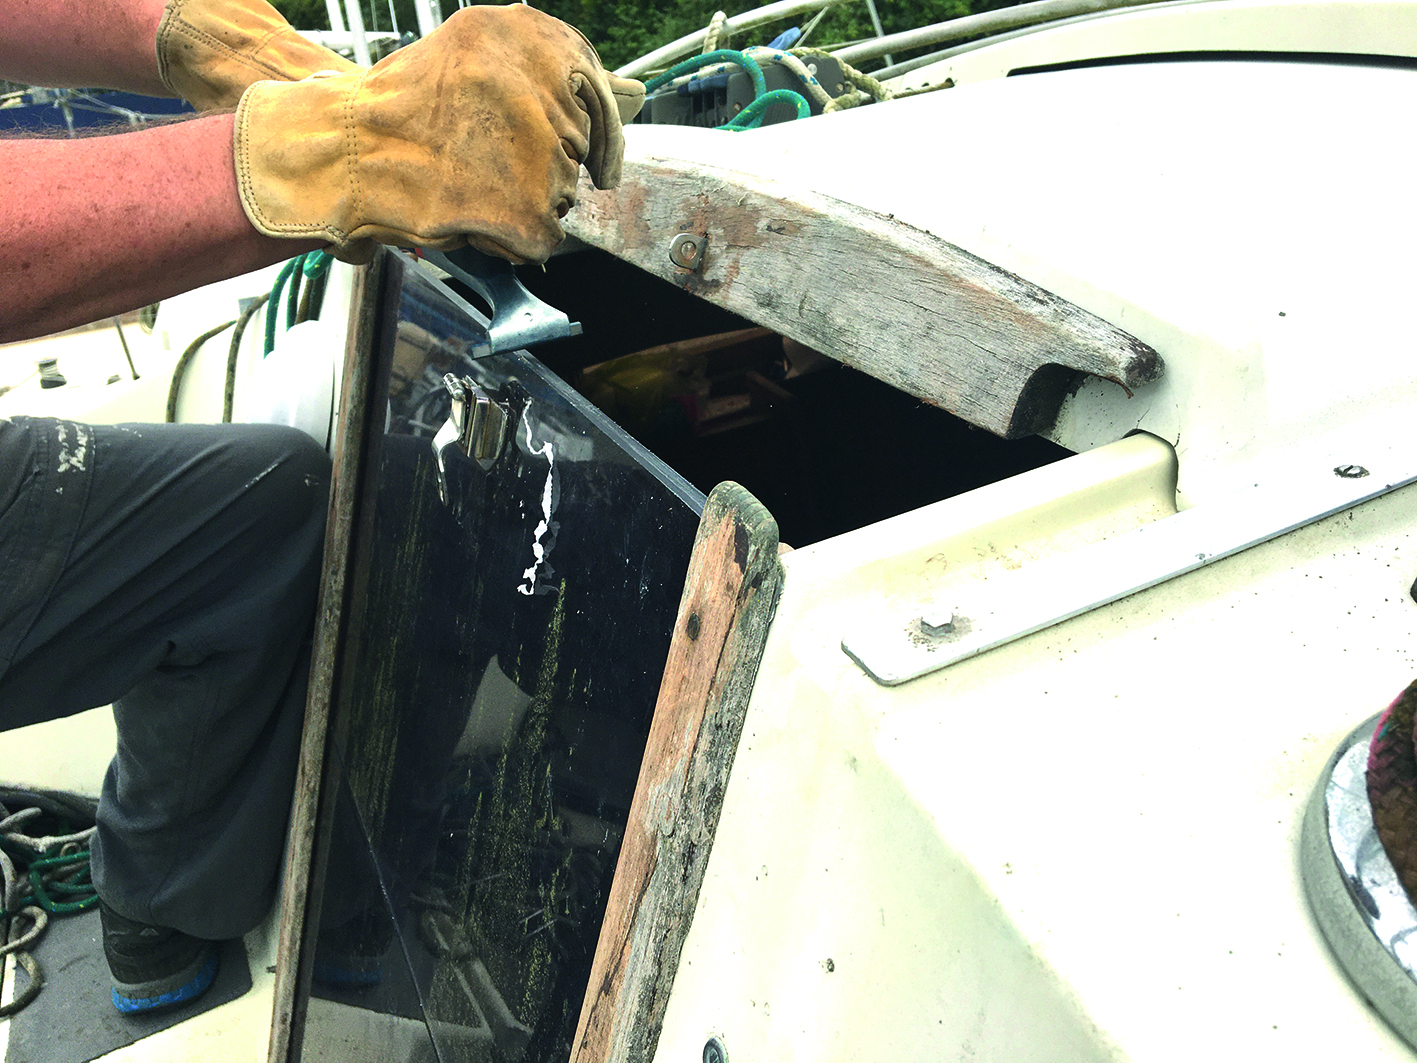
Using the scraper to remove a few millimetres of washboard Perspex
Companionway hatch
The companionway hatch was leaking badly onto the companionway steps.
There was a puddle of water on the top step and when we removed the steps to expose the engine, the wooden treads. were weak and damp and the framework around the engine was completely rotten – you could put your hand through it.
I tried opening and closing the hatch cover and soon realised it wasn’t going the full travel, but jamming against the edge of the top washboard, leaving a centimetre hole in both corners where the water could get in.
At some point the wood must have expanded and prevented it from being fully closed.
As a temporary fix, James and I scraped off a few millimetres of perspex with the Bahco scraper we’d bought for paint removal.
It didn’t look great, but the Perspex was already crazed and uneven, so I don’t think this was the first time someone had taken a scraper to it.
Ideally we’d replace the washboards, but for now the hatch cover closed fully – we got another inch out of it – which would hopefully be enough to stop the leak.
Now we just needed to sand down the companionway frame and varnish it. The wood here was in good condition.
Duct tape can provide an effective emergency seal – but won’t last for long in sunlight
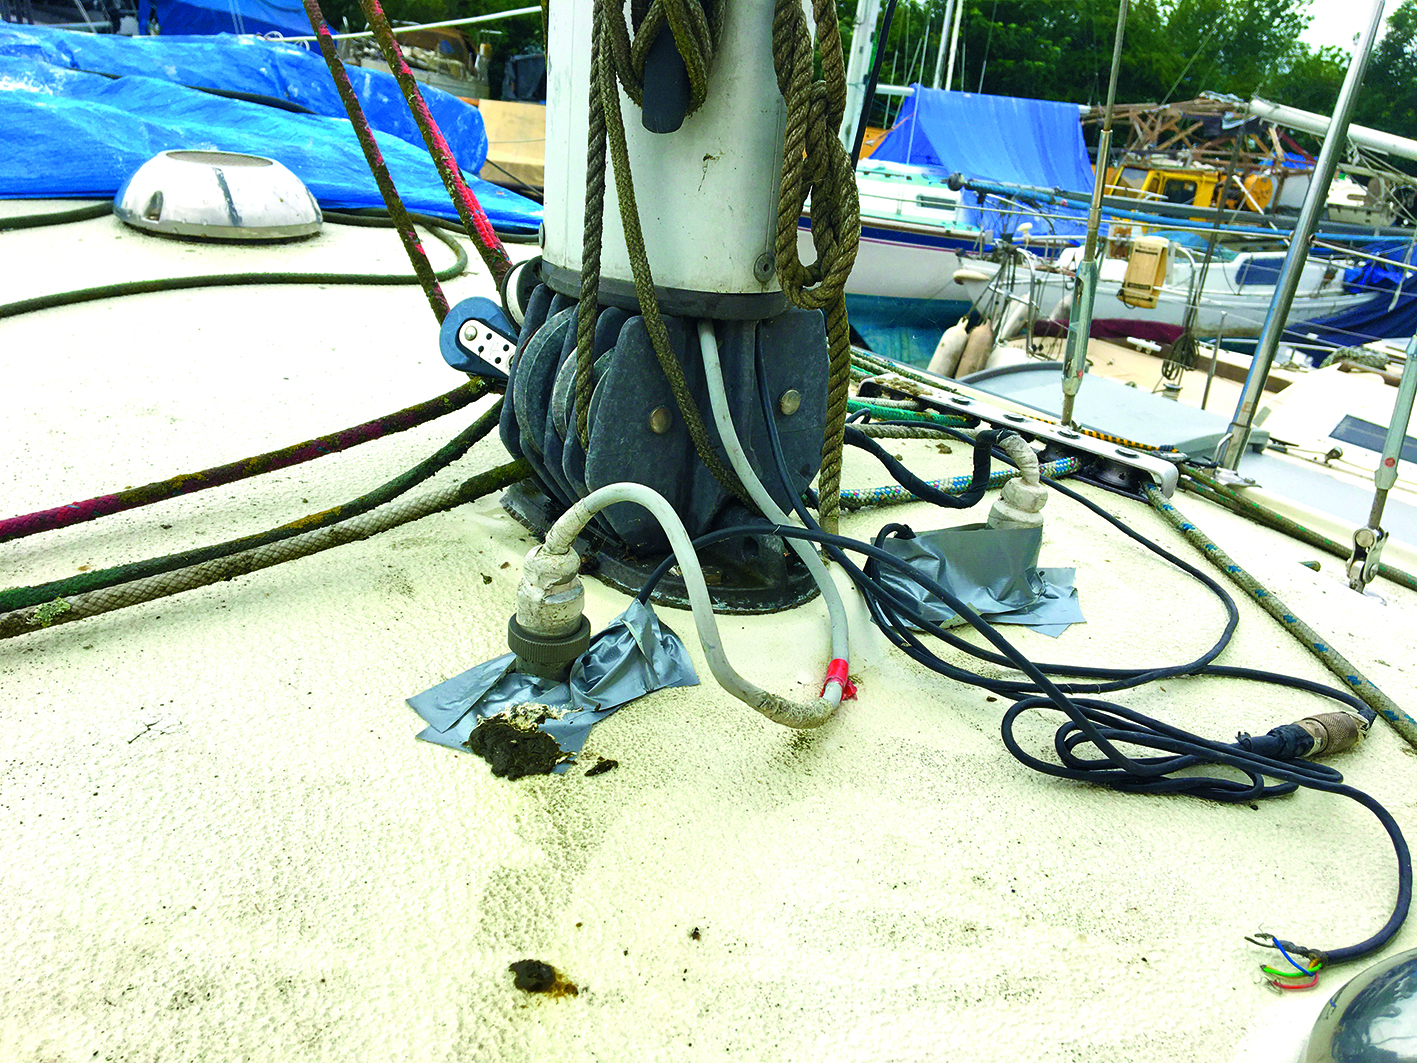
Deck plugs
A substantial amount of water was coming through the deck plugs where the mast wiring had come loose.
Maximus is due a full rewire so these will be replaced eventually, but a quick fix was in order to stop the leaks.
Duct tape worked only briefly, so I used the Sikaflex 361 to plug the holes.
Emptying lockers
Sorting through lockers
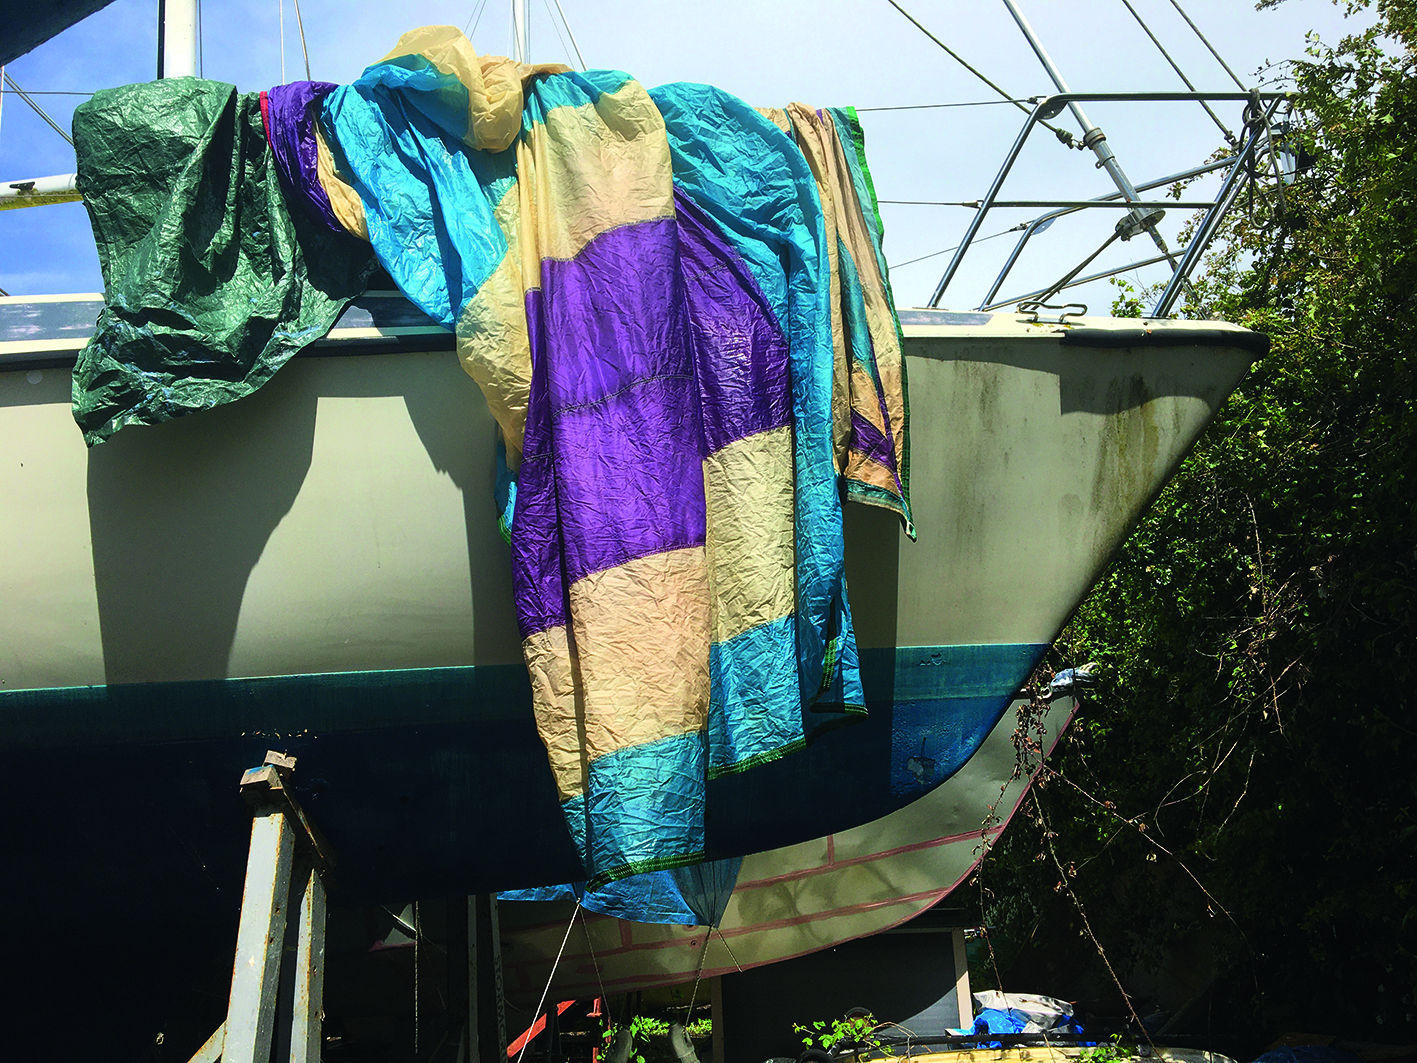
Hanging the spinnaker out to dry
James, Dad and I spent our entire first day at the boatyard emptying lockers first of belongings and then of water.
Bucket after bucket of brown water was removed, and we took away all the cushions, which were damp and mouldy underneath.
Jammed in the back seat for the hour and a half journey back to Bournemouth, I contacted Laurie and explained the situation.
He said that leaks like this were to be expected on an old boat and none were insurmountable.
“It’s actually a good thing the water’s gathered in the lockers,” he said.
“If it collects there, at least it’s not escaping through any holes in the bottom, but you do need to ensure your bilge pumps are in good working order.”
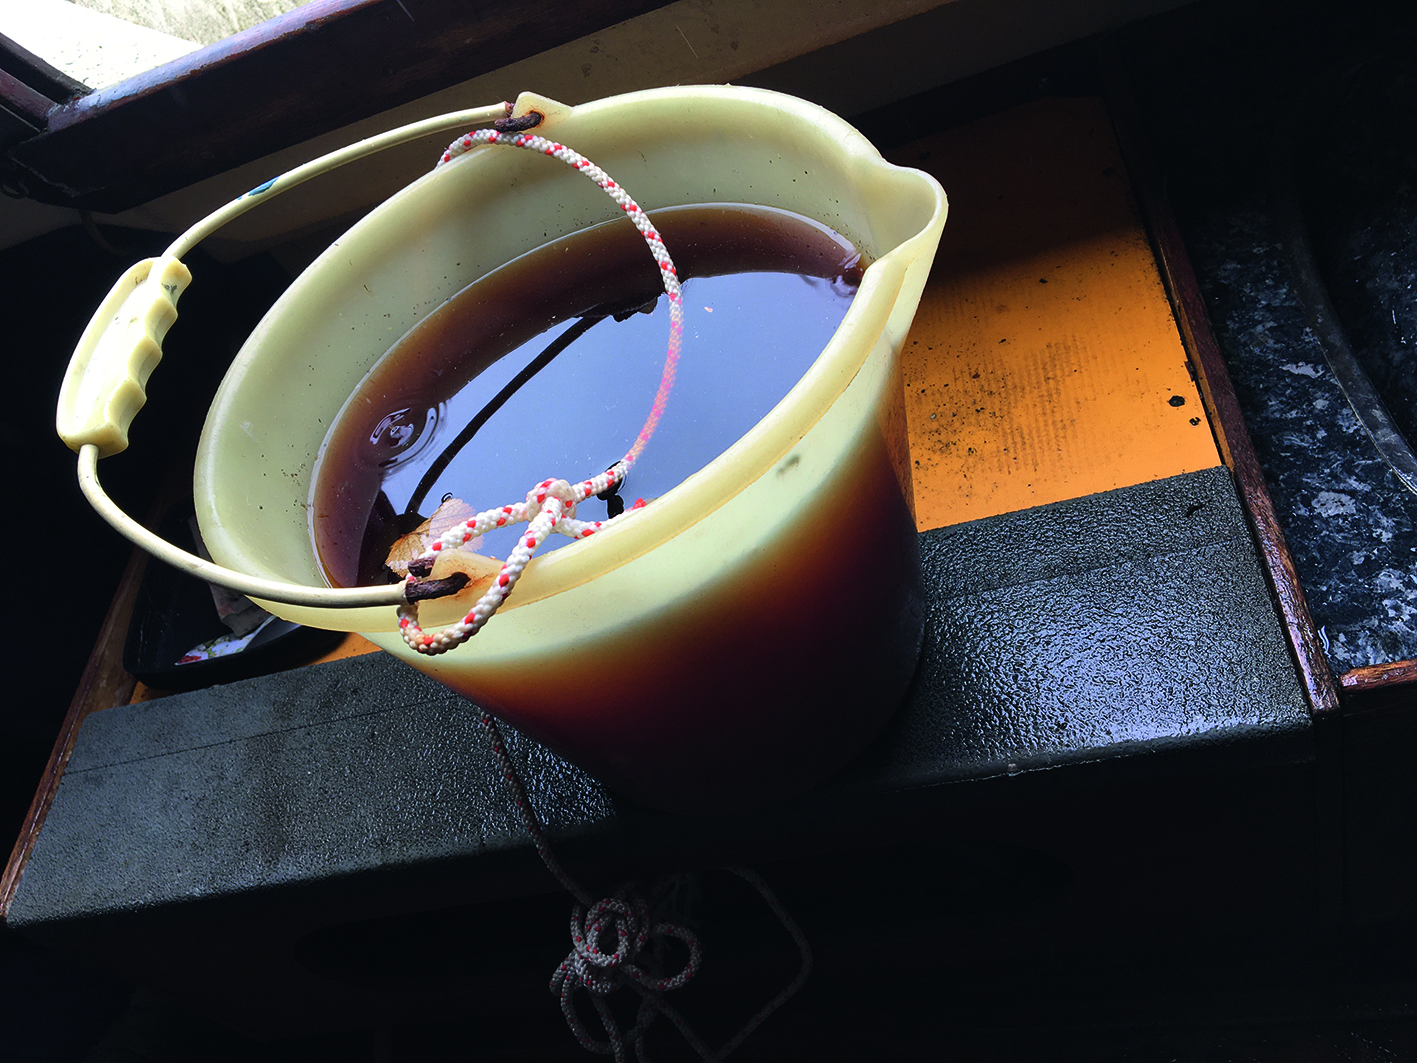
Buckets full of dirty water were extracted from lockers and bilges
Forward hatch
Laurie kindly offered to come down to Maximus and take a look at the leaks. The bendy foredeck hatch caught his attention right away.
He noted, as had surveyor Ben Sutcliffe-Davies, that it would likely shatter under the weight of a 12-stone man or large wave.
Not only was it a safety issue for the crew but a danger to the integrity of the boat.
“When they make up fibreglass in the mould they add 3mm of gelcoat first and then start laying the fibreglass up,” he said.
“With this hatch it’s just chopped strand mat over woven roving.
“All they’ve done, instead of gelcoating the whole hatch, is fibreglassed it off and gelcoated around the edges.”
The hatch will need reinforcing properly, but right now, as it’s leaking, I asked Laurie if he thought the hatch tape I’d found in a locker would work.
He examined the ¾ inch tape and nodded.
“This is a neoprene tape which is self-adhesive, allowing a bit of sponginess and give and take,” he said.
“It’s designed to go around the edges of hatches to allow a soft close so it doesn’t slam.”
I would ask the boatyard for some advice on reinforcing the hatch, but certainly the tape would help stem the leaks in the meantime.
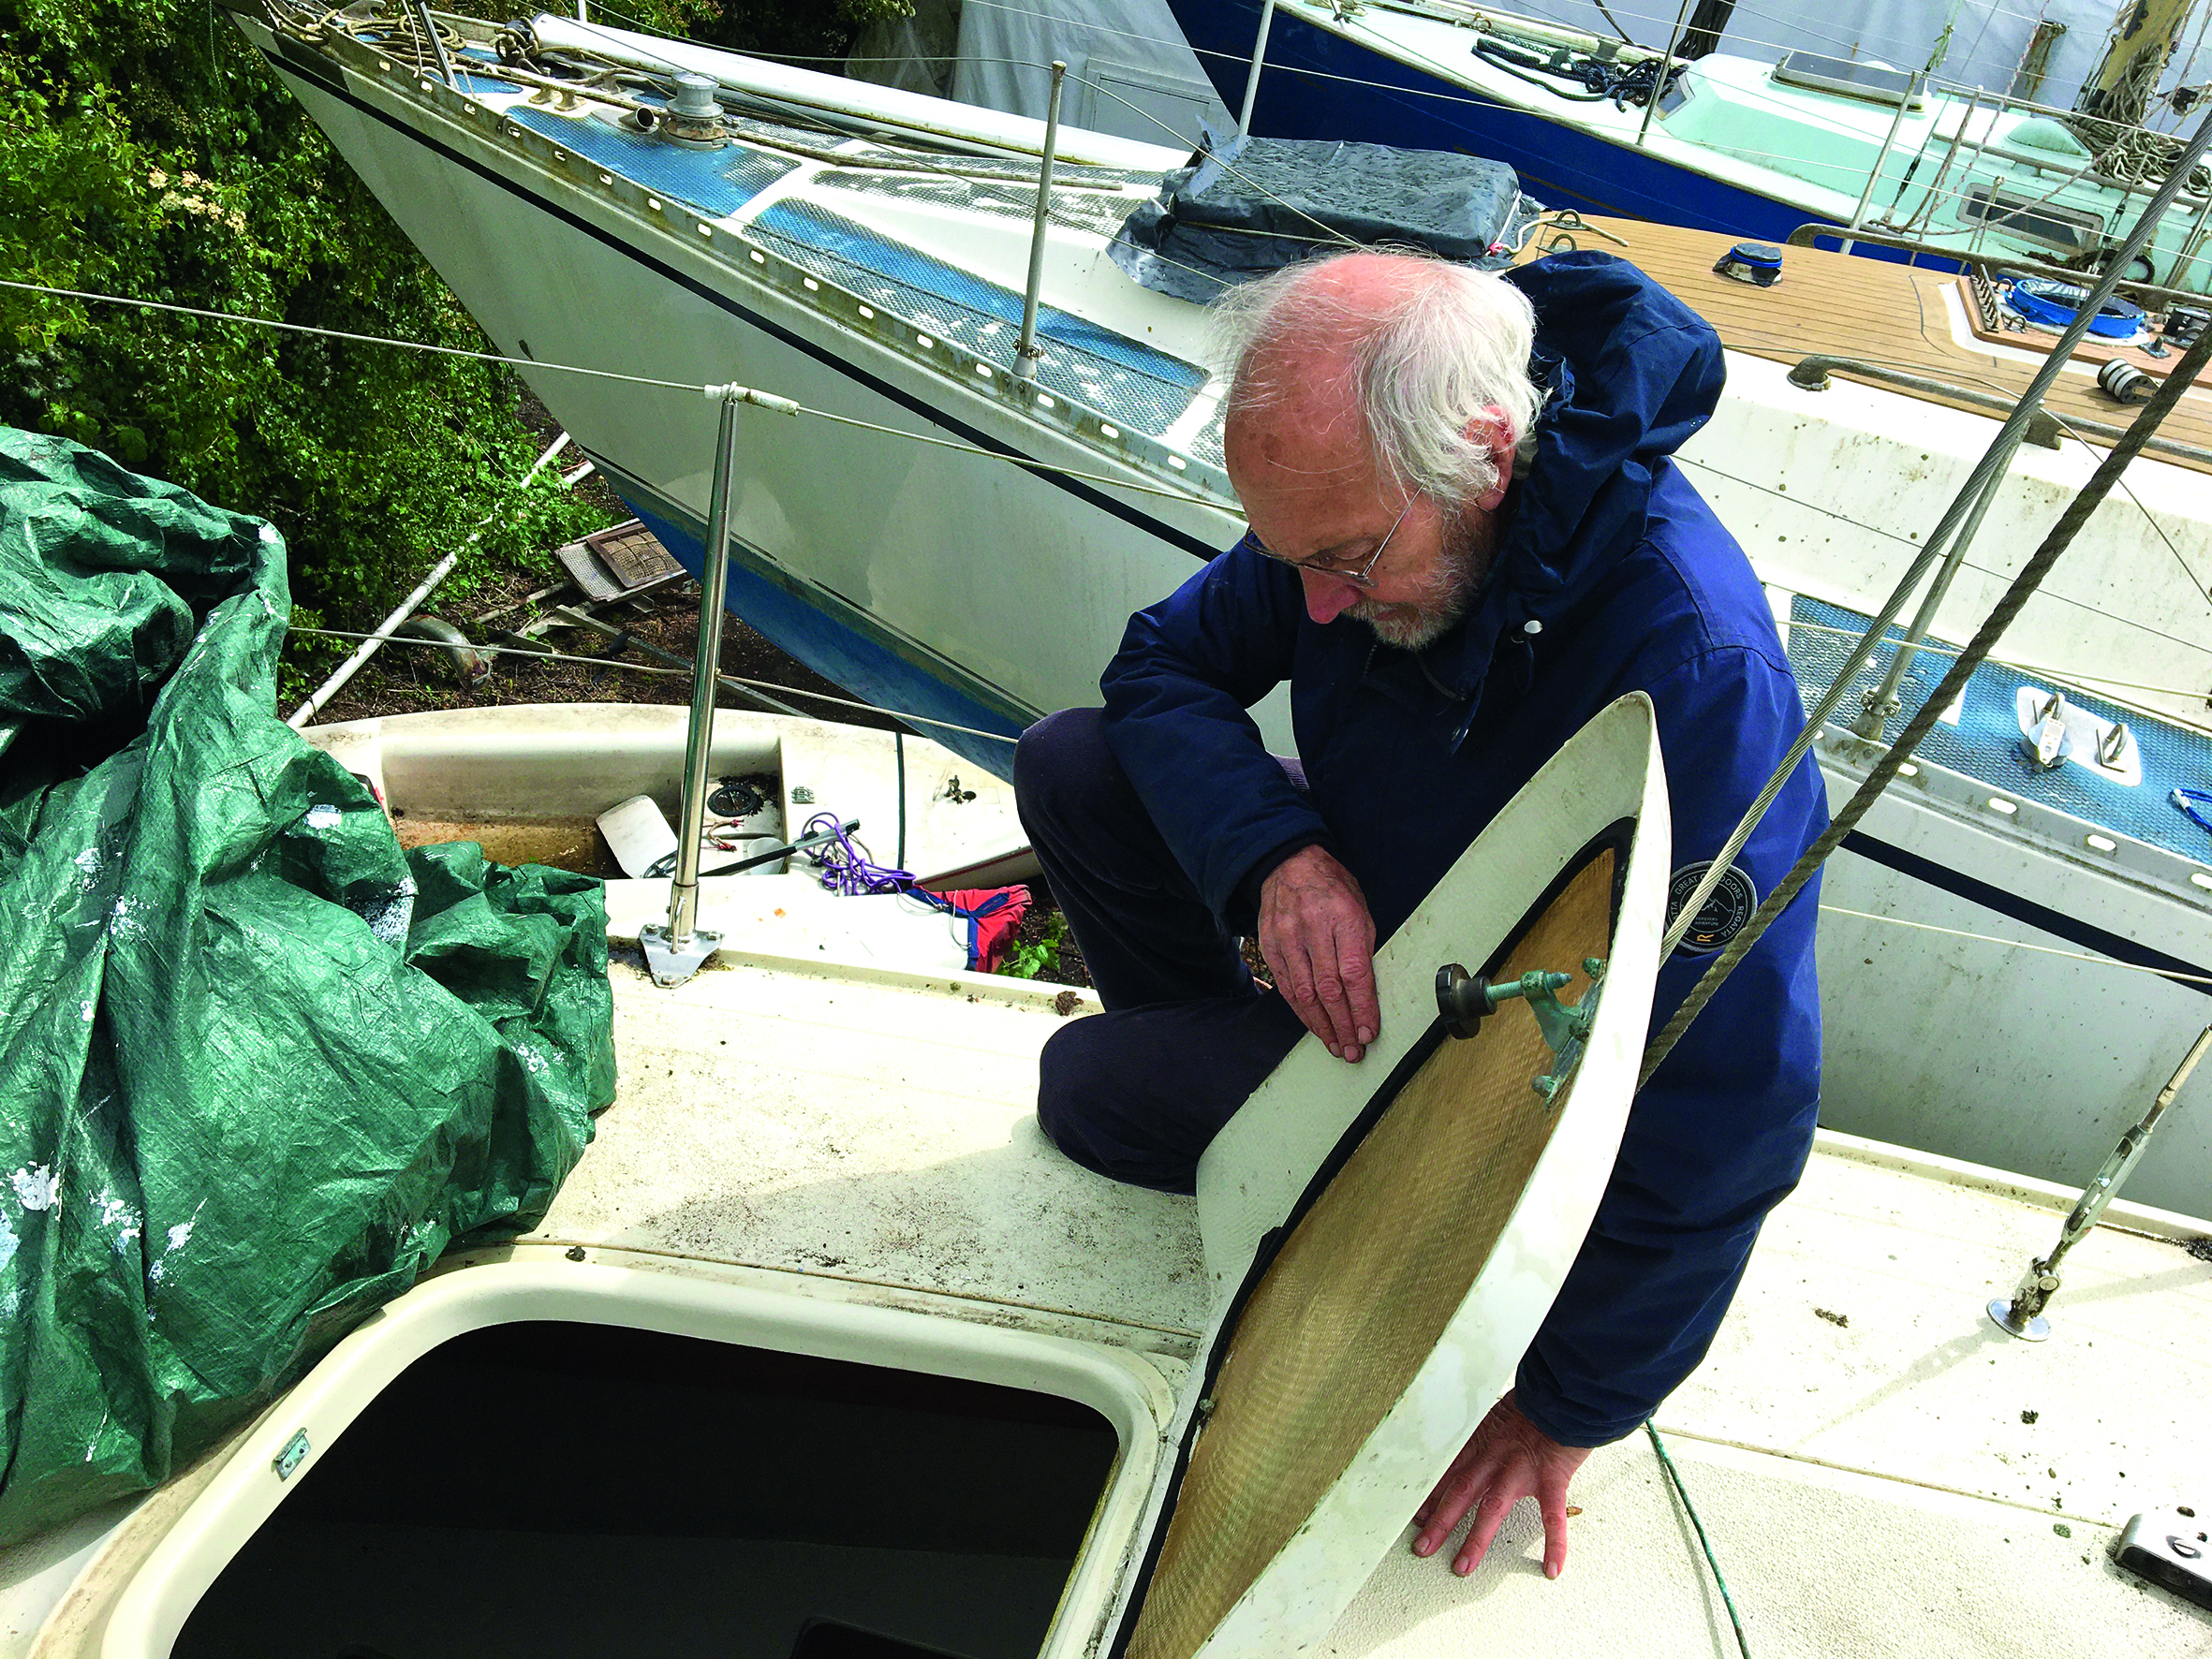
Graham lifts the forward hatch which not only leaks but will also need strengthening
Winches
The winch backing washers on Maximus were badly corroded. On the starboard side they were leaking into the pilot berth, causing the headlining to get wet and fall down.
On the port side – where the winch was fixed above an outside locker – water was finding its way into the bilges.
I explained to Laurie that the winches, which had lost their grip and weren’t self-tailing, would most likely be replaced.
He advised that, when we did so, we first fibreglass in a 12mm backing pad underneath.
“The fibreglass is sturdy, it has integrity but there’s an inordinate amount of weight and strain on that, held in place by six bolts,” he said.
“Something solid under the winch would stop the leaks too.”
In the short-term, however, he agreed that the washers should be replaced and the winch resealed.
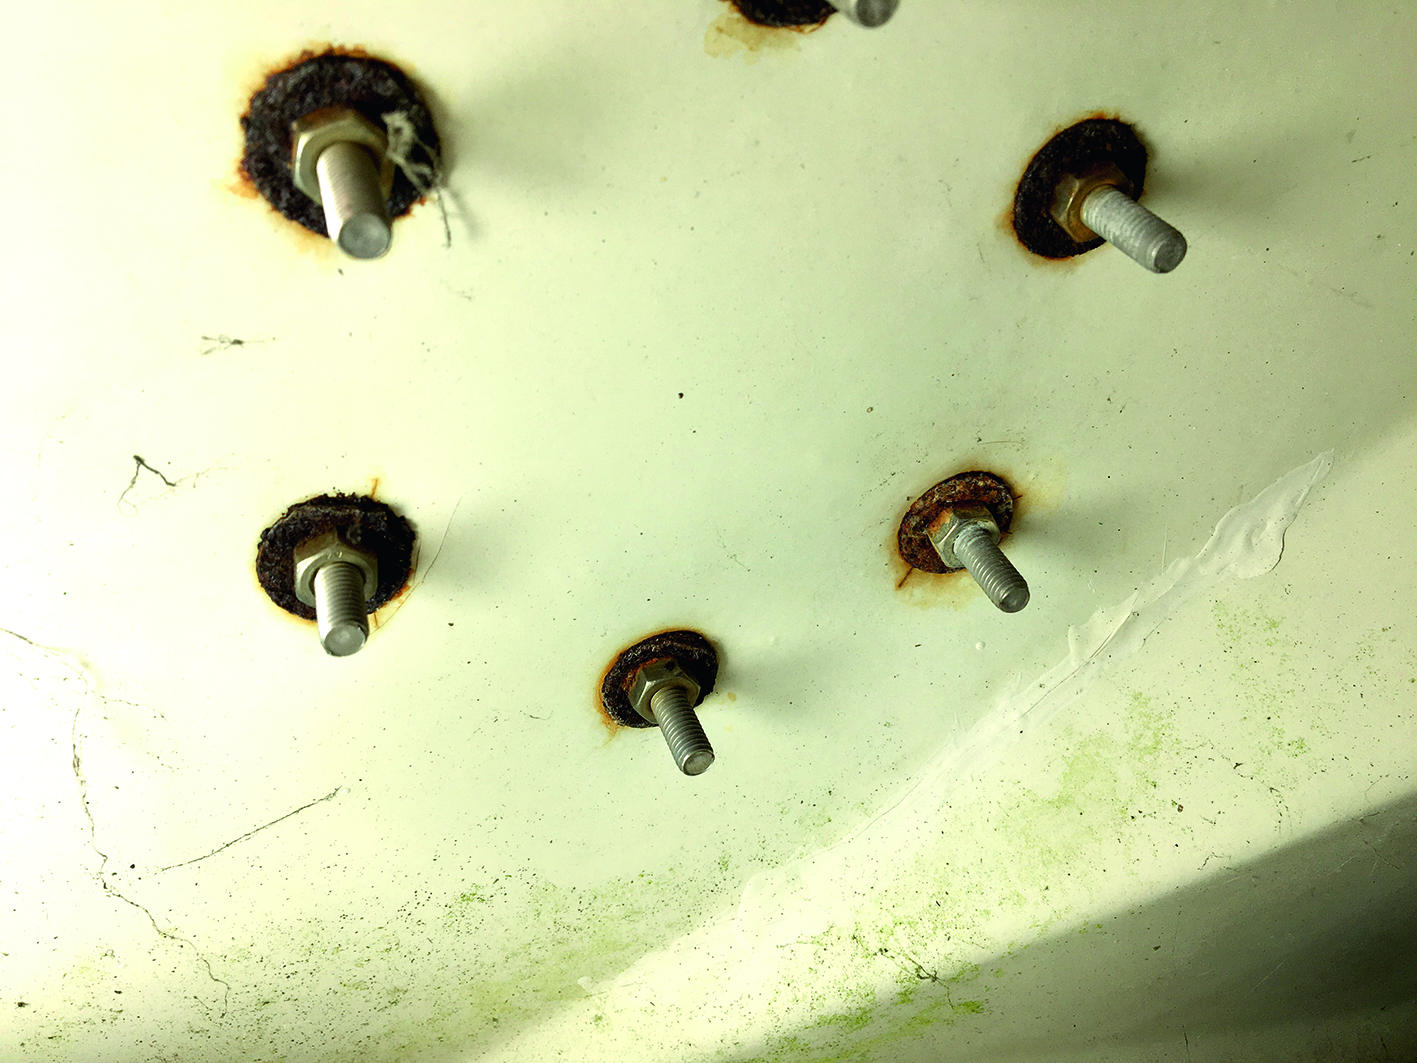
Corroded winch backing washers
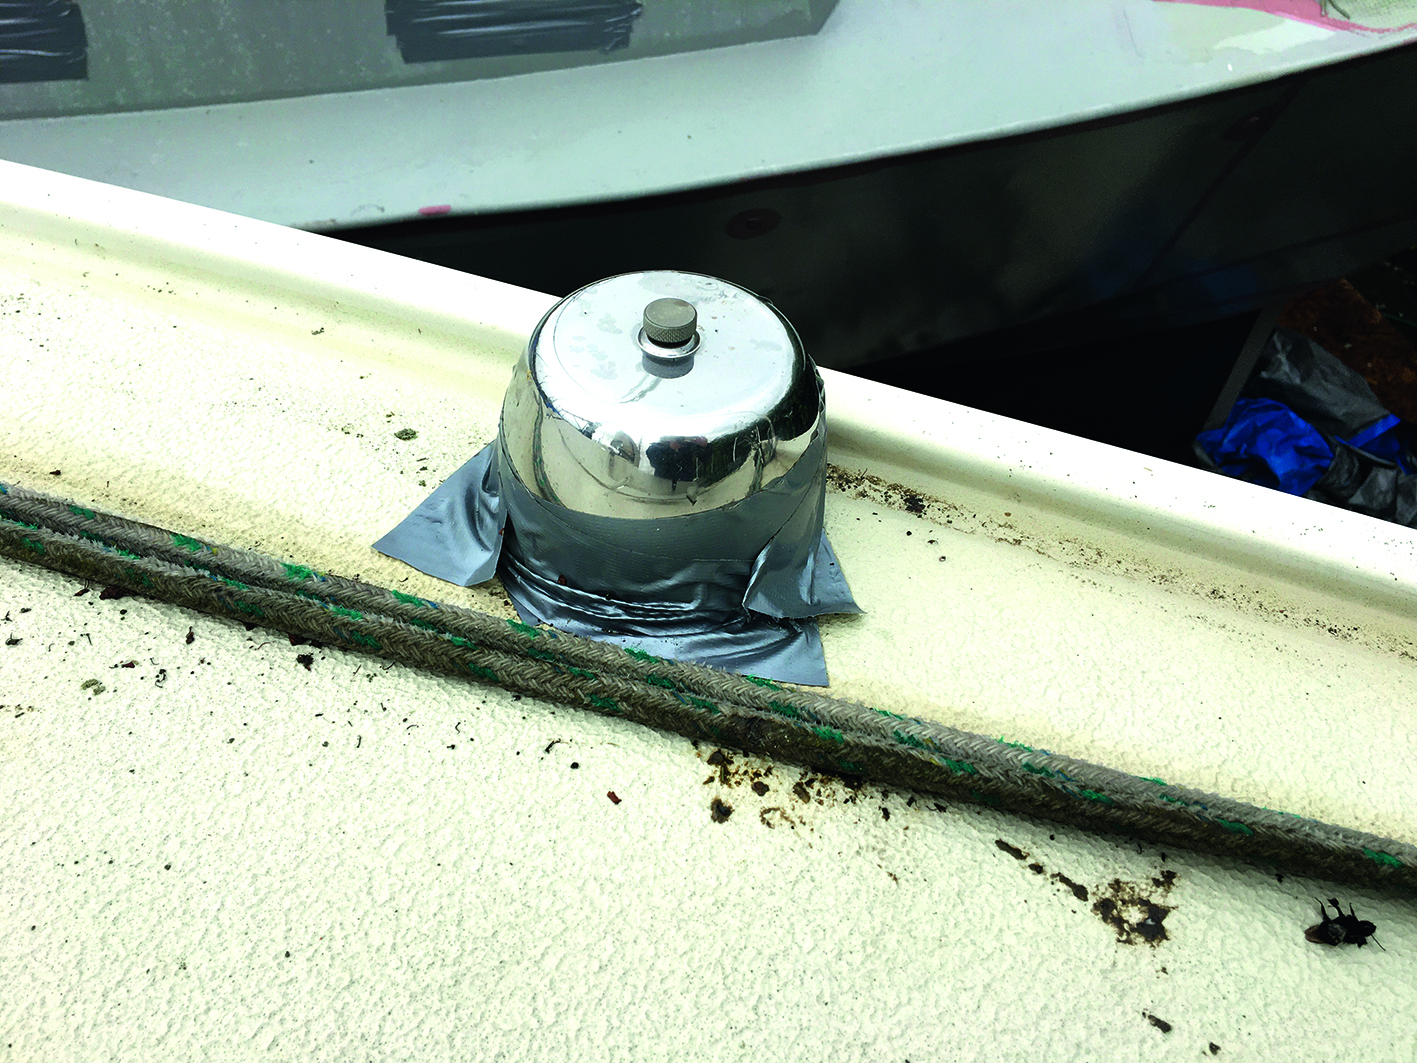
Forward cleat Next, Laurie examined the forward cleat.
“Cleats are held in place mechanically with a bolt or a large capping screw,” he explained. “Where they’re put under tension, these fittings loosen and water will find its way in.”
“It might just be a case of tightening them with a spanner or a socket set, but for a better seal you want to take them off, clean them and reseal them.
“Always be generous with the sealant. As you’re tightening up you’ll see it popping up around the holes and the cleat. Clean it with acetone afterwards.”
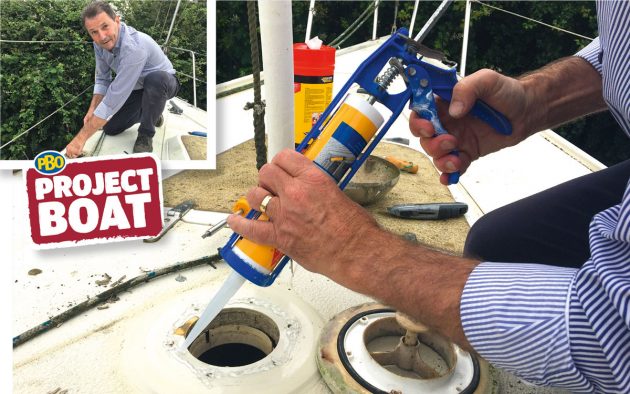
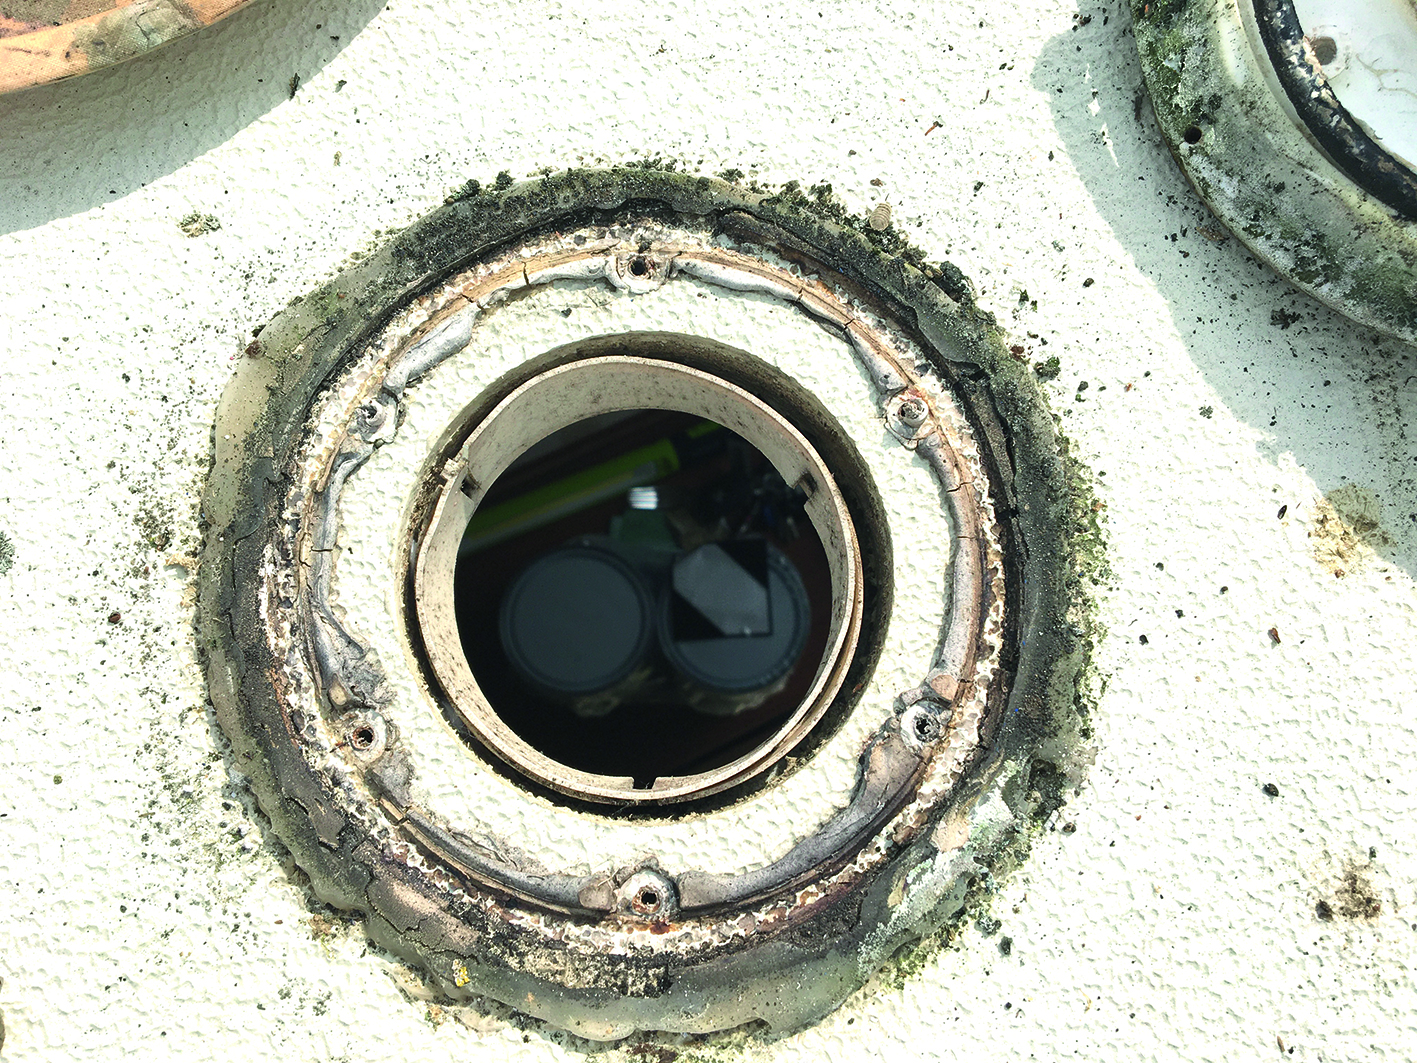
Mushroom vents
Deck side of the leaking heating vent
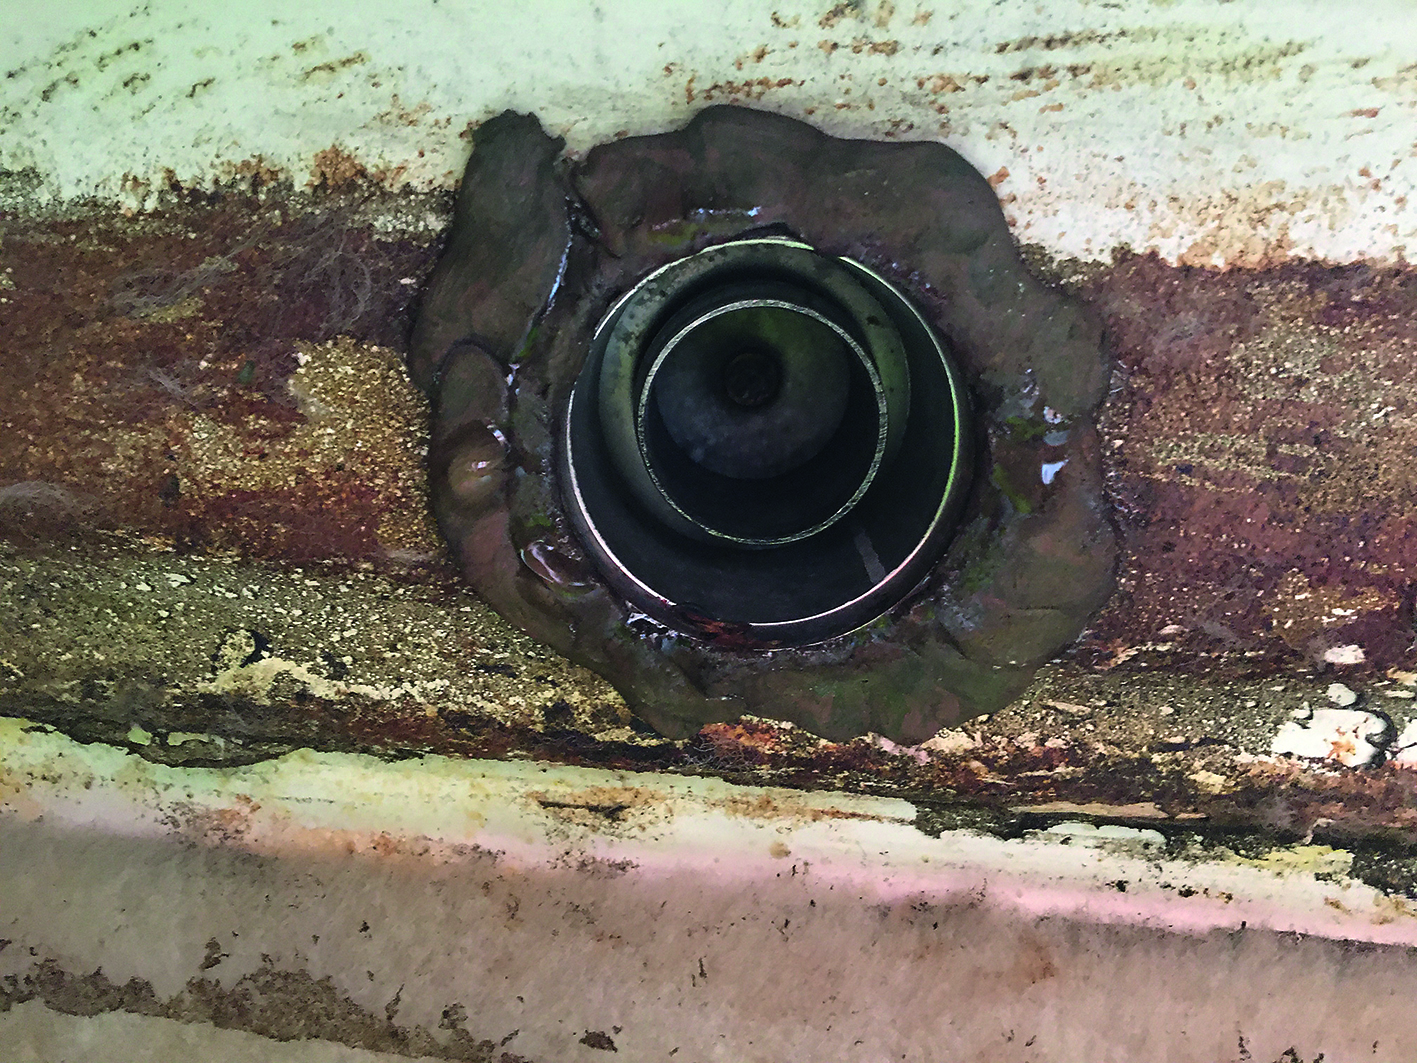
Underneath the leaky heating vent – the water poured in
There are three mushroom vents on Maximus, one an old heating vent, the other two for airflow to the saloon and forepeak.
All three were leaking but the worst by far was from the heating vent.
“Silicones are a good idea for temporary fixes,” said Laurie, bending down to look at the heating vent.
“They’re easy to apply and will do the job until you plug it properly.”
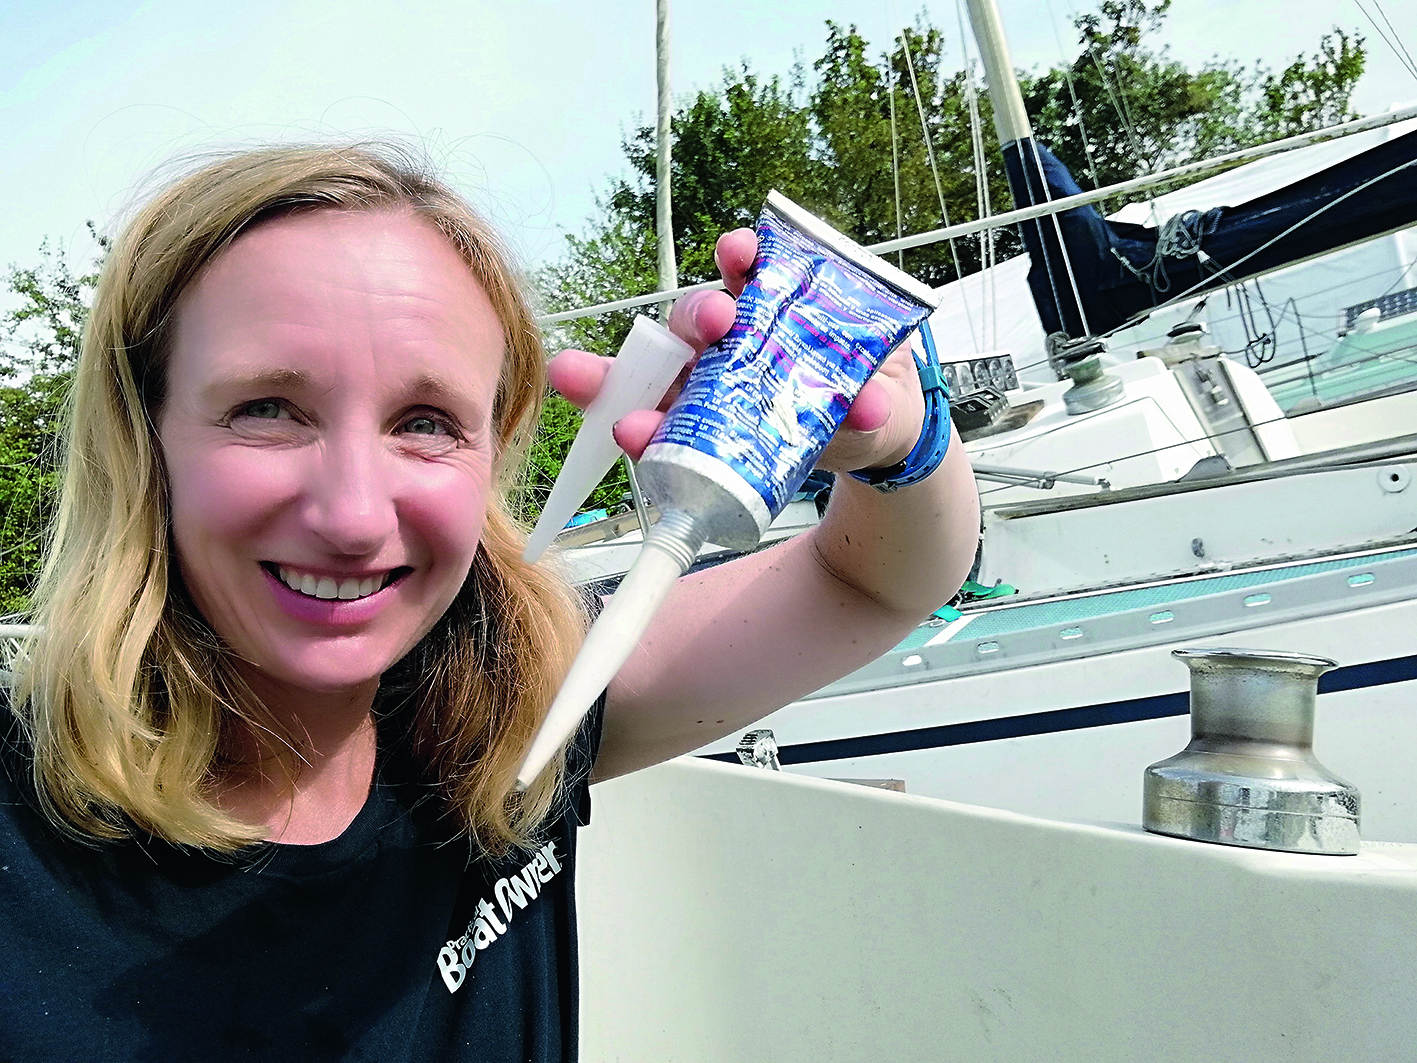
On my way to the boat I’d stopped at Screwfix to pick up a bottle of Sika Sikaflex EBT & All-weather sealant.
This is a silicone which is excellent for sealing with mild adhesive properties, meaning the vents can be removed easily in the future.
He cut the nozzle at an angle of 45° – the bigger the bead you require, the higher up the nozzle you cut it – and inserted it into the gun.
Forward air vent
Starting with the forward air vent, Laurie showed me how to unscrew, clean and lubricate the vent and reseal it before putting it back.
“Be sure to tighten opposite to opposite,” he said as did the screws back up with a long-handled screwdriver.
Heating vent
While Laurie was happy that the two air vents could simply be resealed and reattached, he made it clear that the heating vent – a solid stainless dome – would need to be removed and the hole in the deck filled in properly by a boatyard.
“This is only a temporary fix because when you’re out sailing you’re going to get a lot of water coming over here, and a temporary fix is just that,” he said.
Fair enough. The vent itself wasn’t serving any purpose as the heating system had been removed, but a dry boat was what mattered right now.
In fact, the electrician had refused to start work until I promised him it was no longer leaking!
When Laurie removed the heating vent there was a foam gasket underneath, which fortunately came off easily.
“It’s a good thing it hadn’t stuck to the metal because if it had, and it stuck to the boat we’d have never got it out,” he said.
Laurie generously packed the sealant around the deck, and onto the base of the vent, and then placed the gasket back in between them.
“You can’t use too much,” he said. “All it will do is just squeeze out, it’s not there to be pretty.”

Ali reseals the loose deck plugs to keep them watertight until the electrician replaces them
When Laurie finished with the Sikaflex he hung the sealant gun on the mast.
“Sikaflex has a shelf life of around 6 to 8 months but cures in the nozzle,” he said.
“One trick to do with any sealant, particularly polyurethanes, is to leave the gun hanging. In not too colloquial terms, we call this bit the ‘snotter’.
“They cure from the tip backwards, so leave the snotter on to stop it from going off.”
Laurie also suggested using masking tape around the end of the nozzle. This slows down the curing process by starving it of any air.
“Remember, most sealants cure by absorbing moisture from the atmosphere,” he added.
The heating vent repair was a temporary fix that should hopefully stop any water ingress for the time being.
However, the 1.5in hole through the deck – that the vent is covering – is not something that can be left, especially as it’s towards the bow where the boat’s going to ship water.
The hole needed to be filled, perhaps using a foam core or plugged and epoxied above and underneath – and my DIY skills don’t stretch that far just yet. But at least we were one step closer to a dry boat.
A couple of weeks later, Dell Quay Marine did the job for me. They didn’t have the right colour gelcoat, so it’s a bright white, but that was fine by me. The sooner it was fixed the better.
This five-year-old tube of Sikaflex 291i has cured in the tube. It’s extremely bendy and flexible but won’t adhere to the lid because it’s made of polypropylene, which is notoriously hard to bond to
Fixing the second air vent
After Laurie left, I decided to tackle the second vent by myself, flicking through the images on my phone to check I was following the same procedure. It went well, and was satisfying to feel I’d learnt something new.
Taking the vent apart, and seeing the cone shaped plastic inside that the water runs off, helped me to understand how it works. It’s a simple piece of engineering but effective.
However, it was also quite alarming, as a first-time DIY-er, to see just how exposed the boat was once I’d removed the vent.
I peered down the huge hole onto the saloon table underneath where my car keys were, thinking, “I’d better get this old bit of plastic back on now because if I don’t I’m stuffed!”
The realisation that there’s really not a lot of material between the inside of your boat and the elements is daunting… and I’m not even afloat yet.
I can only imagine how nerve-wracking it might be to drill a hole in the hull for the first time.
Buoyed by my small success, I immediately chucked a bucket of water at the vent, forgetting to wait for the recommended 2-4 hours curing time.
I ran below, holding my breath and stood under the vent waiting for the drips on my head. Nothing! That certainly felt good.
Eek! There’s a huge hole in the deck
The vent isn’t in great nick when Ali takes it apart

Hoovering the headlining
On a roll, I kept working on Maximus until the yard was pitch black, and all I had to see by was the light of my rechargeable Luceco torch.
I sealed the leaking deck plugs with Sikaflex, screwed tight the windows and varnished the companionway.
From my tiptoes I could just about see the sun going down over Chichester Harbour, and imagined myself – hopefully not too long from now – sipping a cold beer on one of those anchored yachts.
Knowing the seacocks were going in soon, and the engineer Peter, who was due to fit them, wasn’t too impressed by the state of the interior, I decided to put the hoover around.
He’d expressed concern that the crumbling black dust from the carpet headlining was mould, but it was just the dirty foam and glue backing that had broken down and disintegrated.
Either way, I wasn’t taking any chances. Using my Henry Hoover vacuum nozzle in the semi-darkness, I worked on that headlining, quite literally to within an inch of its life.
More came unstuck in the process, but Laurie had suggested some good glues for that (3M Scotch Weld spray adhesive or the Tensorgrip spray glue), and it felt really good to see the interior transform from a dirty grey to a pleasing cream colour.
It was gone midnight, and I was just finishing up when I over-stretched the hose. The nozzle broke away from poor Henry Hoover’s nose. Uh-oh…
Did I panic? Did I go straight to Amazon and order a replacement hose? No. I got out the Sikaflex and stuck it right back on. After all, I’m a DIY-er now.
You can watch the video of Laurie and Ali fixing leaks on PBO’s YouTube Channel Thanks to Dell Quay Marine, Screwfix, Louis Derry at boat-renovation.com and Laurie Brebner at marineindustrial.co.uk
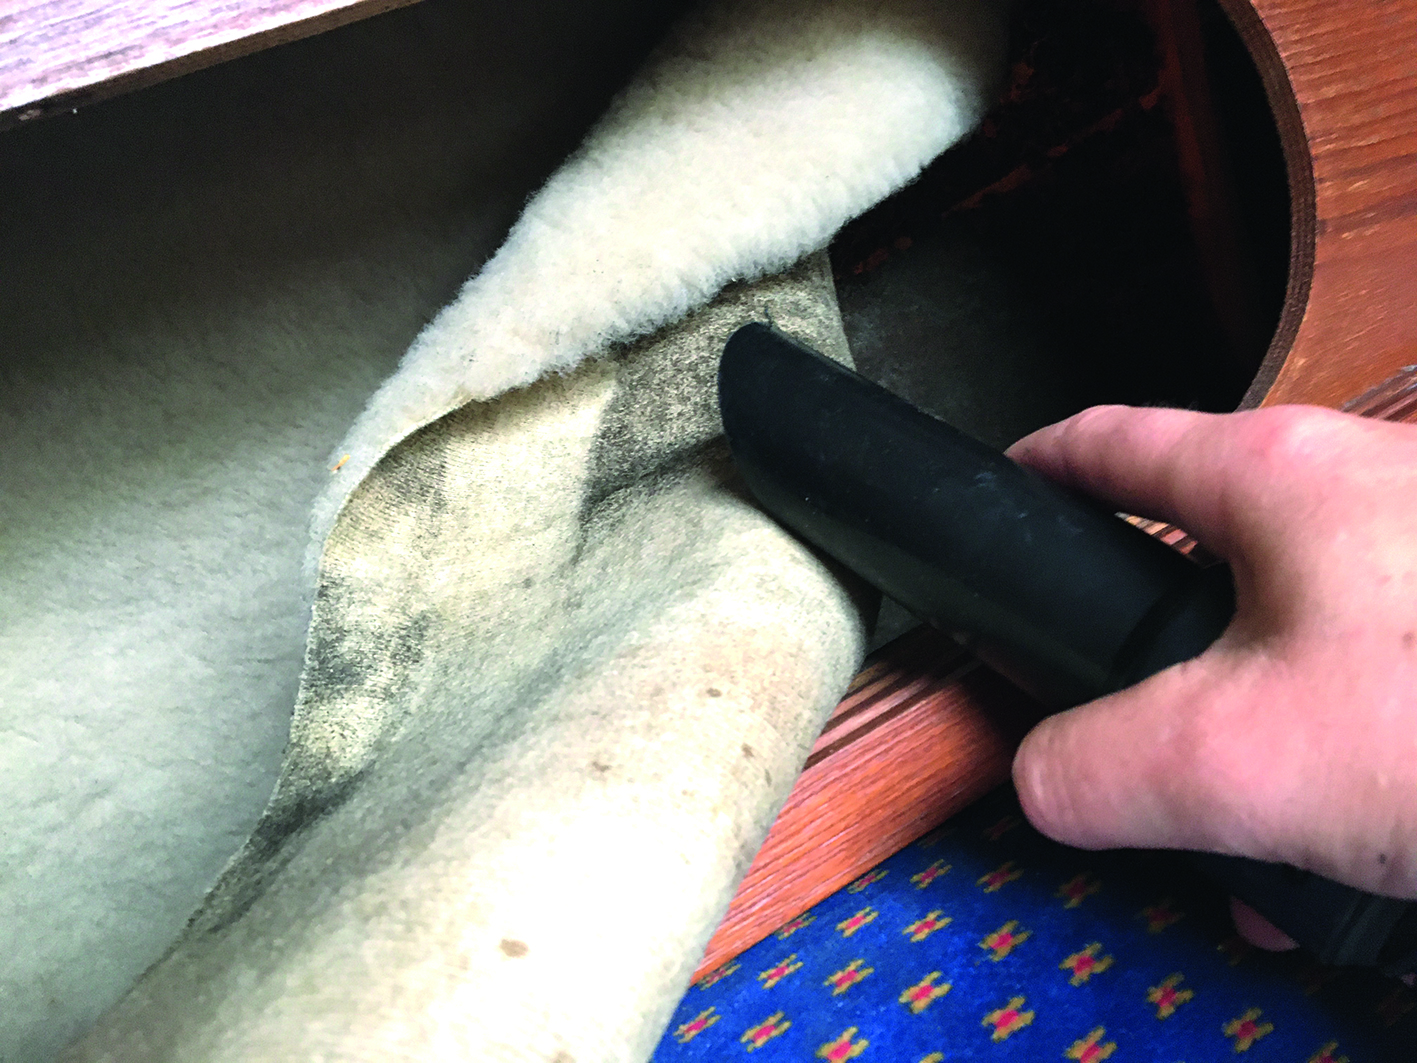
Much cleaner headlining and hull linings – a good result with the hoover

Resealing air vents

- Unscrew the stainless steel vent cover and inner plastic dome.
- Remove the vent. These holes are where the gasket tangs fit.
- Carefully remove the gasket. This one is in reasonable condition.
- Scrape off the old sealant with a screwdriver or scraper.
- Clean deck and vent with acetone, white vinegar or a Wonder Wipe.
- Put the gasket back where it came from (this is the underside view). 9 Screw the domed cover back into place.
- Apply a generous bead of Sikaflex including squirting it in the holes.
- Screw the vent down. When turned from in the cabin below the plastic dome will rise and fall to adjust air flow.
Resealing a heating vent

- Unscrew the vent and scrape off the old gasket and sealant
- Clean the area with acetone or a Wonder Wipe.
- Clean the vent body by scraping off the old sealant.
- Apply a bead of sealant to the deck and then to the vent.
- Place the foam gasket back onto the sealant over the hole.
- Place the vent back over the gasket and screw back into place.

The difference between bonding and sealing
Anything that’s going through the gelcoat – a screw hole, for example – is a potential source of water ingress, and will always need a good sealant.
However, there’s a common misconception among boat owners that bonding and sealing are the same thing – or even that ‘a belt and braces’ approach (ie doing both) is a good idea.
They’re in fact very different, explains Marine and Industrial’s Laurie Brebner.
“Bonding is when you adhere two substrates together without mechanical means, be that screws or bolts,” he says.
“On the other hand, a sealant will stop water ingress but will allow the two parts to come apart once the mechanical fixings are out.”
Take, for example, a mast track. It’s held in place by mechanical fixings – you’ve got bolts or machine screws either end keeping the item in place onto the deck.
Where the sealant comes in, is to go underneath to stop water ingress only. You don’t want to bond it.
“It’s the same with cleats, stanchion plates and fairleads,” he says.
“Over time they get twisted and bent, and you may need to remove and replace them.
“They’re generally held in place by mechanical means, a large bolt or a decent size screw going down into a packer.
“God forbid you should need to take them out if they’ve been stuck down as well. Not only will the part be all beat up, but you’ll end up having to do a gelcoat repair too.
“Sikaflex is brilliant, fantastic, but it’s an excellent adhesive as well as a sealant and you’ll curse anyone who’s used it on something you need to get off!”
For sealing Laurie recommends butyl rubbers such as Arbormast BR, SikaLastomer 710 or Butyl Rubber Sealant 145, which have a consistency a bit like chewing gum and seal without bonding.
Anything that is bonded without mechanical means – for example, the windows you get on boats such as Sunseekers or Oysters – needs the correct adhesive and primer.
Why not subscribe today?
This feature appeared in the November 2021 edition of Practical Boat Owner. For more articles like this, including DIY, money-saving advice, great boat projects, expert tips and ways to improve your boat’s performance, take out a magazine subscription to Britain’s best-selling boating magazine.
Subscribe, or make a gift for someone else, and you’ll always save at least 30% compared to newsstand prices.
See the latest PBO subscription deals on magazinesdirect.com