
It’s time for PBO’s Secret 20 kit boat to be equipped with a beneficial set of hatches. David Pugh reports
Last month, we left you with our Secret kit filleted together and the transom fitted.
See the full set of articles: Building the Secret 20 kit boat with PBO.
At the time of writing, the epoxy was still curing, so it was with some relief that, when we removed its rope clamp a few days later, we found that the transom had retained a fair curve.
The next stage is to start fitting the stringers, an important task which sets the shape of the boat and will allow us to pull the top of the transom into its final form.
Following that will be the hull panels – which bring with them a potential problem.
Owing to its design, with multiple plywood frames joined and braced with fore-and-aft panels, the internal structure of the Secret is separated into multiple small compartments.
This adds considerable stiffness and, if filleted and sealed with epoxy, provides multiple watertight compartments which could prove invaluable if we ever hit anything.
The problem is that these compartments also offer most of the rather limited storage on board, and although we can coat the insides before the hull panels are fitted, it would be useful to be able to access them to ensure that the hull is well fitted and sealed to the structure.
Bring on the hatches
The obvious answer was to fit hatches. Personally, I’ve had mixed success with these in the past – the rectangular ones rarely seem to completely seal. The round ones, on the other hand, screw down tightly against O-rings and work well – it’s perhaps not surprising that they’re the number one choice for dinghy builders, despite the restricted access they provide.
They also offer another, more subtle advantage in our case. If we were to hole the hull, water pressure underneath a rectangular hatch will lift the plastic and cause it to leak. The firm screw closure of the round hatches should be much more resistant to this.
Most of the aft sections will be accessible either from the cockpit lockers or the outboard well, so our initial area of concern was the area enclosed by the bunk boards.
We bought six 150mm round hatches from RWO, five for the bunks and the sixth to give access forward into the bow section, beneath the anchor locker.
We decided to cut a square, unsealed hatch for the centre section of the bunk, just forward of the mast compression post, sacrificing watertightness for better storage and ease of access.
This area may in future house the water tank.
Fitting the round hatches

If you’re using a power drill, make sure you use the extra handle

The tool uses two single-toothed cutters on a rotating bar. A pillar drill helps hold everything rigid and square
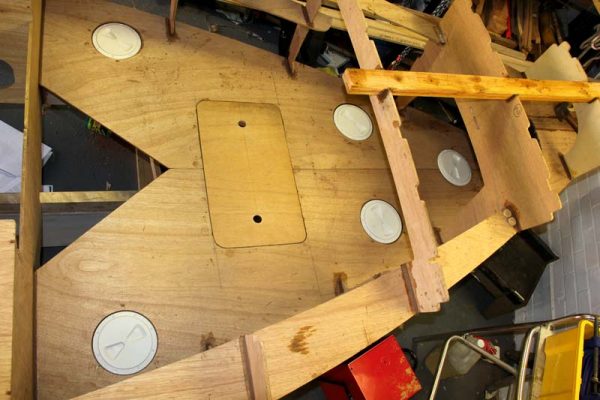
The bunk boards span five frames, so there are four sections to access. A single hatch suffices for the narrow forward section.
We decided to fit two hatches in the next section aft, one either side of the keel. The large, unsealed hatch provides access to the next section. The aftmost sections are under the head ends of the bunks after the boards have divided, so needed a further two hatches.
The round hatches are designed to be fitted into a 157mm-diameter cut-out, but this leaves the top of the hatch proud of the base board by about 8mm. To solve this we opted to recess them, cutting holes in the bunks slightly larger than the diameter of the hatch surround, then epoxying plywood rings underneath to support the flanges so that the tops of the hatches sit flush or slightly below the level of the bunk boards.
There are a few options for cutting neat circles. Marking out the shape and cutting with a jigsaw is not really one of them – it’s extremely hard to keep perfectly to a curved line when working freehand.
If you have many holes to make, one alternative is to make up a router template.
That way you only need to accurately cut a (slightly oversized) hole once, after which you can replicate it using a copy following bit or sleeve. However, an easier option for one-offs is a circle jig.
These use an arm with a bearing at one end, which is fixed in the centre of your cut-out. The other end is fitted to a router or jigsaw allowing you to neatly cut a circle, rather like using a pair of compasses.
For smaller holes, hole saws are the easiest answer, but we spotted a medium-sized alternative in Screwfix, catchily titled ‘Adjustable hole cutter with cowl’.
This uses a centring drill like a hole saw, but the saw is replaced by an arm, on which two single-toothed cutters are held by clamp screws at a spacing of your choice.
The cowl is a plastic dish which fits over the whole affair to catch dust if used upside down – judging by the reviews, most people use these for fitting ceiling lights in plasterboard.
I wasn’t sure how effective this gadget would be, but it worked extremely well. You need a torquey drill to swing it, but my household power drill proved up to the job. We first used it to cut the holes in the bunk boards.
Pleased with the result, we reduced the cutting diameter and used it to cut the inner holes in the support rings, this time using a pillar drill, which effectively eliminates the kick experienced when using it in a handheld drill.
The outside of the rings we marked and cut with a jigsaw, as they won’t be visible beneath the bunk boards.
Once cut, we lined up the rings under their holes and glued them in position with a lightly thickened mix of epoxy, with temporary screws to hold them while the epoxy set. We’ll leave the hatches unfitted until the plywood is coated and painted.

Plywood rings provide the recess. Note the screws holding the ring while the epoxy sets

Using the hole cutter gave neat circles which required minimal finishing afterwards

The hatches drop into place with a small gap. They will be fitted and sealed later
Fitting the square hatch
Cutting the square hatch was simple enough. We marked the rectangle and cut out the corners with a hole saw before using a jigsaw for the straight cuts.
We then used a fresh piece of plywood and cut it to shape, fettling the final fit with a block plane.
Finally we used a small hole saw to add two finger holes either side of the hatch, which will allow the lid to be easily lifted whichever bunk cushion is removed.
The hatch lid is supported in much the same way as the round hatches were recessed, using strips of plywood glued to the underside of the bunk boards around the edges of the hatch.
Rather than temporary screws, we held these long strips in place with clamps while the epoxy cured. As the epoxy squeezed out we were careful to clean it away, lest our hatch failed to fit afterwards

A hole saw gave rounded corners, which we joined up with a jigsaw

Gluing can use a lot of clamps!

We made a new lid and planed it to be a loose fit, with sufficient tolerance for later painting
Next month
Scarfing timber into long lengths to make stringers, followed by fitting them to the hull framework.
As published in the February 2017 issue of Practical Boat Owner magazine.