
Lin and Larry Pardey's step-by-step guide to producing a durable canvas bucket: from the January 1995 issue of Practical Boat Owner magazine.
It is such a simple chore, lifting water from the sea. Seems like any old bucket should work. But at sea nothing is really that simple.
You’ve just caught a glowing, leaping 18 pound mahi-mahi (dorado). Your luck holds and you land it flapping, glorious gold and royal blue.
The battle is over, the fish subdued and reality hits – blood and scales litter the battlefield. You are moving at six or seven knots, you want to sluice the decks with salt water quickly before the sun turns the scales into sequins that will stick like barnacles all along your side deck.

You grab your plastic bucket with a rope spliced around its metal bail, toss it overboard and it skips and bounces and refuses to dip its brim.
Five tries later and it finally fills and almost jerks you overboard. If the bail doesn’t pull out, the metal handle quite often scratches your topsides.
We know the drill because we’ve tried all sorts of buckets over the years: canvas ones with wooden bottoms designed so the wood flats to tip the rim.
Great, but in a seaway the wooden bottom swings wildly as you pull the water onboard and thumps threateningly against everything in its path.
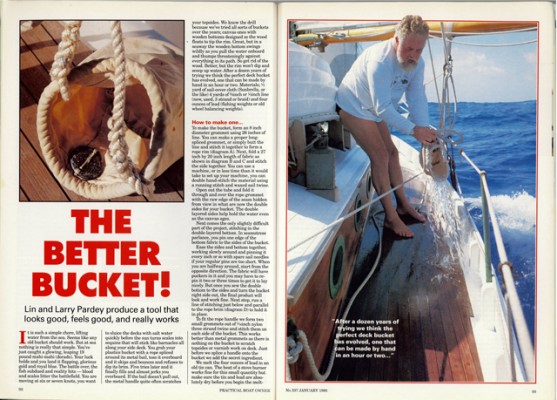
So get ride of the wood. Better, but the rim won’t dip and scoop up water. After a dozen years of trying, we think the perfect deck bucket has evolved, one that can be made by hand in an hour or two.
Materials: 1/2 yard of sail-cover cloth (Sunbrella or the like), 4 yards of 3/8 inch or 1/2 inch line (new, used, 3-strand or braid) and four ounces of lead (fishing weights or old wheel balancing weights).

How to make one…
To make the bucket, form an 8 inch diameter grommet using 26 inches of line. You can make a proper long-spliced grommet, or simply butt the line and stitch it together to form a rope rim (diagram A).
Next, fold a 27 inch by 20 inch length of fabric as shown in diagram B and C and stitch the side together. You can use a machine, or in less time than it would take to set up your machine, you can double hand-stitch the material using a running stitch and waxed sail twine.
 Open out the tube and fold it through and over the rope grommet with the raw edge of the seam hidden from view in what are now the double sides for your bucket. The double layered sides help hold the water even as the canvas ages.
Next comes the only slightly difficult part of the project, stitching in the double-layered bottom. In seamstress parlance, you pin one edge of the bottom fabric to the sides of the bucket.
Ease the sides and bottom together, working slowly around and pinning it every inch or so with spare sail needles if your regular pins are too short. When you are halfway around, start from the opposite direction.
The fabric will have puckers in it and you may have to repin it two or three times to get it to lay nicely. But once you sew the double bottom to the sides and turn the bucket right side out, the final product will look and work fine.
Next step, run a line of stitching just below and parallel to the rope brim (diagram D) to hold it in place.
To fit the rope handle we form two small grommets out of 1/16 inch nylon three strand twine and stitch them to each side of the bucket. This works better than metal grommets as there is nothing to scratch topsides or varnish work on deck.
Just before we splice a handle onto the bucket, we add the secret ingredient.
We melt the four ounces of lead in an old tin can. the heat of a stove burner works fine for this small quantity but make sure the tin and lead are absolutely dry before you begin the meltdown or the lead can blow all over the stove.
Using vice grips as a handle, pour the melted lead into a big soup ladle or beer can with a round bottom to form a slightly rounded pancake-like shape.
When the lead is cool, it will drop right off the ladle.
Now make a hole on each edge of this weight using a heated sail needle or awl or small drill. Then sew this inside the bucket just below the rim, and mid-way between the grommets for your handle.
The hauling line
Splice a short rope 3/8 inch dia bail in place, or tie one onto the bucket using bowlines if braid is your choice of rope.
Then splice or tie eight feet of line onto the bail as a hauling line. We prefer three strand line for the hauling line of the bucket as it is easier to grip with its natural finger-holds. We also like to use a line that is around 1/2 inch in diameter as it is easier to grip than smaller diameter line.
When you are sailing, clovehitch the inboard end of the hauling line to something just in case the bucket is jerked out of your hands.
The lead weighted bucket tilts and fills almost every time at anchor or sailing at speed.
Nothing on the bucket can scratch or dent the boat finish. The bucket squashes flat for storage. Don’t be tempted to make it much larger or it becomes too heavy to pull on board when you are moving fast.
This simple sewing project can add satisfaction to a rainy day. The “Better Bucket” makes a perfect gift for a friend’s boat launching. And if you keep your boat on a swing mooring, far from a dock hose, an easy-to-use bucket will make removing bird’s splattered calling cards far easier.
The final reward, you’ll smile each time you use something you made with your own hands!
Download the Better Bucket! article and step-by-step guide here.
Article by Lin and Larry Pardey. As published in the January 1995 issue of Practical Boat Owner magazine. Click here to browse and buy more archived articles from the PBO Copy Service.

Step for an old sea dog
Our border collie, Floss, is getting on in years and finds the companionway steps on our Southerly 115 Dulcibella II…

Installing mast steps with rivetnuts
When we first launched our Leisure 27, Windrush, we noticed that the anemometer cups were missing. A few weeks later…

How to repack a Stern Gland – step-by-step
How to repack a traditional stuffing-box type stern gland

VHF essentials: How to solder a PL259 plug to a VHF cable
Connecting a PL259 plug to a VHF aerial cable - step by step

Vinyl wrap your boat’s hull
When Tim Powell bought a 30-year-old Gib’Sea 28 he knew that one of his first jobs would be getting the…

Dripless shaft seals – PBO Buyer’s Guide
The once-ubiquitous stuffing-box stern gland still has much in its favour – it’s simple, tried-and-tested and easy to repair and…

Nav in a nutshell: How to deal with wind shifts
Tacking inside a ‘cone’ can help you to harness changes in wind direction, explains Dick Everitt.

How to work out tidal height calculation
If you’re looking for the forms referred to in the October 2016 issue of PBO download them here. PBO…

How to stop ropes slipping in a clutch
Find out how to thicken and sheath ropes to stop them slipping in a clutch in this extract from Splicing…

Nav in a nutshell: How to use a Breton Plotter
Breton Plotters are simple to use in practice, but tricky to explain on paper – it’s much easier if you…

How to repair big holes in GRP boats
Even wrecks can be rescued! Damaged boats can often be bought for a song and then successfully repaired – but…

How to check keel bolts
Colin Brown describes a series of checks you can carry out to assess the structural integrity of the bolts which…

5 top causes of boat engine failure – and how to avoid them
Jake Kavanagh talks to Sea Start marine engineer Nick Eales about how to avoid the five major causes of an…

Replacing headlinings: How to cure the droop
It happens to us all eventually – things start to sag, and it’s particularly true of foam-backed vinyls. For boatbuilders,…

How to reef – expert advice from PBO Sail Clinic
How do you ensure an efficient reef with a roller-reefing headsail and slab-reefing mainsail? David Harding explains

How to service a 2-stroke outboard engine
After a long winter indoors many 2-stroke outboards are reluctant to start. A simple service should make yours more reliable.…
How to tow alongside
Towing another boat in the confines of a harbour means that you'll need to set up a tow alongside. Here's…

DIY Sail repairs – how to do a ‘get you home’ repair
Ben Meakins tries out some useful temporary sail repair methods that will tide you over until you can get to…