
Zoran Glozinic builds a boat stand for haul-out use

Not every boat owner would want to build their own boat stand, but if you decide to do it – for whatever reason – here is one simple way to make them.
This type of stand would work for almost any boat without a deep keel.
It can be scaled up or down to fit your particular boat hull shape/size and it can be easily disassembled for storage, which I think is a big benefit because most stands are really bulky and take up a lot of room when not in use.
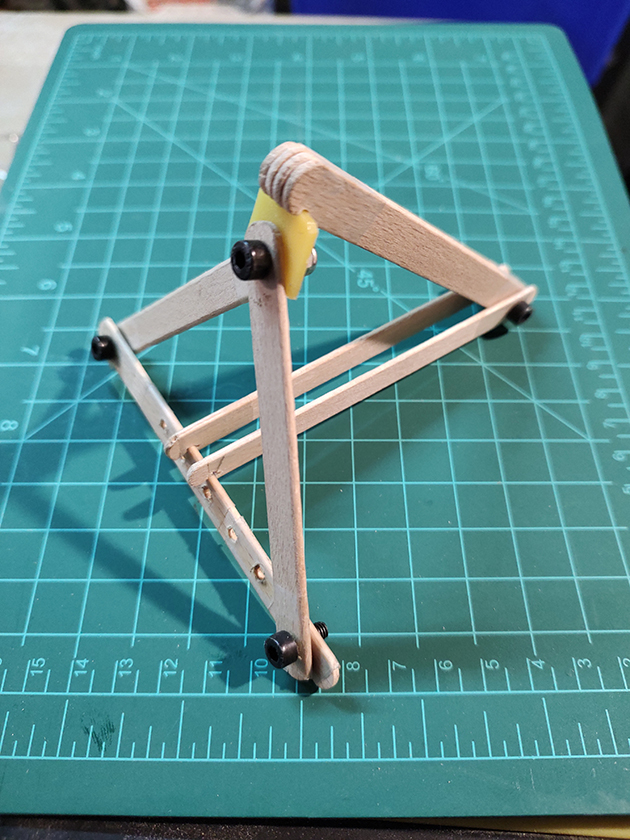
The proof of concept: the model boat stand made from ice cream sticks. Credit: Zoran Glozinic
I recently bought an old wooden motor cruiser and I had to prepare a boat stand before the haul out.
Under ideal circumstances, the best approach would be to take some hull measurements when the boat is on the hard – this way you could design them to fit perfectly.
I was not so lucky so I took some inside hull measurements to help me guess the hull shape but I was not sure how deep the keel was.
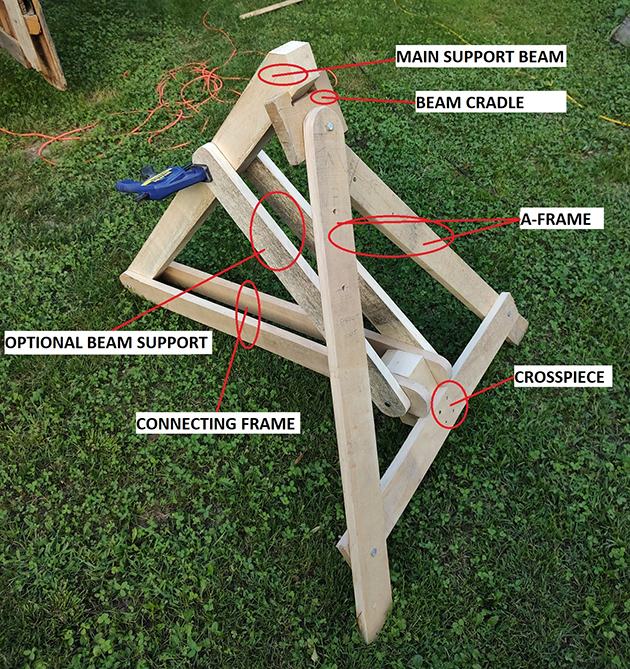
Parts of the boat stand. Credit: Zoran Glozinic
So there was a lot of guessing regarding my design but in the end, I was very satisfied with the result.
My final decision was to go with an A-frame design, the angle of which could be adjusted.
The resulting change in support height is not ideal but it does help to better support the hull at different hull sections.
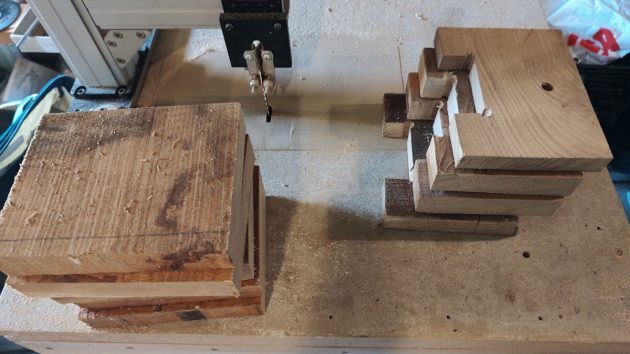
Making the main beam cradles. Credit: Zoran Glozinic
The first step I took was to make a small model to make sure my idea would actually work.
I made a model using ice cream lolly sticks and a few small screws: A-frame, main support beam, connecting frame and optional middle support for the main support beam.
The model performed as expected so I was ready to start working on the stand prototype.
Timber choice for your boat stand
I decided to make all parts of the boat stand using 1in stock timber except for the main support beam which I cut to be about 3in x 3½in in cross-section.
If you’re building much bigger stands, increase the cross-section of the main beam accordingly but most of the other parts can be left at 1in thickness.
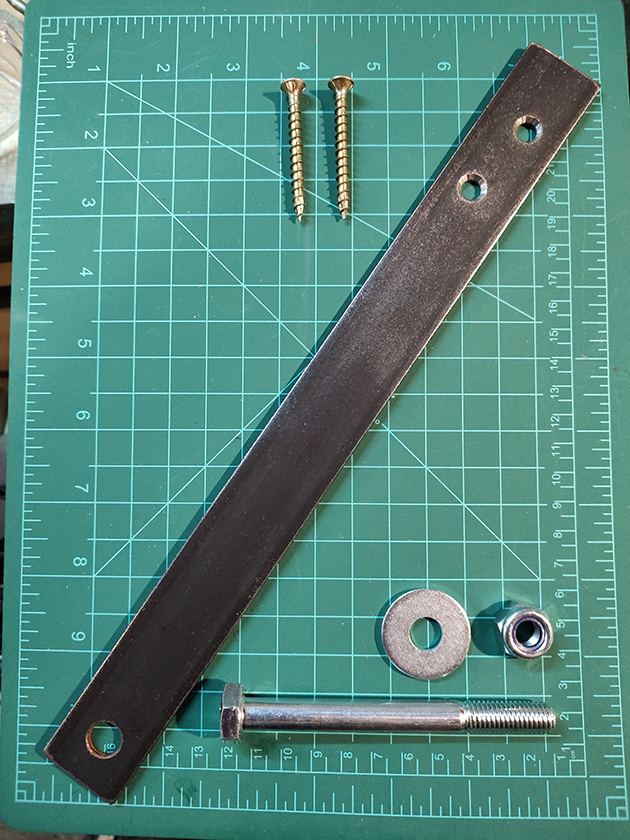
The locking straps were made 1” x 1/8” flat stock steel. Credit: Zoran Glozinic
After cutting all the parts, drill the bolt holes on top of the A-frame legs, on the bottom end of the main support beam and on the both ends of the connecting frame parts.
If you decide to make an optional beam support, drill the holes on one end of each part.
The diameter of the holes will depend on the bolt size(s) you are going to use. I used ⅜in diameter machine bolts I already had at hand.
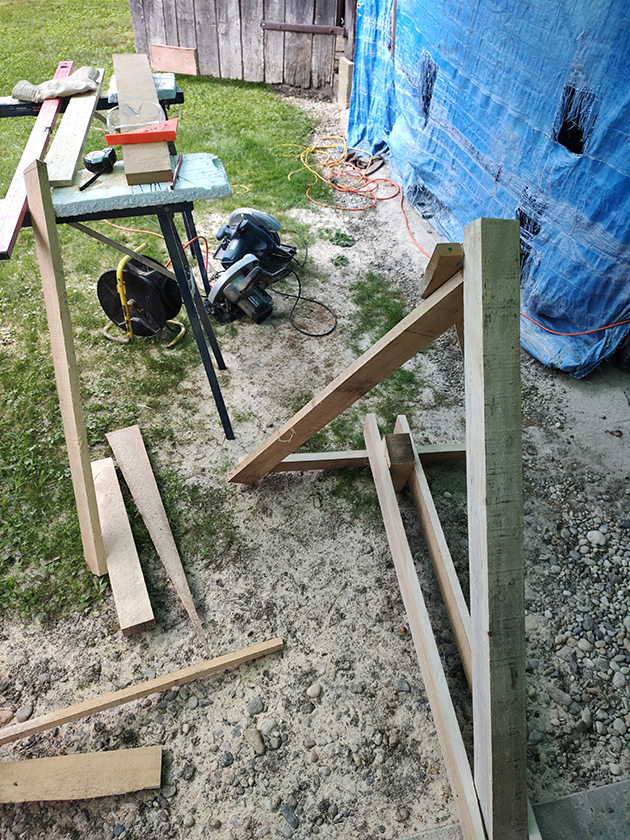
Zoran built a boat stand prototype. Credit: Zoran Glozinic
If you are building a bigger boat stand, go with at least ½in or bigger bolts.
Make the cross piece and attach the connecting block in the middle of it.
You can use glue as well, but I used wood screws only to attach it to the cross-piece.
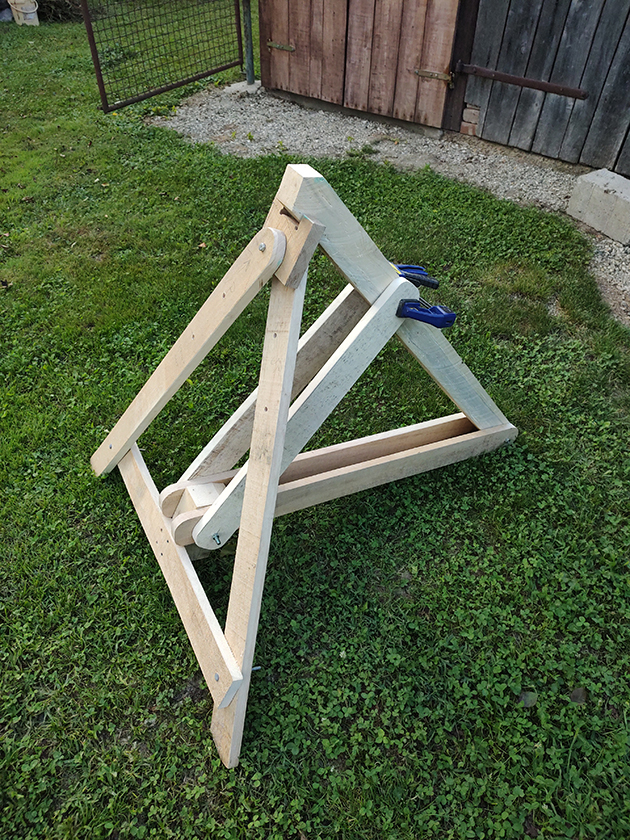
The finished boat stand prototype. Credit: Zoran Glozinic
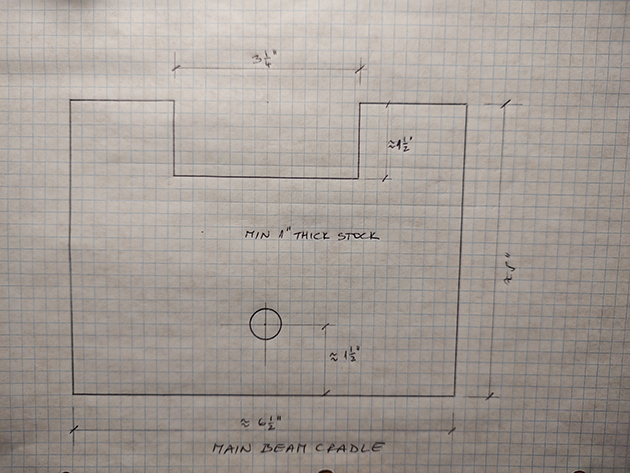
Cut the main beam cradle to size, drill the hole for the A-frame bolt and cut the recess for the main beam.
You can bevel the bottom of the recess at about 30° but this is not critical.
The recess must be deep enough to support the main beam securely to prevent any lateral movement of the main beam.
Portability was an important factor in the design of the boat stands. Credit: Zoran Glozinic
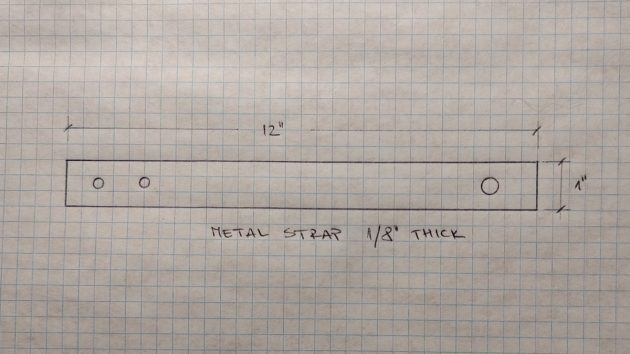
To lock the main beam in place and make sure that it stays there, make a strap from ⅛in mild flat steel.
Around 1in wide strap is enough with a length of 12in.
Drill the hole for the A-frame bolt on one end and two smaller holes for wood screws on the other end.
Assembling the A-frames and main beams/connecting frames. Credit: Zoran Glozinic
I suggest you make parts just for one stand at first and then after assembling it and making sure everything looks OK, you can continue making as many as you might need. I built 10 of them, planning to have five stands on each side of the boat.
In the end, I used only eight because I had some old tyres which I used to support the hull in the middle on each side of the boat.
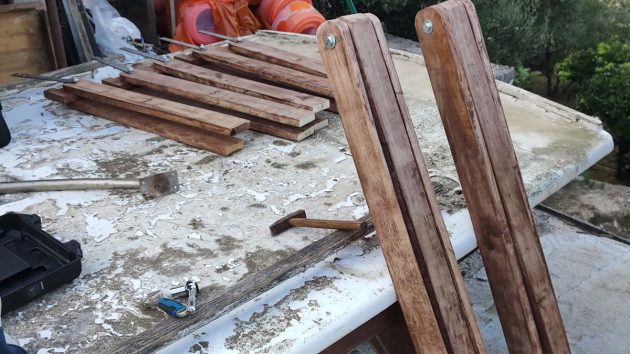
Since I used a local variety of wood which does not last long unprotected, I applied one coat of wood fence oil on all parts.
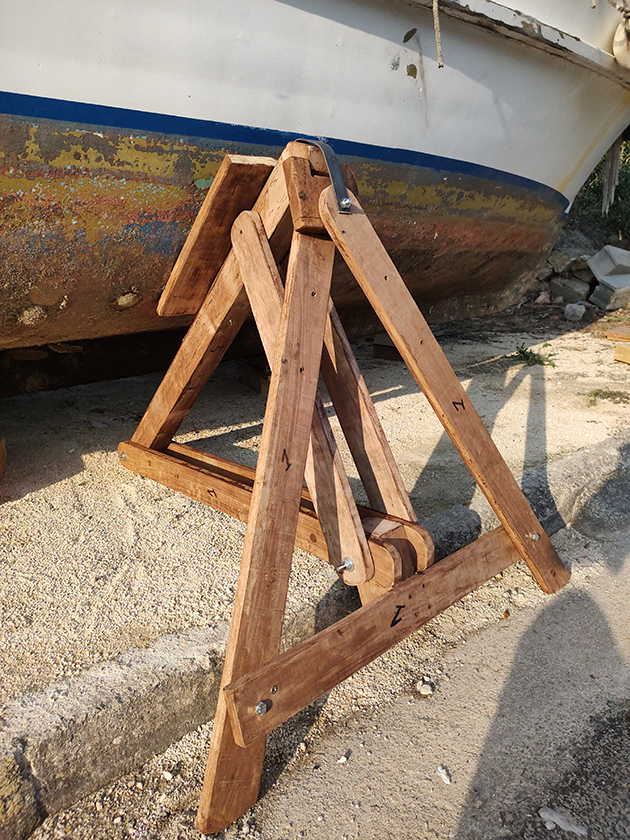
Each boat stand is adjustable for ground and hull ange. Credit: Zoran Glozinic
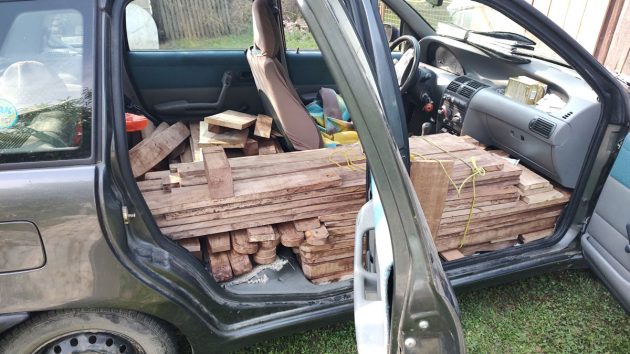
After completing parts for 10 stands and painting them, I removed all passenger seats from my small Fiat and loaded everything for the 400km trip down south to the boat.
Upon arriving and while waiting for the crane to arrive and haul out the boat, I assembled the stands and attached locking straps.
The easiest way is to bend the locking strap in situ – bolt it outside of the A-frame and beam cradle, position the beam inside the cradle recess and then just bend the strap over and onto the main beam top surface using a hammer.
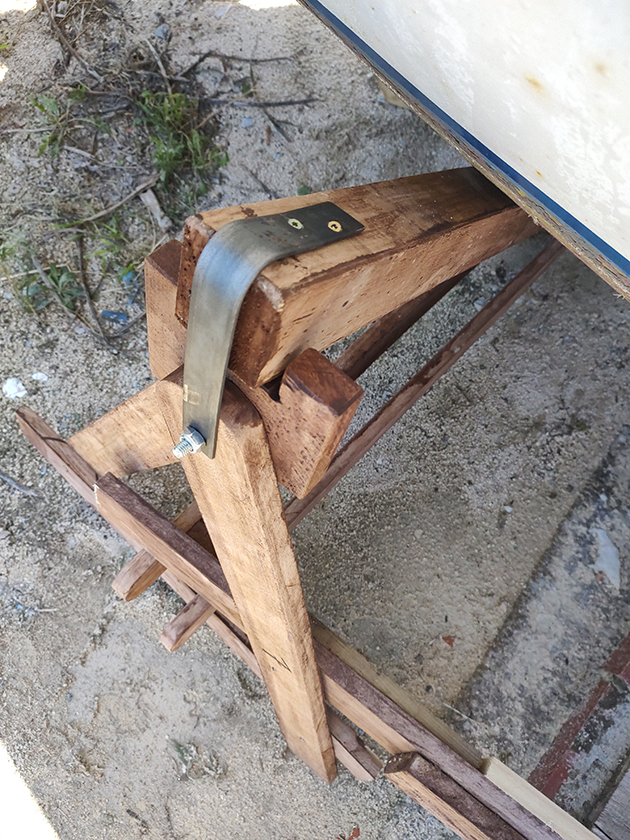
Detail showing how the iron strap holds the main support beam in place. Credit: Zoran Glozinic
Attach it to the main beam with two wood screws – use here at least ¼in screws of 2in length.
I used 3in wood screws to assemble everything – I wasn’t sure how much, if any, modification my stands would need, not being sure if they’d fit the boat shape as I expected.
Continues below…

DIY boat ladder: how to make one on a budget
Zoran Glozinic shares how he made a safe and sturdy DIY boat ladder on a minimal budget

How to make your own cockpit grate: step by step
Zoran Glozinic saves some cash by making a new cockpit grate for his yacht using redundant old wooden kitchen shelves

Bilge pump troubleshooting: getting the float activation switch to work
Zoran Glozinic does a bit of bilge pump troubleshooting to try and work out why the float-activated switch on his…

How to make a budget boat water tank and sink
Fitting out a boat of any size can quickly get pricey, so Zoran Glozinic repurposes some ‘non yachting items’ for…
They mostly did and it was much faster for me to use wood screws to assemble them quickly.
When the work I need to do on the boat is done, I’m planning to replace the screws with bolts so it’ll be easier to assemble and dismantle the stands for storage until the next haul out.
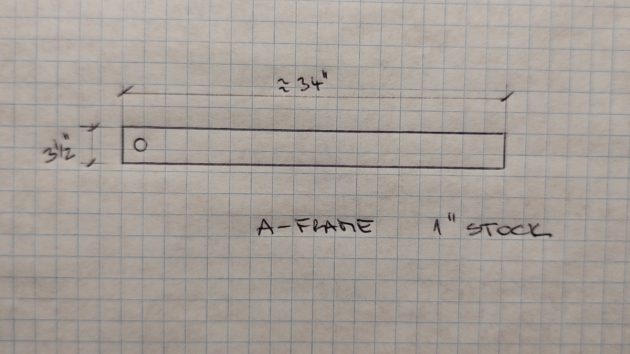
The A-frame component dimensions. Credit: Zoran Glozinic
Once you have all the stands in place, it’s good practice to connect them to each other on each side of the boat and also to connect them from one side to another under the hull.
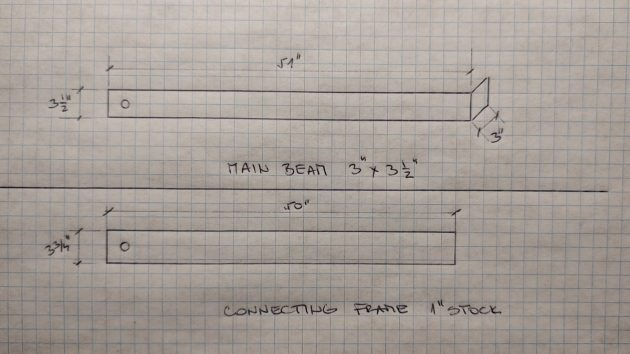
The dimensions of the main support beam and connecting frame. Credit: Zoran Glozinic
That will minimise the possibility of stands coming loose.
The main beam cradle dimensions. Credit: Zoran Glozinic
Tip: it’s better to make the A-frame parts (legs and cross-piece) longer than you think you might need.
The locking strap dimensions for the boat cradle. Credit: Zoran Glozinic
If the angle of the main beam shows to be too steep, you can always shorten A-frame legs and decrease the main beam angle until you have the desired contact point with the hull.
No other changes are needed. Finer adjustment is done by changing the angle between the A-frame parts.
Enjoyed reading How to build your own boat stand? 
A subscription to Practical Boat Owner magazine costs around 40% less than the cover price.
Print and digital editions are available through Magazines Direct – where you can also find the latest deals.
PBO is packed with information to help you get the most from boat ownership – whether sail or power.
-
-
-
- Take your DIY skills to the next level with trusted advice on boat maintenance and repairs
- Impartial in-depth gear reviews
- Practical cruising tips for making the most of your time afloat
-
-
Follow us on Facebook, Instagram, TikTok and Twitter