
Zoran Glozinic saves some cash by making a new cockpit grate for his yacht using redundant old wooden kitchen shelves
The cockpit grate is something you could probably live without, but it does improve the look and comfort of the cockpit of your sail or power boat.
When I was much younger, I was willing to spend a lot of time and money to make a ‘proper teak grate’ made from interlocking slats.
This type of cockpit grate looks great but it is not easy to make for someone inexperienced in woodworking.
Years ago I decided to try a simplified approach and since then I never looked back!

The finished cockpit grate make from old wooden kitchen shelves. Credit: Zoran Glozinic
You can make a solid cockpit grate from almost any kind of wood. Not only will it look attractive, but it’ll also give you a better grip and keep your feet dry in most conditions.
And the type of grate described here will not be hard on your wallet!
Most cockpits have some kind of rectangular shape.
Even if there are some curved sides or areas where you need to avoid something – for example a steering wheel pedestal – it’s not too complicated to create a grate which will conform to the required shape.
At worst, you might need to make it in more than one section.
The template for the cockpit grate
The key to building a grate is to make the template first.
You might be able to skip this part if your cockpit has a very simple rectangular shape, but I wouldn’t recommend it if you want your grate to fit well in the cockpit.
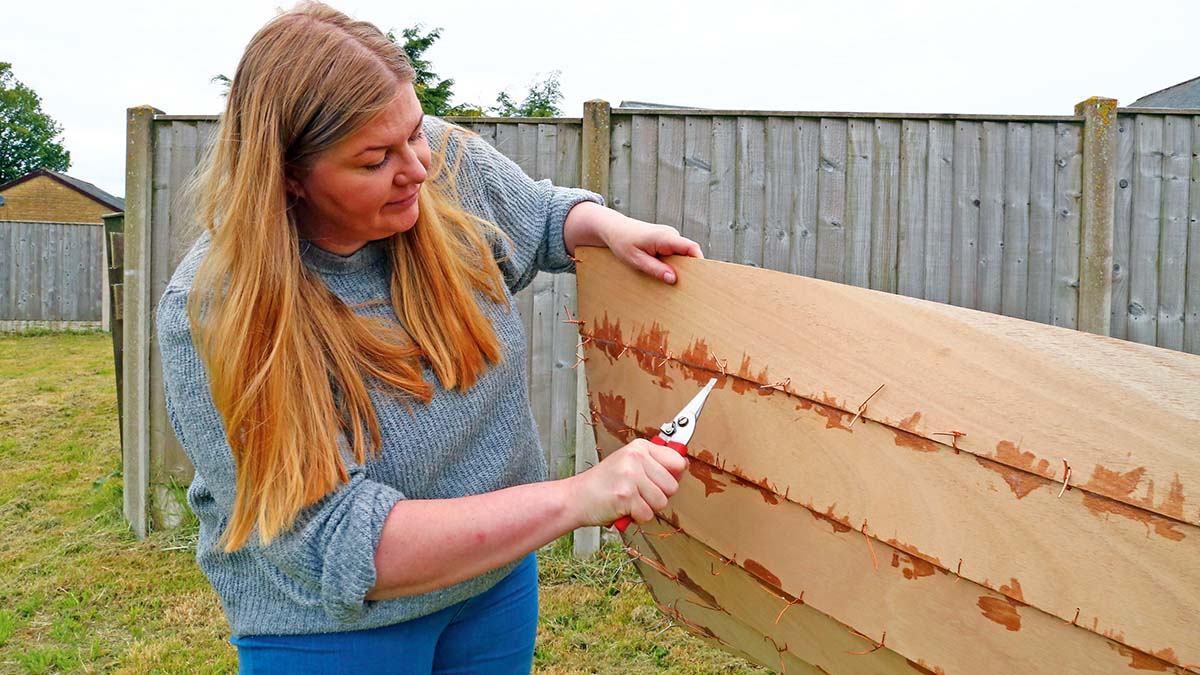
To build the template, first make some plywood or cardboard strips; you can use any old scraps of wood too as long as they’re of sufficient length and width.
Cut them to size to reproduce a full outline of your cockpit shape.

Early stages of the build. Credit: Zoran Glozinic
For curved sides, place the straight strip on the bottom of the cockpit next to the cockpit side, hold it in place and trace the curve on the template by sliding a small block of wood along the cockpit sidewall while holding a pencil on the opposite side of the block (a technique known as spiling).
If the side curve is pronounced you’ll need a wider strip for that part of the template. Cut it and check the fit.
Repeat until you get almost the same curve.
It doesn’t need to be a perfect fit because the grate will not touch the vertical sides of the cockpit. Plan to leave ¼in to ½ in inch between the grate and cockpit sidewalls.
When you’ve finished all sides of the template, position the template parts in the cockpit and secure them together.

You can use any scrap wood or card to make up the template, just make sure it fits well into the cockpit before using it to make up the cockpit grate. Credit: Zoran Glozinic
At this point you’ll need to use some cross pieces to ensure the template holds its shape well.
Depending on the material, use a hot glue gun or small wood screws to attach the strips to each other.
It is important to make sure you can remove the template from the cockpit in one piece without bending it, otherwise you’ll not be able to put your finished grate in!
If it won’t come out you’ll have to make the template – and consequently the grate – in more than one section.
You’ll now also need to think about how the grate will be kept in place.
You can mount a few small cleats on the cockpit side walls just on top of the grate – two would be enough, one of each on opposite sides of the cockpit.
To remove the grate, just one cleat would need to be removed.
Depending on your cockpit, you might find a better or simpler solution.
Making the cockpit grate parts
Once you’ve finished your perimeter template, you need to decide on the width and shape of the slats and the distance between them.
This will depend on the shape of your cockpit.
There are no rules here, but I did find that using slats of a similar width was best.
If the cockpit tapers at one end, make sure you taper the slats. The distance between the slats should be ⅜in to ½in.
Avoid having the slats too narrow on the ends; instead, make one middle slat a bit wider than the rest.

If your cockpit sole is uneven, add small pieces of wood to the cross pieces to make it level. Credit: Zoran Glozinic
All the slats should be wide enough to take two screws, but not too wide to increase the possibility of warping. I used slats which were 2in-4in wide.
The cross pieces can be as wide as you like, just make sure there’s no danger of the wood splitting when it’s screwed into place.
When initially cutting the slats, make sure you leave them a bit longer; final trimming can be done later on.
Plan the positioning of the bottom cross pieces; if the slats are thicker than ¾in, the distance between the cross pieces can be longer.
The end cross pieces should be located no more than 2in from the ends of the grate.

Use a few screws to hold the grate together and then dry fit it into the cockpit. Credit: Zoran Glozinic
Some cockpit soles are not level so as to allow water to drain out of the cockpit scuppers.
If you want a level grate, you’ll need to make sure the bottom cross pieces are of a different thickness to compensate for this.
If you have access to a router, round all of the slats’ lengthway edges. You can also round the bottom edges of cross pieces.
Alternatively, use a power sander or round the edges by hand. Sand all surfaces as well.
It is easier to do this now, rather than waiting until the grate is assembled.
Assembling the cockpit grate
With slats and cross pieces ready, you can assemble the grate on a flat work surface.
Start by positioning all of the top slats over your template; make sure all measurements and distances between the slats are correct.
I found it easier to lay down the slats first and then attach the bottom cross pieces.
I suggest dry-fitting the grate – using a few screws so the grate keeps its shape – to make sure it fits before glueing and screwing

Trim the ends of the slats to the correct length. Credit: Zoran Glozinic
Each slat should be attached with two screws to the bottom cross piece.
Select the length of screws based on the thickness of slats and cross pieces.
You might need a few different screw lengths if your bottom cross pieces are not all the same thickness.
The screws should be driven into the wood from the bottom up so they’re not visible. If some of your slats are too long, you’ll need to trim the ends.
Make sure you measure before cutting, and trim the end edges of the slats at an angle of less than 90°.
At each stage, place the grate in the cockpit to make sure the measurements are correct.
Glueing and screwing
The grate should be assembled using glue and wood screws. You can use any outdoor-rated wood glue or epoxy.
The screws should ideally be bronze, but stainless steel or even brass will do.
Brass will not last long if exposed to seawater, so seal the heads with a bit of epoxy to make them last longer.
Lay the grate with the slats facing down. Using a pencil, mark the position of every cross piece on each slat.
Prepare the glue or epoxy and then start by removing just one cross piece.

Glueing and screwing the cross pieces to the slats. Make sure you use a hand screwdriver for the final screwing in. Credit: Zoran Glozinic
Coat the marked surface of the slats where the cross piece is positioned with glue or with thickened epoxy. Put the cross piece back and start driving the screws in.
If using a drill or electric screwdriver, stop before the screw is completely in and finish with a hand screwdriver.
By removing and re-attaching each cross piece at a time, the grate will hold its shape.
After all the cross pieces are glued and screwed in, apply a generous coat of epoxy to all of the cross pieces.
Applying the finish
You can finish the grate to your liking – either painted or stained – but it is important to protect the wood from moisture and UV light.
My experience with stains is they tend to need to be reapplied every season, but whichever you choose the finish should not be slippery, especially when wet.
Continues below…

Boat wood: a complete guide for yacht owners
Boatbuilder and finisher Lyndon March explains which types of wood work best for different repairs and modifications on board

Woodworking tools – a DIY boat owner’s guide to getting a professional finish
It’s not difficult to achieve a professional finish using woodworking machines and there are bargains to be had every day…
How to build a boat: Essential guide to building your first kit boat
You don’t have to be a boatbuilder to learn how to build a boat, argue Roger Nadin and Polly Robinson.…

8 quick tips for varnishing
Some tips and tricks to get the best finish possible when varnishing your boat's woodwork
Make sure the finish covers the sides of the grate as well as the top, and the bottom cross pieces.
Making this kind of simple cockpit grate is not overly difficult and it requires only some basic woodworking tools.
Making a cockpit grate: step by step
Credit: Zoran Glozinic
1. First create a template using scrap wood or cardboard. This one is braced so it won’t change shape while being used.

Credit: Zoran Glozinic
2. If your boat has an uneven cockpit floor, make sure you test the position and thickness of the cross pieces.

Credit: Zoran Glozinic
3. Check the width of the slats are cut according to the measurements and will accurately fit the template.
Credit: Zoran Glozinic
4. All slats fitted on the template. Note that they’re not yet trimmed to their final length.

Credit: Zoran Glozinic
5. The slats are positioned on the template (face down) ready for the positioning of the cross pieces.

Credit: Zoran Glozinic
6. All the cross pieces in their final positions. Make sure you’ve laid everything out the correct way up on the template so when the grating is inverted it will match the way the template came out of the cockpit.

Credit: Zoran Glozinic
7. Now mark and drill the screw holes on the cross pieces. Use a few screws to hold everything together temporarily.

Credit: Zoran Glozinic
8. Trim the ends of the slats to their final edge, chamfering them to an angle of less than 90°.

Credit: Zoran Glozinic
9. Dry fit the grate to make sure it sits nicely in the cockpit.

Credit: Zoran Glozinic
10. One at a time, remove the slats then glue and screw them back in place so everything remains in shape

Credit: Zoran Glozinic
11. Coat all of the cross pieces with epoxy to preserve them – they’re likely to get wet pretty often.
Credit: Zoran Glozinic
12. Finally, paint or stain the finished grate.
Enjoyed reading How to make your own cockpit grate: step by step? 
A subscription to Practical Boat Owner magazine costs around 40% less than the cover price.
Print and digital editions are available through Magazines Direct – where you can also find the latest deals.
PBO is packed with information to help you get the most from boat ownership – whether sail or power.
-
-
-
- Take your DIY skills to the next level with trusted advice on boat maintenance and repairs
- Impartial in-depth gear reviews
- Practical cruising tips for making the most of your time afloat
-
-