
Robert Pink uses rivet nuts to install mast steps on his Leisure 27


Rivetnuts screw on to the nose of the rivet gun for fitting
When we first launched our Leisure 27, Windrush, we noticed that the anemometer cups were missing. A few weeks later the Windex also vanished. My son Chris, a keen rock climber, had all of the gear needed for getting up and securing himself aloft, but it was clear I needed a simple way to climb the mast myself when my son was not around to help out.
I bought some second-hand mast steps through eBay, then began to ponder exactly how I was going to fit them. I had no idea how thick the side wall of the mast was or whether it would take a thread sufficiently well to support my 16½ stone weight.
An experimental fit with tapped holes in scrap aluminium felt fairly secure, but I was not convinced that it would be safe to trust that method. I considered using pop rivets, but because of the shape of the mast steps I could not get the rivet gun in straight to make a neat job. Self-tapping screws would chew up the lines inside the mast.
While hunting for pop rivets on the internet I noticed some things called ‘Rivetnuts’ or ‘Nutserts’. Rivetnuts are available in mild steel, stainless steel or aluminium, in several sizes to fit varying sizes of machine screw.
I bought aluminium rivetnuts to fit 6mm machine screws, and at the same time bought the special insertion tool to fit them.
A trial in my scrap aluminium convinced me that the rivetnuts provided a very secure fixing, and investigation showed the mast wall thickness to be about 3mm – enough depth to use rivetnuts
with a countersunk head so that they would fit flush with the outside of the mast.
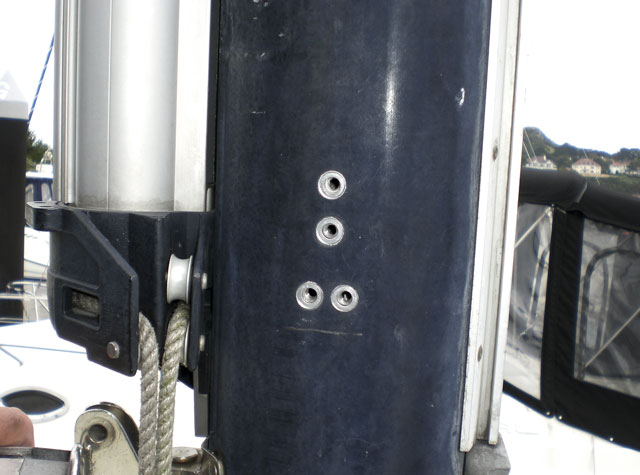
The countersunk, flush-mounted rivetnuts look neat when installed
Fitting
Research suggested that steps are typically placed between 375mm and 500mm apart, so I chose to use 450mm spacing as a compromise between cost and comfort.
To measure the mast I made one end of a long linen tape measure fast to a spare halyard and hoisted it up the mast as far as it would go, adding a guesstimate of 50cm for the bit above the sheave to the masthead. As I lowered the tape I noted the height of each mast fitting above the deck. This allowed me to plan the positions of the steps which are fixed on alternate sides of the mast, except the last ones near the top where I planned to fit a pair at the same height.
I placed the first step in position, and marked the locations for the holes with a pencil before permanently marking with a centrepunch. Next, I drilled a deeper indentation for each fixing with a 6mm drill, before changing to a 9mm drill. The 9mm rivetnuts were just too tight a fit in the holes, but a few strokes with a rat tail file opened them up sufficiently. I then countersunk the holes with a countersinking bit.
Next it was time to fit the rivetnuts. The insertion tool is similar to a hand-operated pop rivet gun except that the rivetnut screws onto the tool’s nose. Squeezing the handles takes a quite lot of effort, but as you do so the sides of each rivetnut deform. Unlike a pop rivet, however, there is nothing to break off once it is in place so it’s important not to overdo the squeeze or you may strip the thread from within the rivetnut. If that happens you’ll have to drill out the nut before trying again. It’s probably best to practise on something else before attacking the mast itself.
Once the handles of the tool will squeeze no further, it’s time to unscrew the insertion tool. Slight outward pressure on the handles takes all the tension off so that the tool can be unscrewed easily.
I installed the remaining rivetnuts for the first step in the same way, and then secured the step with stainless 6mm machine screws. Once secured, it comfortably bore my weight.
Ideally fitting the steps would be done with the mast down, but I chose to do it while the boat was in service and the mast up. This made it a two-person job, with myself up the mast and my neighbour supervising and doing the hard work of winching me up to the height needed for fixing each step.
Getting aloft is now very easy.
The costs were in the order of £120 for 22 second-hand steps complete with 6mm machine screws, approx £15 for the rivetnuts and a similar amount for the riveting tool. Brand new steps vary in price from around £14 to about £25 each.