




A keel shouldn’t just fall off – there are warning signs for keel integrity that every boat owner should know
When did you last check your yacht’s keel bolts? If the answer is ‘never’ or ‘not in the last decade’ now might be a good time to do it. These critical fastenings that secure the keel to the hull are prone to wear and tear, particularly after a grounding, but the damage is not always obvious.
The first time I learned about keel fastenings was over 20 years ago when friends Heather and James Blackburn decided to check the underside of their 25ft Quarter Tonner Quartet. She was a boat we raced hard in a weekly Poole Harbour series, and had also taken to the Isle of Wight for regattas, including the Round the Island Race. She’d had her usual run-ins with sandbanks and buoys but it came as quite a shock, during the winter liftout, to see how badly the keel bolts had deteriorated.
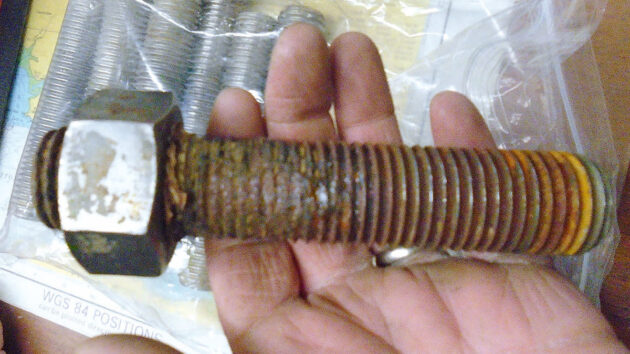
These studs were allegedly stainless steel. Credit: Ben Sutcliffe-Davies
The first sign that something was wrong was when James went to tighten the bolts and found they spun on the thread. Further inspection revealed cracks along the underside of the hull, and alarm bells rang. However, it wasn’t until he commissioned Latham’s boatyard in Poole to remove the keel that the full extent of wear and tear was revealed, requiring some serious work.
Keel bolt failure can, in extreme cases, lead to loss of the keel, with tragic consequences, as in the case of Cheeki Rafiki, a Beneteau First 40.7. The case shook the boating community. It was unlikely the vessel had struck a submerged object. Rather, a combined effect of previous groundings and subsequent repairs to its keel and matrix had possibly weakened the vessel’s structure where the keel was attached to the hull.
A photo of Cheeki Rafiki’s upturned hull taken by the US Coast Guard, was chilling: visible was an elongated white oval where the keel should have been, the partial remains of keelbolt holes and three of the 24mm keelbolts themselves, one of which appeared to be rusty. A report by the MAIB concluded it was possible one or more keel bolts had deteriorated with a consequential loss of strength, allowing movement of the keel, particularly in worsening sea conditions.
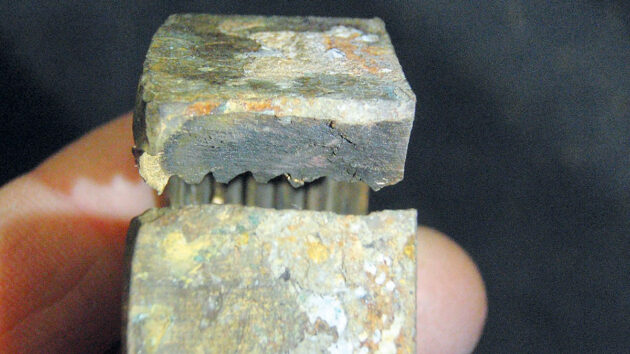
A broken bronze keel nut with brittle fracture zone along the outside. Credit: Colin Brown
It’s important, however, to remember that keel failure is rare. As survey and corrosion expert Colin Brown points out: “There are thousands of boats sailing around and it is virtually unknown for a keel to just fall off… when a boat loses a keel at sea the first reaction is often to blame the keel bolts, but the evidence does not support this; and other failures are actually more common.”
Metallurgist and long-time PBO contributor Vyv Cox points out that Cheeki Rafiki’s keel loss opened a debate about fatigue in keel bolts. “Persistent use of the incorrect phrase ‘metal fatigue’ has led to widespread misunderstanding,” he says. “Fatigue in engineering terms has nothing to do with tiredness or obsolescence, but is far more simply the growth of a crack through a highly stressed component. A crack grows by the repeated application of stress above a certain level.”
Rather than fatigue failure happening ‘suddenly’ or ‘out of the blue’, as is often cited, the reality is that a crack may have been growing for months or even years. The good news, however, is that many of the warning signs of keel attachment weakness can be detected with some simple checks you can carry out yourself.
Keel bolts versus studs
Keel bolts are sometimes referred to as ‘keel studs’ or just ‘studs’, and though studs and bolts are technically different, if a mechanic or marine surveyor advises ‘checking your keel bolts’ they’ll be referring to the fasteners, regardless of which type they are. In this article, I’ve used the term ‘bolts’ to describe both keel bolts and studs.
Keel studs – which are common on modern production yachts – are headless threaded rods, either threaded on both ends or along the length, which are cast into a lead keel or screwed into a tapped hole in an iron keel. Keel bolts, on the other hand, have a head on one end and threads on the other, and pass through the keel from the bottom upwards, where they’re secured with a nut inside the bilge.
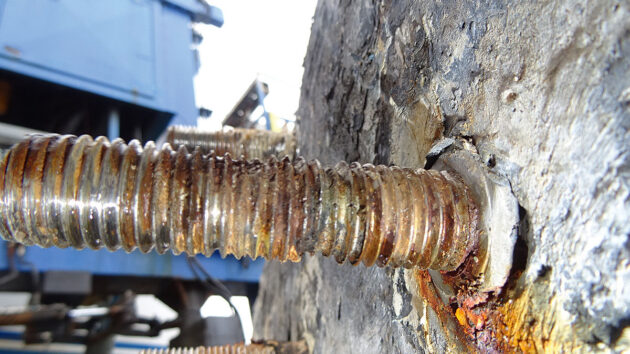
These stainless fastenings are set into a lead keel. Note the wastage. This is serious crevice corrosion. Credit: Ben Sutcliffe-Davies
Marine surveyor Ben Sutcliffe-Davies regularly inspects keel fastenings. He explains that for the majority of modern production yachts the keels are either fitted with studs or bolts that are wound down into the casting using stainless steel. These, just like iron fittings, are perfectly acceptable as long as moisture can be excluded from the fastenings. However, it’s a well-known fact that crevice corrosion happens to stainless steel when oxygen cannot be replenished.
“Over the years I’ve seen some spectacular failures in stainless fastenings when used under water,” he adds. Galvanised carbon steel is a more traditional choice of material for keel bolts. It is prone to surface rust but signs of failure can be more visible. Meanwhile bronze, which tends only to be found on high-end and custom yachts, is known for longevity.
Drawing keel bolts
In the decade that followed the Cheeki Rafiki tragedy, marine surveyors and insurance companies tightened inspection standards, and these days recommend removing or ‘drawing’ a bolt every 10 years for inspection (less on a wooden boat). It’s not enough to simply check that it’s tight. Drawing or removing a keel bolt is a job a confident DIY-er can do with the right tools, provided the boat is out of the water.
Ben Sutcliffe-Davies says the key thing is knowing which one to pull. If any are affected, it’s most likely to be one at the rear end, so start with that. Tighten another nut down on top of the existing nut then undo the existing nut which will bring the stud with it.
When a boat loses a keel, the first reaction is to blame the keelbolts but other failures are more common. Credit: Colin Brown
After inspecting the keel bolt, it’s important to put it back with the right amount of torque. “It’s possible to apply too much torque. The best thing to do is look up a torquing table online and download the correct data for the type of metal and size of fastening. You can buy a torque wrench from most tool-sellers, though for a yacht of 35ft you’re looking at a bar 3ft or 4ft long.”
A quick way to check for insufficient torque in keel bolts is to tap them with a ball pein hammer. According to Ben, it takes time to understand what you’re hearing but you do learn the percussion of what’s under tension and what’s not. With James and Heather’s Quartet, one of the first things the shipwrights did was to remove the keel bolts, which came away far too easily, and were clearly too short.
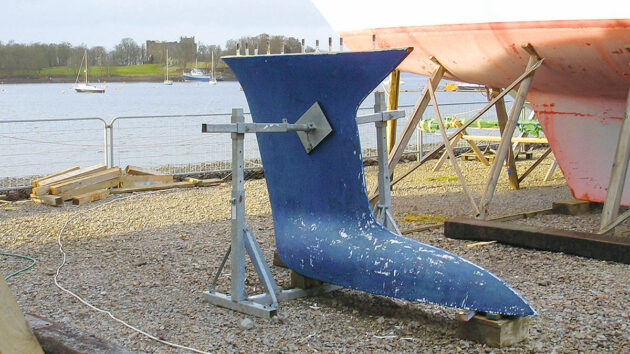
This lead keel had to be chiselled away from the hull. Credit: Colin Brown
“It’s likely that someone replaced them in the past and only screwed them down to the old Sikaflex before grinding them off,” said shipwright Barry Southam. The bolt holes through the hull were also too big and had been stuffed with packing cotton, which was too thin, wet and rotten, and the washer had been dragged down into the hole and distorted.
Cabin sole
Inside Quartet, Barry found rust streaks around the bolt holes and bumps on the hull near the forward and aft end of the keel flange. The rust indicated water ingress, and delamination suggested the keel had taken a knock, with the forward end being pulled down and the aft end being pushed up into the hull.
Keel
After removing the Sikaflex, the shipwrights inspected the join of the flange to the hull and confirmed the forward end of the flange had dropped away from the hull, suggesting it had hit an obstacle; either that or it hadn’t been fitted properly in the first place. Indeed, Barry confirmed that in the late 1970s and 1980s ill-fitting keels were common.
“Boatbuilding was at its peak… if the keel didn’t fit and the pressure was on, they’d just say ‘well make it fit’ and you’d get through a lot of filler! Quarter-tonners were built for racing, with the bulk of investment going into the rig and hull shape. No-one anticipated they’d still be racing more than 25 years later.”
They also discovered a corner of Quartet’s keel flange was missing, along with half a bolt hole, meaning there were only 15 of 16 bolts in place.
Hull
When racing, Heather and James had never managed to achieve a tight forestay, regardless of how much backstay they put on. Now they knew why: the hull had been flexing. Judging from the length of the keel bolts, the hull looked to be only around 7mm. Barry suggested stiffening Quartet’s hull with extra layers of fibreglass around the keel.
Internal ballast checks
Quartet, like most modern cruisers, had external ballast, typically a lead or iron fin keel bolted to the hull. However, if you have encapsulated or fixed internal ballast – for example, lead or iron ingots glassed into the bilge or keel stub – then look for swelling or splits around the keel.
Marine surveyor Colin Brown advises: “In particular, check the leading edge and underside of the keel where it may have hit obstructions. Damage can let water in round the ballast, and iron ballast will swell as it rusts and can split the ballast top or cause bulges in the hull. Lead won’t rust or swell, but trapped water will swell if it freezes. If you suspect the keel has hit something (you may even have been at the helm at the time!), check the internal structures for cracks and delamination.”
Ben Sutcliffe-Davies points out that many boats built in the 1970s and 1980s have encapsulated ballast, where the keel is part of the hull moulding. The GRP fin contains steel punchings (the pellet of steel that is left after punching out the centre of a washer) and no bolts or studs. He says, “I’ve found these to be very strong and you only need to ensure the GRP casing is not compromised, leaving the punchings open to potential rusting.”
External ballast checks
It’s rarely the keel bolts themselves that snap under load. In normal circumstances, keel fastenings are designed to have an infinite fatigue life, explains Colin Brown, and it’s only when corrosion removes the load-bearing area from the bolts that fatigue becomes an issue. However, as Colin points out, “We can’t assume an infinite fatigue life for a hull… and no boats seem immune to manufacturing defects. In all cases, seemingly small failures can allow the keel to move and this can spread to widespread separation of structures, loss of strength and ultimately to keel loss.”
Failure often begins in the keel matrix – the grid-like structure in the hull that the keel is attached to. When you hit a rock or a sandbank the keel can be forced upwards causing delamination. As well as delamination at the joint, warning signs might include damage to the bottom of the keel and sagging of the hull where it overhangs the back of the keel. Inside the boat, check the keel matrix for cracks in the hull and corrosion on the keel bolts.
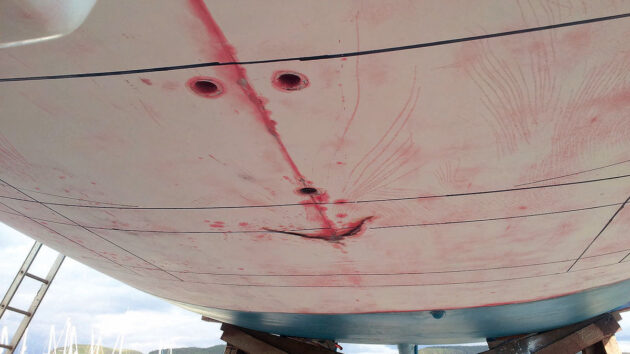
Grounding damage puncture at the keel’s aft end is obvious. Less obvious are the stress cracks reaching almost to the waterline. Credit: Colin Brown
However, Ben Sutcliffe-Davies warns that unscrupulous boat owners may simply try and paint over the cracks. “If your boat has suffered grounding, replace the keel bolts too,” he adds. “Don’t re-use them, even if they look okay.” Cracks can be detected before catastrophic failure occurs.
This can often be achieved by visual inspection, says metallurgist Vyv Cox, but in more difficult situations a range of specialist techniques can be used. “Dye penetrant kits that reveal small cracks are relatively cheap and easy to use,” he says. “Regular inspection of highly stressed components will help to prevent more serious situations from developing.”
Here are some checks you can make to ensure your keel and supporting structures are sound, though if you have any concerns whatsoever, speak to a boatyard or a marine surveyor.
Exterior boat checks
- Gap between keel and hull. When the boat is lifted, look at the hull-to-keel joint. Is there a gap that closes when the boat is put down? A hairline crack in antifouling is normal at a hull-to-keel joint, especially if flexible sealant has been used.
- Large cracks. With the dense keel being attached to lighter glassfibre, some surface cracking on the hull is normal, but large cracks may indicate the keel has moved and dislodged the paint. Chalk over them to reveal the location, then remove a layer of antifouling beneath for further inspection.
- Keel swings. Push the keel and let go. Does it swing? Likewise, apply some pumping action to the foot of the keel. Does it move or flex the hull?
- Rusty hull-to-keel join. Rust caused by chipped paintwork can be dealt with by filling, fairing and applying a waterproof paint. However, rust at the keel join requires further inspection, particularly with a lead keel with stainless steel bolts.
- Saggy hull. With the boat resting on the keel the hull should be flat, not hanging over the keel. When the boat is lifted does the keel drop?
Interior boat checks
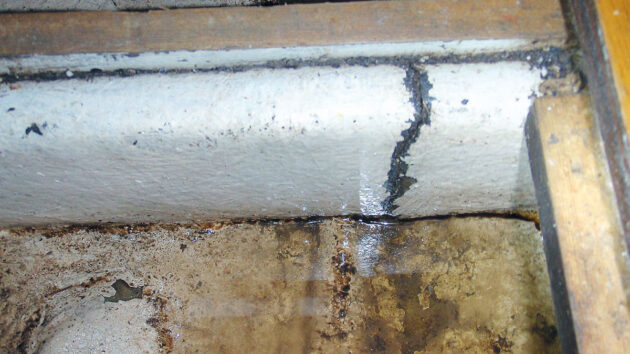
Cracked frames around the keel are a clear sign of excess movement. Credit: Colin Brown
- Familiarise yourself. Know where the keel fastenings are located. Often there are fastenings aligned with the main areas of the casting, but frequently there will be a smaller fastening forward and aft.
- Water in the bilge. This may be an indication of leaky keelbolts. Rule out obvious leaks first, such as plumbing, etc. Bubbly gelcoat is another giveaway.
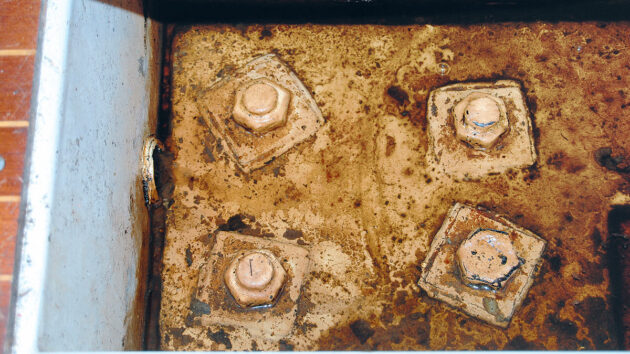
- Rust stains around stainless steel bolts. If they’ve been wet for some time, they may be corroding. Areas of ‘tea-staining’ under the washers in an otherwise clean bilge may be an issue. Take photos and zoom in to see problems in detail.
- The wrong sound. Lightly hammer glassed-over keelbolts. Any dull notes may indicate a fastening that isn’t under the same tension as the others.
- Doors not closing. Do sole boards not fit and doors not open and close? If so, the hull may have changed shape due to weakening structures (or an over-tuned rig!).
- Cracks in keel matrix. A light hammer will reveal areas where structures are delaminating. Note you might have to unscrew soleboards.
- Signs of previous repair. A poor finish, different colours, resin over the keel bolts or repair edges might be red flags. Painted fastenings and nuts could be a sign of good maintenance – or an attempt to hide something.
- Loose keel bolts. Clean off debris with a wire brush, inspect the threads for rust and check the tightness with a spanner. If they come undone too easily they may need replacing. Draw and inspect a different bolt each year.
- Rusty or damaged nuts. These will need to be replaced.
- Cup-shaped washers. Enlarged holes and re-tightened nuts may deflect washers into a tell-tale cup shape.
The solution
If you find damage to the internal structure, a full repair is likely to be complex and expensive and will probably require the keel to be removed to allow the hull to regain its proper shape. The only way to check if your keel bolts are rusting is to lower the keel to have a look.
The Quarter-Tonner Quartet had many of the above symptoms, but to see the full extent of damage, exploratory work was required, which could only be done at the yard. Once the keel bolts were removed, Quartet was hoisted slightly so the keel hung only by its Sikaflex. Incredibly, it still took 20 minutes of chiselling and working away at it with a hacksaw to detach the keel.
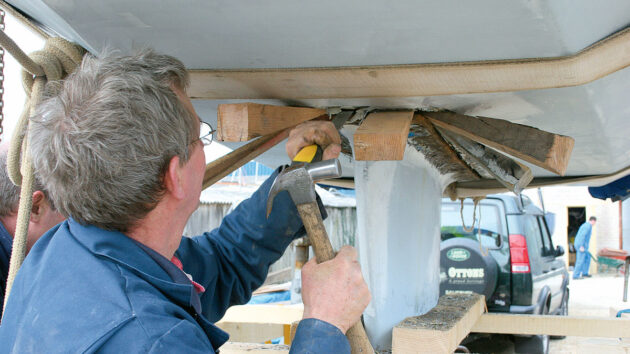
It took 20 minutes and plenty of wedges to prise off Quartet‘s keel
This revealed the flange had been rusting away for some time and the front six bolt holes were full of water. In the underside of the hull there was rust and cracks around the bolt holes, but it wasn’t all bad news. The bolt-hole threads were all intact except for one.
The keel was sent to a specialist for the thread to be replaced (helicoiled) and a new hole to be drilled close to the broken corner. On its return, the hull was stiffened and the keelbolts replaced with 20mm studs. After being cleaned, the keel recess was coated in Sikaflex and epoxy primer while the boat’s interior was gel coated.
Using chains attached to strops the boat was lowered carefully back down to its keel and the studs were tightened. Just two weeks before race season, Quartet’s keel attachments were good as new!
How to investigate keel bolts: step-by-step
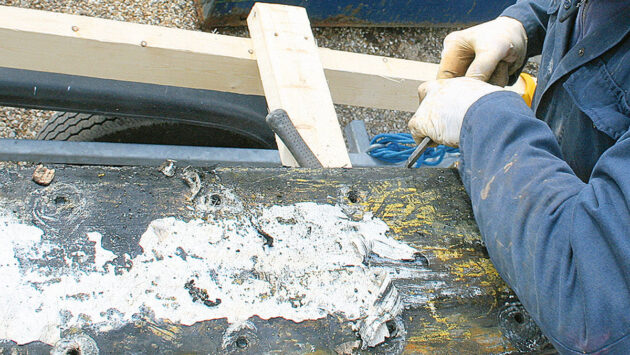
1. Andy removes the Sikaflex from the top of the keel.
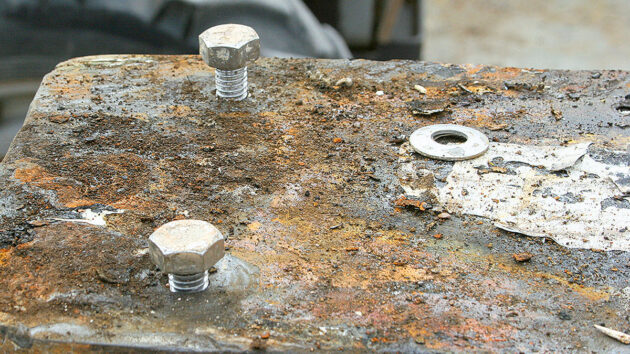
2. From the two bolts you can see the difference in the thickness of the hull.
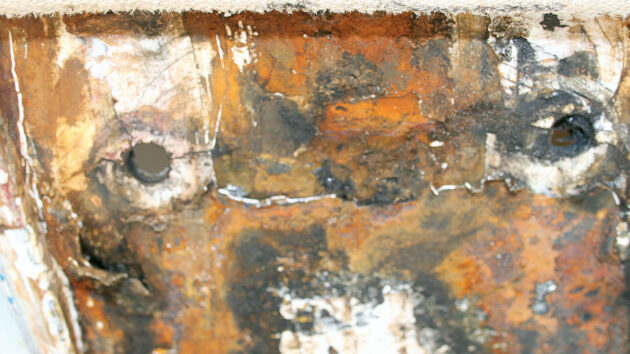
3. Cracks and rust around the bolt holes in the underside of the hull.
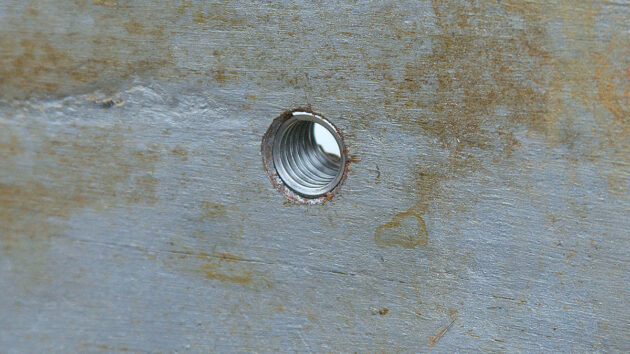
4. The one stripped bolt hole was re-threaded with a helicoil.
Preparing the hull and keel: step-by-step
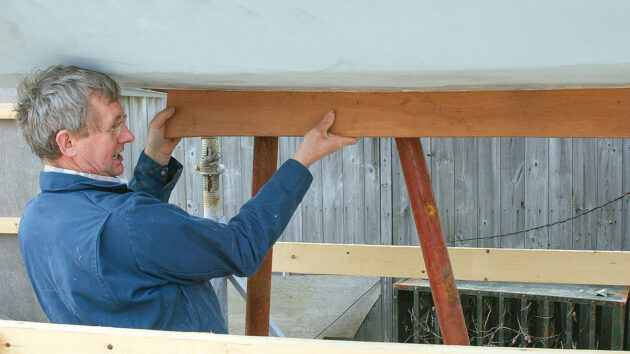
1. Barry makes a wooden template of the curve of the keel.
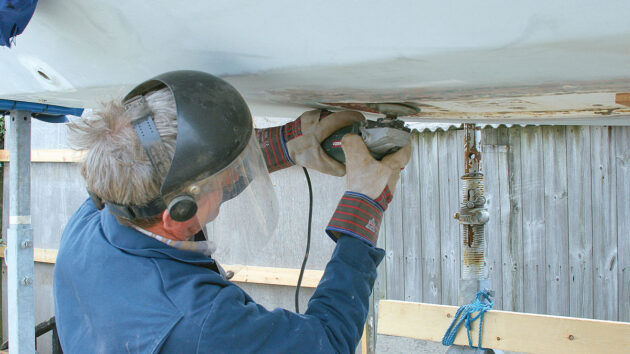
2. He smooths the underside with an angle-grinder.
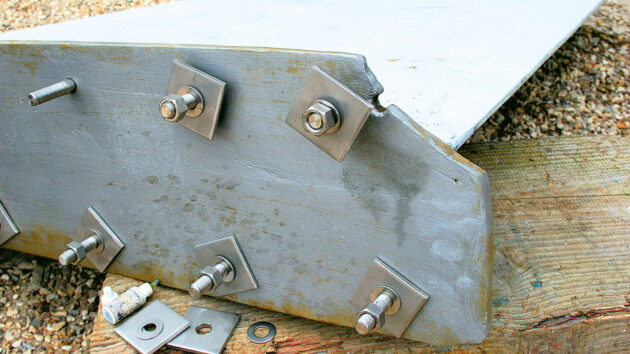
3. The keel is painted and new 20mm studs are installed.
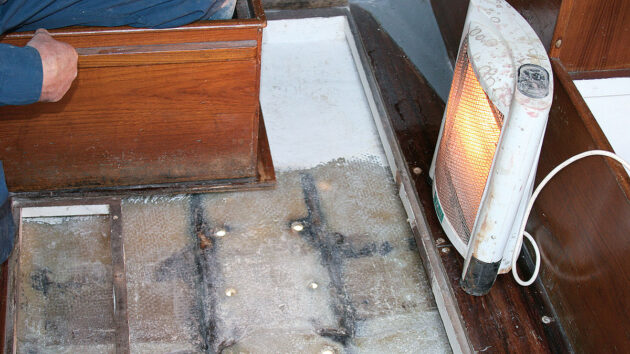
4. Keel area of the hull is reinforced with chopped strand mat and resin.
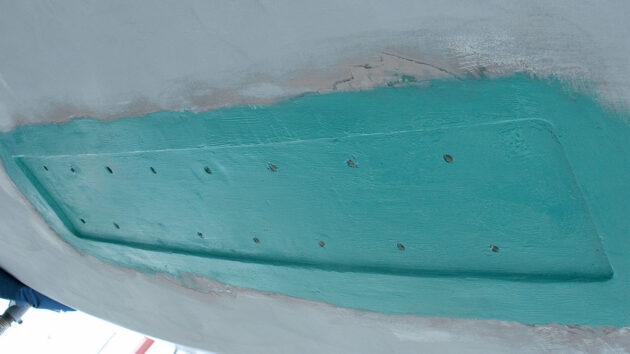
5. Andy coats the underside of the hull with epoxy primer.
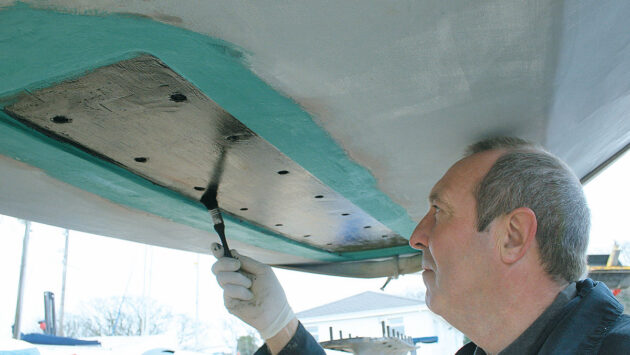
6. He then coats the keel recess in Sikaflex primer.
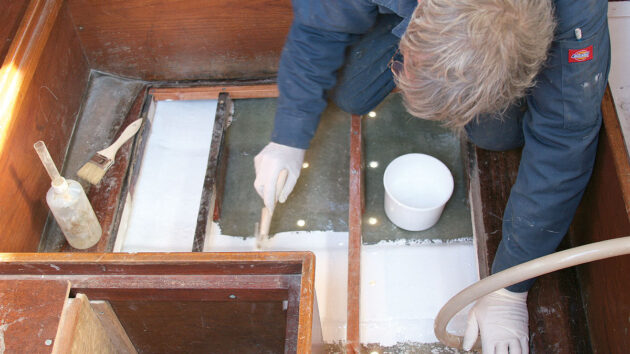
7. Inside, the interior finished with flow coat – a gel coat with a wax solution.
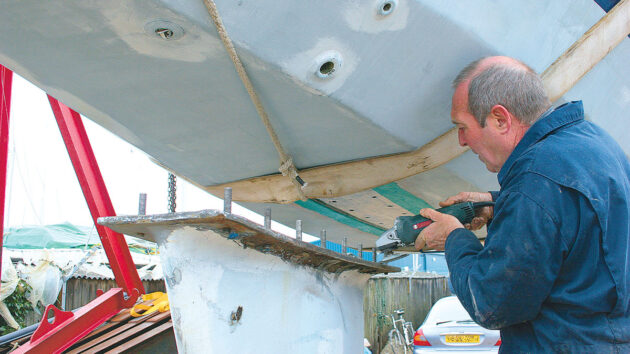
8. Andy cleans the keel stub back to bright metal ready for Sikaflex.
Reassembly of keel and bolts: step-by-step
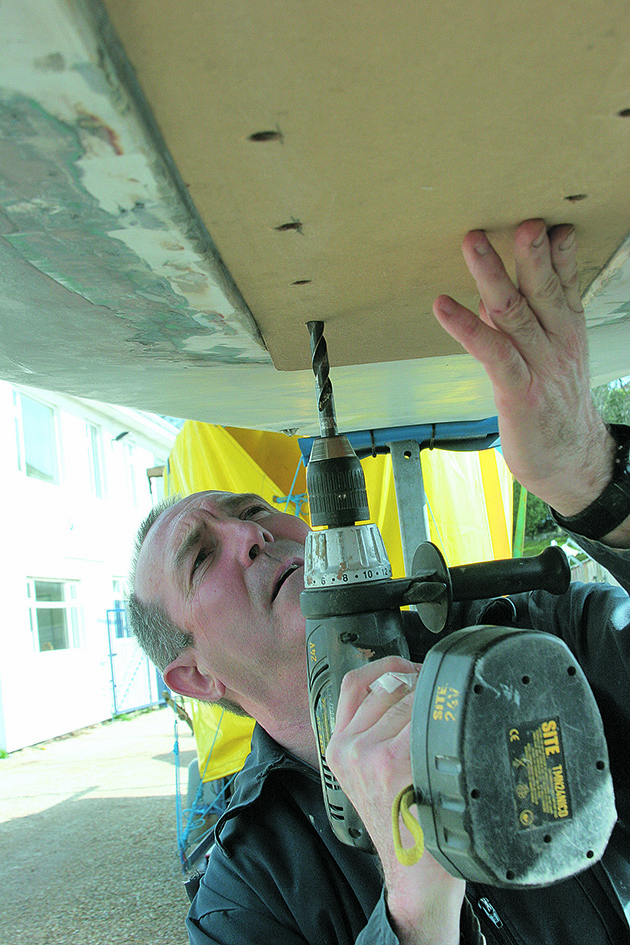
1. Using a template made from the flange, keel holes were redrilled.
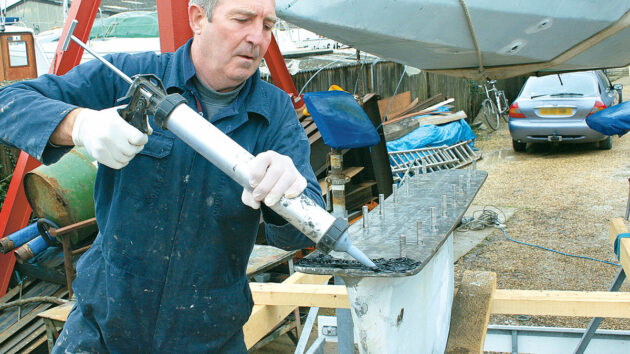
2. Andy applies a generous amount of Sikaflex to the keel stub.
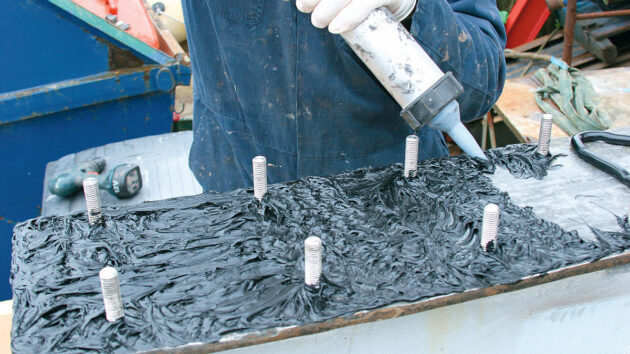
3. This should ‘ooze everywhere’ but can be trimmed away once dry.
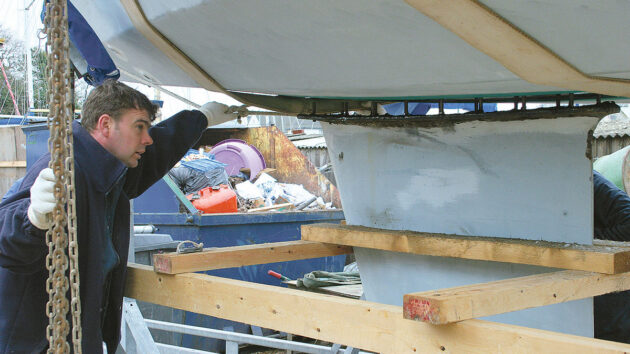
4. A chain hoist is used to carefully lower the boat back onto the keel.
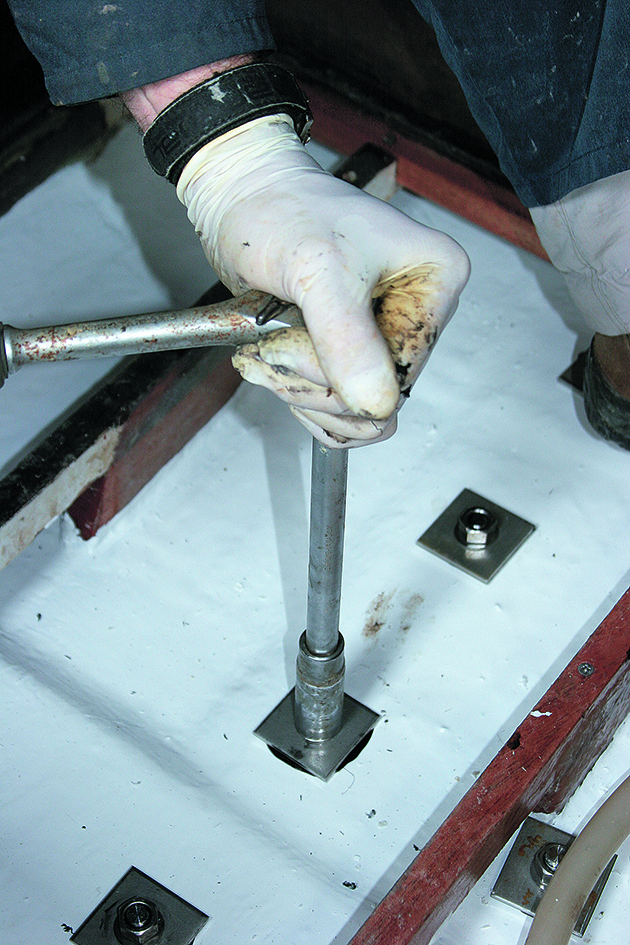
5. Each stud is tightened a little at a time.
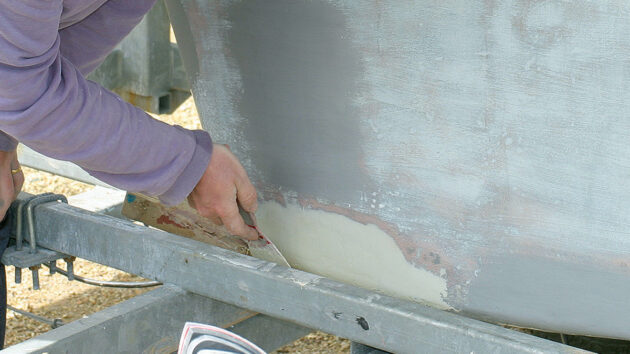
6. Owner James fills and fairs the chips in the keel from the strops.
What does a surveyor look for in a keel
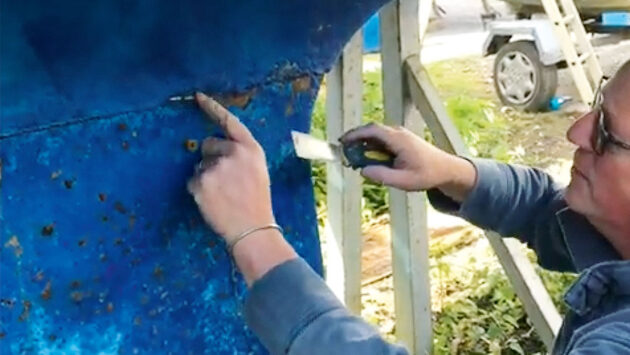
Ben Sutcliffe-Davies checks Maximus‘s keel
When we commissioned marine surveyor Ben Sutcliffe-Davies to look at the PBO Project Boat, a Maxi 84, he was satisfied with the cast iron keel.
“You’ve got a nice keel joint here,” he said. “It’s a stepped keel joint which is actually a lot stronger, especially from an impact point of view.” He tapped along the laminate and pointed out that when there’s delamination you can hear the difference in the thickness. Fortunately, there was no hollowness there. He was unable to get his fillet knife between the hull-to-keel join, which was reassuring (incredibly, he has been to boat surveys where he has actually pushed the knife into the corrosion and jacked the two apart!).
Inside the boat, when he inspected the keel bolts, he was surprised to find only five. “On modern boats now you rarely see less than eight or 10 fastenings,” he said. There was no moisture or movement – though he suggested looking once more when the boat was on strops – and he suggested at some point drawing a couple of bolts to see what they looked like, though this was not urgent.
We asked what this process looked like, and he explained: “You slacken off the nut a fraction, put a lock nut on top and basically unwind them and draw them out of the keel casting. “I would draw the rear fastening first because if any are going to be bad, it’s always the back one which is more susceptible. Everyone worries about taking keels off but really it’s not that hard with a boatyard and a boat hoist.”
After undoing the fastenings you’d need to break the joint. Ben has seen some keels stay put, even when lifted and the bolts removed, because the mastic has proved so strong. “You then replace the keel bolts and get the keel shot-blasted – get all that corrosion off, epoxy it and you’ll be good for another 30 years.”
Cheeki Rafiki Safety Lessons
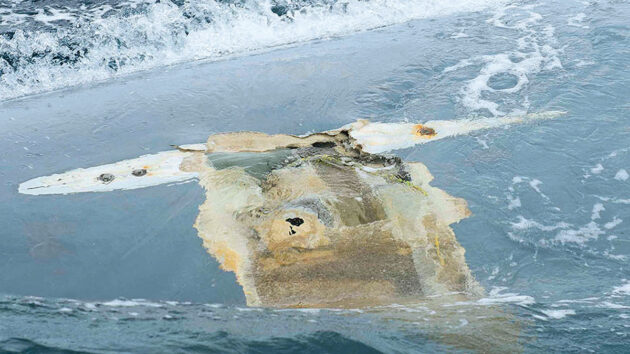
The upturned hull of Cheeki Rafiki. Credit: United States Coast Guard
Cheeki Rafiki, a Beneteau First 40.7, capsized in the North Atlantic in 2014 on returning to the UK from Antigua Race Week. Despite an extensive search that found the upturned hull of the yacht, the four crew were never found. In the absence of survivors and material evidence, the causes of the accident remain a matter of some speculation.
However, the MAIB was able to conclude that the yacht capsized and inverted following a detachment of its keel, and published the following safety lessons:
- Where bonding is used to secure a matrix of stiffeners into a hull, it’s possible for that bond to break down leading to weakening of the overall structure. Importantly, break down of the bond can be difficult to detect.
- A ‘light’ grounding can still cause significant undetected damage to the matrix bonding.
- Regular inspection of the hull and internal structure should help to provide early warning of possible keel detachment.
- When flooding is detected, all possible sources of water ingress should be checked, including the area the keel is attached to the hull.
Wooden boats and keel bolts
Keel bolts need regular inspection on all boats, but the long bolts used on wooden craft are particularly susceptible to corrosion. The interval between inspections will be determined by the type of metal the bolt is made from: mild steel should be checked every four to five years, while bronze can be left for up to eight years.
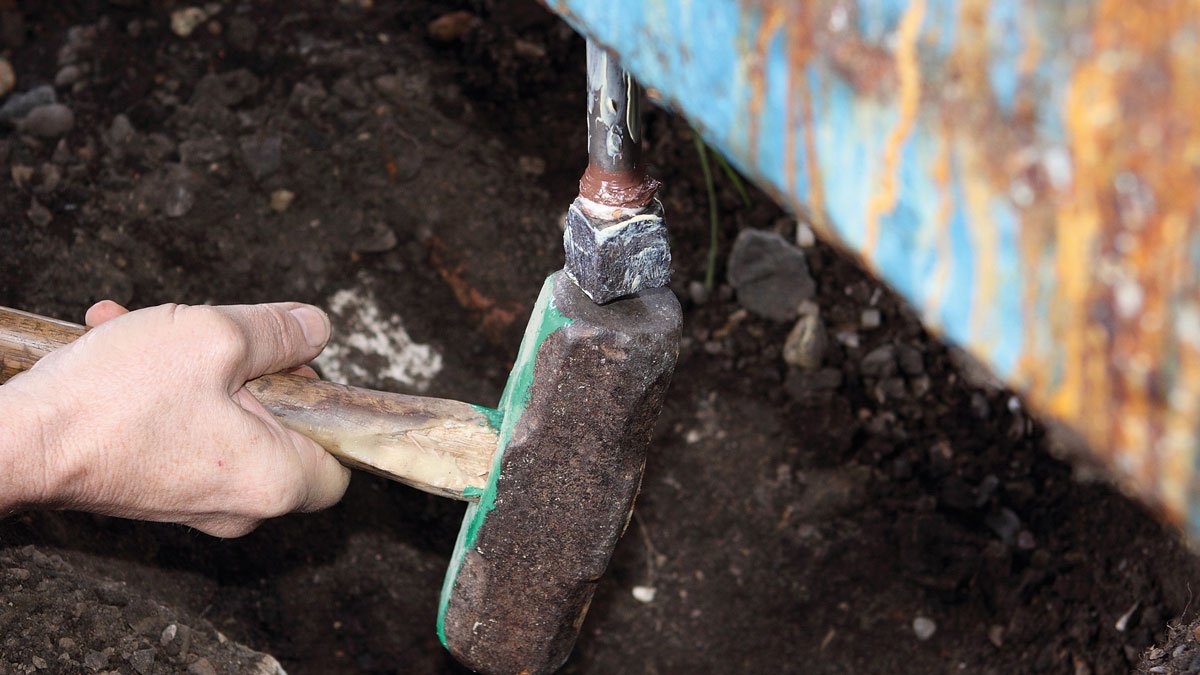
Checking and replacing keel bolts on wooden boats
If a keel parts company from a yacht, capsize is the inevitable result, which is why checking and replacing keel…

Keel types and how they affect performance
Peter Poland looks at the history of keel design and how the different types affect performance
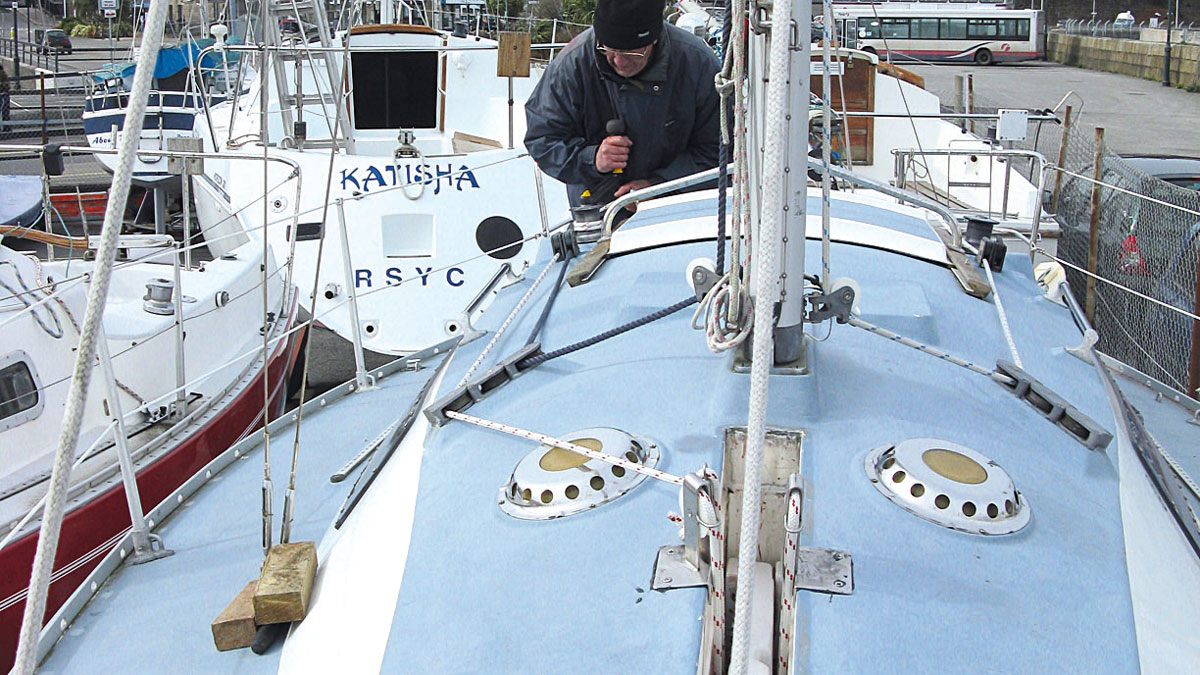
Making a lifting keel easier to raise
After struggling with a heavy lifting keel, Brian Johnson builds a simple tackle to make light of the problem

How to repair keel band corrosion on small boats
Galvanic corrosion is often something mainly associated with metal fittings on larger craft: however, David Parker has a cautionary tale…
Want to read more articles about boat maintenance?

A subscription to Practical Boat Owner magazine costs around 40% less than the cover price.
Print and digital editions are available through Magazines Direct – where you can also find the latest deals.
PBO is packed with information to help you get the most from boat ownership – whether sail or power.
-
-
-
- Take your DIY skills to the next level with trusted advice on boat maintenance and repairs
- Impartial, in-depth gear reviews
- Practical cruising tips for making the most of your time afloat
-
-
Follow us on Facebook, Instagram, TikTok and X