
Kit boat builder Polly Robinson shares her tips for painting and varnishing a plywood-epoxy boat

Painting and varnishing a boat: how to get the perfect finish
Plywood-epoxy construction is a modern boatbuilding method that allows you to build a boat quicker than traditionally built boats.
But epoxy requires UV protection to stop it from breaking down and yellowing over time, so applying a finish is both practical and cosmetic.
Preparing for painting and/or varnishing a boat
The most important part of the finishing of your plywood-epoxy boat is the surface preparation before you add paint or varnish.
Spending extra time and effort at this stage will mean you get a better result.
The finish is what people will notice, so it’s worth putting the time in. The preparation for paint and varnish is the same.

The boat before the painting and varnishing. Credit: Polly Robinson
After you have completed laying the fibreglass and applied the fill coat which is used to fill the weave of the glass, you’ll need to fair the hull.
First sand the boat inside and out to get rid of any high point or epoxy drips from the glassing stage.
If you have been particularly relaxed with cleaning up spills you may need to start with a 60-grit paper to get any big drips off but usually, you can start with 80-grit.
You need to take care to not go through the weave of the glass, as this is what is giving your plywood boat its strength and protecting the plywood from water ingress.
Getting started on painting and varnishing a boat

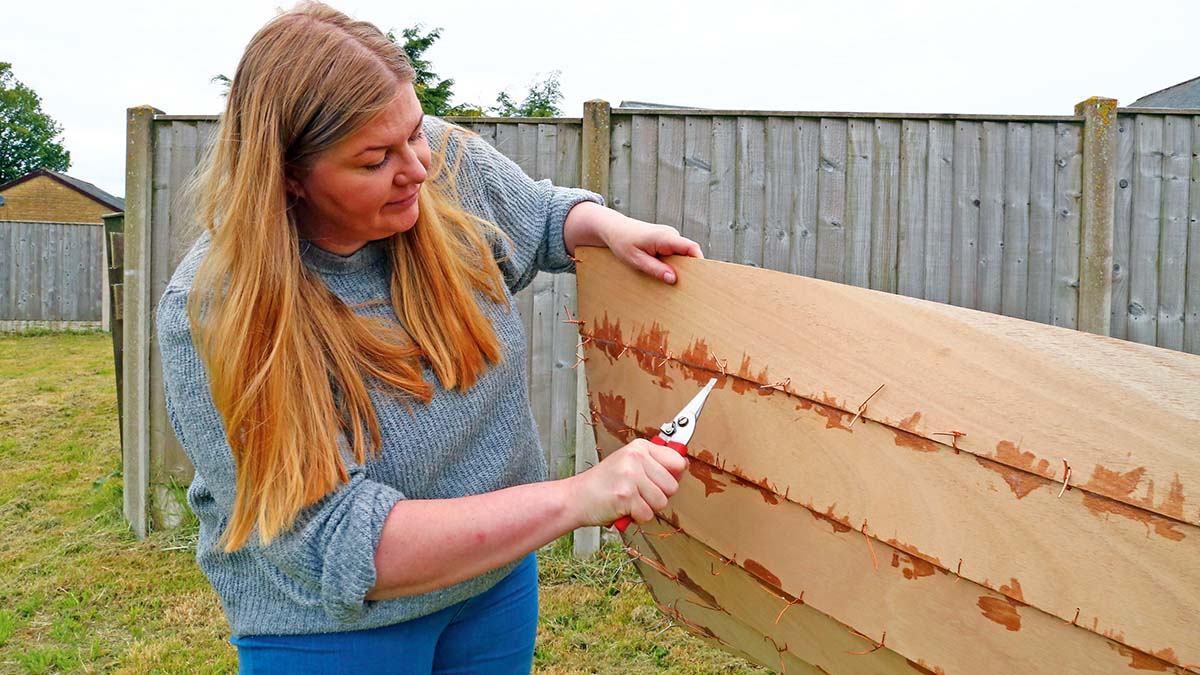
Watertite applied to the lapstrakes on any low spots. Credit: Polly Robinson
- Starting with 60- or 80-grit paper, remove any high spots from the boat. I usually start with any obvious drips or runs and then work bow to stern and cover the whole boat using a random orbit sander. Take your time and keep moving, you don’t want to sand too much and add low points using the sander, as these will need filling in later.
- Once you’ve removed the high spots you need to then work from bow to stern using 120-grit to remove any scratches made by the 80-grit. I repeat the 120-grit two to three times to ensure the whole boat is smooth. Run your hands over the boat as this is an easier way to find any high spots you’ve missed – your eyes can be deceived by the light bouncing off the epoxy coating.
- Check the boat for any low points; getting down to eye level and looking along the boat is a good way of doing this. You need good lighting so if the boat is small enough or on a trailer, it’s worth taking it outside.
- If you find any low points you can use some epoxy thickened with microballoons to skim over and fill the hollows. You’ll then need to re-sand these, but it’s worth doing it at this stage rather than earlier as you need the boat smooth to see the dips. If you intend to paint the boat, I have known people use a marine body filler instead of epoxy here, such as Watertite by International. You can apply this to any dips and then sand back to achieve an even surface.
- Wait for the filler to cure properly – and do not sand partially-cured epoxy.
- Finally sand the entire boat with 240-grit – the epoxy should turn a milky opaque colour at this stage. The aim is to buff out any scratches but also remove the ‘shine’ of the epoxy. This keys the surface which is required for the paint or varnish to bond. Don’t be concerned by the milky appearance as the varnish will turn the epoxy back to its shiny look.
- Once happy with the finish, lightly clean the boat with meths and leave it to fully dry. Ensure the workshop is as free of dust as possible – you don’t want to be kicking it up when painting and varnishing. Note: you should always wear a dust mask and eye protection when sanding. When sanding epoxy, ensure your skin is covered and the workshop or garage is well ventilated. Most sanders have dust collection available, and this should be used; you’ll want to keep the dust to a minimum when painting later.
Paint or varnish?
If you have chosen to paint either inside or outside or a combination of the two you have probably put a lot of thought into which colour.
Light paints make the boat look bigger.
If you have a clinker-style boat then light colours allow a shadow to form under the planks which exaggerates the clinker and looks fantastic.
A combination of paint and varnish also looks great – and shows that your boat is wooden too.

Varnishing a boat: The boat after the first coat of varnish. A minimum of four coats will be needed. Credit: Polly Robinson
A lot of smaller boats have the top strake varnished, along with the transom, which is a great combination.
It’s also worth thinking about how you will use your boat.
Paint is more hardwearing than varnish and will generally require less maintenance.
If you have any flaws in the boat or marks on the plywood, paint will hide them whereas varnish will probably make them more obvious.
If the build has been carefully done and you have a great figuring pattern on the plywood, a fully varnished ‘bright’ boat is a real head-turner.
Epoxy does breakdown over time when exposed to sunlight and can yellow.
So whether you decide to go with paint or varnish, just make sure the entire boat has one or the other protecting it.
Painting the boat
For the boat I’m currently working on we decided to paint the hull, leaving the top strake and transom varnished. Inside the boat will be varnished too.
You can use an anti-slip paint on the bottom panels, which provides more traction underfoot.
This is a good idea if you’ll be stepping in and out of the boat with wet feet, and should reduce the risk of an unexpected swim!
You’ll want to use an undercoat and topcoat to get an even finish. I use International One Up which is a primer and undercoat in one and gives a good coverage from the first coat.
It’s easy to work with and applies well.
I use this with International Toplac Plus which is a high gloss enamel finish. It comes in a good range of colours and gives a beautiful finish.

Side view with the first coat of topcoat. Note the masking tape on the topstrake to ensure a clean line. Credit: Polly Robinson
If you’re planning to keep your boat on the water year-round you will need a suitable paint.
It’s always worth giving the paint manufacturer a call and chatting through your options.
It’s also worth mentioning that your undercoat and topcoat need to be compatible. Paints are either single-pack or two-pack.
As a rule, two-pack paints can’t be applied over single-pack paints.
Continues below…
How to build a boat: Essential guide to building your first kit boat
You don’t have to be a boatbuilder to learn how to build a boat, argue Roger Nadin and Polly Robinson.…

8 quick tips for varnishing
Some tips and tricks to get the best finish possible when varnishing your boat's woodwork

Surface preparation for polishing or varnishing a boat
Mirka’s Andy Mierau shares trade tips on how to prepare surfaces for polishing or varnishing
Best boat varnish: 7 top options for gleaming woodwork
Few things are as quintessential to the archetypal sailboat as gleaming, iridescent woodwork that is indicative of a recent coat…
Two-pack paints are stronger, and the solvents will soften the undercoat. Single-pack can usually be applied over two-pack, but I would recommend sticking to the same system.
Roller size is also worth considering.
The boat I was painting was only 7ft 6in/2.3m LOA with a 4ft/1.2m beam and 6ft/1.8m panels on each side, so they were thin.
I used a 4in roller as any bigger would have made it tricky to get good coverage.
If you’re painting a larger boat or one with larger panels, then a larger roller will give better coverage as you’ll not need so many passes to cover a panel.
Get cracking
- Now we’ve decided on a finish, the first step is to mask off the parts that will be varnished. Care should be taken to get the lines even and a ‘true line’. Where the paint and varnish meet will be where the eye is drawn to, so this needs to be correct and even on both sides.
- Paint is temperature sensitive so check the manufacturer’s guidelines. I was finishing the boat in an unheated garage so used a small plug-in heater to achieve the required temperature.
- The rest of the varnish area can then be masked off with newspaper to stop any splashes from getting on the boat. Cover the gunwales too when painting the boat upside down.
- Check the instructions on your paint. The system I am using – International One Up – requires three coats and thinners. Decant roughly the amount of paint needed for the first coat into a container and add the thinners. Mix well.
- Use a foam roller to apply the paint. Do not overload the roller as this will cause the paint to run. Work along the boat, ensuring an even coat. Once you have rolled the paint on, follow with the brush to remove any bubbles left by the roller (known as ‘tipping off’). Slow and steady is key and keep the coat thin.
- Once the undercoat is on, check the boat for any missed spots. Leave to dry according to the manufacturer’s instructions on the tin –there is often a recoating time.
- Once dry, lightly sand the paint with 240-grit paper and apply a second coat in the same way. You should start to get a uniform colour across the entire area painted. The paint I used was pigmented enough that I only needed two coats, but some brands may require a third. Ensure you lightly sand between coats.
- Once the undercoat is fully cured (you can find the full cure times on the manufacturer’s website or the paint tin) you can prepare for the topcoat. Lightly sand the painted area again with 400-grit.
- Decant the topcoat into a fresh container and repeat the process. You may not need to use thinners this time – check the manufacturer’s instructions.
- You’ll need to do multiple coats; sand with 300- to 400-grit paper in between coats. I used International Toplac Plus which was beautifully pigmented, so I only needed three coats.
Varnishing a boat
There are many varnishes on the market. Some have a slight colour, so it’s worth checking if you’d like yours clear to show the colour of the wood as is, or tinted if you would like it slightly darker.
I have sapele gunwales on my boat, which is a dark coloured wood, so I opted for a slightly tinted varnish to complement these.
I used International Original, which I’d highly recommend. It’s a beautiful honey colour and applies well.

Varnishing a boat: Dinghy looks smart with a fresh coat of epoxy – but will need painting or varnishing to protect the epoxy from UV sunlight. Credit: Polly Robinson
Keep the varnish in a warm area before using it, so it flows well and is easier to work with.
Thin layers of varnish that you build up are key to a good finish. Varnish will easily run if you try and put too much on at once.
It’s worth investing in a good varnishing brush. You should be able to find one in your local hardware shop but ensure it is a non-bristle dropping brush.

Varnishing the gunwale. Always use a good quality brush for a bristle-free finish. Credit: Polly Robinson
It’s infuriating after you’ve applied a beautiful varnish to find you’ve left brush bristles all over the boat.
The epoxy should have been sanded up to 240-grit, cleaned with meths and allowed to dry as before.
- Mask off any areas where the varnish meets the paint. This stops the varnish from running onto the paint, especially important if using a tinted varnish and a light coloured paint.
- Some varnishes may need thinners, check your instructions. The varnish I was using did not require thinners unless being used on bare wood.
- Decant some varnish into a clean plastic container. If you were using thinners you would add them at this stage.
- Dip the tip of the varnish brush into the decanted varnish, and wipe off any excess using the rim of the container. You want a very light amount on the brush so don’t overload it. Thin layers are key to a good finish.
- Brush the varnish slowly along the panel. If the brush runs dry then re-dip into the varnish, but be very careful to not overload the brush. Then come back against the direction you have applied the varnish.
- Start the next pass of varnish, slightly overlapping that you’ve just applied, which is called the wet edge.
- I like to work along the boat one panel at a time. Because we are varnishing a plywood-epoxy boat we do not need to worry about grain patterns, so I find working one panel at a time to be the most methodical.
- If you miss a small spot don’t be tempted to go back over it at this stage. Finish the first coat and then catch it on the second coat.
- Once the varnish is dry, lightly sand with 300- to 400-grit paper and then repeat the steps above, working slowly and methodically. The time between coats will vary with brands, so do check the tin.
- You will need to apply a minimum of four coats. The more the better, up to around 10 coats.
Maintaining paint and varnish
Paint and varnish do need maintenance to keep them looking their best.
Surface scratches are unavoidable, but you can add brass rubbing strips to the bottom of the hull if you’ll be launching somewhere particularly rocky.
At the end of the season, giving the boat a light sand will get any surface scratches out and a fresh coat will keep the boat looking smart.
Painting and varnishing a boat: step by step

Credit: Polly Robinson
1. International Watertite applied to any ‘low’ areas after fairing the hull. Note masking tape on the topstrake ready to protect it from the undercoat.

Credit: Polly Robinson
2. The sanded boat ready for painting. You can see how the epoxy appeared ‘milky’ after sanding.

Credit: Polly Robinson
3. Here, the first coat of undercoat has been applied. You can see it’s patchy in places and requires a second coat.

Credit: Polly Robinson
4. Applying the second coat of undercoat – it appears patchy when wet but dries to an opaque finish.

Credit: Polly Robinson
5. Applying the topcoat, one panel at a time using a roller, followed immediately by a ‘tipping off’ brush.

Credit: Polly Robinson
6. Overhead view showing the boat with the first application of topcoat.

Credit: Polly Robinson
7. Final topcoat applied to the hull. Once this is dry the boat will be ready for applying varnish to the upper lapstrake.

Credit: Polly Robinson
8. You can see the left hand side of the bowseat has had fresh varnish applied, and the line where we have varnished up to. The next brushful will be applied overlapping this.

Credit: Polly Robinson
9. Getting started on varnishing the topstrake. A head torch is a good way to see where you’ve varnished so far and to ensure you’re not missing any spots.

Credit: Polly Robinson
10. Work on one panel at a time to ensure a thin, even coat of varnish. Be sure to take up just a small amount of varnish on the brush each time to avoid runs.

Credit: Polly Robinson
11. Applying a first coat of varnish to the gunwales. See how the varnish turns the ‘milky’ sanded epoxy to a satisfying bright, shiny finish.

Credit: Polly Robinson
12. With the final of many coats of varnish applied to the dinghy inside and out it’s job done!
Enjoy reading Painting and varnishing a boat: how to get the perfect finish?
A subscription to Practical Boat Owner magazine costs around 40% less than the cover price.
Print and digital editions are available through Magazines Direct – where you can also find the latest deals.
PBO is packed with information to help you get the most from boat ownership – whether sail or power.
-
-
-
- Take your DIY skills to the next level with trusted advice on boat maintenance and repairs
- Impartial in-depth gear reviews
- Practical cruising tips for making the most of your time afloat
-
-
Follow us on Facebook, Instagram, TikTok and Twitter