
Take the stress out of the big day with practical tips from Practical Boat Owner's Ali Wood

Boat launch checklist: all the jobs you need to do before getting on the water
The RNLI’s top call-out at this time of the year is due to machinery and equipment failure.
“We would encourage boat owners to be prepared by making sure you have your engine and equipment serviced regularly,” advises the RNLI’s water safety manager, Sam Hughes.

Boat launch checklist: Have you done an oil change?
“Before heading out, check your belts, oil, filters, bilges, coolant, strainers, air filters and seacocks. It’s important to make sure you check your fuel too – often we see people who have run out of fuel or have contaminated fuel. Ideally, carry spares and tools for small repairs you can carry out yourself.”
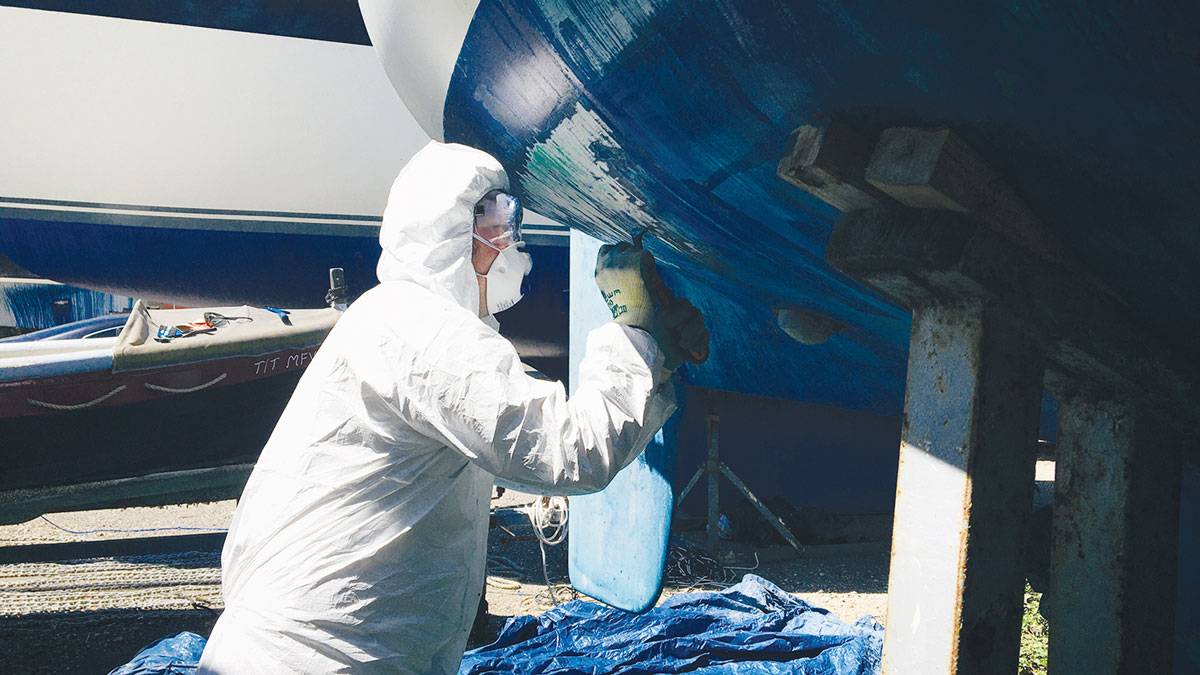
Hopefully, by now, you’ve done the big winter maintenance boat jobs – things such as antifouling and engine service, replacing anodes and skin fittings, cleaning the water tanks and checking for wear and tear.
The following are some more pointers to ensure a safe and fun launch day.
Boat launch checklist: before hitting the water
Dewinterising the engine
Mechanical failure is the single biggest cause of RNLI call-outs to yachts and motorboats, accounting for nearly 40% of all lifeboat launches.
Hopefully, your engine has been serviced over the winter.
Replace the raw water pump impeller if you’ve not already done so and replace or reinstall any engine belts you may have removed.
Check for signs of leaks and inspect hoses and belts for damage. Are the oil and coolant levels topped up?

Boat launch checklist: Have you serviced your outboard?
Check stern glands for leaks and grease where necessary. Examine filters, strainers and particularly water separators in fuel lines.
Always keep a copy of your engine’s user guide on board (if you’ve lost it you can probably download one online).
If you feel you need more training on engine servicing, why not enrol on the RYA’s diesel engine maintenance course? The RYA Diesel Engine Handbook is also a great resource.
And don’t forget PBO’s own series of videos with our engine expert Stu Davies and his wife Laura on the Project Boat’s Volvo MD2020 engine.
Fuel tank check
Check the fuel tank for condensation. If you have a drain plug on the tank, open it at least once a week to check for water.
You might also consider fitting a Diesel Dipper or fuel polishing system which removes sludge and water.
If you see any evidence of diesel bug, you should treat it and remove the water and organic matter before you start your engine.
Alternatively, empty and steam-clean the tank.

Boat launch checklist: Check for water and diesel bug in the fuel
If your fuel filler cap is leaky, replace it as this is a common way for water to enter the fuel.
PBO’s marine surveyor Ben Sutcliffe-Davies experienced this problem on his own boat and explains how to tackle it on his YouTube channel, The Surveyor’s Notebook.
Now it’s time to fill up the tank with fresh diesel.
Be sure to use a fuel additive such as Marine16 Diesel Fuel Complete.
Batteries and electronics
Make sure your batteries are fully charged, and that all electronics are working. You may need to top up lead batteries with de-ionised water.
Marine electrician Adam McMenemy says that spring is the time of year when he collects dead batteries from boats.

Boat launch checks: Ensure your batteries are fully charged
Ideally, over winter you’ve been charging and exercising your batteries as they don’t like to be left permanently on-charge or without charge.
“Make sure everything on board is working,” advises Adam. “Switch on all your instruments and lights, which can suffer from the damp and cold. You may need to change a bulb. Most importantly, check the bilge pump is working.”

Boat launch checks: Marine electrician Adam McMenemy recommends having a box of spare fuses
It’s a good idea to clean your bilges thoroughly before launch. Having dry bilges means you’ll be better able to trace any leaks.
Through-hull fittings
If you removed any hoses, check these are now reattached and double clipped, and that your seacocks are closed but accessible – along with any skin fittings and anything else that might leak when you get afloat.

Boat launch checklist: The hose needs to be refitted to this seacock before the boat enters the water
It’s a good idea to have wooden bungs kept near through-hull fittings for use in an emergency.
Antifouling and lift-point
Are your lift-points clear? Your yard will have a good idea where these should be, but they will vary from boat to boat.
You can buy new stickers online if your old ones have peeled off.
If you have silicone-type antifouling the hull will be slippier than usual – mention this to the marina or yard so they can take adequate precautions when lifting.
Safety equipment
Is your boat’s safety equipment up to date, and do you have a separate grab-bag, if needed, should you need to evacuate?
Check safety harnesses, ensuring you have one for each person on board.
If you’ve removed lifebuoys, reattach them now, with a long floating line if appropriate.

Boat launch checklist: Is your danbuoy and MOB device ready for use?
At night an automatic light attached to the lifebuoy could be a lifesaver. A tall danbuoy is also useful for marking a man overboard (MOB).
World Cruising Club publishes an excellent list of safety equipment required for participants of its offshore rallies.
This is a useful ‘best practice’ list for any sailor, though some items such as sat comms systems and liferafts may be out of budget for your average coastal cruise.
You can download it here.
Adlard Coles’s Pass your Yachtmaster also has this comprehensive safety kit checklist
- Lifejackets – one for each crewmember
- Safety harnesses – one for each crewmember
- Lifebuoys x 2
- Danbuoy
- Buoyant automatic light
- VHF with DSC alert, with position fed from GNSS
- Consider EPIRB/PLB
- Consider personal AIS for locating a person overboard
- Deep boarding ladder, consider using a lifting tackle led to a winch
- Liferaft
- Flares – four red rockets, four red hand flares, two orange smokes, two white flares or if vessel is under 13.7m and not commercial, and EVDS
- Fire extinguishers (1.5kg) x 2
- First aid kit
- Fire blanket
- Waterproof torch, floodlight
- Radar reflector
- Foghorn
- Bilge pumps x 2
- Bucket on a lanyard
- Bailer for dinghy
- Gas detector
- CO detector
Lifejackets
If you haven’t already done so, now’s the time to service your lifejackets.
RNLI lifejacket clinics, which offer advice, have found that a large proportion of lifejackets brought in would not have worked in an emergency.
“Surprisingly many boat owners don’t check their lifejackets,” says Sam Hughes of the RNLI. “Often these have out-of-date firing heads, rusty and corroded CO2 canisters or have even been fired which means they might not work when you would expect.”

Boat launch checklist: Ensure you’ve serviced all lifejackets
Your lifejacket manufacturer can advise where annual servicing can be done.
In between servicing, you should also check your lifejacket inside and out for signs of wear and tear and that the gas bottle isn’t corroded.
Don’t forget the harness, buckle and crotch straps. Remove the cylinder and auto-inflation mechanism and orally inflate the lifejacket.
Leave for 24 hours to check for leaks. If it loses pressure it’s probably at the end of its life – either replace it or have it checked professionally.
Don’t forget to re-arm and repack it according to the manufacturer’s instructions.
Flares
Make sure your flares are in-date. Yachts above 13.7m and smaller commercial vessels are legally required to carry flares.
However, if your vessel is less than 13.7m, you might wish to consider complementing or swapping flares for electronic visual distress signals (EVDS), which use bright laser lights to show your position to rescuers.
Although these have a greater range and duration than red flares, EVDS aren’t yet recognised as an official international distress signal, so should only be used to alert people already looking for you.
You may need to check requirements outside of the UK. Where flares are carried, ensure they are still in date.
The RYA’s stance is that there are numerous modern methods of distress signalling – such as a VHF/DSC radio, EVDS, AIS, EPIRBs, PLBs and SART.
These provide more reliable, accurate and timely alerting and location methods without the inherent risk involved with the use of pyrotechnics.
Radio
Check your ship’s VHF radio and your handheld VHF radio are both working and charged.
Ideally, at least one of these will be a DSC-equipped radio, which will transmit your location in an emergency.

Boat launch checklist: Ensure your radio and comms equipment is charged and working
This requires an operator’s licence, a ship’s portable radio or ship’s radio licence (free online in the UK) and a Maritime Mobile Service Identity (MMSI) number, which comes with the radio licence.
First aid kit
Is your first aid kit fully stocked? You may need to replace items such as painkillers, plasters and seasickness tablets. Check the expiry dates too.
A book with first aid instructions, including mouth-to-mouth resuscitation and how to treat burns and hypothermia is a good idea.
Reeds Nautical Alamanac and the PBO Small Craft Almanac both contain good sections on first aid.
Many offshore cruisers carry the Ship’s Captain Medical Guide by the Maritime and Coastguard Agency (MCA).
MOB recovery
If you’re doing a passage, familiarise your crew with your man overboard recovery plan – choose a recovery device suitable for your vessel and make sure everyone on board knows the plan and has practised it.
A laminated note taped to the wall near the VHF is a good idea to remind crew how to do a Mayday, citing the vessel’s name, call sign and MMSI number, and other relevant details.
If you have a liferaft, ensure this and the equipment inside it has been serviced.
Dinghy
Don’t forget to put your dinghy back on board if it’s been removed for the winter.

Boat launch checklist: Is your inflatable dinghy in good working order?
If you’ve not done so already, pump it up and check for wear and chafe.
If the dinghy is damaged, you may still be able to fix it.
Outboard
Has your outboard been winterised? Fuel older than six months needs to be replaced.
Plan ahead
Let your insurance company know the date you plan to have your boat re-enter the water, in case this affects the policy.
If you have marine breakdown cover such as Sea Start, check it’s not expired.
The same applies to any navigation software such as Navionics – make sure that hasn’t expired or is due for an update.
Boatyards and marinas get busy in the spring, especially those where access is tidal dependent.

Boat launch checklist: Advise the yard before lifting if
you have silicone antifouling
Check the tides, particularly if you’re going on to do a passage, and book your slot as early as you can.
Ideally, you don’t want to be in a rush to leave the pontoon.
It pays to stay moored up while you run the engine, check for leaks, switch on the instruments and check the batteries are charging.
A conversation with the harbourmaster, marina staff or other boat owners is a great way to start planning a trip.
Local knowledge is priceless, though if the weather gods are not on your side, and no temporary moorings are available, don’t be afraid to rearrange your launch date.
You’ve enough to worry about without storm planning!
Onward journey
Make a pilotage plan for your onward journey, making a note of hazards, tides, channel markers, and any challenges such as locks or bridges that may require access.
Note down the phone numbers and VHF channels for relevant shore stations, and ensure fenders and lines are easy to access.
Ensure you have your paper and/or electronic charts to hand and that they’re updated.

Boat launch checklist: A waterproof case allows you to keep a paper chart in the cockpit
Don’t leave this to launch day when marina wifi may not be available and downloads can take a considerable amount of faff and looking up long-forgotten passwords!
Do you need to refresh yourself with the collision regulations? If so, see PBO’s series of videos with RYA examiner James Stevens.
Swinging mooring
Are you going to a swinging mooring? The most common cause of boats breaking away from moorings is the failure of rope bridles.
Check yours thoroughly, as well as your deck fittings, which will be subjected to high forces.
Boat launch checklist: Launch Day
Don’t be an RNLI statistic. Sam Hughes advises, “Before heading out onto the water always make sure you are prepared; you’ve checked your boat and equipment, you know the forecast weather and tides, you’ve got a means of calling for help and that everyone on board wears a lifejacket.”
Patching and slings
If your boat’s been chocked and there are patches that still require antifouling, you may be able to get to them when the boat’s lifted.
You could ask the yard to keep the boat in slings overnight or the weekend if they’re not too busy so you can allow the right drying time between coats.

Boat launch checklist: This last patch of antifouling
was dealt with on launch day
When the boat is lifted onto slings, it’s also a good opportunity to check the keel for any movement or play, advises marine surveyor Ben Sutcliffe-Davies.
Hopefully, you’ve already checked the keel bolts internally and the hull-to-keel join externally for any sign of corrosion or cracking.
If you do spot any red flags, delay launch and seek professional advice.
Trailers
If you’re delivering your boat by trailer, don’t forget to get the trailer serviced.
Just like the wheel bearings in your car, those in your trailer are essential for friction-free movement.
If you don’t get them serviced, water can make its way into the bearing and if left untreated it can seize.
Continues below…

Boat maintenance: jobs to tackle over the winter
Now’s the time to tick-off those jobs you’ve been putting off all season and get a head-start on the spring…

Maintenance on a boat: 71-point skipper’s checklist
Make sure your boat is ready to go back in the water with Practical Boat Owner's comprehensive guide

Battery maintenance for boat owners: How to look after your boat batteries
For all but the smallest and simplest of craft a reliable supply of battery power is essential to keep both…
Antifouling: Everything you need to know
Here’s PBO’s guide to preparing for, choosing and using antifouling paints
The National Trailer and Towing Association (NTTA) recommends an annual service.
Also, don’t forget to make sure the registration number on your lighting board matches your car.
If your boat has a bung or drain plug, don’t forget to put it back in!
On-the-water checks
When your boat finally touches the water, be sure to go down below and check for water ingress.
Check all skin fittings and seacocks for leaks. Turn off the automatic bilge pump until you’re sure that the boat’s dry (though, of course, you’ll have checked the pump is working beforehand, in case it’s needed!).

Boat launch checklist: The yard will reattach the stays but you may need to tension them
If your mast has been down, the boatyard will put your rig back up but they won’t necessarily tune it.
You may need to tension the shrouds and set up the mast rake. If your mast is keel-stepped, make sure the gasket at deck level is secure and fully watertight.
Radio check
Check your radio is working, though note the Coastguard should not be a first resort as this ties up the air and increases operator workload.
Marinas, other vessels and National Coastwatch Institution shore stations can provide a radio check on Ch65.
For example: “Rame Head NCI, this is vessel Maximus. Radio check, please. Over.”
It’s also worth downloading the RYA’s free SafeTrx app so you can let friends and family know where you are, share your trip, photos and gain quick access to emergency services.
Engine check
The RNLI publishes an excellent set of instructions for engine checks which you can download.
Check the propeller is clear of anything that might foul it before starting then immediately after starting check that there is a good flow of water from the exhaust pipe – or cooling water tell-tale in the case of an outboard.
Allow the engine to warm up so you can check that it will tick-over smoothly before setting off.
Check for any leaks in the engine water pump.
Inboard and outdrive checks from the RNLI

Credit: RNLI
Pre-start checks
- Bilge blower: if you have a bilge blower or engine room extractor fan, run it for a few minutes before starting the engine.
- Visual check: check belts and hoses for cuts, splits or fraying, and look out for oil or coolant leaks.
- Fuel: make sure you have enough for your intended trip, plus a reserve of about 20% of the tank’s capacity, and make sure the fuel tap is open.
- Fuel filter: some boats have a transparent water separator/filter in the fuel line. Inspect the bowl for water or dirt, and drain off any visible contamination.
- Engine oil: check the engine oil level with the dipstick, and top up if necessary to keep the level between the ‘max’ and ‘min’ marks.
- Gearbox oil: check the engine oil level with the dipstick. NOTE: Some gearbox oil levels can only be checked with the engine running. Many gearboxes need special oil: engine oil will not do!
- Raw water filter: shut the cooling water seacock; remove the filter element and clean it if necessary. Replace the element, screw the lid back onto the filter body, and open the seacock.
- Fresh water level some engines have fresh water cooling systems as well as raw water. Carefully remove the header tank cap, and top up with water/antifreeze mixture if necessary to bring the level within about 50mm of the top. Replace the header tank cap.
- Battery switch: turn the battery switch on before starting. Do not switch it off while the engine is running.
- Stern gland greaser: boats with ‘traditional’ transmission systems have stern gland greasers. Give the cap or handle one full turn.
Other checks
- Hydraulic fluid: if your boat has an outdrive engine, trim tabs, or power steering, check the level of the hydraulic fluid in the hydraulic reservoirs and top up if necessary.
- Outdrive leg: if your boat has an outdrive engine, check that the leg is clear of weed, rope, plastic bags, etc and is in the fully down position.
- Immediately check there is a good flow of water from the exhaust pipe or cooling water tell-tale.
- Allow the engine to warm up so that it will tick-over smoothly before setting off.
- Download this and other safety leaflets via the RNLI.
Boat launch checklist for wooden craft
A wooden boat that has been out of the water for a long time will leak when put back in as the wood swells up. This is a process known as ‘taking up’.
A boatyard that’s familiar with wooden vessels will hopefully allow you to leave the boat in slings on launch day as you stand by with a pump.

Wooden boats need extra care when taking-up
Larger boats with heavy planking might need a more thorough soaking before launch day.
On the excellent blog diy-wood-boat.com, builder of wooden boats, Mike, has the following tips:
- Before launching, clean the bilge to ensure no detritus can get caught into the seams and prevent them closing.
- Don’t be tempted to ram extra caulking into any cracked seams. Too little caulking may cause leaks but that is better than too much caulking, which could result in cracked frames and buckled planks.
- If the boat’s on a trailer, you can give it a hose down, but only enough to cover the bottom to allow the garboards to swell (you don’t want to overload the trailer).
- To avoid overloading the boat, line the inside with wet sacking or rags.
- Hang a curtain of plastic sheeting around the outside of the hull to retain the moisture, then use a garden sprinkler, spraying under the hull.
- Filling any suspect seams with soft bar soap will slow the ingress of water. As the seams close the soap will be squeezed out, dissolve and wash away during the taking up.
Enjoy reading this article?
A subscription to Practical Boat Owner magazine costs around 40% less than the cover price.
Print and digital editions are available through Magazines Direct – where you can also find the latest deals.
PBO is packed with information to help you get the most from boat ownership – whether sail or power.
-
-
-
- Take your DIY skills to the next level with trusted advice on boat maintenance and repairs
- Impartial in-depth gear reviews
- Practical cruising tips for making the most of your time afloat
-
-
Follow us on Facebook, Instagram, TikTok and Twitter