
Mike Attree explains how he fixed his engine's sea water pump, and the part-replacement lessons he learned in the process.
Before we bought a yacht, I hadn’t realised that boat parts wore out so quickly, much less my engine’s sea water pump.
For example, I was quite surprised to discover that you had to attach a fresh lump of metal to the underside of the hull every year because last year’s lump had disappeared.
Vanishing antifouling paint was also a surprise but, in this case, you had to sand down any old residue before applying the new layer. That was no fun at all…
Boat engine parts also seemed to suffer from rapid wear. Every seven years (regardless of engine hours), you had to change the saildrive diaphragm, and as this involved moving the engine, the work was very expensive.
Apparently, getting eight years of use from our cast iron exhaust elbow was good going, and when it needed changing, I wondered whether a stainless steel elbow would last even longer; however, as ours died from coking-up rather than corrosion, maybe a stainless steel version wouldn’t have been much better.
Eventually, I realised that the only way to cope with these irregular, but big-ticket items, was to estimate an average annual expenditure; then save enough in the ‘good years’ to cover the more expensive bills such as sails.

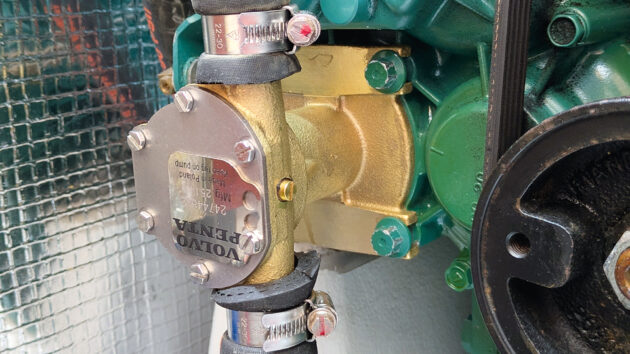
Sea water pumps
Engine sea water pumps are definitely a wear item.
You’d think that it would be possible to design a pump to last the life of the engine, but no, they wear out and fail long before that; invariably at the most inconvenient moment.
Our engine had only done about 500 hours before the pump started to drip from a hole on its underside (thoughtfully, a drain hole had been put there specifically to draw your attention to a failing pump seal).
I managed to change the pump’s water-side lip-seal without actually removing the pump from the engine, using an old screwdriver bent at right angles as a ‘prodder’; then congratulated myself on having ‘sorted the pump’.
Incidentally, the old seal’s ‘garter spring’ had almost completely rusted away as it was made of plain steel, whereas the replacement had a stainless steel spring.
Who’d have thought that a mild steel part constantly immersed in sea water would corrode?
Was it simply wilful ignorance, or just a bad case of penny-pinching?
Anyway, when your sea water pump starts to leak, be sure to change the lip seal as soon as possible, as a broken seal can score the pump’s shaft, leading to a far more expensive repair than just the cost of a new seal.
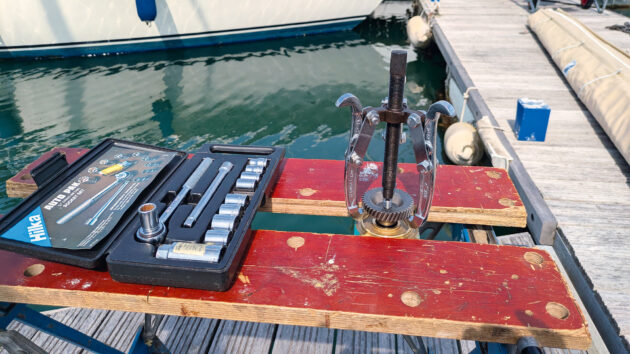
Pulling the drive gear from the original pump. Photo by Mike Attree
Pump replacement
Fast forward a few hundred engine hours, and this time the pump began to drip oil through its ‘tell-tale’ hole.
Knowing that you can’t replace the oil-side lip-seal without removing the pump from the engine, and given the likelihood of wear on other parts of the pump (eg seals, shaft, bearings, cam and cover), I decided to replace the whole pump.
I could have chosen to refurbish the original, but a Volvo rebuild kit can cost more than £200, depending on what needs replacing, whereas a pattern-part pump is only about £250.
Fitting a new pump would mean no downtime for the boat, and I’d be able to strip and rebuild the old pump at my leisure, ending up with a spare pump.
The replacement pump quickly arrived, and I set off for the boat with the new pump, a portable workbench and a heavy-duty gear puller (as the original pump’s drive gear must be removed and transferred to the new pump).
The gear sits on a plain tapered shaft without splines or keyways, and relies entirely on a tight fit to prevent slippage; I’d been warned that they can be a bit of a pig to remove, and that the job is not for the faint-hearted.
I clamped the pump firmly in the workbench, and slowly wound the gear puller tighter and tighter, all the while tapping away at the pump shaft and gear with a hammer; it wouldn’t budge.
I then enlisted the help of a fellow pontoon dweller, and between us, we gave the puller the beans (probably around 100Nm); the gear still wouldn’t come off.
Starting to get worried, we stopped for a tea break, and were actually talking about taking the pump to a local machine shop when there was a terrific bang, and the gear popped off the shaft all by itself.
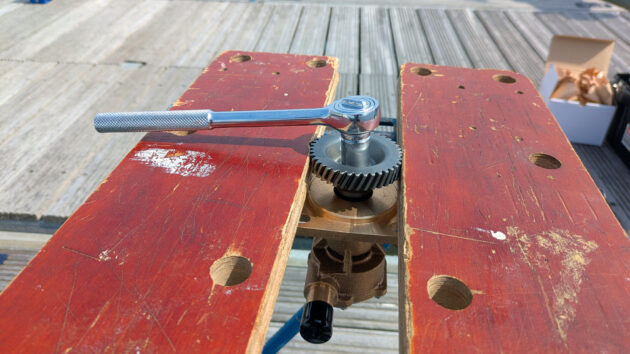
Mike had to attach the gear to the new pump before fitting it to his engine. Photo by Mike Attree
Work on the sea water pump begins
Suitably encouraged, I put the gear on the new pump and tightened its securing nut down to the recommended 23 NM, then fitted the pump to the engine (complete with a new O-ring), and re-connected the hoses.
Full of confidence, I fired up the engine, but unfortunately, and to my dismay, I was greeted by a loud rattling noise from the pump; plenty of water was coming out of the exhaust, but clearly something was not right.
Interestingly, the rattling sound changed as the pump’s attachment bolts were loosened and tightened, but it never went away completely. I contacted the pump supplier about the problem.
Photos were duly sent, followed by a protracted dialogue about tolerances and dimensions, and eventually, the supplier said he would contact the pump’s South East Asian manufacturer.
Sadly, I never did get to hear from the manufacturer, but when discussions with the supplier arrived at the customary ‘we’ve never had a problem before’ stage, I returned the pump.
I ordered a different pattern-part pump (advertised as specifically for our engine) from another supplier, and again it was delivered promptly.
This time, strangely the pump was a different shape to the original, and when I contacted the supplier, I was told that the pump was a type used on older Volvo engines, and had never originally been fitted to a D2 engine like ours.
At this point, having lost all faith in pattern parts, I gave in and ordered an extremely expensive genuine Volvo pump.
With a somewhat lighter wallet, and after another exciting gear-pulling session, we were soon motoring again.
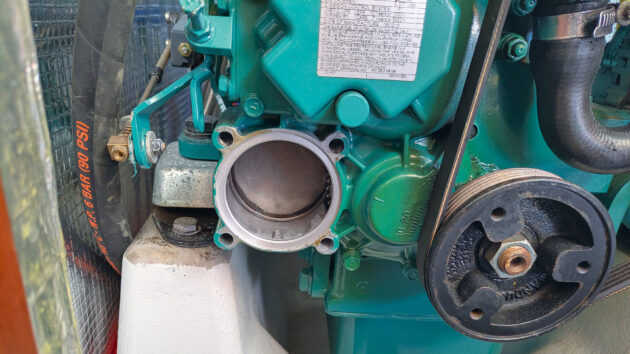
The pump housing, drive gear just visible. Photo by Mike Attree
The takeaway
After my experience with sea water pumps, I’m now somewhat wary of pattern parts, and in future will probably only use them for service items such as seals, bearings and filters.
Hopefully, if the parts are sourced from reputable manufacturers, they should at least be equivalent to the manufacturer’s ‘badged’ parts.
However, when I need specific, non-generic components, I will definitely consider paying the extra for the genuine article.
A last minute lesson learned
Unfortunately, that wasn’t the end of the sea water pump saga, as when I came to change the pump’s impeller, one of its blades was missing.
On examination, I noticed that the impeller wasn’t in fact a Volvo part (although it had been fitted inside the Volvo pump), and it felt a lot less pliable than previous impellers I’ve removed after a similar amount of use.
I’ve never actually had an impeller fail before, and I put this down to using genuine parts, and changing the impeller every year.
This time, was I unlucky enough to get a faulty impeller, or had the pump been fitted with an inferior pattern part?
I guess I’ll never know the answer, but I have learned that even genuine spare parts need to be thoroughly checked before putting them into use.
Want to read more articles about sea water pump repairs?

A subscription to Practical Boat Owner magazine costs around 40% less than the cover price.
Print and digital editions are available through Magazines Direct – where you can also find the latest deals.
PBO is packed with information to help you get the most from boat ownership – whether sail or power.
-
-
-
- Take your DIY skills to the next level with trusted advice on boat maintenance and repairs
- Impartial, in-depth gear reviews
- Practical cruising tips for making the most of your time afloat
-
-
Follow us on Facebook, Instagram, TikTok and Twitter