
With a few practical woodworking skills anyone should be able to replace a plank on a carvel-built wooden hull, as Richard Johnstone-Bryden discovers
One of the beauties of a traditionally planked wooden boat is that each individual hull plank can be replaced if they lose integrity through rot, old age or accident, writes Richard Johnstone-Bryden.
The procedure should not be beyond the skills of most practical boat owners.
Here, Harry Morgan removes an old hull plank before cutting and fitting a replacement.
Hull plank repair: step-by-step

1. With filler picked away from the nail head and the copper rove ground off inside the hull, Harry uses a centre punch to drive the nail back through the hull plank so it can be extracted with a claw hammer.

A metal dolly held against the outside of the hull counteracts the vibration.

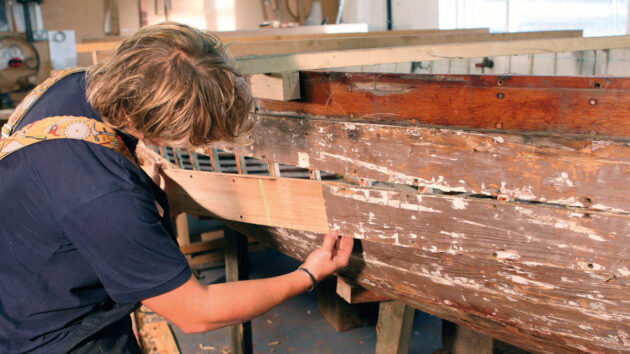
2. With the damaged wood cut away, the adjoining end of the sound plank also needs to be pulled away from the timbers.

3. The length of this adjoining plank is then marked up to ensure that the scarf joint will be over a timber to provide additional strength.

4. A wedge keeps the still-attached plank steady and away from the hull while Harry cuts it to length. He’s using a Japanese kataba saw, but a tenon saw will work too.

5. A smoothing plane removes the bulk of the wood required to form the inboard half of the aft scarf joint.

6. Harry now saws a straight edge at the aft end of the scarf. The idea is to create a bull-nosed edge to the outer part of the joint rather than a difficult-to-fasten feather edge. He cuts the rest of the joining surface away with a bull-nosed plane

7. A similar scarf needs to be cut on the inboard end of the forward plank. Again the plank is wedged out for stability, though Harry is using a smaller block plane because of the restricted working space between the inner face of the plank and the hull.

8. To determine the exact shape of the new plank, Harry nailed on a temporary spiling plank. He uses a dummy stick placed against the existing upper and lower planks to draw lines on the spiling plank – these will be transferred back to the new plank to determine its exact width and length.

9. The positions of the timbers are also marked on to the spiling plank and each timber is numbered so the plank can be pre-drilled for fastening later.

10. An alternative to a dummy stick is to use a set of dividers to measure the required width at each numbered frame. These measurements are then plotted out onto the replacement plank.

11. Using the spiling plank, Harry now plots the positions of the frames onto an overwidth 3⁄4in-thick larch plank.

12. Harry places the inboard edge of the dummy stick along the line on the spiling plank and runs a pencil along the outer edge to plot one edge of the replacement plank. He does the same for the other edge.

13. The plank can now be cut – slightly oversized – with a handheld circular saw, which gives a good, clean line.

14. A plane finishes off the edges to make the plank the exact width. After that it is run through a thicknessing machine so it exactly matches the thickness of the boat’s existing planks.

15. Scarf joints are cut on the ends of the new plank, and the edges are accurately trimmed to mate with those on the boat.

16. The moment of truth! The time spent marking up and accurately cutting the joint has paid off, as the two halves of the forward scarf fit together perfectly. This joint will then be glued and allowed to cure.

17. Having secured the forward scarf joint, wooden battens are used to clamp the plank in position along the hull so it can be permanently fixed with copper nails and roves.

18. Where the plank forms part of a sharp curve in the hull, a bridging batten is used: wedges are hammered beneath the bridge to force the plank into position.
Final fixings

The plank and timbers are then joined using copper nails and proves to complete the repair – (above) being demonstrated on a different job.

Boat wood: a complete guide for yacht owners
Boatbuilder and finisher Lyndon March explains which types of wood work best for different repairs and modifications on board

Painting and varnishing a boat: how to get the perfect finish
Kit boat builder Polly Robinson shares her tips for painting and varnishing a plywood-epoxy boat

The art of veneering: step-by-step
Face up to the task of applying veneer with the help of boatbuilder Tony Davies

How to make your own cockpit grate: step by step
Zoran Glozinic saves some cash by making a new cockpit grate for his yacht using redundant old wooden kitchen shelves
Want to read more practical articles?

A subscription to Practical Boat Owner magazine costs around 40% less than the cover price.
Print and digital editions are available through Magazines Direct – where you can also find the latest deals.
PBO is packed with information to help you get the most from boat ownership – whether sail or power.
-
-
-
- Take your DIY skills to the next level with trusted advice on boat maintenance and repairs
- Impartial in-depth gear reviews
- Practical cruising tips for making the most of your time afloat
-
-
Follow us on Facebook, Instagram, TikTok and Twitter