
Fancy building or restoring your own boat? Ali Wood takes a tour of the Boat Building Academy in Lyme Regis

What to expect to learn on a boat building course
Having spent the morning on the five-day boat restoration course, I was keen to know what’s involved in the 40-week boat building course, so asked tutor Matthew Law to give me a tour.
Matt began his career at Latham’s boatyard in Poole and moved to Lyme Regis in 2004 where he’s now one of the four instructors.
Joinery
Our tour started in the upstairs classroom where students begin by learning joinery.
Matt fished out some interesting pieces of wood – scarf joints, which I’d learned about that morning, and box joints.
It’s surprising just how many different joints there are. He showed me a drawer front dovetail joint – the tails of which you’d only see from the sides of the drawers.

Students on the boat building course start by learning joinery. This is a drawer front dovetail
For each joint there was a model, showing how the cuts are made; the pins, in this instance, starting with a slope, then cutting it away gradually top and bottom until you have the socket ready to receive the tails.
“Joints can be used to lengthen, widen and frame,” explained Matt. “Generally there’s a male and female element to each joint. But it’s unforgiving. As the great Jack Chippendale used to say, ‘I haven’t brought my putting-on plane today’. Woodworking is reductive; you use tools to take wood away. It forces discipline, and it teaches you about sawing.”
That said, it doesn’t always pay to be too cautious; dovetail joints need to fit straight off the saw.
Messing around with chisels afterwards is, according to Matt, a “mug’s game”.
Oars and spars
Next, Matt showed me a classic spoon-bladed oar. This exercise teaches the principles of going from square to round, and involves sculptural work too.
The students even have to make their own bollow planes for shaping it. It’s an important skill to learn because later the students will make spars.
To demonstrate the spar-making process, Matt showed me a prop with three pieces of wood: the first was square, the next had eight sides and the last 16.

A classic spoon-bladed oar. By making this, students on the boat building course learn the principals of going from square to round
The eight and 16 siding is marked out using gauges, but further flats are created by eye, until you simply round off the edges with a plane.
Conventional wooden masts may be solid (and relatively heavy), but a stronger, lighter alternative is a spar made up from staves.
I watched with surprise as Matt laid a spar on the floor, propped one end up and stepped on it. It didn’t even flex!
“This bird’s mouth spar has eight individual pieces, with the same grain orientation all around,” said Matt. “It’s lunatically stiff!”
Building boats
What’s nice about the course is that students help build and restore wooden boats, and some of them – who agree to pay for the materials – will actually go home with one.
However, no student works on just one boat.
They decide early on who the commissioning students will be, and which boats to build, as plans often have to be ordered from the US or a museum.

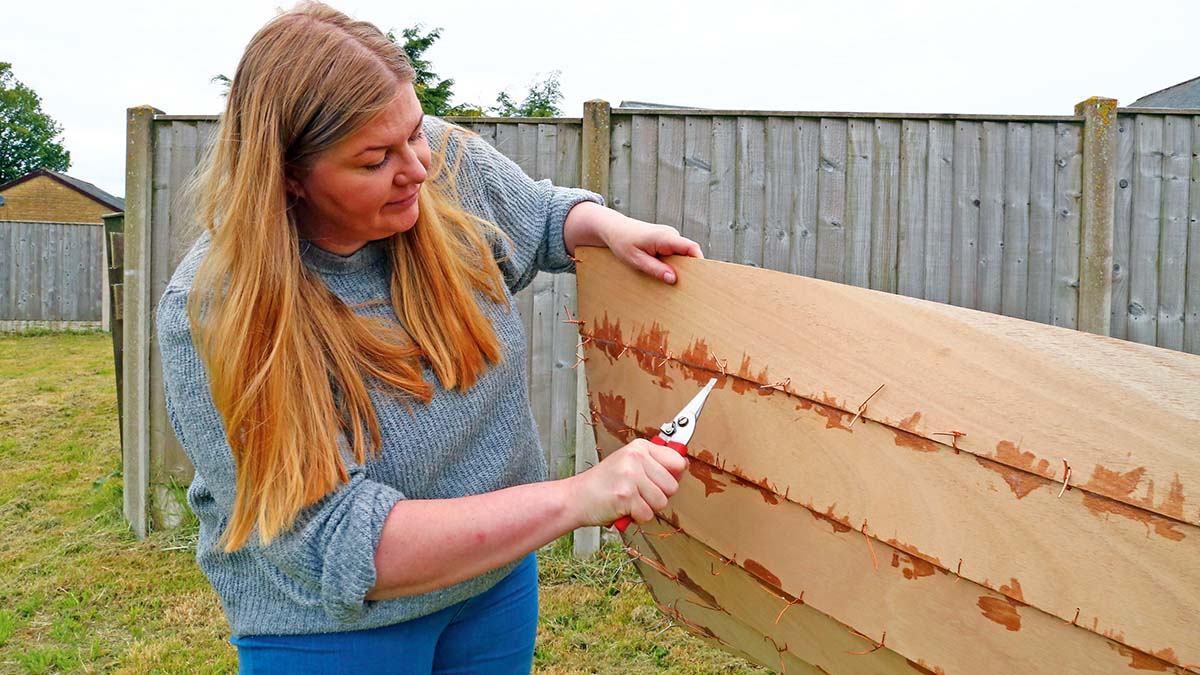
A student on the boat building course has experimented with decking on a stitch and glue dinghy
Sometimes boats are built from books so they’ll need to magnify a line drawing.
“We go for a mix of construction types,” says Matt. “Right now, we have carvel, traditional clinker, glued clinker, cold-moulded, strip-planked and a stitch-and glue method. The latter uses wide plywood panels, which only bend in certain ways; this gets you to a hull shape very quickly and then you can spend your time making it pretty.”
By weeks seven and eight the students are lofting the boats, which means they’re taking the lines plans and drawing them full-size.
Matt showed me a lofted pattern, which took up almost the whole length of the classroom. In the corner was a stitch-and-glue dinghy, which a student had used to explore deck construction.
Contemporary methods
Wooden boatbuilding today makes use of contemporary construction methods.
Matt showed me a piece of ply that had been crafted to simulate the different stages of building a plywood boat.
Continues below…
How to build a boat: Essential guide to building your first kit boat
You don’t have to be a boatbuilder to learn how to build a boat, argue Roger Nadin and Polly Robinson.…

Woodworking tools – a DIY boat owner’s guide to getting a professional finish
It’s not difficult to achieve a professional finish using woodworking machines and there are bargains to be had every day…

Boat wood: a complete guide for yacht owners
Boatbuilder and finisher Lyndon March explains which types of wood work best for different repairs and modifications on board
The bottom strip showed the raw wood, the next showed it coated with epoxy, then it was glassed and had peel ply added, then a fairing compound to fill the weave, and was sanded, primed and given a shiny topcoat.
“You don’t just build a boat and slap a coat of paint on it,” said Matt. “There are many intermediate stages, though not every stage would be appropriate for a conventional carvel or clinker boat.”
Right or wrong way up?
The majority of the ground floor was given over to boatbuilding, where there were several different boats being built.
The August 2022 intake moved down into the main workshop in January, and began setting up the building jigs, temporary moulds and backbone elements over which the hulls would be planked.
Matt showed me some oak jointed stems – one for a boat in progress and another which was submitted for the City & Guilds examination.
Most of the wooden moulds were upside down.

The moulds are made for upside down boatbuilding and finish at a central baseline
The reason for this is that they can be carried down to a common baseline, so when stood up you know they’re the right height.
Some boats are built the right way up, such as the 18ft Nick Smith launch Matt pointed out.
This was a traditional clinker design, to be planked in larch on steamed oak timbers, with a mahogany centreline structure, fastened with copper rivets.
“With clinker you have to plank from the keel to the sheer, so you can fasten as you go and you can see what you’re doing with the hammer,” said Matt.
Hot and cold moulding
We passed a cold-moulded boat, where the jig was battened longitudinally so the thin veneers stay in place during construction.
Cold moulding is a relatively modern construction type.
The first glued boats were ‘hot-moulded’ using adhesives such as Bakelite, a technique developed during World War II to assemble aircraft such as the Mosquito fighter.
However, this required a large autoclave (heat machine) to set the glue. These days adhesives cure at room temperature.
Matt showed me a restoration project – a Morgan Giles clinker-built dinghy.

This restoration project is a dinghy built by Morgan Giles, one of the great south-western boatbuilders, based in Teignmouth
Morgan Giles was one of the great south-western boatbuilders, based down the road in Teignmouth.
Bought by Frank Morgan Giles in 1920, the yard built over 800 vessels, which he designed, built and sailed with exceptional skill.
By the large window, where the winter sun flooded in, was what would be a cold-moulded lateen-rigged double-ender, drawn with a conventional engine installation but being fitted with an electric motor.
Another boat Matt pointed out would be glued carvel construction, which is far more technical than strip-planking.
“Some people say you can’t glue carvel,” he said. “Well, we do, quite often. The main thing is that once you’ve planked it, you can’t allow the moisture content to change so you have to seal it up as you plank it.”
For every boat there was a lofting nearby so students could continually check their progress against plans.
If the loftings needed modifying this could be done in the classroom next door.
Caulking
In a yard to the back of the workshop was a small demonstration carvel boat, so students don’t have to grapple with heavy 20ft planking.
Matt showed me where the planks had been hollowed out in order to bend onto the frames, and screwed and riveted on.
Historically boats were not always caulked, but built ‘close or tight seamed’ with no caulking or gap between the planks, especially so in the West Country.

Demonstration pieces showing the process of going from square to round
However, as the boats aged they were caulked to keep them water-tight, especially when dried out.
It was interesting to see the oakum (loosely twisted hemp impregnated with tar) used to pack or ‘caulk’ the seams.
This will swell up when wet, preventing water ingress.
However, it’s the linseed putty, used to ‘pay’ the seams, that provides the main waterproof seal.
GRP
Although the focus of the course is largely wooden boatbuilding, students do also learn about GRP.
On the floor in the sailmaking room, Matt showed me a bundle of mini GRP hulls.

The fibreglass City & Guilds assignment pieces by former students
These were assignment pieces by former students and consisted of a hand laid-up hull with a vacuum consolidated deck, bonded together.
Students work in an insulated Portakabin with an extraction fan to put these together, and afterwards they’re assessed on the quality of the finish.
Sailmaking
Modern sailmaking techniques are taught as part of the 40-week course, but anyone interested in traditional sailmaking – for example, hand-sewing in canvas and sewing in bolt ropes – can do that as a separate course.
Faux old cloth is used – it might look traditional but actually it’s polyester with waxed polyester thread.

The floor of the sailmaking room has been boarded over so sails can be pegged to it
The concrete floor in the sailmaking room will be boarded over so that sails can be stretched along its length and pegged down.
The sail making sewing machines have a ‘walking’ presser foot, to facilitate feeding long lengths of fabric when sewing the panels together.
Machine rooms
Although the course runs from 0830 to 1730, any students wishing to work after hours are encouraged to use the small machine shop, which includes a selection of small-scale drills, saws, planers, and disc sanders.
For larger scale work, students have access to the machines in the big machine shop, a huge loft stacked floor to ceiling with timber, and housing large planers and a big dimension saw.
Though there were lots of timbers, Matt explained that very few of them were for boatbuilding – maybe a dozen, compared to the 100 or so used by furniture-makers.

The big machine room is also where the timber is kept
“The palette of boatbuilding timbers is relatively small,” he said. “If you’re making a mast it will be spruce or Douglas fir. Hulls are often larch on oak.”
There’s a band of more yellowish wood, which Matt explained was tulipwood.
Not actually a boatbuilding material, but a good wood for teaching and assignments. It was what I’d used earlier when making a scarf joint.
We finished the tour outside, by Monmouth beach, a place I’d visited many times with the kids and where Victorian palaeontologist Mary Anning famously found fossils.
In fact, I’d found an exciting specimen here myself once – a likely prehistoric flint knife with scrape marks and chips.
Could that have been used for boatbuilding too?
I reflected on my find and how wonderful it is that five thousand years later, tool making is still happening on this very spot.
Enjoyed reading What to expect to learn on a boat building course? 
A subscription to Practical Boat Owner magazine costs around 40% less than the cover price.
Print and digital editions are available through Magazines Direct – where you can also find the latest deals.
PBO is packed with information to help you get the most from boat ownership – whether sail or power.
-
-
-
- Take your DIY skills to the next level with trusted advice on boat maintenance and repairs
- Impartial in-depth gear reviews
- Practical cruising tips for making the most of your time afloat
-
-