
When your boat’s mainsheet arrangement doesn’t quite do the job it’s not difficult to improve upon it yourself. Here’s how Bob Goode devised his own
In common with many yachts, my Jeanneau Sun Odyssey 32 had a bridle arrangement for sheeting the mainsail, using padeyes in front of the spray hood, writes Bob Goode.
This is undoubtedly cheap for the manufacturer and does at least keep the cockpit clear of lines when sailing.
It has some major drawbacks though: it is less than ideal for getting good shape from the sail and it is impossible for the person at the helm to reach if the wind has to be spilled in a gust.
A track-mounted mainsheet is the way to go, but if located ahead of the hatch it’s still impossible for the helmsman to reach.
One mounted across the cockpit is ideal from the sailing perspective but my wife, Anne, was dead set against this as it would ‘clutter up the cockpit’ for in-harbour lounging.
A compromise was needed, so I resolved to make a traveller that could be readily removed in harbour.
The Sun Fast version of the 32 has a track spanning the cockpit and several of the smaller Jeanneau yachts have a similar arrangement.

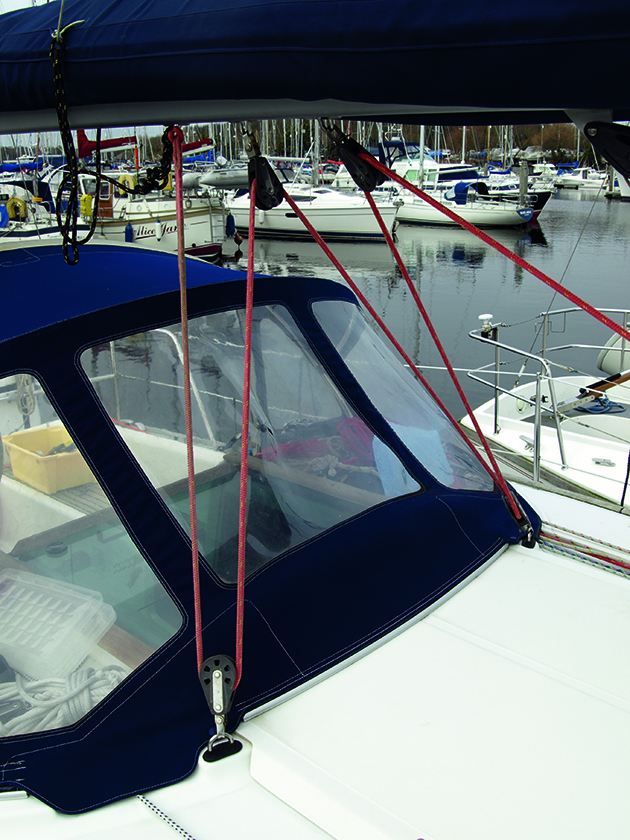
With a mainsheet bridle arrangement forward of the companionway hatch trimming is impossible from the helm. Credit: All photos Bob Goode
Close inspection of these revealed that none have any real reinforcement of the cockpit sides, which in any case are quite thick GRP. However, the fittings were placed carefully so that other structures behind offered support.
A little research soon came up with a piece on the Jeanneau owners’ website, where a New Zealand owner had used Rutgerson fittings to do exactly what I planned.
The Rutgerson gear even had an option of cast end plates to mount the track spanning the cockpit.
The only downside was the cost – nearly £300 for the castings alone.
Instead, I opted to use Harken gear to match the boat’s existing winches and have the brackets and backing plates custom-made in stainless steel – at half the price.
A word here on the selection of the track: most manufacturers produce ‘high beam’ versions of their track for use when spanning cockpits.
These are more expensive but are of a heavier section and engineered to carry the loads of an unsupported span.
Check with the manufacturer that the track will suit your sail area and cockpit span.
Harken publishes this data online and in their catalogue. If in doubt a phone call or email will quickly get the facts. I found all the manufacturers helpful during the initial planning stages.
Careful measurements were made of the cockpit sides, which are not vertical, and from these, I produced some working drawings.
These were given to the stainless steel fabricators, along with a short section of the track to ensure a perfect fit during manufacture.
As 8mm stainless steel drop nose pins would be used to hold the track in place, for simplicity I also used 8mm bolts for mounting the brackets though the GRP.
When correctly fitted the drop pins would not be taking any vertical load as this would be carried by the track bearing on the upper face of the bracket.
However, they would be carrying a horizontal load – hence the need for some fairly chunky ones.
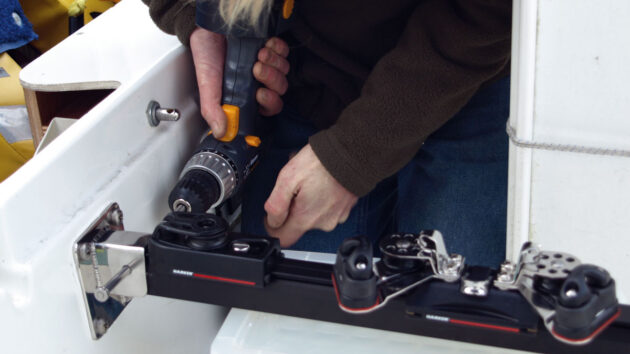
Having selected the best location with regard to the position of the wheel, I drilled a single hole to locate the first bracket.
I then cut the track to length and clamped it to the first bracket. I clamped the second bracket to the other end of the mainsheet track, and then took great care to not only measure the location of the second bracket but to ensure that it looked right from all angles by sighting against fixed lines such as that made by the base of the companionway.
Once the position was determined I drilled a hole and bolted the second bracket in place.
Now I could remove the track and drill the remaining holes.
After a final dry fit to check alignment, the plates were degreased and sealant added before I bolted them into place.
They were tightened lightly and then left for a couple of hours to allow the sealant to start to go off before further work. I used Nyloc nuts in the locker but, for a more pleasing finish, used dome nuts and spring washers in the aft cabin where they’d be seen.
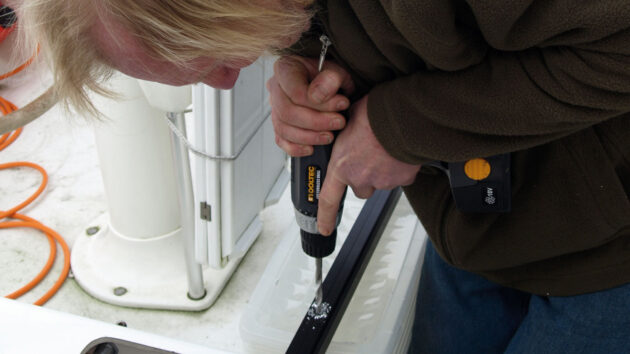
After a final tighten of the nuts I clamped the mainsheeet track back in place and drilled the holes through the track for the drop nose pins.
I drilled from each side using the hole in the bracket as a guide, before running the drill right through to check alignment.
I then removed the mainsheet track once more to clean up any burred edges.
The track ends were then secured according to the manufacturer’s instructions and the mainsheet blocks added.
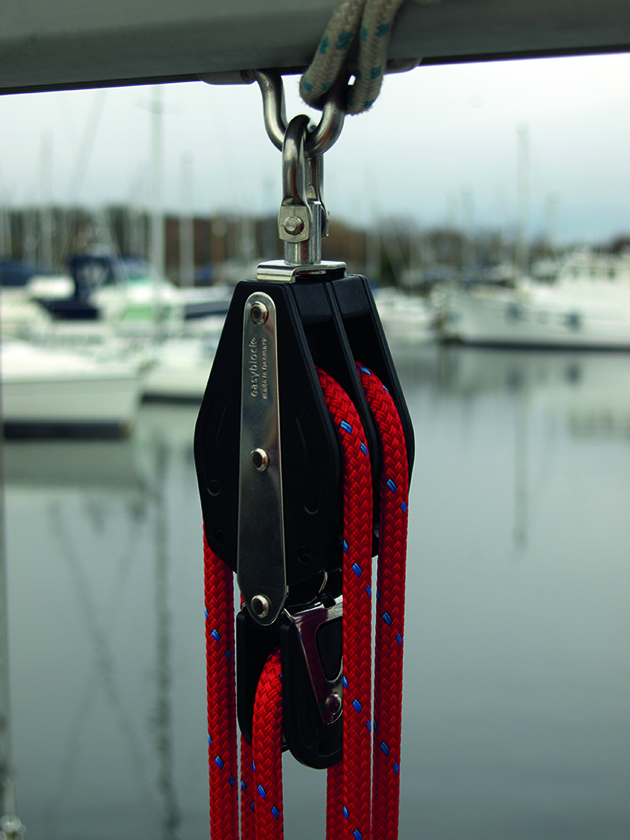
I opted for blocks by ‘Easy’ as these were half the price of the Harken equivalents.
The system has a double jammer on the lower block and gives the option of either a 3:1 purchase if both tails are hauled, or a 6:1 purchase if only one tail is hauled. A case of speed or ease – your choice!
The two ends were spliced to form a continuous loop for convenience (I did this myself as it really is a simple splice to make).
I fitted a Lewmar snap shackle to the lower block so that it can be quickly released and taken to the guardrail before removing the track.
The new mainsheert track has been a big success.
Sheeting the main for better shape and control is much easier from the helm, allowing the sail to be feathered down the track, or even dumped to maintain control in gusty conditions.
Anne likes it as the cockpit can be cleared in a matter of seconds once alongside.
On the downside there is a lot of rope in the cockpit – but part of the fun of a sailing boat is pulling the bits of string!
The skill level needed for fitting a removable mainsheet track
The design element relies on careful measurements with ruler, pencil and set square.
For the rest, it’s just drilling holes in the correct place and cutting the track square, all fairly straightforward stuff and well within the capabilities of most people.
Do take time to make sure that the proposed location is strong enough to carry the expected loads.
In my case, the mid-boom sheeting on the coachroof imposes roughly twice the load of an end-boom sheeting arrangement in the cockpit.
This mid-boom load is taken by two relatively small eyebolts bolted through the coachroof with no particular reinforcing structure below.
So this, combined with my inspection of the Sun Fast 32, gave me confidence that my proposed location would be plenty strong enough.
The total time to fit was around five hours from start to finish and included a break for a bacon and egg bap while the sealant cured.
Installing a mainsheet track: Step-by-step
1. The old, standard mainsheet bridle arrangement which I wanted to replace.
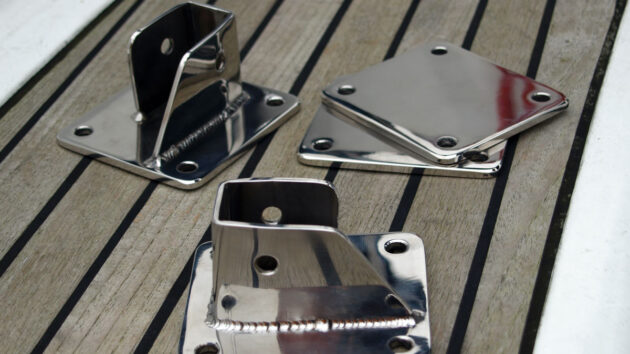
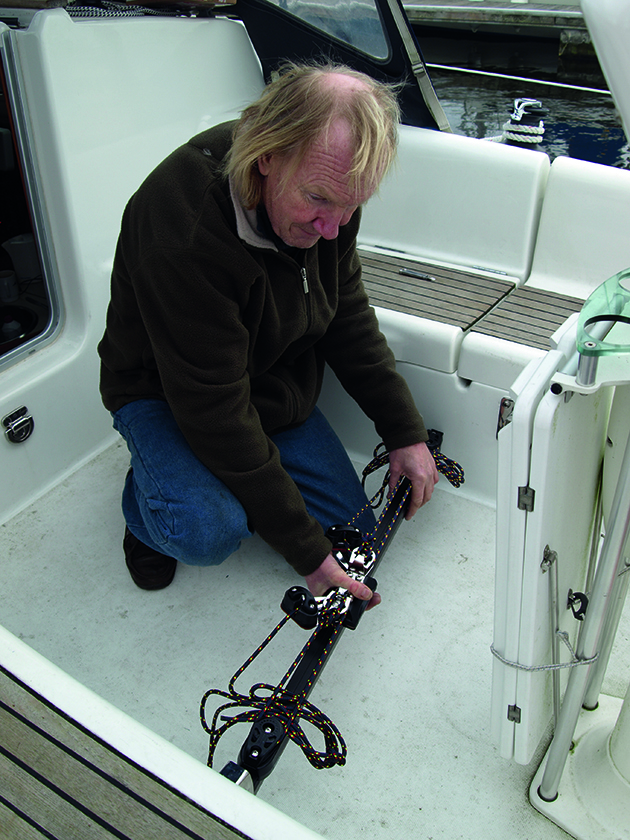
2. The handed pair of custom-made stainless steel end fittings and their backing plates.
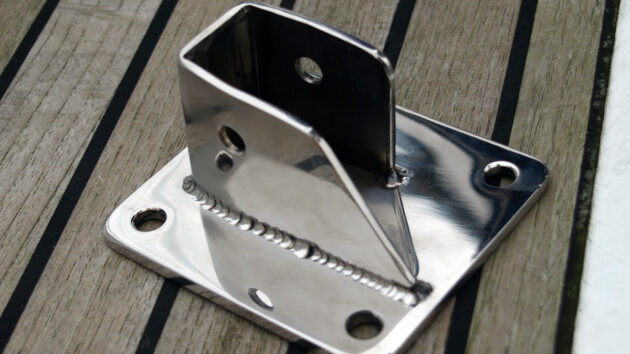
3. Close-up of one fitting. Note the cutaway on the far side to allow easier removal of the track.
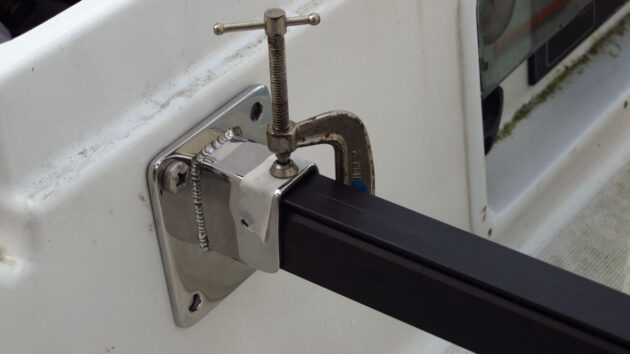
4. One bolt holds the fitting in place and a clamp secures the track while the other end fitting is located. Note how masking tape stops the clamp marking the fitting.

5. I used stacking boxes to support the track while the precise location was determined for the second end fitting.
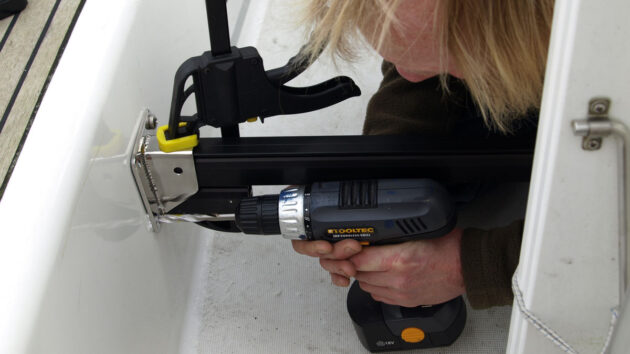
6. The remaining holes could then be started with the drill…
7…and finished off with the track removed to make drilling access easier.
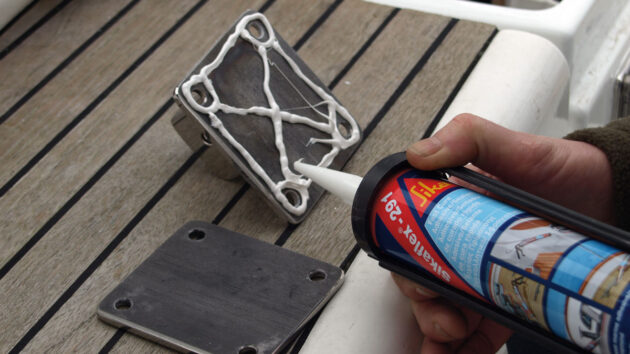
8. Degrease the fittings with methylated spirits before applying sealant.
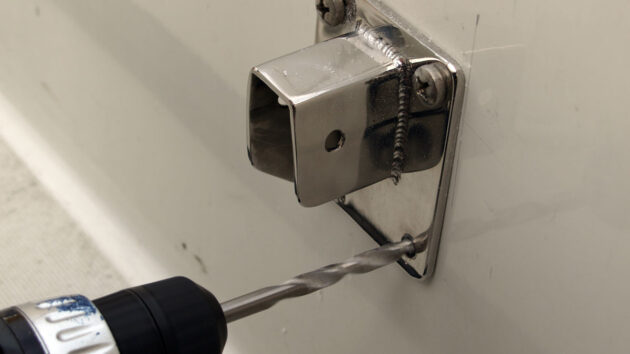
9. Here the holes are being drilled for the drop nose pins which hold the track in place.
10. Drilling the holes which are used to secure the Harken track end fittings

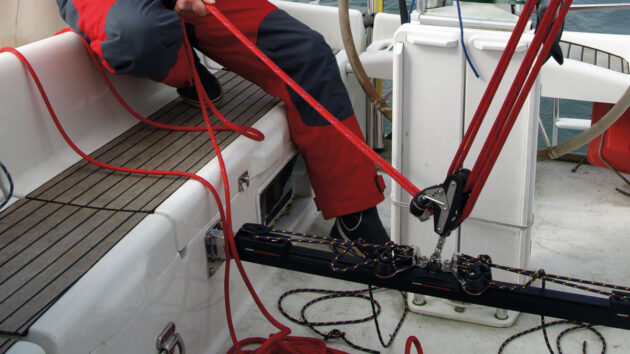
11. The track in place complete with control lines and mainsheet system.
12. The top block of the Easy mainsheet system.
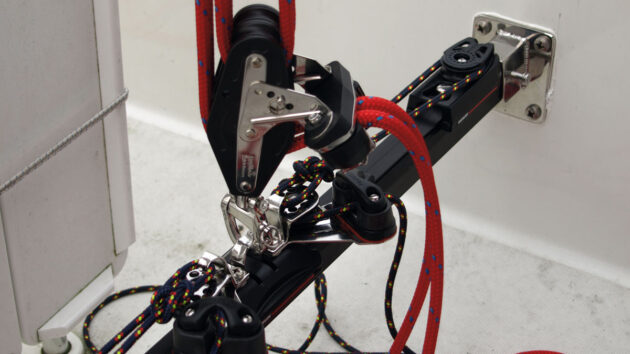
13. The bottom block of the Easy mainsheet system. Note the Lewmar snap shackle for quick removal and the double cam which allows for a 3:1 or 6:1 purchase.
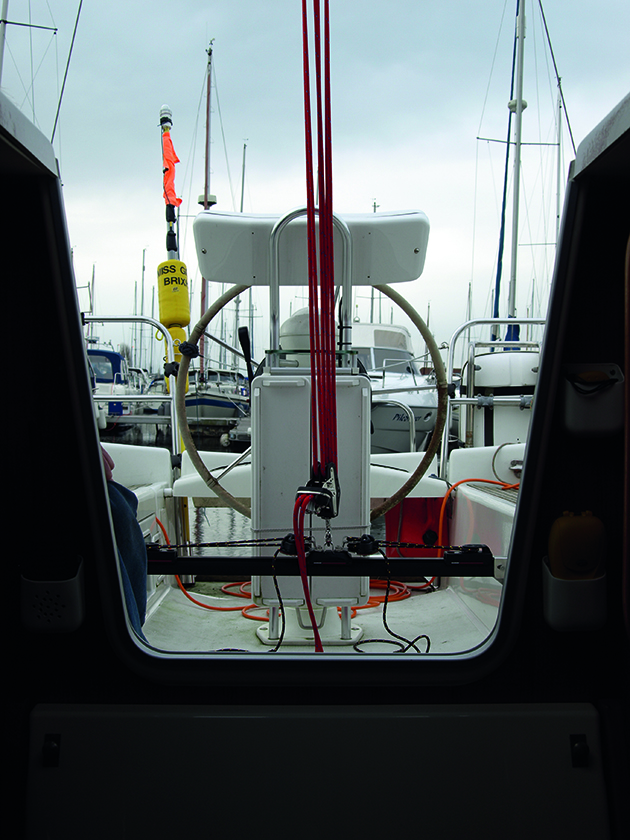
14. The system as seen through the companionway. When fitting, make sure the track lines up against fixtures such as the bottom edge of the companionway.
15. With the block unshackled and the drop nose pins removed the track can be lifted out.
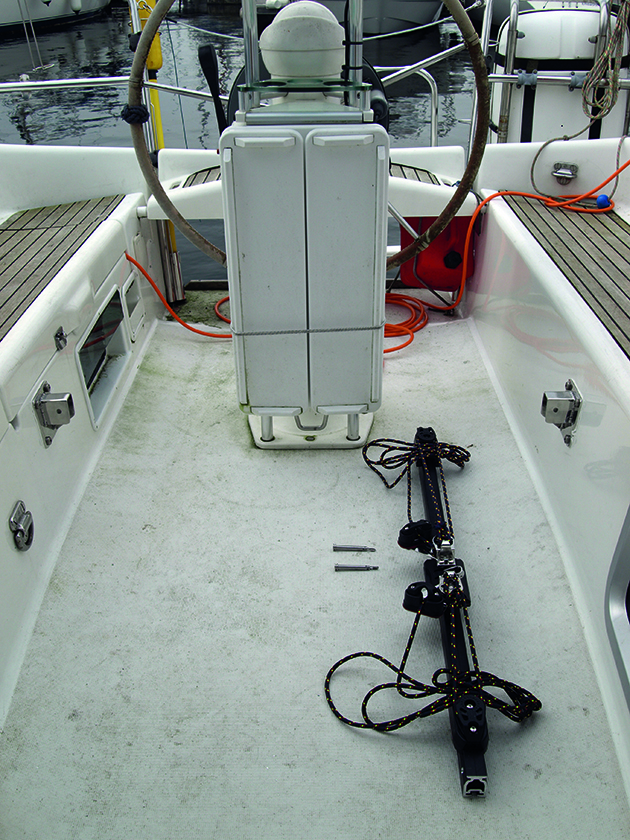
16. The cockpit is clear again, leaving plenty of uncluttered space for harbour lounging.
Want to read more practical articles?

A subscription to Practical Boat Owner magazine costs around 40% less than the cover price.
Print and digital editions are available through Magazines Direct – where you can also find the latest deals.
PBO is packed with information to help you get the most from boat ownership – whether sail or power.
-
-
-
- Take your DIY skills to the next level with trusted advice on boat maintenance and repairs
- Impartial in-depth gear reviews
- Practical cruising tips for making the most of your time afloat
-
-
Follow us on Facebook, Instagram, TikTok and Twitter