
With the rewire done, it's time to get to grips with the battery management system and instruments on our Maxi 84
The day was approaching for Maximus’s shakedown cruise, a two-day voyage from Chichester to her new home at Cobbs Quay Marina, Poole. Before then, however, we needed to understand our new electronics.
We’d spent six months restoring the Maxi 84. We’d prepped the hull and keel, polished the topsides, replaced skin-fittings, engine filters and electronics – and were finishing off a full rewire.
My husband, James, spruced up the hull stripe with a regal shade of blue and PBO contributor Gilbert Park had refurbished the heads.

Adam of ACM Marine chats to Gilbert Park about Maximus’s electronics
We’d had a helping hand from so many friends and experts, and while above decks there was still plenty to do, her rig was sound, she was seaworthy and ready to go sailing.
Now it was time to plan the passage and get to grips with our new electronics.
Electronics walk-through
With the rewire now complete I met our electrician Adam McMenemy from ACM Marine at Chichester Marina.
Together with Gilbert, who’d be joining us on the voyage, we had a walk-through to familiarise ourselves with the boat’s new electrics.
Starting in the cockpit, Adam showed us the shore power connection lead and the RCD breaker box underneath, with its test trip button.

The RCD breaker box in the cockpit
“That’s your first protection,” said Adam. “The power goes into the boat and into the RCD. This is what saves your life.”
He explained the importance of always connecting the shore power cable to the boat first and then the shore power socket, and disconnecting in reverse (mains first) so you’re not walking around with the live current.
Victron solar panel
Adam showed us the location of the plug for the Victron 40W solar panel and warned us to lay the panel face-down before plugging in, otherwise a surge of energy could blow the fuse.
“If you’re lifting out over winter and don’t have shore power, leave the solar panel plugged in,” advised Adam.
“Every time you go to the boat switch the batteries on and the instruments and drain them down a bit. Batteries like to be charged and discharged. They like to be used. If you’re in the marina, switch the shore power on for a few weeks, then leave it off for a few weeks.”
“Solar panels are fragile and you have to be careful handling them,” he said. “The other problem with unfixed panels is you must avoid the plug touching the metal rim or you’ll cause a dead short.”
Adam also reminded us that the solar panel’s MPPT controller would only be charging the domestic battery bank, not the starter battery.
Article continues below…

Upgrading electronics on the PBO Project Boat
Upgrading electronics on Maximus seemed like a huge leap in the first weeks of ownership. We were still discovering new…

Boat batteries 101: Which battery is the best choice for my boat?
We’d borrowed a lead acid battery from our marine electrician, Adam McMenemy, which would get the Maxi 84 afloat and…

Boat power management: How to keep your batteries topped up
Now we’d decided on batteries for Maximus the next conundrum was how to keep those batteries charged. Premier Marinas had…
Instruments
Next, Adam talked us through the Raymarine tiller pilot which can operate in Auto-mode where it’s locked onto a heading, Track mode where it maintains a track between two waypoints created on a chartplotter, and WindTrim mode where it maintains a course relative to an apparent wind angle.
Gilbert also suggested I download the instrument manuals onto my laptop as a backup, which sounded like a good idea.

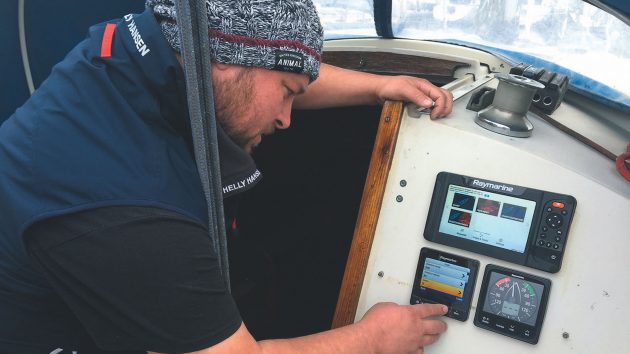
The new Raymarine instruments in the cockpit
In the cockpit we had Raymarine’s i70s tri data (wind speed, boat speed and depth), the i60 wind speed/ direction instrument and the Element 7 multifunction display (MFD), which would primarily be used as a chartplotter with AIS.
It had been quite a mission to download charts onto the MFD’s micro SD card so I was relieved that when I inserted the card and selected charts, Chichester marina appeared on the screen. The depth showed 7.2ft
“We better change that to metres,” said Gilbert. “The classic mistake is to install new equipment and set out thinking you’ve got metres rather than feet.” While we were about it we also added a depth alarm at 2m.
Note: We may earn a commission when you buy through links on our site, at no extra cost to you. This doesn’t affect our editorial independence.
Down below
In the cabin we had a Scanstrut USB socket and wireless mobile phone charger, which worked with my newer Android phone but not my ageing iPhone.
Adam talked through the battery rotary (or isolator) switch, which has the options of Battery 1 (engine), Battery 2 (the two domestic batteries), Both and Off. All three batteries are the Exide 115Ah dual-type, capable of cranking or leisure.
Adam prefers all batteries to be the same. It’s much simpler for charging, and once in parallel they can float together and rise at the same time.

Adam points out the Sterling splitter on his phone
“If you didn’t have split management charging, then it would be more important that you switch to Both when charging, but this system is automatic. It’s bulletproof,” said Adam.
Once under way, the alternator will charge both battery banks, regardless of which one the switch is on, thanks to the Sterling Pro Split R. What’s even cleverer is that it will ensure there’s enough charge in the engine battery before topping up the domestic bank, while promising a voltage drop of less than 0.001V.
When the rotary switch matters
That said, where the rotary switch does matter is when we’re actually using the batteries, and running them down. If we’re at anchor and running cabin lights and the fridge, it’s best to switch to domestic, so we only draw off that bank and leave the engine battery free for starting.
If we forget, and the engine battery gets low, however, we can switch to ‘Both’ and use the combined battery banks to start the engine.
Gauges
Next, we had a good look at the new switch panel, and flicked the ‘accessories’ switch to turn on the gauges for fuel and water.
The fuel was low, so we resolved to fill it up later that afternoon, rather than leave it to the morning of the voyage.
Adam then pointed out the automatic bilge pump which has manual override.
Lighting
We’d kept some of Maximus’s original lights but replaced the bulbs with LEDs, and on Adam’s recommendation added spot lights and strip lighting, which could be dimmed and switched to blue and red for night vision.
He showed us the cable which we’d need to attach to the vintage Sailor radio, once it had been refurbished. We wanted to keep the original radio because it was really smart and ‘belonged’ to the boat, but the new Raymarine VHF AIS radio would be our main form of communication.

LED strip lighting on red option for night vision
Adam pointed out the electronic Seatalk ‘backbone’ – Raymarine’s version of NMEA 2000 – which allows all the instruments to talk to each other. So for example, the VHF set can now send AIS data to the MFD in the cockpit.
I had my MMSI number to hand – Maximus’s unique 9-digital number, which I’d recently transferred into my name via the Ofcom’s website. I entered this into the Raymarine VHF, so now the set was registered to our vessel. This means if we ever have to send a DSC distress call, the number will be included.

Make sure you enter your MMSI number correctly. No second chances
We flicked through the Victron Smart meter, which showed the batteries (connected to shorepower), were at 13.9V.
All looked good. Maximus was finally ready to leave Chichester Marina.
Thanks to our Project Boat Supporters

Dell Quay Marine, Osculati, Raymarine, Shakespeare Marine, TruDesign, Screwfix, Coleman Marine Insurance, MDL Marinas, Premier Marinas, seajet, Marine & Industrial, Clean to Gleam, West System, Farécla, Navigators Marine, RYA, Aqua Marine, Ecobat, Victron Energy, Scanstrut, T Sails and XP Rigging.