
Gilbert Park explains how he installed a Victron BMV-712 marine battery monitor to his boat.

Despite fitting solar panels I still worry about my batteries going flat when I’m at anchor or in a marina with no electricity.
Not only will domestic equipment not work and engines not start but flattening batteries may shorten their lifespan. So how should you monitor them?
There are two solutions. The first is a simple voltmeter that will measure how full the batteries are. The second option is a marine battery monitor. A battery monitor will measure voltage, but in addition will also measure the amount of electricity stored.
Article continues below…

Which battery is best for my boat? How to increase battery capacity on board
With more and more electrical gear going on board the modern cruising yacht there comes a time when the battery…

Battery maintenance for boat owners: How to look after your boat batteries
For all but the smallest and simplest of craft a reliable supply of battery power is essential to keep both…
The best way to imagine the difference is to think of a glass of water. If you have a small glass absolutely full the voltage will be high, however there is not much water in it.
A larger glass full of water will also register the same high voltage, but a battery monitor will tell you that there is more water in the glass.
Voltmeters are inexpensive, indeed many boats have a voltmeter built into the chartplotter. Marine battery monitors are more expensive depending on the manufacturer and the facilities they offer.
How do marine battery monitors work?
The central part is a shunt, a low resistance connection between the negative pole and the rest of the electrical appliances connected to the battery.
As the resistance is known and the voltage drop across the shunt can be measured easily this allows the calculation of the number of amps going in and out of the battery using Ohm’s law. This states that Amperes (I) = Volts (V) / Resistance (R).
A shunt may measure 100A, and the voltage drop for 100A may be 50mV. Using Ohm’s Law its resistance is V/I = 50mV/100A =0.0005 Ohms. The software translates the measured 0 to 50mV to the current of 0 to 100A.

The Victron display and the options for fitting it. There is a reversible ring that screws onto the back of the display. It is reversible to allow for bulkheads of different thickness and does need access to the back of the unit. If access is difficult then the white plate can be clipped to it and screwed into place with the four small holes. It is then covered with the black trim. A surface mounted box is also available if you want to avoid cutting large holes in your bulkhead
The important thing when connecting the shunt is that nothing is connected to the battery side of the shunt.
Everything, including solar panels and battery chargers, must be connected to the load side, otherwise the marine battery monitor cannot measure the input and output accurately and so may give incorrect readings.
I chose to fit a Victron BMV-712 which has a digital display and using Bluetooth can connect to a smartphone or tablet. Victron also make models that just have a digital display and more recently make a ‘Smart shunt’.
I would have fitted the Smart shunt had it been available at the time as this has everything built into the shunt and gives details to a smartphone or tablet using Bluetooth.
This means there’s no need to drill holes or feed wires through the boat, it will be faster to fit, as there are only the battery connections and it’s less expensive.
I have also used a non-Bluetooth Victron marine battery monitor and all of the settings and most of the information can be obtained using the digital display.
Whenever working with the electrical system the first thing to do is to disconnect the mains (so there is no battery charging). Then disconnect the negative pole of the battery.
Mounting the marine battery monitor display
With the BMV-712 you have to decide where to mount the display. I needed a 52mm hole with access from the back. The mounting ring for the display screws onto the back and is reversible for different thicknesses of bulkhead.
If access from the back is difficult then the display can be mounted using a fascia plate that it clips into – or in a surface- mounted box. The RJ12 wire then has to be plugged into the back of the display.
The shunt is connected between the negative post on the battery and all other connections. After this then the fused power lead from the positive post to the shunt is connected.

I needed to drill a 52mm hole in a bulkhead or instrument binnacle for the display and attach the RJ 12 wire
The connecting wire from the display to the shunt needs to be connected from the back of the display, fed through the boat to the battery compartment, where it is connected to the shunt.
There is an additional port on the shunt. A connecting wire is supplied that enables the voltage of a second battery to be monitored.
I used this, but you can buy a temperature monitoring cable for the battery you are monitoring. This enables further accuracy during charging.

I bought a 15cm black battery wire with M10 connectors to connect the shunt to the negative post on the battery. All of the other previous connections (including the solar panel) to the negative post are connected to load connection on the shunt. The grey wire is the RJ12 wire to the display. The red wire that runs with the RJ12 wire goes to the positive post of the battery to provide power to the system. The remaining red wire goes to the other battery on the boat and measures its voltage. I found it easier to wire the shunt up and then screw it into place, because access in the battery compartment was difficult.
Having fitted the shunt and connected the display you do have to set up the system. As my unit had Bluetooth connectivity I was able to do this (and update all the firmware) using a tablet.
Important information is needed like the size of the batteries being monitored, their type and a few other bits of data.
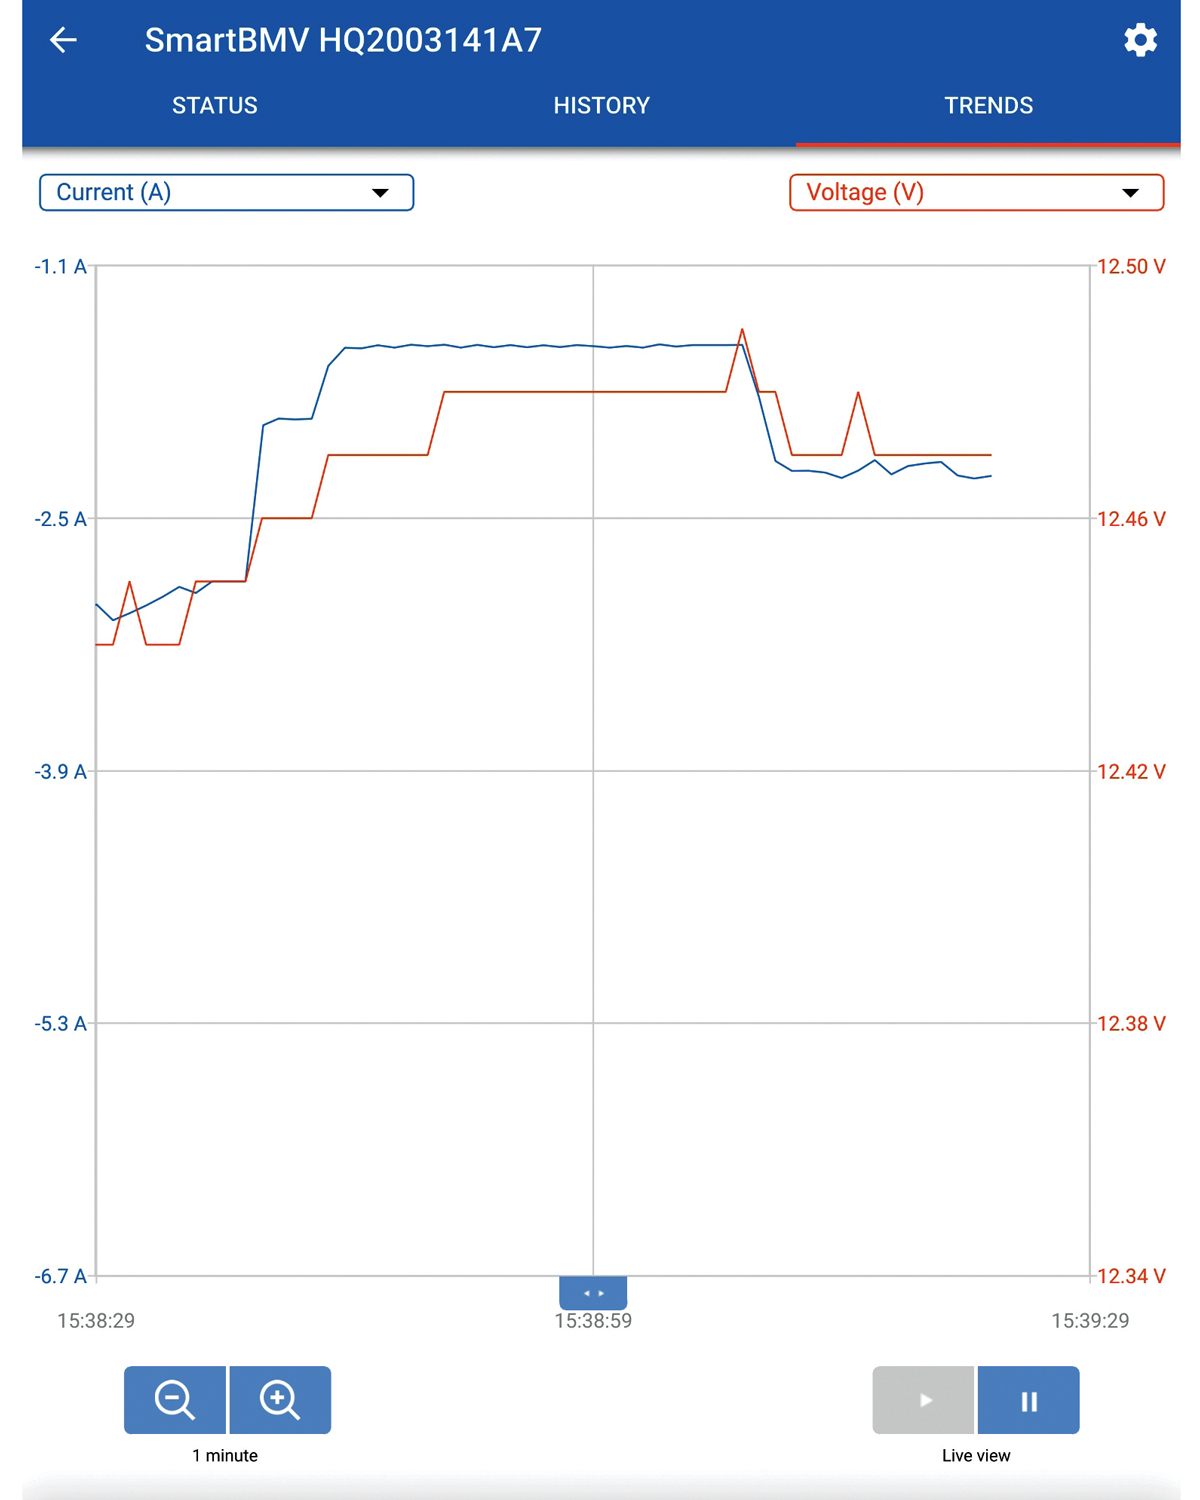
This screen shot shows the fridge turning on and off. It didn’t return to zero because the lights were on. This screen proves invaluable if you want to trace what is using electricity and how much. Switch everything off and the number of amps in use should be almost zero (there may be a tiny bit of current used from various marine battery monitors). If it doesn’t then you need to track down what is on. Then you can turn items on and off to see how much current they use
What’s the Peukert?
One of the data fields asks for the Peukert exponent. The higher the Peukert exponent the faster the effective capacity ‘shrinks’ with increasing discharge rate. You should be able to get this value from the battery seller or manufacturer.
However, despite buying my batteries from the ‘largest online supplier of batteries’ they couldn’t supply it and nor could the manufacturer! Fortunately, the number is small and using the default value should be OK for most lead acid batteries.
If you have other Victron equipment on your boat you can connect it all together if you wish and monitor the whole system via the VictronConnect app.
Does it work – the simple answer is yes! After trips in the summer and autumn I know the state of charge of my one domestic battery and an average night uses 25% of battery capacity.
On a sunny day the battery is recharged by about lunch time. On cloudy days the battery may not be recharged fully before the night, depending on the length of day.
Once underway the outboard will charge the battery at about 10% per hour. I can also use it to see if there is a large current drain and take remedial action (for the fridge I fitted extra ventilation).
Battery state of charge solved… one more thing not to have to worry about!
Why not subscribe today?
This feature appeared in the March 2022 edition of Practical Boat Owner. For more articles like this, including DIY, money-saving advice, great boat projects, expert tips and ways to improve your boat’s performance, take out a magazine subscription to Britain’s best-selling boating magazine.
Subscribe, or make a gift for someone else, and you’ll always save at least 30% compared to newsstand prices.
See the latest PBO subscription deals on magazinesdirect.com