
Understand the common causes of rigging failure and how different materials, rigging types, and uses can affect your rigging's lifespan with this expert advice from Nick Cook of Technical Marine Supplies.
Most sailors will probably have seen or experienced a stranded wire, or a failed swage, or the catastrophic resulting from the failure of a single rigging part.
While there can be many reasons for these failures, there are a few common causes at play.
Unfortunately, stainless steel rigging won’t last forever. You should view your rigging as one of your boat’s consumable items, much like antifouling or sails.
Lifespan and rigging failure
The lifespan of most things onboard will be dependent on the type, distance logged, and frequency of use.
For rigging, use is not limited to just sailing miles. Standing rigging is still working when the boat is sat on a mooring, or even when ashore in a cradle.
In fact, the only time its lifespan clock stops ticking is when the mast is unstepped.
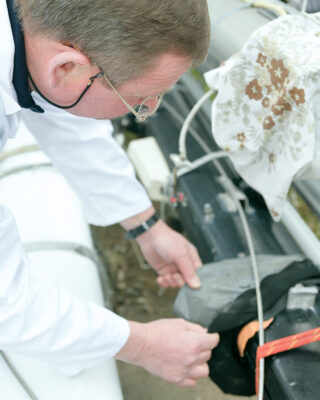
Unstepping a mast when your boat is on the hard will help your rigging last longer. Photo: Paul Tinley.
Still, it “ticks” at different rates. Rigging on a boat on an exposed mooring will bear more strain than rigging on a boat in a protected, sheltered marina berth.
As such, it is impossible to simply say standing rigging lasts more or less than ten years, as every boat will experience different levels of use. Some rigging should be changed after as little as five years.
What materials are used in standing rigging, and what should you look out for?
There are many different grades of stainless steel used in rigging, and not all manufacturers use the same types or quality of raw material to make their products.
Stainless steel is an alloy, and the different quantities of the base elements mean different types of stainless steel.
Most manufacturers will choose a grade with a high enough chromium level to provide good corrosion resistance, but this will affect other properties and the potential strength of the material.
Some stainless steel is good to machine, some is better to forge or cast, so choices are made depending on what product is being made.
Price is also a consideration for some manufacturers, so buyer beware.
Looking after your stainless steel rigging
Stainless rigging should be regularly rinsed with fresh water and protected with a metal or stainless steel polish.
Still, it’s normal for ‘stainless steel’ to experience tarnishing or discolouration.
Some think this is rust, but it’s normally only on the outer surface and is usually easily removed with a soft, clean cloth and a specialist metal cleaner.
It is also important to understand the effects of different weather conditions.
Boats sailing in the warmer but humid climates of the Mediterranean are likely to experience different reasons for failures than boats based in cooler Northern European waters.
Common types of rigging failure
Certain types of sailing boats, such as bluewater cruising yachts, can also be prone to what some would consider a premature rigging failure.
This is attributable to three main causes:
- A significant increase in the designed displacement of the yacht, causing an increase in the righting moment and thus an increase in the loads on the rigging.
- Poor (slack) tune of the rigging, allowing for an accelerated level of fatigue in the leeward rigging
- Extended sailing miles, so a lifetime of expected mileage can be used in just one year on a circumnavigation.
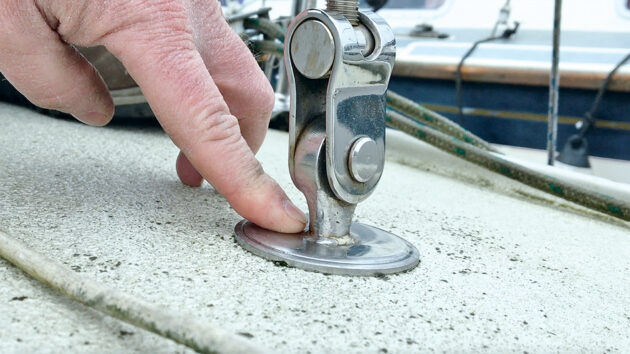
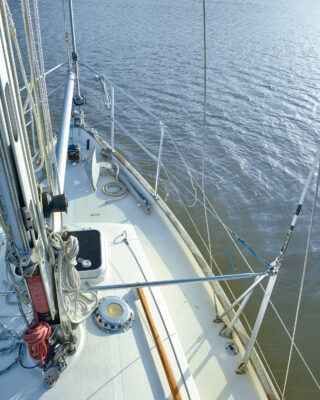
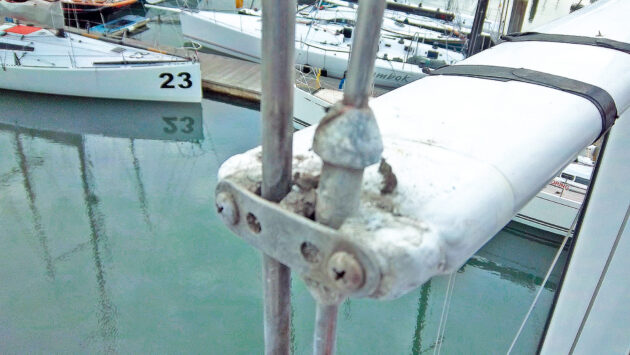
Check for wear or looseness in toggles, which are found on most modern rigs. Photo: Graham Snook/Future PLC.
Whatever type of yacht or dinghy you have, you need to regularly check all parts of the rig.
There is no simple one-rig-check-fits-all approach. The detail and frequency of checks will depend on the type of boat you have, how often you sail, and how many miles you sail.
For instance, a pocket cruiser moored in a sheltered marina, sailed eight weekends a season and stored ashore for five months (ideally with the mast down) should have a rig check at least once a season.
A bluewater cruiser on a big passage, possibly on an Atlantic circuit, would require deck-based checks to be done daily, with full up-mast checks carried out before each open water crossing.
In both cases, you should be inspecting all elements of the standing rigging from the attachment to the chainplate to the integration with the mast tube.
You should also check all components of the mast for wear, cracks or dents.
Types of standing rigging: Wire rigging
The most common product used to make standing rigging on boats, from dinghies to large yachts, is wire.
It is more cost-effective than using composite or rod rigging and has many different styles and types of fittings, along with three main types of wire construction.
Wire is the most common type of standing rigging. Photo: Graham Snook/Future PLC.
Most boats are rigged using a stainless steel wire made using a 1×19 construction, where 19 individual strands are wound together to the given diameter of wire.
There is also a stronger and lower stretch wire, often referred to as Dyform, Compact or Hamma Pro.
All these names are brand types and have different construction and properties, but effectively they are squashed 1×19 or preformed wire strands formed together with less airspace inside the diameter to achieve greater strength for a given diameter.
The choice then exists to consider using (1) a smaller (lighter) wire diameter to achieve a similar load to 1×19 wire, or (2) stay with a chosen diameter and achieve lower stretch, or a higher break load to give greater safety margins on the rigging.
The third type of wire occasionally used is 7×7 construction, and this is normally only seen on traditional craft, where Talurit ends or hand-spliced and served ends are preferred.
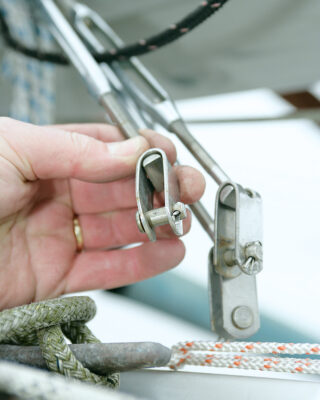
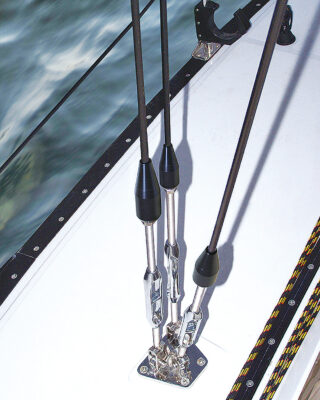
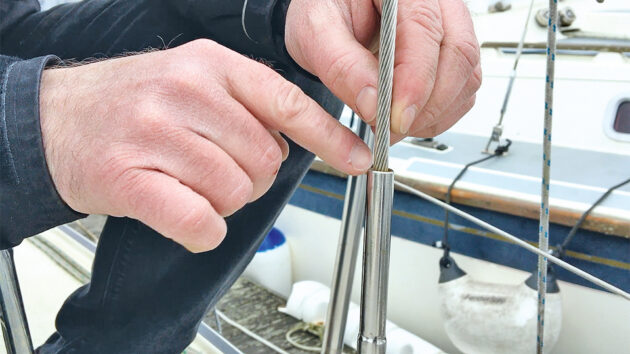
There are many different types of swage terminals for wire rigging.
The choice of manufacturer and type of end can be critical for most types of shroud fittings and mast makers. For instance, each major mast maker has their own T-terminal backing plate or coquille shell for attaching lateral standing rigging.
Common problems with wire rigging
It’s important to use the correct and matching Tee or Stemball in these fittings, as the incorrect ones will not fit or articulate correctly, causing a premature failure of the swage.
The choice of rigging screws is also very important. Most rigging screw bodies are now made from chrome-plated bronze (or have bronze threaded inserts) to prevent stainless-on-stainless thread forms.
One of the issues with stainless steel in thread form is that it is prone to galling or cold welding; swapping one surface out for bronze will normally remove this issue.
It’s also important to allow full articulation in all directions of the rigging screw where it joins the chainplate or stemhead. This is normally done with the addition of a separate or integral toggle.
Without it, you risk reducing articulation in the leeward rigging, which again leads to premature fatigue failure of the swage.
Types of standing rigging: Rod rigging
This is the preferred choice of standing rigging for more performance-oriented and larger yachts.
The rod generally used in rod rigging is not a true stainless steel, as the composition of elements is modified to significantly increase break load and elongation as a core property.
Nitronic 50 is the most popular brand name of material used. Race boats will generally choose this over wire, as much smaller diameters can be used for a similar break load, but with less stretch than even the low-stretch wires, thus saving significant weight and windage aloft.
The process of cold forming heads on the ends, rather than swaging on a fitting as per wire rigging, also allows for much smaller designed parts, which increases the potential for weight reduction.
These significant weight savings aloft are also the main reason large yachts use rod over wire.
Many superyachts also use rod as the starting place for standing rigging, as wire is generally not available in large enough diameters.
Common problems with rod rigging
There can be some potential drawbacks of rod depending on the original design brief and spec.
If the choice of rod is all about weight and windage, when safety margins are reduced, then life expectancy is reduced.
These are manageable with regular inspections and dye pen tests, but they add to annual maintenance costs, so generally will only be chosen when chasing small gains on the race course.
A rig tune becomes very important with rod rigging, as it can suffer fatigue in the cold-formed heads. It’s important to tension correctly, to minimise the risks and make sure the rod will last as expected.
Larger yachts and superyachts will have hydraulic mast jacks in the heel of the mast so tensions on each set of stays can be accurately added as a conversion to pressure.
Types of standing rigging: Composite rigging
The third option for standing rigging on sailboats is composite rigging.
It’s more commonly seen on performance-oriented multihulls where weight aloft is a significant performance barrier, and superyachts and the larger maxi racing yachts, where the budgets extend far enough to push all and every boundary to the limits to save weight and chase every performance gain.
Composite rigging like Powerlite PBO is most often found on performance or maxi racing yachts as it weighs less than standard rigging. Photo: Powerlite PBO Rigging.
On the multihulls, the cores are generally Aramid or PBO-based, with Dyneema or PVC covers. On superyachts, it is normally carbon. Both need to be treated with some care to prevent chafing on the covers, and they certainly do not like impact.
Composite rigging is exceptionally lightweight and high-performance, but requires specialist use and care.
It’s expensive to replace, and the lifespan is generally quite short.
Boats with composite rigging must run very detailed rigging logs detailing weather and mileage sailed.
There is an American company now marketing Dyneema standing rigging for monohulls.
This appears to be simple at first glance, but is not that easy to integrate into all mast fitting options and certainly has some performance issues, as it will suffer stretch and elongation under load.
The big benefit is that it will not suffer fatigue, though it will need to be replaced more often than wire.
How fatigue can cause rigging failure
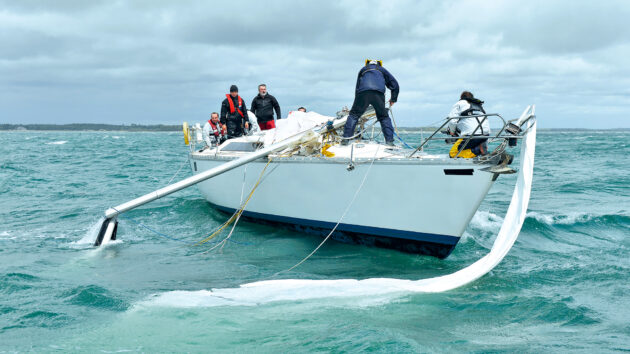
A single failure in standing rigging can have catastrophic consequences, which is why it should be regularly checked. Photo: Lester McCarthy/Future PLC.
In Northern Europe, the most common failure point on standing rigging will be where the wire exits the swage terminal – more commonly, but not exclusively, the lower swage terminal on a wire, due to the additional mass of the rigging screw wobbling below it.
This is the point when the wire goes from being held rigid within the swage to being flexible.
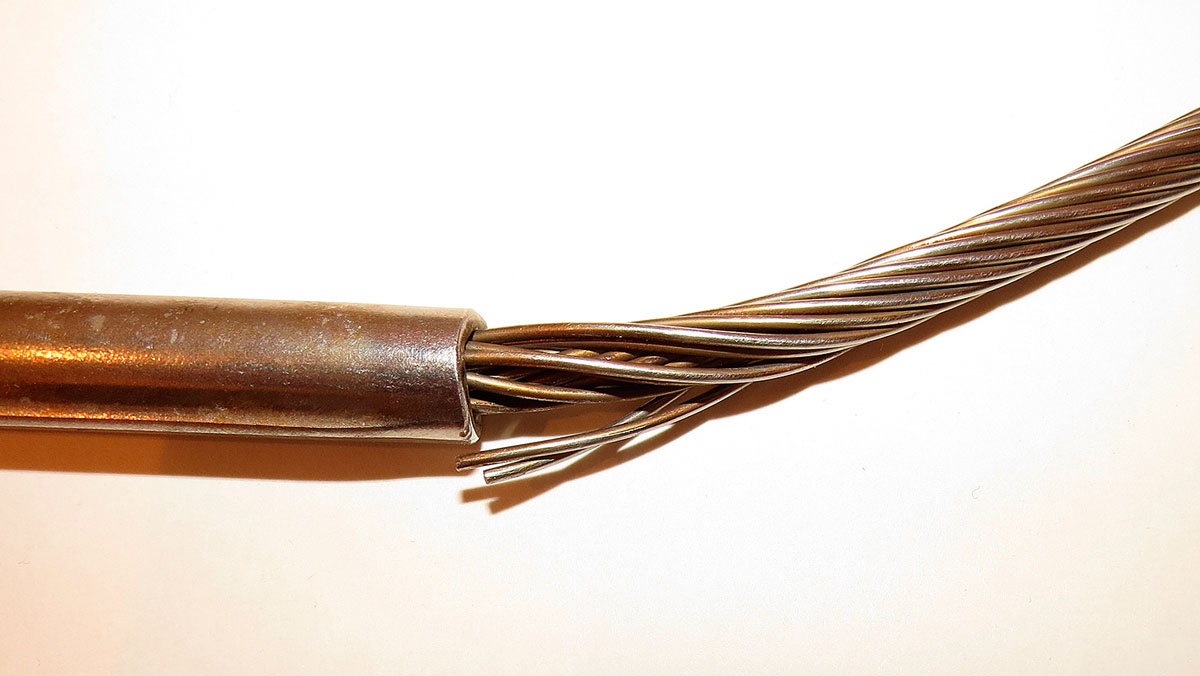
Often, one or two of the 19 strands might part and pop out of the swage, becoming visible to the naked eye on inspection. This is known as cyclic fatigue failure and is normal.
All materials have a known fatigue level. If we put a swaged wire in a lab flex test and repeat many times, it will give a good indication of the number of cycles it takes to fatigue and ultimately break the strand.
What we cannot do yet is measure how many times the wires cycle on any given individual boat, so it’s not possible to pinpoint the exact time that the rigging is likely to fail.
What makes that already impossible task harder is that some causes reduce the expected lifespan further.
Why your wire rigging might be failing
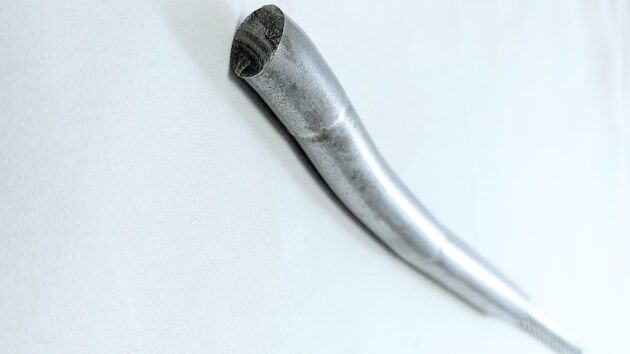
Look for excess rusting and raised strands where the wire enters the stud. Photo: Ali Wood.
Tuning and load
Slack rigging, as we discussed earlier, will massively reduce the expected lifespan.
Increasing the righting moment of the boat and thus increasing the load on the standing rigging will also reduce the expected lifespan.
Mileage
Much like the warranty on a new car that states it’s either five years or 50,000 miles, whichever comes sooner (hypothetical numbers), rigging is the same.
It is not simply age-related; mileage can easily overtake time as the major contributor to fatigue.
As a guide and certainly not a universally accepted number by all manufacturers, as tune and load play a significant part in fatigue, between 25,000-30,000 miles is when we would fully expect to see some stranding occur, requiring full replacement of rigging.
Corrosion
In tropical climates, owners and yacht riggers will generally see split swages due to crevice corrosion on one or more swage terminals.
This can be anywhere up the rig, but is usually a lower swage terminal, as water generally runs downhill.
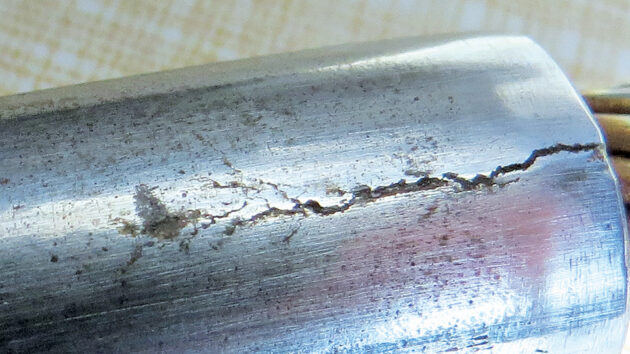
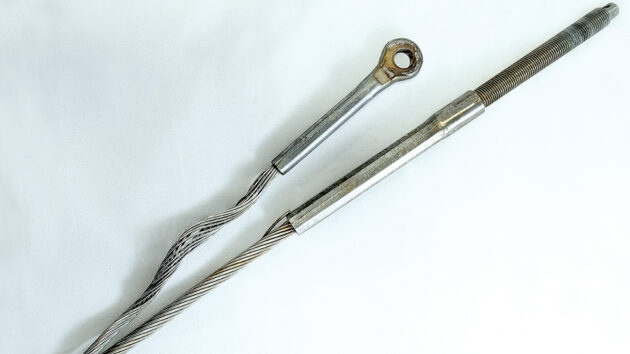
Branch cracking – a sure sign of corrosion on a swaged fitting. Photo: Vyv Cox.
One of the faults of stainless steel is that it suffers from crevice corrosion, where moisture enters small microscopic cracks in the material and, along with the chloride in saltwater coupled with the extremes of temperatures, can cause the cracks to open and eventually cause a swage to open along where the fitting has been pressed onto the wire.
This is more likely to happen in salty, hot, humid conditions and will often occur before the signs of fatigue failure.
Workmanship
Another reason for the failure of a swage fitting is poor swaging and inferior or incorrect fittings.
If a swage machine is out of calibration and not pressing the fitting home correctly, then it is fair to assume the fitting is weaker than it should be and could risk the wire pulling out of the swage.
If the wrong or incompatible swage fitting is used, leading to incorrect installation, this will result in rapid or reduced life expectancy for the rigging.
Poor standard swaging. It’s best to invest in your rigging rather than to cut costs. Photo: Technical Marine Supplies (TMS).
A rigging shop should have strategies in place to ensure the wire is pushed fully home into the swage to guarantee full strength when pressed.
It’s all too easy to allow the wire to slip out a centimetre or two when swaging, which is impossible to see, but the strength of the fitting has been compromised.
Swages should not be curly along the wire joint. This happens when a swage machine is out of calibration, or the swages are low-cost inferior products, where the hole down the middle is not straight or not in the middle of the swage.
Quality manufacturers of marine fittings will gun drill swages to ensure accuracy. Fittings used in industrial applications are generally not gun-drilled to keep costs down, so these items, along with ‘industrial wire’, should not be used to manufacture yacht rigging. Their expected lifespan will be significantly lower.
Stray current/earth leakage
Stray earth currents, which are unintended electrical currents flowing through metal parts of your yacht, can seriously damage rigging over time.
These currents often come from onboard systems or shore power and can travel through stainless steel rigging, causing hidden corrosion.
Evidence of stray current is highly visible and is often determined by excessive tea staining on the wire and fittings, which is often seen on other metallic areas of the yacht, such as stanchions, chainplates, guard wires and deck fittings.
Even small amounts of corrosion can drastically reduce the fatigue life of rigging, making it more prone to failure under normal sailing loads. What should last 10-12 years might fail in half that time if stray current is present.
Age
Knowing what we have learnt above, we know that stainless steel rigging will not last forever. Most insurers, based on extensive claims history, would prefer standing rigging to be replaced every 10 years or so.
But clearly, this time frame does not apply to every yacht; boats which sail a lot of miles or are afloat a lot might need rigging changed earlier.
Rigging on yachts afloat three or four months a year with the mast unstepped for six months every winter could be expected to last longer, assuming that all rigging is tuned correctly.
Be proactive about maintenance and replacement; replacing a pair of stays over winter will help spread the costs. Photo: Nic Compton.
It is sensible to have your rigging tuned by a time-served rigger with experience of tuning different types of boats. A good rigger will get it pretty close in a dock tune, but will get it even better if the boat undergoes a sail trial in 10-12 knots of wind, where the dynamic loads can be seen and accounted for.
If you’ve just had new standing rigging fitted or taken delivery of a new yacht, the rigging must be re-tuned after a month or two, or after 1,000 sailing miles.
This is to remove and account for the constructional stretch that occurs in the wire when it is made. Rigging needs time to bed in and then be readjusted to maximise its longevity.
If this doesn’t happen, the rigging will be slack and will speed up the fatigue. A rigger’s job is to swap out the rigging while it is still safe and usable, before it fails, resulting in a catastrophic failure of the rig.
Other contributors to wire rigging failure
Failures can also be caused by other unexpected external factors, such as a halyard wrap on a forestay.
This occurs when a furling system does not work correctly and the jib halyard wraps around the forestay wire, opening up the lay of the wire, often to the point of failure.
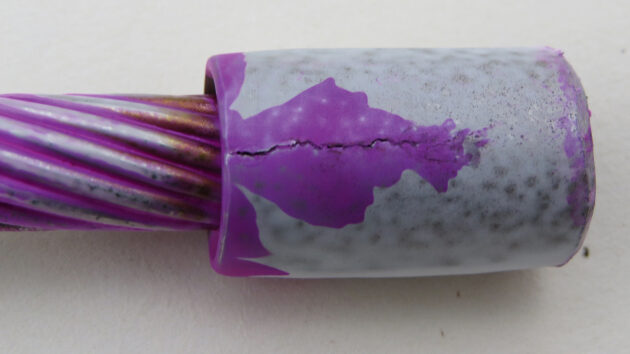
Halyard wrap can open up the lay of the wire, which can then fail. Photo: Technical Marine Supplies (TMS).
All furling systems should be checked regularly; if they are proving harder than normal to furl, the key is to stop and have a thorough look at what is happening.
This could be as simple as a spinnaker halyard that has not been stowed away from the furling system and is being wrapped into the furled headsail, which can then wrap around the forestay and damage it.
Common causes of rod rigging failure
Rod rigging suffers fatigue in similar ways to wire rigging. The fittings need to provide adequate articulation to prevent premature fatigue of the cold head, in the same way as the swage fittings.
The issue with the cold head is that it is generally hidden inside a fitting and cannot easily be seen without removing the mast, opening the fitting and cleaning off all the necessary lubricant (Copaslip, Tef-Gel or other suitable products) on the cold head, allowing it to be inspected for vertical or the more sinister horizontal cracks under the head.
These cracks can be microscopic, so they’re usually detected with a dye pen test, where a penetrant is sprayed on the heads, allowed to dry and then a developer is sprayed on. This will reveal any cracks invisible to the naked eye.
Dye penetrant can help clearly identify cracks in the metal. Photo: Vyv Cox.
Again, the fatigue life is directly linked to the quality of initial manufacture. To ensure the head is correctly aligned and the rig is correctly tuned, ensure the rigging is not slack or overloaded for the mileage sailed.
If there is a crack, it is unlikely to be seen on a visual rig inspection and, if left, it will result in a catastrophic failure of the rod and probably the rig.
It is therefore prudent to carry out frequent visual tests of the rods and replace them every six to eight years to be sure the rod is not close to failure when it is changed out.
One big benefit of rod, however, is that the parts are reusable (up to a point in time, where the fitting itself will suffer fatigue), and often the old cold heads can be trimmed off the rods and new ones reformed.
This process, every six to eight years, is a cost-effective solution when considering the whole lifespan of rod rigging.
Mileage fatigue is similar to wire, but, assuming the rig is correctly tuned, we’d expect it to last 30,000 sea miles.
Lifespan, Inspection & Replacement Guidelines
The general rule for wire, assuming all elements of load, tune, and installation are correct, is that it should last approximately 10-12 years or 25-30,000 miles, whichever comes first.
It is important to regularly tune your rig and carry out aloft inspections. This can be done by either the boat owner, crew or a professional rigger at least annually.
If in doubt about what to look for, employ a professional rigger. Photo: Graham Snook/Future PLC.
When to replace your rigging
Do not delay; proactive replacement is cheaper than emergency repairs. To help spread costs, consider swapping a pair of stays each winter refit season, rather than doing it all in one go.
Some rigging is easily swapped without unstepping the mast, so work on those stays first.
Always swap a matching pair, as it’s fair to assume the opposite stay has seen the same loads and fatigue applied. Forestays take a fair bit of rotational punishment with furlers, so do not leave this stay until last.
The adage ‘you get what you pay for’ is very true of rigging. Buy cheap, and it’s unlikely the rigging will be made using the best materials, so don’t expect it to last as long.
A large cost of rigging replacement can be the services of a professional rigger.
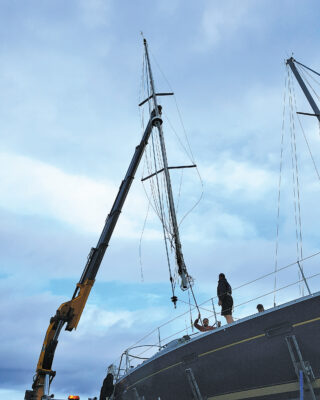
Do as much of the prep work as you feel comfortable doing – removing sails, disconnecting electrics, removing the boom – so long as the retaining split pins are still in place, and the rigging screws can be secured so they cannot undo ahead of the visit to the crane.
Case Study: Rigging Failure in the Caribbean
In early 2023, a 42ft performance cruiser sailing between Grenada and St Lucia suffered a sudden dismasting in moderate trade winds.
The yacht had recently completed a transatlantic crossing and was on a leisurely island-hopping itinerary when the failure occurred.
The vessel was equipped with wire standing rigging, installed approximately 11 years prior. The owner had performed visual inspections but hadn’t replaced the rigging, believing it to be in ‘good condition’ due to limited signs of wear.
While close-reaching in 18 knots of wind, the starboard lower shroud parted just above the swage terminal.
The mast collapsed to port, damaging the deck and lifelines, but fortunately causing no injuries.
A subsequent inspection revealed crevice corrosion inside the swage fitting – a classic failure in tropical climates where salt and humidity accelerate corrosion in hidden areas.
Rigging should not be slack or overloaded, otherwise it could lead to failure, like this rod rigging which failed during an Atlantic crossing. Photo: Vyv Cox.
Key learnings:
- Age is not the only factor in rigging failure. The rigging had just reached the suggested 10–12-year lifespan, but the owner had underestimated the impact of the boat’s mileage, extra weight on board for the extended cruise and tropical exposure.
- Visual checks are not enough to prevent rigging failure. The corrosion was internal and invisible without disassembly or dye penetrant testing.
- Costly consequences. The damage exceeded £55,000, including replacement of mast and deck.
Technical Marine Supplies: A smarter approach to preventing rigging failure with the ‘Check it, tune it, trust it’ campaign
At Technical Marine Supplies, we believe that rigging safety starts with awareness – and ends with action.
That’s why we’ve launched our Check it, Tune it, Trust it campaign: an initiative to raise awareness of rigging maintenance among boat owners, and to encourage them to take preventative action before problems arise.
Rigging is the backbone of any sailing vessel, yet its condition is often overlooked until failure occurs.
Our campaign encourages owners to take a structured, preventative approach to rigging health, in collaboration with local riggers, leading hardware manufacturers and marine surveyors.
Rigging is the backbone of your boat, and all of it needs checking. Photo: Technical Marine Supplies.
From terminals and turnbuckles to spreaders and stays, we implore owners to engage with a local professional, who’ll advise on what to look for – and when to act.
By educating owners on these timely tasks, raising awareness that a yacht’s rigging is a consumable, and offering expert support, we aim to extend the service life of rigging and improve onboard safety.
Whether you’re preparing for a season of coastal cruising or gearing up for offshore passage making, Check it, Tune it, Trust it is your first step toward peace of mind.
Backed by our technical expertise and nationwide network of rigging professionals, TMS is proud to support safer sailing. TMS is the leading distributor of high-performance marine rigging and hardware. With a strong technical foundation and a commitment to quality, it supports rigging professionals from specification through to installation.
As proud members of the British Stainless Steel Association, TMS upholds the highest standards in material integrity and best practice, often advising surveying bodies and insurance assessors, reinforcing its position as a trusted partner in the European rigging supply chain.
Nick Cook heads up UK-based Technical Marine Supplies (TMS), a manufacturer and supplier of high quality components to spar builders, riggers, yards, sailmakers and OEMs across the UK & Europe. With over 20 years of experience in the marine industry, Nick brings a wealth of practical knowledge and technical insight.
Rigging tension on a fractional-rigged trailer-sailer
What considerations should you be aware of for setting the rigging tension on a mast that is frequently lowered and…
Understanding metal fatigue: What causes rigging and engine failures?
Do you know the difference between a sudden fracture and a fatigue fracture? Understanding the characteristic 'beach marks' is the…

Understanding and mastering boat rigging
Your yacht’s rig remains upright thanks to the right balance of compression and deflection, as Owen Brown explains

How to check your rigging
Maintenance of your rigging can save expensive failures and could be a lifesaver - here's how to check your boat's…
Want to read more articles on rigging failure?
A subscription to Practical Boat Owner magazine costs around 40% less than the cover price.
Print and digital editions are available through Magazines Direct – where you can also find the latest deals.
PBO is packed with information to help you get the most from boat ownership – whether sail or power.
-
-
-
- Take your DIY skills to the next level with trusted advice on boat maintenance and repairs
- Impartial, in-depth gear reviews
- Practical cruising tips for making the most of your time afloat
-
-
Follow us on Facebook, Instagram, TikTok and Twitter