
Faced with a sudden dismasting in 40-knot gusts, Rupert Holmes explains how he and his crew saved his boat, and offers advice for simple safety checks you can make to your own rig

Coping with a dismasting and how to carry out your own rig checks
It had all started so well. The previous week we had sailed from the North Aegean and were now off Kefalonia on a 35-mile passage from Poros with a leisurely Force 3-4 forecast.
As we rounded Cape Mounda on Kefalonia’s southern extremity in the late morning, however, this built rapidly, and by mid-afternoon we were beating under just a small headsail against winds gusting towards 40 knots in the lee of the 1,628m (5,340ft) bulk of Mount Ainos, Kefalonia’s highest peak.

Make sure you check your rig at least once a season, although it is no guarantee a dismasting won’t happen. Credit: Rupert Holmes
Even with the benefit of hindsight it‘s difficult to say exactly what happened next – no one saw the boat rig come down.
I heard a big bang from aloft, but when I looked up there was nothing left to see!
Unfortunately we also lost some of the potential evidence for the cause as part of the rig eventually had to be jettisoned.
Post-dismasting checks
As we bobbed around in big seas with the mast snapped in half at the spreaders, I reflected on the fact that I’d been up the mast only a few weeks previously to carefully inspect everything that could be checked in situ.
To make matters worse, the lower half of the mast was now leaning precariously at 20° to the vertical, with the masthead in the water just aft of amidships on the port side, tilting perilously and swaying gently as Ammos rolled.
It was threatening to become disengaged from the (on-deck) mast step. It was immediately clear that setting to work with bolt cutters was not the first priority.
A more immediate concern was everyone’s safety.
Staying safe after a dismasting
This immediate risk was easily mitigated simply by going below.
Once we were all safe, it quickly became clear that the boat was in no immediate danger – we were 10 miles off a weather shore, with a few hundred miles of sea room to leeward.
Although the sea was quite rough, with spray being whisked off the wave crests, the boat’s motion was by no mean uncomfortable.
This was a pleasant surprise, as a boat with no rig has a much lower resistance to rolling.
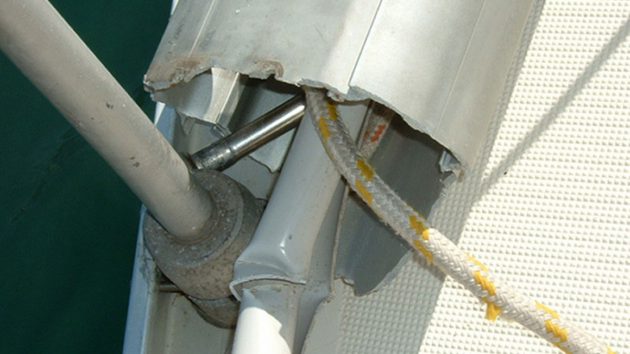
The mast on Ammos fractured through the rivet holes of the spreader brackets following the dismasting. Credit: Rupert Holmes
The masthead, which was in the water just after the beam on the port side, appeared to be barely moving and not even chafing the gelcoat, let along the bigger worry that is might have been bashing against the boat hull with a risk of structural damage.
However, there remained the issue of the rig to stabilise.
It appeared that the babystay was all that was left holding the lower mast up.
I could reach it from the forward overhead hatch in the saloon, and could therefore cut it without being in danger of being injured by the damaged rig when it fell.
Having managed this, I was disappointed when it made little difference apart from some increased movement of the lower mast.
Taking stock
By now, it was just three or four minutes after the rig had failed, but the kettle had boiled, and it seemed a good move to contemplate the situation over a cup of tea.
It was becoming apparent the rig was unlikely to move imminently from its existing position and the boat was lying comfortably in open water.
What was needed next was a cool appraisal of the situation and a considered, cohesive plan of action.
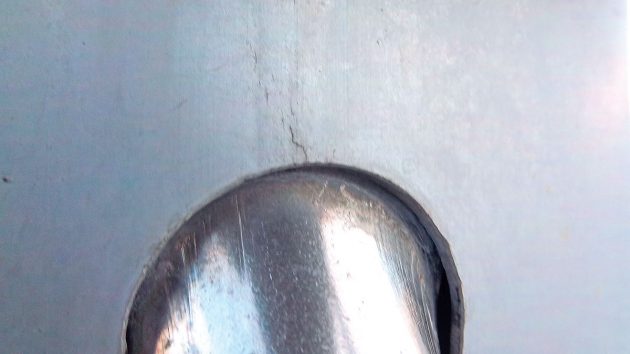
Check for cracks around shroud terminals during a rig check Examine all standing rigging terminals to help prevent a dismasting
To the outsider it may appear inappropriate to stop for tea in the middle of a potential emergency.
However, it’s very easy to be driven into an adrenaline-fuelled frenzy – and that’s when the serious accidents can happen.
We were very aware that, while the situation appeared controllable, if one of us fell overboard, or became injured, that could very easily change.
We all therefore continued to clip on at all times that we were not below deck, and no line or rigging wire was cut without being absolutely certain that no one was, for instance, standing in a coil of line that may have been carried away.
This may sound like a painfully slow way of working, but it’s the only safe way and need not be inefficient – we were tidied up and ready to start the engine within 45 minutes of the mast breaking.
Back to work
Although we were not far offshore I was initially keen to salvage as much of the rig as possible.
I therefore tied the upper part of the mast to the rail, with the hope of being able to encourage the entire rig to collapse on deck.
All that it did was to hold the lower section of the mast in place, but at least it was now stabilised and it was possible to work cautiously on deck without fear of it collapsing.
I next retied the upper mast to the rail, this time using a line via a snatch block to a primary winch.
Then I methodically went around the boat, cutting the halyards at the base of the mast, the backstays and both cap and lower shrouds.
Finally easing the line holding the masthead allowed it to gently slide into the water, with the lower section of the rig now lying on deck.
We were now assured of being safe, in the sense that the situation was fully under control.
A sharp knife made quick work of cutting through the internal halyards, allowing the upper part of the mast to drift away from the hull.
By the time they were all cut, what had been a very sharp knife was almost blunt – emphasising the importance of a really good knife.
With the top section of mast overboard and held now only by the forestay, which was leading directly over the bow, we were effectively lying to a giant sea anchor.
The final tidy-up
It seemed sensible to lie to this accidental sea anchor while we finished tidying up – the motion was comfortable so we could work relatively quickly and with ease.
It also helped stop us being blown further downwind of our destination, which remained the nearest available port.
Once we had lashed the lower part of the spar firmly on deck, coiled all the remaining rope and wire, and stowed it safely below deck, two of us made careful independent checks along both sides of the boat – that way we could be doubly sure there were no remaining lines over the side.

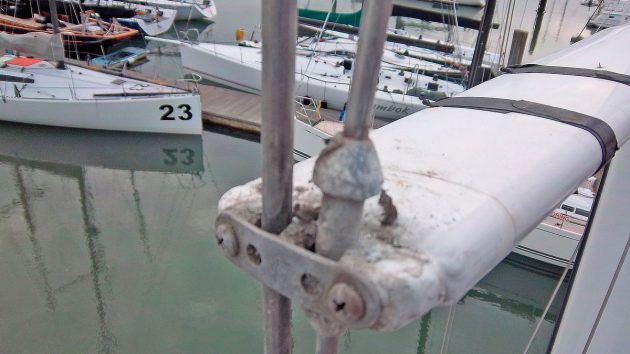
The twisted remains of Ammos‘s furling gear after cutting the forestay away following the dismasting. Credit: Rupert Holmes
At that point we cut free the forestay, reluctantly jettisoning the top half of the rig, together with the furling gear and the roller headsail, into water more than 300m deep.
Before starting the engine we had another double-check that there were no lines in the water. If this sounds a little paranoid, it’s right to be so at this stage.
After the chaos of having lines everywhere, both on deck and in the water, there are a plenty of instances of boats that foul the prop on an unseen line, after thinking everything was clear.
Heading for port
We then started the engine for the slow motor upwind to Argostoli. The wind had not moderated and there was a short, typically Mediterranean steep sea – however carefully you tried to steer around the biggest crests, every third wave brought Ammos crashing to a halt, sending spray flying up to the height the spreaders had been only an hour earlier.
But without the windage of the rig we were able to make progress upwind in conditions that would otherwise be challenging.
As we had not felt in any imminent danger at any stage, we had not connected the emergency antenna to the VHF and therefore weren’t aware our dismasting had been reported.
Continues below…
Refining rigging and improving performance
Sometimes you have to be cruel to be kind. When, back in 2014, I saw the mainsail on Peter Kewish’s…

Rigging setup: Turning round a yacht’s performance
Little old boats can offer enormous fun for your money, but they often require some tweaking in order to be…

How to check your rigging – video guide
There are plenty of ways that a mast or its rigging can fail, but there are often key telltale signs…

How a thorough rig inspection saved my mast and our Atlantic crossing
As a former RAAF (Royal Australian Air Force) aircraft technician, I was always going to perform a thorough rig check…
About 20 minutes after we started heading towards Argostoli a local ferry diverted towards us – and was clearly standing by to see if we needed help.
At the time we were enjoying more tea and biscuits – doing our best to keep the spray out of the mugs – and decided the best way to indicate all was OK was to raise our mugs in a very British salute.
As we slowly closed the shore the waves decreased in severity, with our average speed increasing from three knots to four and then to more than five, getting us into port just in time to catch a late meal and a well-earned carafe of local wine in a harbourside taverna.
Lessons learned from the dismasting
As I discovered, being diligent about looking after your rig may make it much less likely to fail, but there’s no absolute guarantee that it will stay up.
While my experience was of rig failure in very strong winds, it can also happen in much more moderate conditions – after all, most boats are fully powered up under full sail in less than 15 knots of true wind.
I’d read lots about other peoples’ experience of a dismasting and what they did to tidy up afterwards.
Examine all standing rigging terminals to help prevent a dismasting
Nothing gives you a recipe book solution for the specific circumstances you might face – but to me the essence of seamanship is being able to adapt your knowledge and experience to a situation you’ve not faced before.
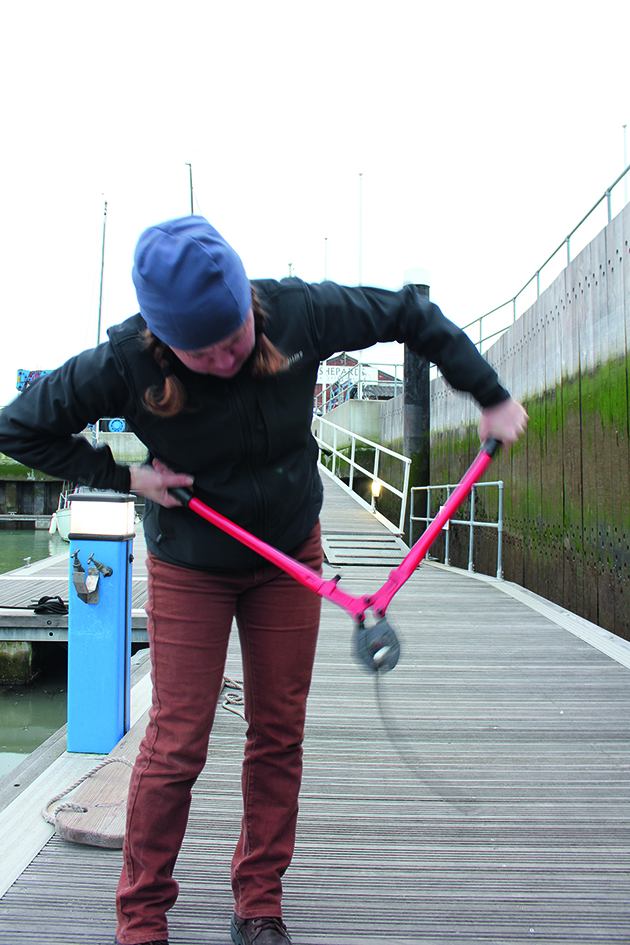
There’s only so much you can do to prepare for a dismasting, but one thing is to have a good pair of bolt cutters on board.
They don’t have to be expensive – mine were one of the best €13 purchases I have made.
I knew they were adequate for the 7mm rigging as I’d tested them on a spare piece of wire to confirm they were up to the job.
I would want to do this irrespective of the price of the tool: you need to be certain that you are equipped to cut the rig free, and the task is much more difficult with larger-diameter wire.
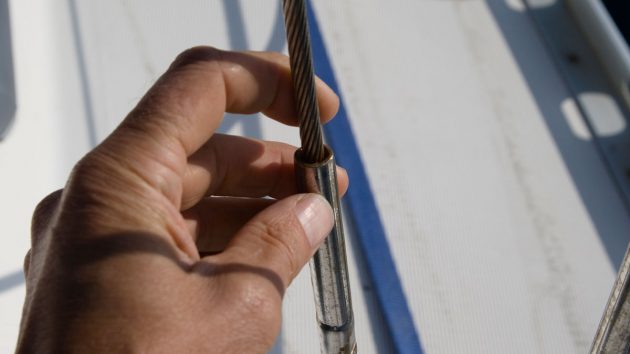
Most people will struggle to cut 10mm 1×19 wire, even with heavy-duty cutters. Credit: Rupert Holmes
In practice, the crucial point for me was crew safety.
In many cases this will be inextricably linked with the safety of the boat, but we were fortunate enough to be in no immediate danger and have time to think through our strategy for dealing with the situation.
Whatever you do, however, don’t risk your crew trying to save the rig – most of it will have to be scrapped in any case, so unless it’s absolutely safe to retrieve it or you would put yourselves in further danger by not preserving some of it for a jury rig, ditch it.
Finally, you’ll need your engine to get out of trouble, so check for lines over the side – then check twice more.
A dismasting results in a huge amount of debris in the water, any of which could foul your propeller – make sure it’s absolutely clear before engaging gear.
What’s best? Heavy-duty wire cutters or a hacksaw?
Never assume that the wire cutters supplied with a boat will do the job.
My partner Kass Schmitt tried cutting 10mm 1×19 wire with the wire cutters on her Humphreys 36 Zest.
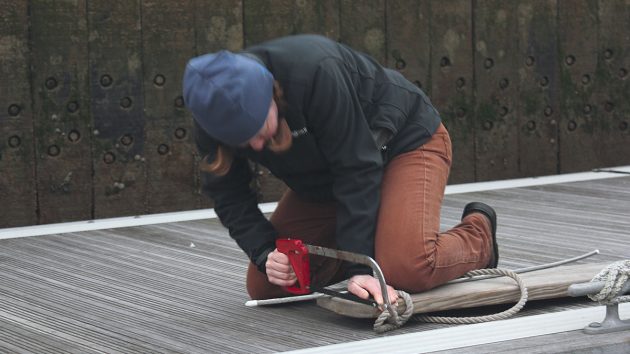
A tungsten carbide hacksaw blade did cut the wire – but it was a slow job. Would it cut quick enough in the event of a dismasting? Credit: Rupert Holmes
At first glance 10mm wire may not sound that much heavier than 7mm – but it’s roughly two-and-a-half times the cross- sectional area.
And that makes cutting it a lot more difficult. Even the leverage of substantial 24in wire cutters made barely any impression on the wire.
Next, Kass tried using a tungsten carbide hacksaw blade.
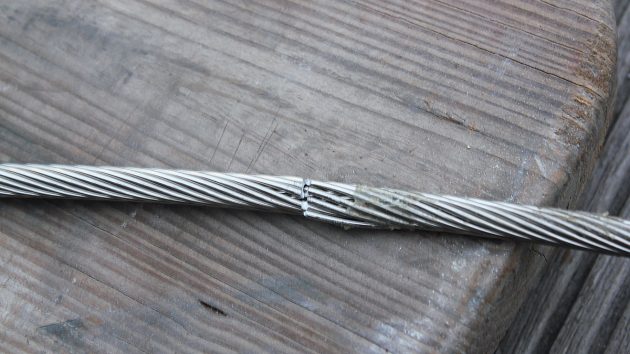
Cutting through 10mm 1×19 stainless steel rigging wire proved heavy going. Credit: Rupert Holmes
This certainly made more of an impression – sawing through four strands of wire in two or three minutes, but certainly not enough to be able to clear away the rig in a hurry if it’s in danger of damaging the structure of the hull.
A decent set of ratchet or hydraulic cutters are now on the shopping list.
Reasons rigs fail
Many rig failures occur owing to poor tuning.
It’s an all too common fallacy to think that tuning a rig is primarily the preserve of the racing community: accurate tuning is a crucial part of ensuring the stability of any rig.
Most cruising boats suffer from standing rigging that is too slack.
This may not matter unduly for a masthead rig with in-line spreaders, apart from the fact that there is extra fatigue from movement of the lee shrouds.
Check the spreaders carefully during a rig check to help prevent a dismasting – these are in a pretty poor state
The correct setting for such a rig is for the lee shrouds to be just holding a small amount of tension when the boat is fully powered up, sailing to windward with around 20° of heel.
However, any slack in the lee cap shrouds is certainly an issue for boats with swept-back spreaders – if the lee cap shroud is slack, the windward one is trying to rotate the rig, with considerable force.
Therefore, even when the boat is fully powered up sailing to windward there should be some residual tension in the leeward shroud.
Balancing forces
The areas around the spreader brackets and where a keel-stepped mast passes through the deck are common points for failure to occur.
At the spreader bracket, a host of forces are at work from the lower/intermediate shrouds and the spreaders themselves.
These forces should all balance out to keep the mast upright, prevent inversion and ensure that any bend occurs evenly.
While it’s important to ensure you have sufficient tension in the cap shrouds, you should guard against excess tension in lower and intermediate shrouds – if they are allowed to pull the midsections of the mast to windward, the upper section of the rig will bend off to leeward, reducing the angle that the cap shrouds make with the mast.
The geometry of this means that more downward (compression) force is placed on the rig, and there’s a smaller component of sideways force to prevent it falling over.
It’s one of the most common reasons for failure of a rig that’s otherwise in good condition.
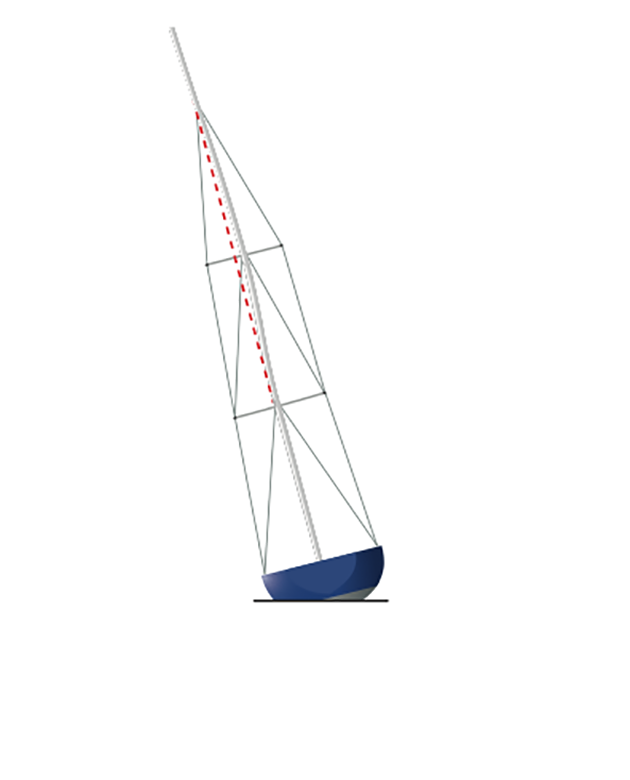
Lower or intermediate shrouds that are too tight allow the upper mast to curve off to leeward. This reduces the angle the cap shrouds make with the spar, which in turn reduces the lateral support they can apply to the rig and can lead to rig failure at the spreaders. In the illustration above, the mast is bowing to windward at the upper spreader: windward intermediate is too tight
The spreaders also have their part to play in the way they transfer force to the mast.
All the tension should be in the rigging wire: the spreaders should be in compression, which means ensuring they meet the mast at the correct angle.
Fore-and-aft spreader angle should be preset by the spreader bracket and match that naturally set by the shrouds when the mast is correctly raked and prebend has been established.
Incorrect rig set-up can result in incorrect spreader angles, straining the spreaders and bracket and contributing to mast failure.
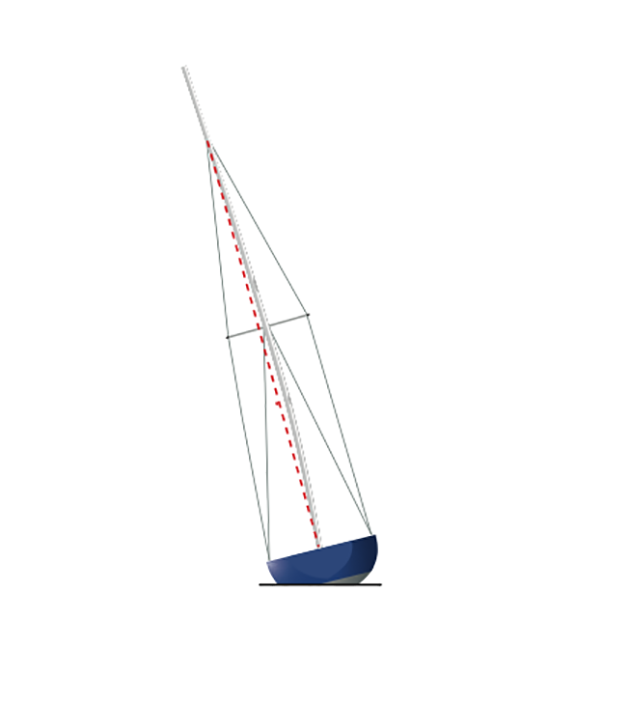
Top of mast curving to leeward: windward lower too tight
Vertical spreader angle controls the way in which the spreader transfers loads from the cap shrouds.
The spreaders should be angled upwards by 6-7°, minimising the bending moment on the spreader and keeping it in compression.
If the spreader droops, the forces are trying to wrench it off the mast, but droopy spreaders are a disconcertingly common sight – especially on older boats.
Modern brackets are set up to allow most of this compressive force to be transferred straight through the bracket to the opposite spreader, forming a rigid structure with the shrouds.
The bracket will usually either pass straight through the mast or use a stiff collar around the spar.
There’s a lot going on at the spreader brackets, and to complete the picture the mast is weakened by the necessity to drill holes in it to fit the bracket and shroud terminals.
This certainly appeared to be the final straw for Ammos – the mast fractured through the holes for the rivets that attached the spreader brackets.
The point where the mast passes through the deck is less subject to conflicting forces, but if the cap shrouds or forestay fail will provide a hard edge against which a mast bending beyond its limits is likely to fail.
Don’t overlook the details
So what had gone wrong? As we lost the evidence we’ll never be certain why Ammos’ rig came down, but a lot is known about the most common reasons for rig failure.
While we tend to think of failure of standing rigging wire, or the swages at each end, as being the most likely culprits, this is by no means the only consideration.
Some of the smallest elements of the rig – such as clevis pins and split pins – can equally be to blame.
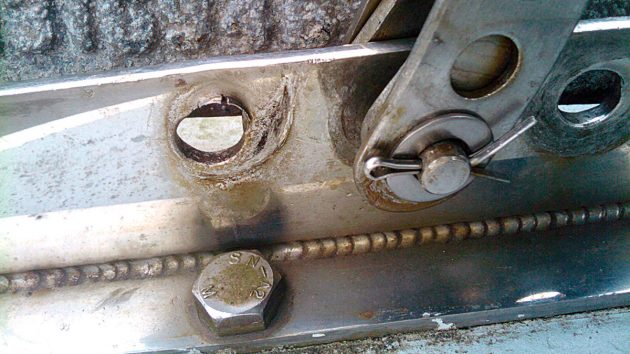
Wear and deformation due to an ill-fitting clevis pin. Change it to avoid the threat of a dismasting
It’s of vital importance that these components are of the correct size, yet I’ve seen plenty of boats where an insubstantial clevis pin has been used as a substitute.
There are two reasons why this is a problem: the obvious one is the smaller pin is not as strong, but also the load will not be spread as evenly as the designer intended.
This had been an issue when I bought Ammos – the forestay was attached with a clevis pin of only half the necessary diameter.
It was already badly bent, and most likely no more than one long windward passage away from failure.
Needless to say, it was one of many things replaced before the boat was launched.
Why I think the dismasting happened
On reflection, having subsequently examined other Discovery 3000s, it seems likely that the problem with Ammos’s rig was down to insufficient forward force exerted at the spreaders.
This may have been exacerbated by my sailing to windward under headsail alone; research shows that this can cause failure as the compressive forces from a tight jib luff try to force the mast out of column when not offset by the balancing forces exerted by a tight mainsail leech and kicker.
In this case, the spreaders, lower shrouds and/or babystay are the only forces supporting the centre section of the mast, and on Ammos this was compounded by relatively insecure attachment of the spreaders – there were just four rivets each side.
My replacement rig is much more robust in this respect, with the spreaders attached to a collar that fits securely round the spar.
How to stop your rig failing
- The rig should be closely examined for damage or other problems at least once a season. It’s also good practice to do so before a long offshore passage.
- Examine all standing rigging terminals. Any sign of movement or broken strands of wire is a sure sign of potential failure: rigging needs immediate replacement.
- Examine the entire length of the spar for dents and other impact damage.
- Look for evidence of corrosion around all fittings and at the mast foot.
- Check the spreaders carefully – nicks, chips and other dings decrease their ability to withstand compression.
- Check all clevis pins are of exactly the right size and are properly secured.
- Tape the sharp edges of split pins in a manner that allows water to escape.
- Look at the rig during regular general boat checks – it’s easy to inspect at deck level and binoculars can be used to look for problems aloft. This should also be standard procedure at dawn and before dusk on an offshore passage.
- Tuning the rig properly will help prevent dismasting and prolong the life of your standing rigging.
- Electronic or dye testing can help to identify any potential microscopic cracks that may be a precursor of crevice corrosion.
Why is stainless steel used to make rigs and rigging?
Stainless steel wire and rod is commonplace on most boats. It’s not without problems, but for long-term cruising it has yet to be bettered.
Broken strands can often be found by inspection and usually occur near stress points such as swages and spreader tips.
Cracks from fatigue in wire, rod or fittings are less obvious, but can be tested for using electronic or dye testing.
They are a major reason why insurers recommend complete rig replacement every 10 years.
In swages, these cracks are often a result of poor swaging technique.
For example, if a swage is passed through the swagging machine too many times it will work-harden and become weaker.
Worn swaging machines also cause problems as they do not reduce the terminal to the correct size, which may result in the wire pulling out or water ingress into the terminal.
This can permit crevice corrosion; also an issue with swageless terminals which have not been filled with sealant.
Galvanised wire
By comparison, old-fashioned galvanised rigging is less proneto fatigue.
However, it is stretchy compared to 1×19 stainless steel wire, which makes it difficult to maintain the tune of complex modern rigs.
It also requires regular attention to keep corrosion at bay, usually proofing with a mix of varnish and linseed oil.
With care it can last for many years and is easy to repair, so should not be dismissed by long- term cruisers with simple rigs that only require basic tuning.
If galvanised rigging is used, it’s essential that galvanised fittings are employed rather than stainless, as electrolytic action with stainless steel will rapidly strip the zinc coating and cause severe internal and external corrosion.
Fibre rigging
At the opposite end of the scale, many performance yachts now use fibre rigging.
It’s 70% lighter and 50% stronger than stainless steel, and has been well proven over thousands of sea miles.
Some types now claim a lifespan of up to 15 years.
These advantages, together with gradually reducing cost, mean that fibre rigs may become viable for cruisers in future.
However, it has its problems, namely cost, high susceptibility to UV damage should the outer braid sheath be damaged, and difficulty of inspection owing to the core fibres being concealed by the sheath.
Enjoyed reading Coping with a dismasting & rig checks? 
A subscription to Practical Boat Owner magazine costs around 40% less than the cover price.
Print and digital editions are available through Magazines Direct – where you can also find the latest deals.
PBO is packed with information to help you get the most from boat ownership – whether sail or power.
-
-
-
- Take your DIY skills to the next level with trusted advice on boat maintenance and repairs
- Impartial in-depth gear reviews
- Practical cruising tips for making the most of your time afloat
-
-