
How to set up three common types of rig: the traditional masthead with a single set of in-line spreaders, single-spreader swept fractional rigs, and fractional rigs with two sets of swept spreaders. David Harding reports

How to set up your rig: tension your shrouds on masthead or fractional
If boats were cars, many of those I see sailing along would be coughing and spluttering down the motorway at 35mph in third gear with three flat tyres and a smoky exhaust. Others would cruise past in top gear at 70, making half the noise and using a fraction of the fuel.
Would these top-gear drivers be working any harder? Would they have cars that were faster by design and more expensive? Not at all. They would simply be the ones who had pumped up their tyres, learned their way around the gearbox and had their engines serviced.
It’s worth keeping an eye on your leeward cap shrouds during early-season outings after the mast has been re-stepped. The ones on this yacht could do with a little more tension
The obvious question, then, is why so many boat owners seem to leave their quest for efficiency and economy on the dockside.
One answer is that many are unaware how inefficiently their boats are performing. Another is that there’s no MOT for sailing boats and no driving test to make sure people know how to sail them (thank goodness on both counts).
Whatever the reasons, the fact remains that an efficient rig is fundamental. If the rig’s not right, the sails have no hope of setting properly.
And that’s important whether you’re racing or cruising, because sailors of both persuasions ultimately want the same: maximum lift for minimum drag.
For racers, that means more speed and better results. They carry more sail because they have more crew to handle it and more weight on the rail to balance it.
Cruisers carry less sail but, if it works efficiently, it means less heel, less leeway, better pointing, less tacking, a lighter helm and greater comfort than if it’s working inefficiently – plus the ability to get home before night falls or the pub shuts. Who can object to that?
What matters is that the sail you’re carrying is driving you forwards, not pushing you sideways.
When I question cruising sailors about the state of their rig I often get the reply ‘Oh it doesn’t matter – I’m not racing!’.
Those I know who have done something about it, however, have been delighted by the transformation their boats have undergone and have had to agree that cruising fast and comfortably is definitely better.
Setting up your boat rigging
In this article we’re going to look at how to set up the three most common types of rig: the traditional masthead with a single set of in-line spreaders, single-spreader swept fractional rigs, and fractional rigs with two sets of swept spreaders.
For simplicity we’re assuming the use of 1×19 rigging except where mentioned otherwise.
Variations in boat rig type are almost infinite by the time you take into account deck-stepped and keel-stepped masts, masthead rigs with swept spreaders, jumper struts, fractional rigs with in-line spreaders, and so on.
Once you understand the basics, however, you’ll find that you can apply your knowledge to good effect on most types of rig.
Rig tuning is not only for the experts. Experience helps, of course, and a multiple-spreader fractional rig is harder to tune than an old tree-trunk of a masthead rig from the 1970s.
Nonetheless, with practice, a good eye and some observation you will probably find you can set it up pretty well.
You might want to call in a rigger or an experienced rig-tweaker to help or to do it for you the first time, and perhaps to check it periodically thereafter, but at least if you know what to look for you’ll notice when anything needs adjusting.
A word of warning when it comes to boatyards that have re-stepped your mast: sometimes re-stepping means just that and no more.
I have been on boats whose owners have assumed that the yard had set up the rig, whereas in fact it had just been dropped in and the bottlescrews hand-tensioned to stop it falling over.
It’s scary to think of the number of boats that must have been sailed in this condition.
What you will need to tune your rig
- Essential
A calm day: don’t try setting up your rig in more than a few knots
of windA boat that’s floating level fore-and-aft (and preferably laterally
as well)Screwdriver/lever bar
Spanners (fixed or adjustable)
Needle-nose pliers for split-pins
Electrical insulation or self-amalgamating tape
Lubricant for bottlescrews
Tape measure (folding/small cassette type, or ideally folding rule)
- Useful
Spring balance
Long tape-measure
Rig-tension gauge
The importance of enough tension: Why tight is right
If you think you’re being kind to your boat by leaving the rigging slack, think again. It’s true that some keelboats (such as Squibs and XODs) sail with the leeward cap shroud waving around in the wind, but that doesn’t work on yachts designed to go to sea.
Rigging that’s under-tensioned puts infinitely more load on the wire, bottlescrews, terminals and hull structure because of the snatch loads every time the boat falls off a wave. When it hits the bottom of the trough, anything that’s free to move gets thrown forwards and sideways before being brought up short by whatever happens to be in the way to stop it. That applies to the crew, to loose gear down below or to the mast. Think of the inertia to which a mast is subjected because of its height, and you can imagine the loads involved.
If the rigging is sensibly tight, on the other hand, movement and the consequent stresses are minimised.
Boats are built to withstand the static loads of a properly-tensioned rig, but asking them to cope with constant snatch loading is unfair – so don’t kill your boat with kindness.
As we discuss in the sections on the types of rig (below), masthead configurations with in-line spreaders need less cap-shroud tension than swept-spreader fractional rigs. This is because in-line caps are only supporting the mast laterally. The backstay stops it moving forwards, so each wire has a separate, clearly-defined role.
Aft-swept caps support the mast both laterally and fore-and-aft. Being swept aft typically about 25°, they need to be under a lot of tension to keep the forestay tight. Because they’re also at a much shallower angle to the mast, they bear between three and five times the load of the forestay.
With fractional rigs, then, it’s vital to keep the cap shrouds tight. If they’re too loose, the forestay will sag too much, the headsail will become too full and its leech will be too tight. Then the boat will become unbalanced, heel too far, make more leeway and lose both speed and pointing ability.
Structurally, under-tensioned rigging with a swept-spreader rig presents a problem in addition to the issue of snatch loading. Tension in the leeward cap shroud is important in keeping the mast in column, to the extent that Loos and Co (the manufacturer of the popular rig-tension gauges) states that a mast loses 50% of its lateral stiffness when the leeward cap goes slack. When this happens, the mast is effectively hinging around the forestay and the windward cap shroud and is far more prone to pumping as the boat bounces around.
The main reason why under-tensioned rigs on cruising boats stay standing as they do is that manufacturers build in enormous margins.
Even so, proper tension means better performance and greater safety. The ‘it doesn’t matter – I’m only cruising’ excuse for slack rigging just doesn’t cut it!
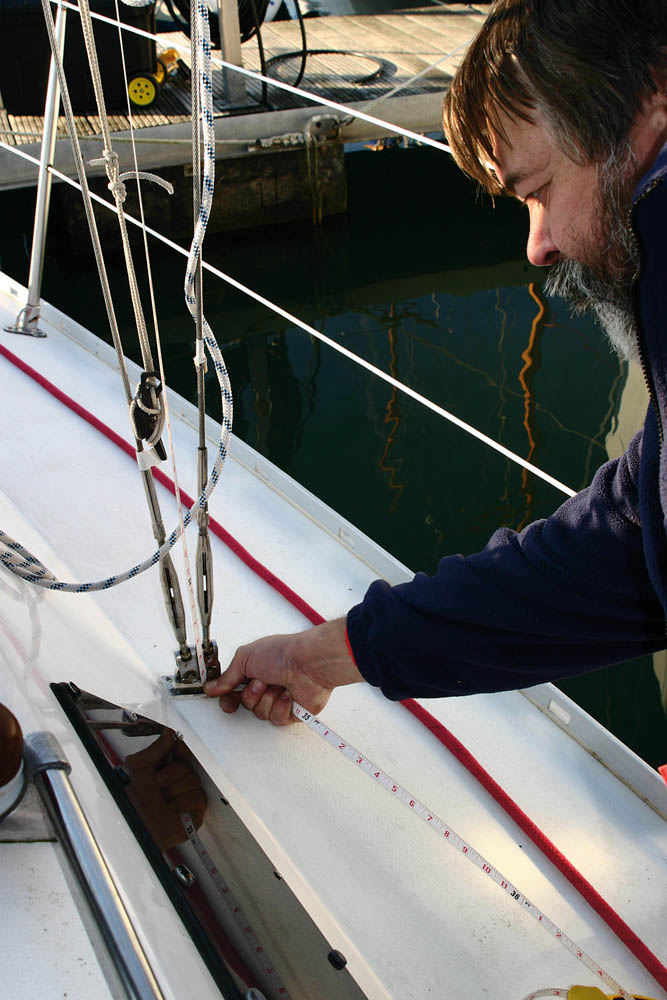
How to measure rig tension

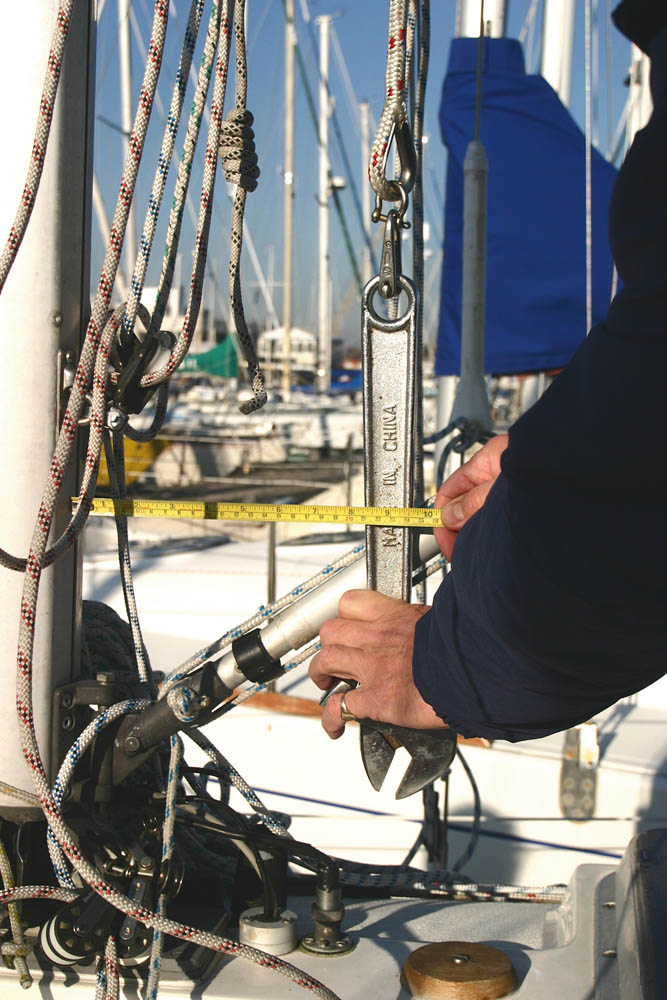
This Loos gauge (left image) is indicating that the 6mm wire in the cap shroud is at 22% of its breaking strain (730kg). To measure the stretch, extend a tape measure (right) (or ideally a folding rule) to 2,000mm and mark this distance up the wire…
…but start with the end of the tape a couple of millimetres above the top of the swaging. As the wire is tensioned it will stretch, increasing the gap below the end of the tape.
Experienced riggers and rig-tweakers will often tension the rigging at the dockside by feel, then sight up the mast and make any adjustments under way.
Most people aren’t confident enough to do this, though – so what are the best ways to check the tension as you wind down the bottlescrews?
The simplest and quickest way is to use a rig-tension meter, such as the Loos gauge. Once you know the diameter of the wire, it will give you the load both in kg and as a percentage of its breaking strain.
The gauge for rigging of 5m and 6mm (and up to 14% of breaking strain on 7mm) typically costs around £65, while the bigger version for wire from 7mm to 10mm is closer to £200.
If you don’t have a tension gauge, you can calculate the percentage of a wire’s breaking strain by measuring its stretch, normally over a distance of 2m: when 1×19 wire has stretched by 1mm over a 2,000mm length, it’s at 5% of its breaking load whatever its diameter.
Most cruising boats have rigging made from 1×19 wire. On sportier boats, it might be Dyform or rod, in which case 5% of breaking load is indicated by stretch of 0.95 and 0.7mm respectively. For the purpose of our illustrations, we’ll assume 1×19.
For accurate measurement the rigging needs to be completely slack. Hold the end of the tape a couple of millimetres above the top of the swaging, then measure 2,000mm up the wire, secure the other end of the tape here and start tensioning. When the gap between the top of the swaging and the end of the tape has increased by 1mm, you have reached 5% of the wire’s breaking strain, so 3mm equates to 15% and 5mm to 25%.
Bear in mind that 1×19 wire will be affected by bedding-in stretch during its first few outings, so new rigging will need to be re-tensioned a time or two during the first season.
Sensible precautions
1. Don’t force dry bottlescrews: keep them well lubricated.
2. Don’t use massively long tools for extra leverage on the bottlescrews. If you can feel the load,
you’re less likely to strain or break anything.3. Most boats will flex to some extent when the rig is properly tensioned. If you’re concerned about excessive bend, take it easy, use a straight edge across the deck to check for movement, and seek advice.
4. The percentages of breaking load quoted assume that the rigging is of the correct diameter as specified by the designer, builder or rigger.
How to set up a masthead rig with single in-line spreaders
This is the simplest type of rig to set up. Whether it’s keel-stepped or deck-stepped and supported by forward lowers or a babystay, it’s the same basic procedure.
Step 1: Get the mast upright athwartships
 With the bottlescrews on the cap shrouds not even hand-tight and the lowers/babystay completely loose, hoist a tape measure to the masthead on the main halyard (provided it runs over a central sheave).
Measure the distance to fixed points on both sides that are symmetrical about the centreline, such as the base of the chainplates.
If you don’t have a long tape measure, use the halyard itself (this is where a spring balance can help you gauge the same tension on each side).
Centre the masthead by adjusting the port and starboard cap shrouds until the measurements are the same, then hand-tighten the bottlescrews by taking the same number of turns on each side.
Re-check and adjust as necessary.
A long tape measure is useful for getting the mast upright.
Step 2: Setting the rake
 Most boats are designed to sail best with some aft rake, typically 1°-2°. If you have a recommended measurement from a designer, builder, rigger, sailmaker or other reliable source, use it.
Rake is determined principally by the length of the forestay. Some roller-reefing systems allow no adjustment but you can increase length by adding toggles.
Adjust the forestay and backstay, checking the rake with a weight suspended from the end of the main halyard. One degree of rake is about 6in (15cm) in 30ft (9m).
Hand-tight on the backstay’s bottlescrew (or gentle use of the tensioner) is fine at this stage.
Rake is measured from the aft face of the mast, at or below boom-level. If the boat’s rocking around, suspend the weight in a bucket of water to dampen the movement.
Step 3: Tighten the cap shrouds and backstay
 With the mast now upright laterally and the rake set, tension the cap shrouds by taking the same number of turns on each.
Take no more than two or three full turns on one side before doing the same on the other.
Count carefully.
You’re aiming to tension the caps to 15% of their breaking strain, measured as explained on page 41.
That might be much tighter than you’ve ever had them before!
Tension the backstay to 15% of its breaking load.
Note: Using ordinary hand-tools on the bottlescrews, it’s hard to over-tension the rigging
Step 4: Tighten the lowers / babystay
 The aft lowers and forward lowers/babystay control the bend at mid-height.
A mast should bend forward in the middle, though only to a small extent on masthead rigs of heavy section.
This ‘pre-bend’ is principally to counter two factors in heavy weather: increased forestay loads pulling the top of the mast forward, and the head of a reefed mainsail pulling the middle aft.
Together, they can result in the middle of the mast bowing aft, which makes it unstable and is bad for sail trim. For maximum strength in extremis it should be straight.
Use the forward lowers or babystay to pull the middle of the mast forward. The bend thus induced should be no more than half the mast’s fore-and-aft measurement.
Then take up the slack in the aft lowers.
They don’t need to be tight; they’re just countering the forward pull.
Sight up the luff groove to make sure the mast is straight laterally. Correct any deflections with the lowers.
If you set up the caps properly to start with, you should not adjust them again at this stage.
Step 5: Check the rig under sail
 Go sailing under full canvas in flat water and enough wind to power the boat up fully – approaching the top end of full-sail conditions, so you’re heeling around 20°.
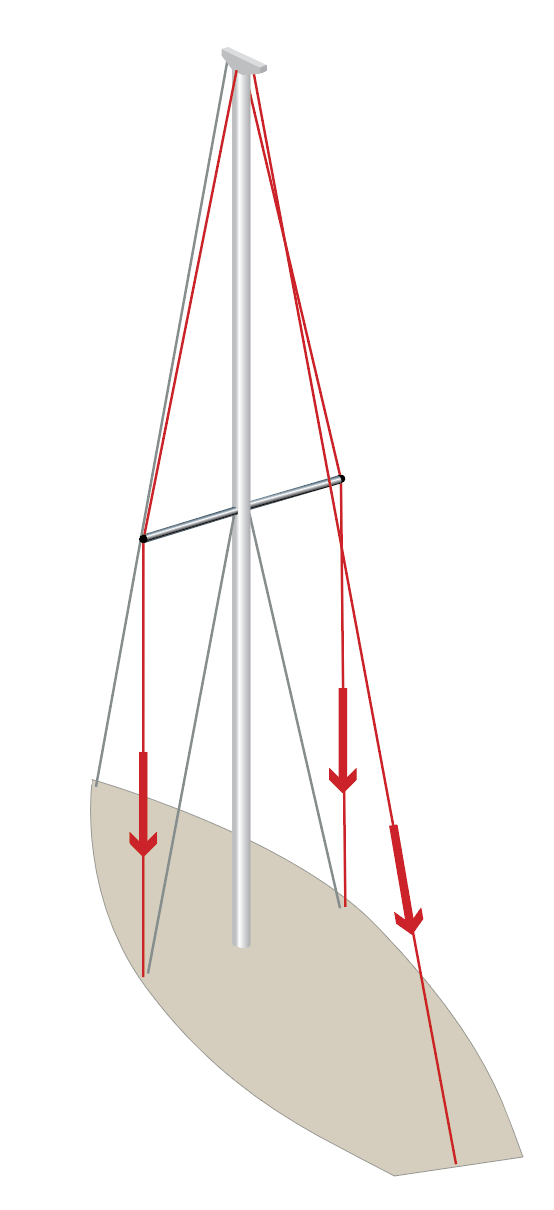
First, make sure the leeward cap shroud isn’t waving around in the breeze. You should be able to deflect it with a finger by a few inches; no more.
If it’s too loose, take a turn or two on the leeward bottlescrew, then tack and do the same on the other side.
Now sight up the back of the mast.
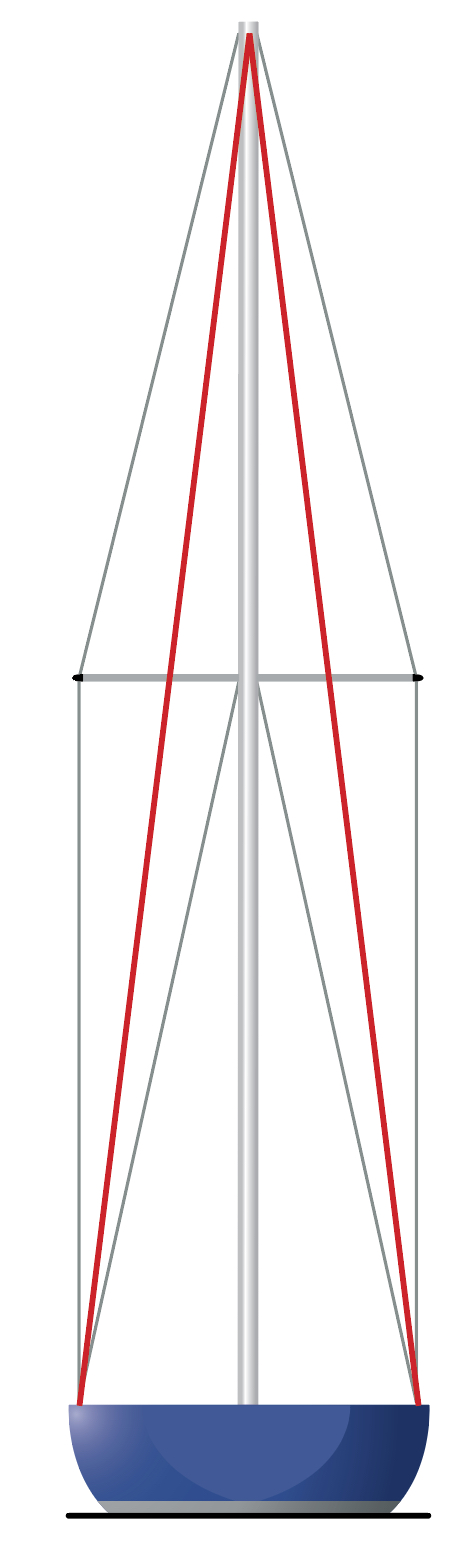
It should be straight athwartships and bending slightly forward in the middle.
Athwartships deflection might make it look as though the top is falling away to one side (see diagram), but it won’t be if it was centred properly in Step 1. Straighten the middle by adjusting the lowers
If it’s straight or bending aft in the middle, try increasing the backstay tension (but not beyond 30% of its breaking strain) and, if necessary, tensioning the forward lowers/babystay and slackening the aft lowers.
Remove any lateral bends by adjusting the lowers.
Once you’re happy, lock off the bottlescrews to make sure they can’t come undone.

Inverted bend (mast bowing aft in the middle) is bad for sail trim and potentially dangerous for the rig.
Setting up a fractional rig with single, aft-swept spreaders
Widely used on smaller cruisers and cruiser/racers, this configuration needs a very different approach from an in-line masthead rig
Step 1: Get the mast upright athwartships
This stage is the same as with a masthead rig (scroll up).
Step 2: Set the rake
 Fractional rigs often need more rake than a masthead equivalent. Anything up to 2° is the norm.
This time, however, rake is set by the forestay and cap shrouds rather than the forestay and backstay.
With a swept-spreader fractional rig it’s the cap shrouds, not the backstay, that stop the mast moving forward. They provide both fore-and-aft and lateral support, so they’re doing two jobs.
The backstay’s principal role is to control the topmast and mast-bend. Because it’s above the point where the forestay joins the mast, it’s not pulling directly against the forestay and therefore has less effect on forestay tension. How much it pulls against the forestay depends on factors including the height of the topmast, the stiffness of the mast section and the tension of the lower shrouds (which determine the bend).
Step 3: Tighten the cap shrouds
 With the mast upright laterally and the rake set, it’s time to start tensioning the cap shrouds.
Forestay tension is achieved primarily through the caps, and because they’re swept back at such a shallow angle they need to be seriously tight.
Their maximum tension is 25% of breaking load, but it’s best not to tension them all the way in one go because that would result in a very bent mast: tensioning the caps pushes the spreaders, and therefore the middle of the mast, forward.
Start by taking them to about 15% of breaking load, then tighten the lowers to pull the middle of the mast back so it’s straight.
This is how the swept-spreader fractional rig works: the caps and lowers are working against each other, caps pushing and lowers pulling, to stabilise the middle of the mast. Sight up the mast when it’s straight to check for lateral deflection, correcting it with the lowers.
With a flexible mast you might need to repeat the process, taking the caps to 20% before tensioning the lowers again.
Otherwise go straight to the next stage, which is to pull on the backstay.
Since the backstays on fractional rigs often have cascade purchases at the bottom you can’t measure the tension by stretch as you can with wire, so you have to do this by feel: pull it tight, but don’t go mad.
Tensioning the backstay bends the mast and therefore shortens the distance from the hounds (where the caps join) to the deck. This loosens the caps, so it’s easier to tension them back to the 20% mark.
When you let the backstay off, the caps will tension again and should be at about 25% of breaking load – but no more.
Step 4: Set the pre-bend
 Pre-bend is the fore-and-aft bend in the mast of a fractional rig before the backstay is tensioned.
Take a few turns on the lowers to achieve the right amount of pre-bend. It should be more than with an in-line masthead rig, but a mast should never bend to more than 2% of the height of the foretriangle even with the backstay tensioned (that’s about 180mm in 9m, or 7in in 30ft).
Check to see how far the mast bends with a tight backstay. The optimum bend will often be determined by the cut of the mainsail, or recommended by the sailmaker or class association.
Pre-bend is vital because most fractional rigs don’t have forward lowers or a babystay, so if the mast were to bend aft in the middle (inverted bend) it could collapse.
In fresh conditions, especially under spinnaker, it’s a wise precaution never to release the backstay completely. That stops the upper section of the mast being pulled too far forward.
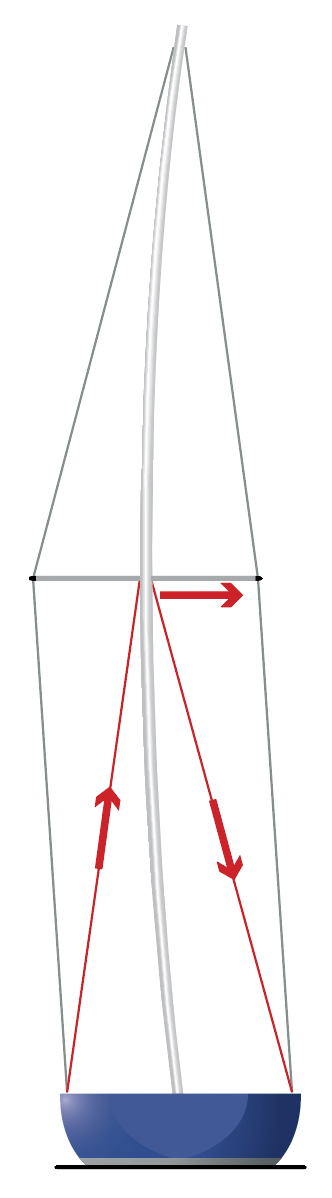
Step 5: Check the rig under sail
The caps should be tighter than with a masthead rig, with no significant slack on the leeward side when the boat’s hard on the wind and heeling 15-20°.
If the static tension is up to 25% but the leeward cap is always slack, the boat might be bending. That’s a topic beyond the scope of this article!
Sight up the mast to check the bend both fore-and-aft and athwartships, adjusting the lowers as necessary.
Setting up a fractional rig with two sets of aft-swept spreaders
As mast sections have become slimmer, this is now a popular configuration on boats between 30ft (9m) and 40ft (12m) but it’s more complex to tune.
Step 1: Get the mast upright athwartships
This stage is the same as with the other types of rig.
Step 2: Set the rake
Follow the procedure as described for single-spreader fractional rigs. Generally speaking, more rake improves upwind performance but too much will induce excessive weather helm and hamper performance downwind. Getting it right might involve some trial and error.
Steps 3 & 4: Tighten the caps and set the bend

The same fundamentals apply as for a single-spreader rig, but this time after each tensioning of the cap shrouds, which induces bend, you have to straighten the mast by tensioning both the lowers (also known as D1s) and the intermediates (D2s).
The D1s control the bend between the deck and the upper spreaders and the D2s between the lower spreaders and the hounds, so their areas of influence overlap.
On boats where the D2s terminate at the lower spreaders you have to send someone aloft to adjust them. These are referred to as discontinuous intermediates.
If they run over the spreader tips and down to the chainplates (continuous intermediates) you can do everything from on deck.
You need to achieve an even bend fore-and-aft. If the mast is bending too much at the bottom and is too straight at the top, tighten the D1s and slacken the D2s.
S-bends can creep in athwartships and make it look as though the top of the mast is off-centre. If you set up the cap shrouds properly it shouldn’t be, so don’t fiddle with them any further now: take out the bends with the D1s and D2s.
You’re aiming for a cap-shroud tension of 20-25% of breaking strain, as with a single-spreader fractional rig, and again the sweep-back of the spreader means that the caps will be slackened as you pull on the backstay.
Step 5: Check the rig under sail
As with other types of rig, get the boat heeling around 20° on the wind, tension the backstay and feel the leeward cap to make sure there’s only minimal slack.
Removing any kinks and S-bends can take more tweaking of lowers and intermediates, the latter being more fiddly to adjust if they’re discontinuous.
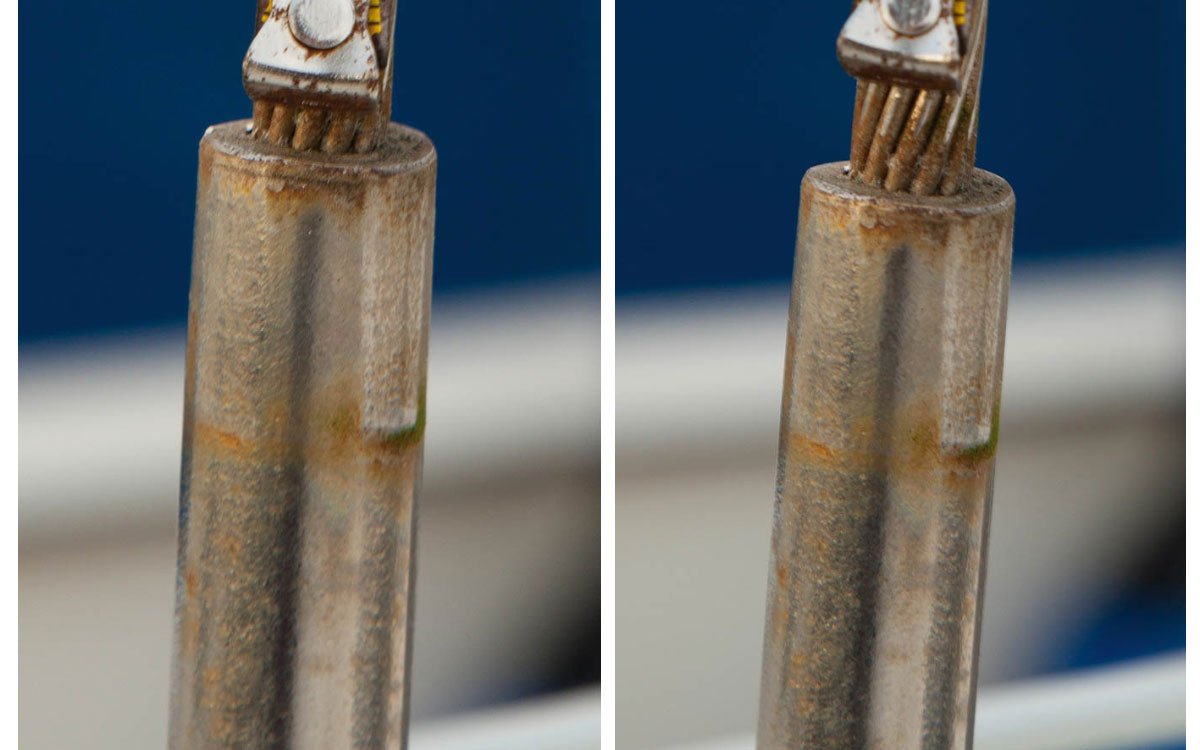
If the masthead looks as though it’s falling off one way, it’s probably because the D2 on the opposite side is too tight.

Left: Windward lower too loose. Right: Windward intermediate too tight.
Why not subscribe today?
This feature appeared in the May 2012 edition of Practical Boat Owner. For more articles like this, including DIY, money-saving advice, great boat projects, expert tips and ways to improve your boat’s performance, take out a magazine subscription to Britain’s best-selling boating magazine.
Subscribe, or make a gift for someone else, and you’ll always save at least 30% compared to newsstand prices.
See the latest PBO subscription deals on magazinesdirect.com