
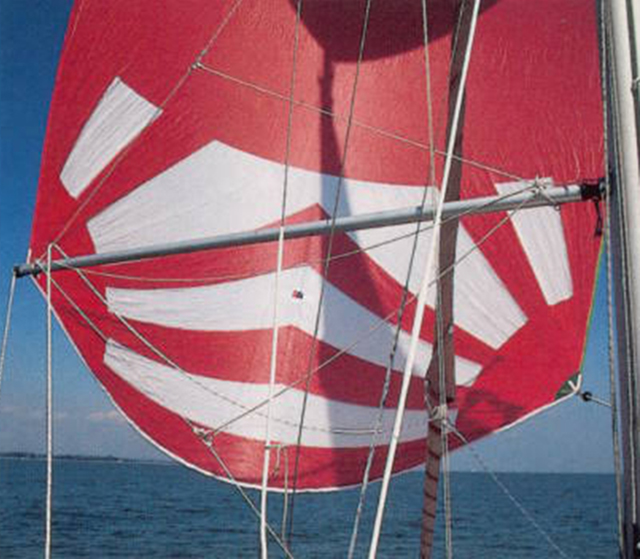
David Harding helps a PBO reader figure out how to rig a spinnaker on her Contessa 26

How to rig a spinnaker on a small yacht – what you need and where to fit it
Jo Mooring Aldridge has had a cruising chute on her Contessa 26, Sulali, for years. But she has hardly used it, because it only flies happily with the apparent wind on or a few points abaft the beam.
Her solution was to buy a spinnaker. That was the easy part. Next, she started thinking about everything else she had to buy and fit. David Harding shares some tips to help Jo rig a spinnaker on Sulali.
Kit for a kite
All you need with a cruising chute is a halyard, a means of attaching – and, preferably, adjusting – the tack strop, a couple of sheets, and a block on or near each quarter.
A spinnaker is more complex. You will need:
■ A pole and an attachment point on the mast for its inboard end. You can attach the pole to a fixed ring, though it’s better to have one that can slide up and down on a track. The pole should be fitted with a pair of bridles for the uphaul and downhaul, and it will need somewhere to live on deck when not in use.
■ An uphaul (topping lift) and a downhaul. The uphaul runs through a sheave or a block on the mast, normally at about spreader height on a boat with a single-spreader rig.
It can then be run aft if you want to adjust it from the cockpit. On a boat of the Contessa’s size, the downhaul can be led to a point just ahead of the mast, as it is on dinghies; larger boats will need the block further forward, to provide a more vertical pull.
■ Sheets and guys Boats up to 30ft (9m) or so usually have a single set of sheets rather than sheets and lazy guys, because they’re seldom under enough load to present difficulties during gybes. Instead of lazy guys, you find barber haulers, alternatively called tweakers or twinning lines. Barber haulers deflect the guy (which becomes the sheet on the other tack) downwards and outwards to the point of maximum beam, thereby increasing the angle between pole and guy for a more effective pull.
Each barber hauler consists of a relatively light block through which the sheet is roven before passing through the turning block on the quarter. Snatch blocks are ideal, because they can be snapped on and off. A line attached to the block passes through another block which is fixed as far outboard and as close to the point of maximum beam as possible. The line needs to be long enough not to deflect the (leeward) sheet on any point of sailing. From the toerail, it should be led to a cleat within easy reach of the cockpit.
Rig a spinnaker: Fixing the kit
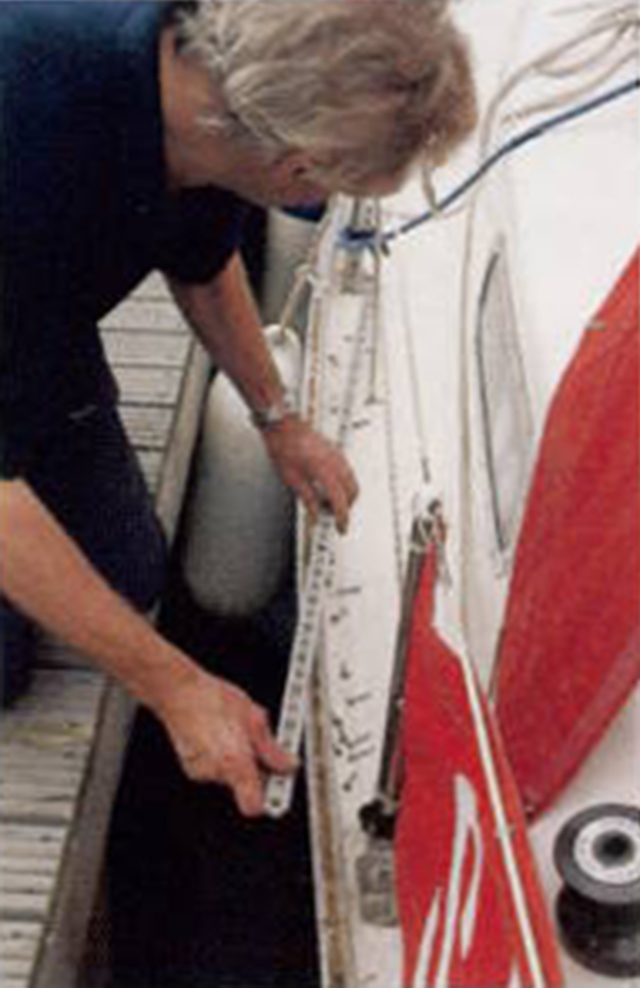
Jo was already part-way there with Sulali, because she had the spinnaker, the sheets, the halyard, the pole, and the track on the mast with a ring. The halyard ran through a block at the masthead and then down the outside to a winch; nothing could be simpler. Most masts on new boats come with the necessary provisions for a spinnaker halyard, but if yours doesn’t, you may want to call in a rigger. Shackling a block to the masthead is one thing; cutting through the mast wall and inserting a sheave box is a job many people would rather leave to an expert.
1. Feeding a mouse line through the uphaul sheave

2. Jeremy removed the old T-tracks from the gunwales…
3. …and put plenty of sealant around the screw holes…

4. …before positioning the new sections of track from Barton

5. Fortunately, most of the holes lined up with those used for the old tracks…

6. …but sometimes Jeremy had to drill at an angle to avoid the screw securing the toerail

7. The deck eye and cam cleat for the downhaul by the mast came next

8. In the cockpit, Jeremy worked out the position for the clutch that would handle the roller reefing line
9. The barber-hauler lines would also need a fair lead to the winch after passing through the cam cleats on the coaming. Securing fittings to the coamings was easy because we could reach the inside from the quarter berths
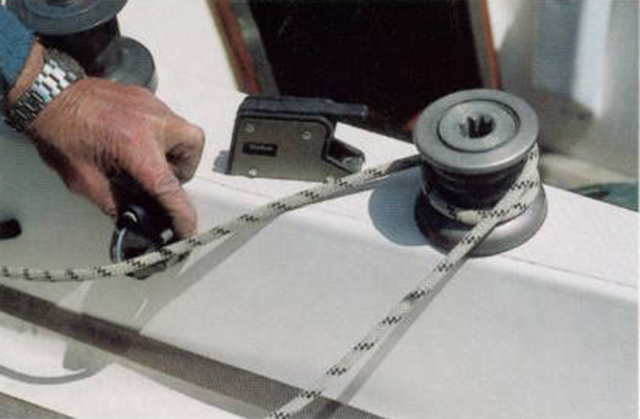
10. How it works in practice: the loose line on the primary winch is the sheet of the furled genoa. The barber-hauler passes through the forward block on the track and is led back to the cleat on the outside of the coaming. The genoa’s roller reefing line is held in the clutch, and the spinnaker guy is around the aftermost winch

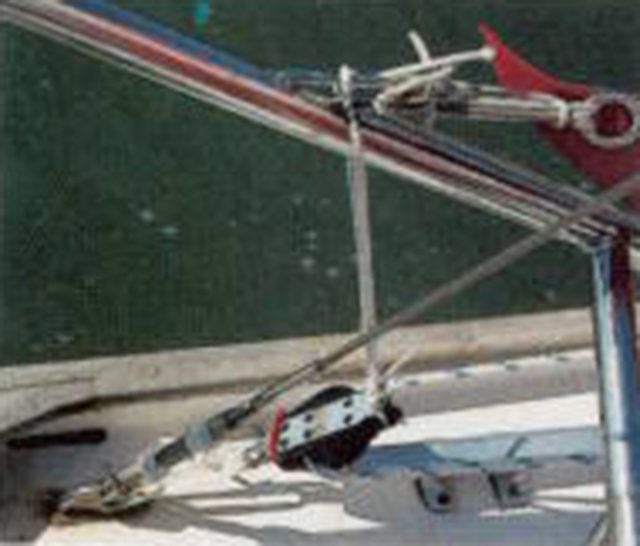
11. To allow the Harken ratchet blocks to rotate freely, we attached them with short strops. Bungy cord taken around the pulpit stops them hitting the deck when not in use
12. Although the downhaul is cleated by the mast, a long tail means that it can be adjusted from the comfort of the cockpit.

13. The track for the pole attachment on the mast allows about 3ft (1m) of travel. It couldn’t go any lower because of the mainsail’s roller reefing handle

14. We tied the uphaul and downhaul bridles around the pole, using the eyes to stop the line sliding rather than to take the weight
Rig a spinnaker: Reeving the uphaul
A similar situation applies with the pole uphaul. The least you need is a block shackled to an eye on the mast, but an internal system is neater. On Sulali, the mast was fitted with an uphaul sheave just below the spreaders and an exit sheave at deck level. The mouse line had broken, so I went up the mast, removed the sheave box and dropped a new line down with a large washer on the end. Then I removed the lower sheave box and fished out the mouse before pulling through the 6mm uphaul line.
The pole came next. We riveted eyes to the top and bottom at each end before making bridles with pre-stretched 5mm line and stainless steel rings. The line for the upper bridle passed around the pole and through the eyes on the bottom, which would be subjected merely to the deflection loads instead of taking the full weight of the uphaul.
Rig a spinnaker: Hardware choices
We chose most of the rest of the hardware from Barton’s catalogue; blocks, deck eyes and cam cleats. To make life as easy as possible, I suggested that Jo buy a pair of ratchet blocks for the sheets. The extra price compared with plain blocks is well worth paying, because a ratchet makes an enormous difference. Barton doesn’t make ratchet blocks, so we got them from Harken.
Other items on our list from Barton included two, 5ft (1.52m) lengths of 20mm T track and a pair of genoa slides. As on all Contessa 26s, the blocks for Sulali’s headsail sheets were attached to tracks on the wooden toerail. The obvious place for the barber hauler blocks was on the same tracks, but the section was of obscure Dutch origin and we could find no slides to fit it.
Help from a pro to rig a spinnaker
Since Jo keeps Sulali in Lymington, it seemed sensible to enlist the help of Jeremy Rogers in fitting the hardware. Jeremy built the Contessa 26 for many years and now undertakes restorations and refits at his yard in Milford-on-Sea, just down the road. He also sailed his own 26, Rosina of Beaulieu, to overall victory in last year’s Round-the-Island race.
Removing the old genoa tracks was simply a matter of lifting them off, having removed the screws that secured them to the toerail. Before fitting the replacements, Jeremy applied a generous daub of sealant around the holes to make sure no water could get into the wood, though the spacing of the holes in the Barton track meant that not all the original holes in the toerail could be used. Jeremy had to drill some new ones – which was easy enough, except in a couple of places each side when the holes in the track were directly above the screws that secured the toerail to the bulwarks.
His solution was to drill at an angle from the vertical so the screw he was about to put in would diverge from the one that was in the way. By the time the new one was screwed in tight, the fact that the head was slightly askew could hardly be noticed.
Deck eye for the downhaul
Once the tracks were secured, we looked at the best position for the deck eye to which the downhaul block was to be shackled. We had already agreed that Jo would adjust the uphaul and downhaul from on deck, since none of the other control lines on Sulali were led aft, so we put the eye just ahead of the mast and the cam cleat further aft on the mast’s port side. Before drilling holes in the deck, it’s important to make sure that any lines will have a fair lead and can easily be adjusted.
The headliner moulding and the deckhead are solidly bonded around the foot of the mast on the Contessa 26, so Jeremy fastened the eye using bolts long enough to go through both laminates. For the cam cleat, it was simply a question of putting a couple of machine screws into the thick deck moulding by the mast step. Other boats may present more of a challenge – especially when there’s a gap between the deck and a non-removable headliner – unless the builder has bonded aluminium plates to the underside of the deck laminate in the right position.
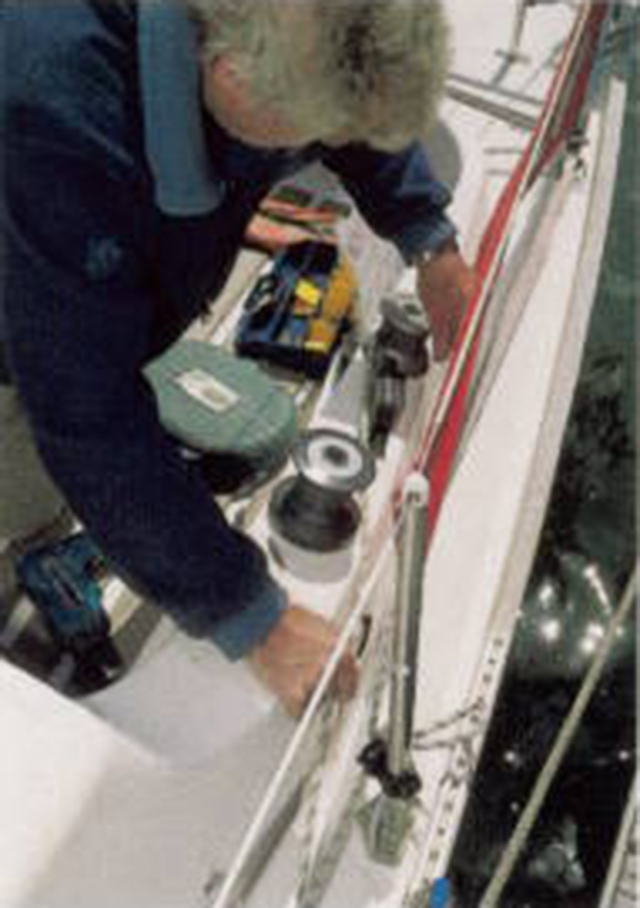
Clutches and cleats
The final hardware attachments were on the cockpit coamings. First, Jeremy fitted a clutch for the genoa’s roller reefing line, which had previously occupied the spinnaker winch on the port side. He positioned it carefully so the line could still be led around the winch without causing unnecessary chafe. Then he bolted a cam cleat to the outside of each coaming for the barber haulers. Again, alignment with the spinnaker sheet winches was important; the barber haulers can be under substantial load on a close reach, so it’s useful to be able to take them around a winch.
Bolting the clutch and cleats to the coamings was relatively simple, because the inside of the coamings were easily reached from the quarter berths. We used penny washers to spread the load.
In terms of hardware bolted to the deck, that was all we needed. Spinnaker winches can be useful, but on many boats the primary winches serve both headsail and spinnaker sheets with the help of jamming foot blocks.
Rig a spinnaker: IMPORTANT MEASUREMENTS
■ Spinnaker pole: the normal length of a pole is the same as the J measurement, i.e., the distance from the front of the mast to the base of the forestay.
■ Pole attachment ring on mast: typically about 5ft (1.5m) above the deck on a 26-footer. The objective is to fly the spinnaker with the pole horizontal and the clews level. If you fit a track, its upper end should be high enough to cater for the maximum pole height and its lower end should, ideally, be close to the deck. That way, you can slide the track to the bottom and leave the pole attached to the mast when sailing upwind. The topping lift can stay attached, too, held against the mast with a plastic clip on the end of a length of bungy.
■ Cordage (approximate lengths, for guidance only)
Halyard: length of mast from base to halyard sheave/block x 2.5 (longer if led aft)
Sheets/guys: LOA x 2.5
Uphaul: distance from base of mast to sheave/block x 3
Downhaul: LOA x 1
Tweakers: LOA x 0.5
Finishing off
Our final jobs were to attach the ratchet blocks to the quarter, buy some 6mm line for the downhaul and barber haulers, set everything up and wait for a suitable day to make sure it all worked. Fortunately, it did.
Once her autopilot is working properly, Jo should be able to hoist, dowse and gybe the spinnaker on her own in winds up to 10 or 12 knots. And, much of the time, she will be sailing far more efficiently than she would with a cruising chute.
■ Remember that buying the spinnaker is only the start; everything else you need could easily come to as much again
■ If in doubt about what’s needed or where to fit it, ask your sailmaker or rigger. They will have an interest in helping you get everything right. Boats, rigs and deck layouts vary so much that it’s impossible to provide guidelines on how to rig a spinnaker to cover every situation.
Continues below…

Cruising chute or spinnaker? We compare both sails on the same boat on different points of sail
Many cruising sailors favour a cruising chute over a spinnaker – but how do the two sails compare on different…

How to use a cruising chute
For non-racing sailors, a cruising chute is often the downwind sail of choice: it’s nothing to be afraid of, but…

Sail trim: Sailing downwind without a spinnaker
Sailing efficiently when the wind comes astern doesn’t mean you have to fly a spinnaker or cruising chute. David Harding…

Spinnaker repair: how to do it yourself
Andy Pag saves thousands of pounds on a replacement by mending his shredded sail himself using a domestic sewing machine
Enjoy reading How to rig a spinnaker on a small yacht – what you need and where to fit it?
A subscription to Practical Boat Owner magazine costs around 40% less than the cover price.
Print and digital editions are available through Magazines Direct – where you can also find the latest deals.
PBO is packed with information to help you get the most from boat ownership – whether sail or power.
-
-
-
- Take your DIY skills to the next level with trusted advice on boat maintenance and repairs
- Impartial in-depth gear reviews
- Practical cruising tips for making the most of your time afloat
-
-
Follow us on Facebook, Instagram, TikTok and Twitter