
Metallurgist Vyv Cox shows how strongly-coloured dyes can be used to reveal fatigue cracks in rig components

Metal fatigue failures are among the most common causes of problems on yachts, particularly the standing rigging of the mast.
Metal fatigue can affect almost every part of the boat rig, including chainplates, turnbuckles, swaged fittings, the cable itself, the T-balls or stemballs swaged onto the upper end of the cable and the fixed mast plates or tangs that connect these fittings to the mast.
Fatigue cracks initiate and grow due to the action of stress that is applied cyclically: that is, repeated bending of the components.
Even where the rig is designed correctly with adequate toggles it can happen that fatigue cracks will appear, usually due to excessive slackness.
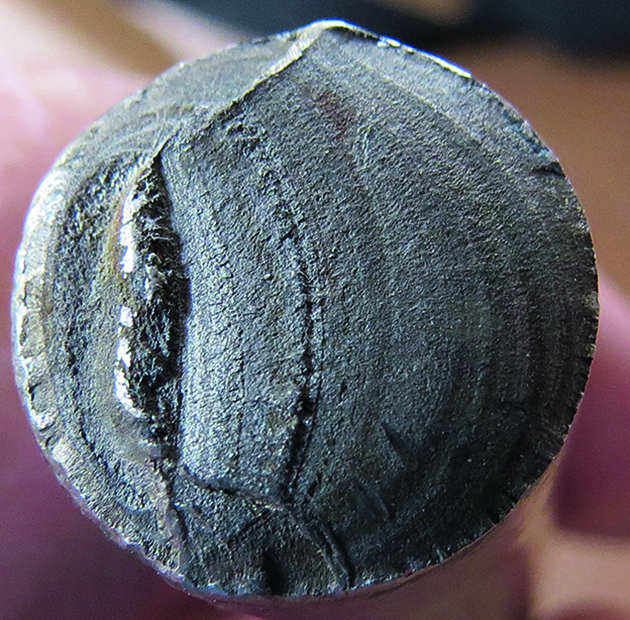
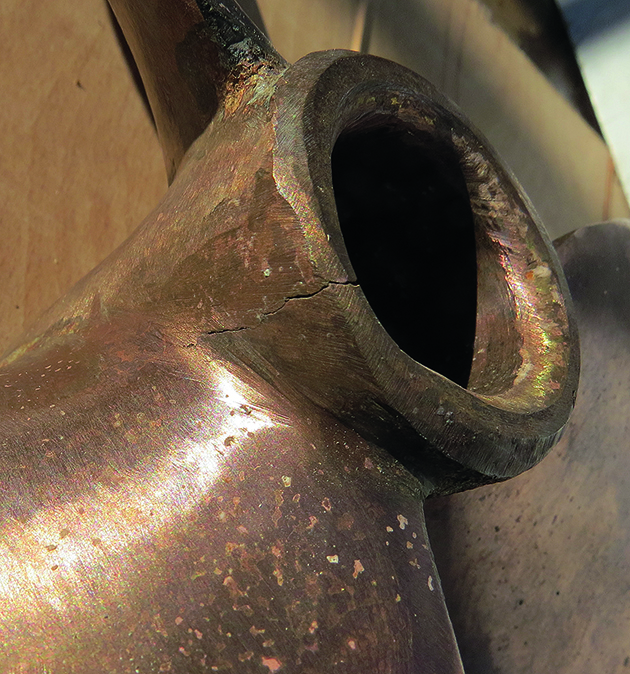
A beautiful example of a multiple-origin metal fatigue fracture. Two cracks have grown, one from each side, initiated simultaneously around the periphery of the stem due to cyclic loading of the genoa. The final fracture is the vertical rough feature left of centre. If the forestay had been tightened to its correct value the area of this would have been nearly 25% of the total cross-section area, but in fact it is probably less than 5%. This shows the rig to have been seriously under-tightened
However, metal fatigue is not confined to the rig: other components known to fail in fatigue are engine mountings, chainplates, rudder stocks, propeller shafts and many others.
The time to catch fatigue cracks is when they have only just initiated and are very small.
At this stage they are pretty much invisible to the naked eye, although careful inspection using a magnifying glass of around x8 may find them.
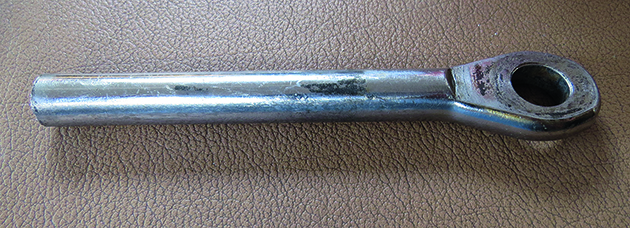
A stemball fitting connecting the forestay to the masthead on a large sailing yacht. It failed when the boat was sailing, but fortunately for the owner the halyard held the mast up. Credit: Vyv Cox
This would be a very tedious way to inspect a complete boat, so something better is required.
The method selected needs to be affordable, leave the components being examined unaffected and in place, and be easy to interpret by the non-specialist.
There are many inspection methods, some costing a small fortune and being specific to a particular type of crack, but one of the most versatile is dye penetrant testing.
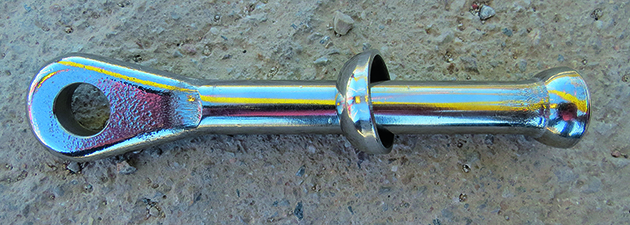
A new stemball fitting. This is a high-cost component, forged for strength and with large radii for reliability. The ball end sits in the dished socket to provide articulation. I assume either that the socket and stemball had galled together or that the movement was excessive. Credit: Vyv Cox
Very simply, a strongly coloured dye is sprayed onto the component and allowed to penetrate any cracks.
The excess is then cleaned off and a white titanium dioxide powder in suspension, known as ‘developer’, is sprayed on.
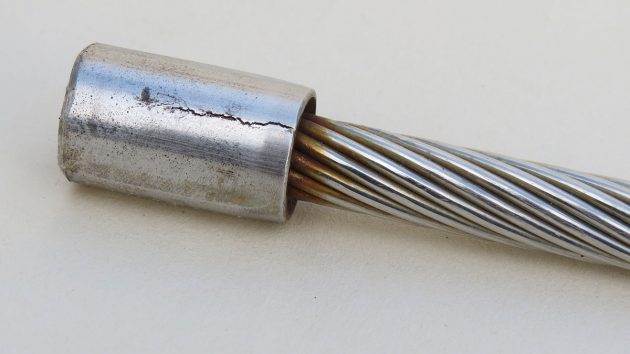
A stress corrosion crack in the end of the swaged fitting at the lower end of a 10mm shroud. The failed part had been cut off previously to check for corrosion penetration down the wires, which had not occurred. Credit: Vyv Cox
The dye that has remained in the crack is drawn out, staining the white layer and revealing its location.
At one time, dye penetrant kits were expensive to purchase, but now they can be obtained far more cheaply.
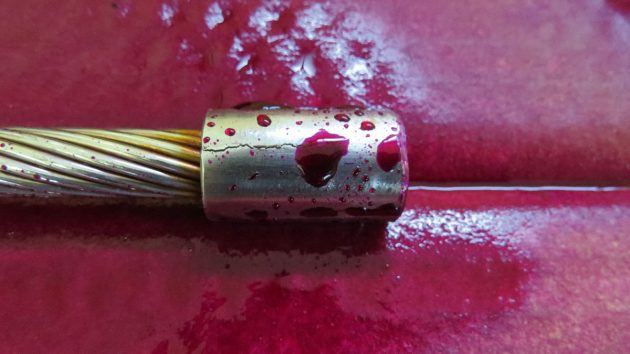
I found that the dye formed globules on the surface of polished stainless steel, but this appeared not to affect its penetration into the cracks. Credit: Vyv Cox
I bought the three tins, one each of dye, cleaner and developer, for £17 on eBay. Instructions for use of the kit were printed on each tin.
Reference to several internet non-destructive testing sites suggests a few minor modifications.
The crack in this component was very obvious by eye, but the dye and developer emphasised its shape and location almost immediately. Credit: Vyv Cox
The first step is to spray the cleaner onto the part, drying it off with a lint-free cloth. I used paper towels.
Next the dye is sprayed on to the area under investigation. I wore gloves when handling anything with dye on it, not because I thought it was hazardous but because it is very saturated, and I did not want purple stains on my hands for several days.
A propeller hub with a crack at the keyway. It was not certain that the crack had penetrated throughout the hub’s length. (Note the bruising where the propeller has been rattling against the washer and nut). Credit: Vyv Cox
The instruction on the tins is to leave the dye on for 15 minutes, but advice from other sources is that 20 minutes is better.
After this time the dye is wiped off, initially with a dry rag, then one soaked in cleaner.
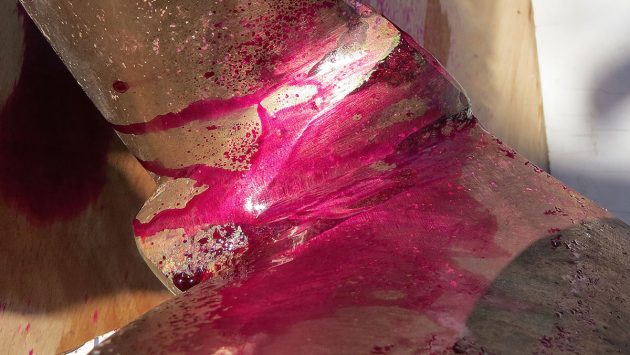
The dye wetted the manganese bronze more effectively, not forming globules as it did on stainless steel. I checked both sides of the blade to detect whether the crack went right through the hub along the keyway. Credit: Vyv Cox
The developer is then sprayed on and left to dry for 10 minutes. In obvious cracks the dye is drawn out almost instantly, but for fine, invisible cracks the full 10 minutes is needed for full development.
Again, it is suggested that 15 minutes could be better.
How dye works to detect metal fatigue
Paint the dye onto the affected area. After waiting for or around 20 minutes I wiped off the dye with paper towels, then sprayed a new towel with the cleaner and wiped off each item until it appeared clean.
Continues below…

How a thorough rig inspection saved my mast and our Atlantic crossing
As a former RAAF (Royal Australian Air Force) aircraft technician, I was always going to perform a thorough rig check…

Rigging setup: Turning round a yacht’s performance
Little old boats can offer enormous fun for your money, but they often require some tweaking in order to be…

How to check your rigging – video guide
There are plenty of ways that a mast or its rigging can fail, but there are often key telltale signs…

Coping with a dismasting & rig checks
Faced with a sudden dismasting in 40-knot gusts, Rupert Holmes explains how he and his crew saved his boat, and…
I then sprayed on the developer. This should be done from a distance of around 12in, but it is quite difficult to ensure an even film.
Stress-corrosion
For the purposes of this article I was forced to use components that I knew to be cracked.
These included a 10mm swaged fitting with a crack that is probably due to stress-corrosion.
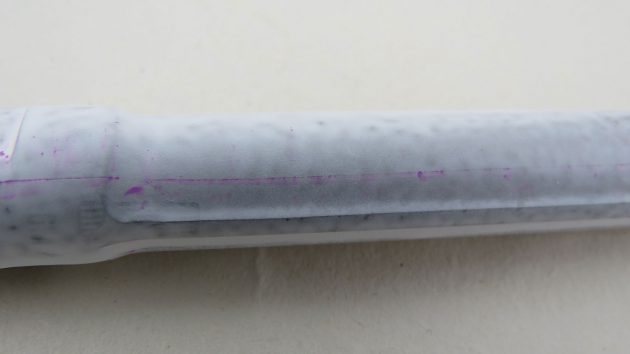
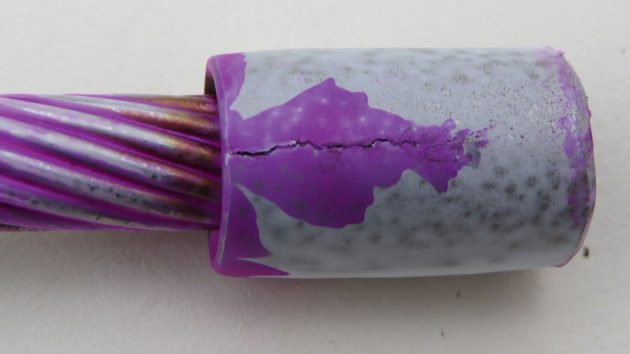
The tiny crack in the swaged fitting was revealed perfectly, despite being invisible to the naked eye. This photograph was taken after about 15 minutes. Credit: Vyv Cox
This failure mode occurs quite often in stainless steels that are under high tensile stress in a chloride-rich environment, of which seawater is a perfect example.
A small swaged fitting has a longitudinal crack that is invisible to the eye and takes detailed examination using a magnifying glass to find.
A propeller that had been used loose on its tapered shaft, leading to fatigue cracking of the hub, was another good example.
I also looked at a T-ball fitting, believed to be crack-free, on which several cable strands had fatigued at the swaged end due to slackness.
Conclusion
Inspection for cracks using dye penetrant is widely used in industrial, aeronautical and military applications, where until recently it was a relatively expensive process for a one-off investigation.
Now that the kits can be purchased quite cheaply the technique could well within the reach of the yacht owner.
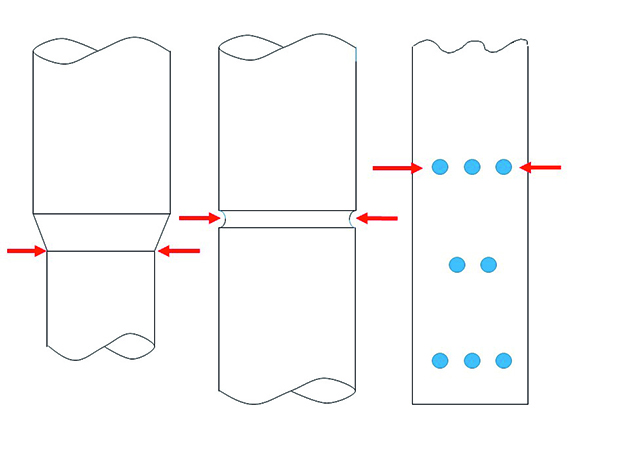
These drawings illustrate typical section changes in shafts and chain plates. At the points indicated by the arrows the stress carried is at its greatest and inspection should be rigorous here. The one on the left is of particular interest as several yacht rudders have failed due to construction in this way.
Dye penetrant inspection is unlikely to be something that would be carried out on a regular basis (although it is for example on military helicopters) but where there is a history of fatigue failures, perhaps class-related, it would be worth carrying out occasional checks on items such as rudder stocks, chainplates, sheet metal engine mountings, bottle screws and possibly other rigging components.
Enjoy reading fatigue in rig components: crack detection by dye penetrant?

A subscription to Practical Boat Owner magazine costs around 40% less than the cover price.
Print and digital editions are available through Magazines Direct – where you can also find the latest deals.
PBO is packed with information to help you get the most from boat ownership – whether sail or power.
-
-
-
- Take your DIY skills to the next level with trusted advice on boat maintenance and repairs
- Impartial in-depth gear reviews
- Practical cruising tips for making the most of your time afloat
-
-
Follow us on Facebook, Instagram, TikTok and Twitter