
Ben Meakins shows how he installed synthetic teak Dek-King seating

Teak decks look amazing – they feel good underfoot, stay cool in the sun and offer excellent non-slip properties.
But there are downsides – the wood is logged from some of the world’s most endangered rainforests, it’s heavy and it’s very expensive.
Synthetic teak options have become available in recent years.
Made from composite plastic with a realistic colour and grain, they reproduce the look and feel of teak while weighing and costing less.
Various manufacturers and suppliers are out there, including Wilks (Dek-King), Permateek and Flexiteek.

The cockpit seating before the work began
The cockpit seats on my Hunter Impala Polly had been covered with grey diamond-patterned Treadmaster when the boat was built back in the late 1970s.
Although well worn it was still a good non-slip surface, but the edges were rough and jagged and it wasn’t particularly comfortable to sit on for long.
We settled on replacing it – but what with?
Treadmaster produce a product to rejuvenate tired Treadmaster, but as the issue was that the edges and pattern had worn away, that wasn’t really an option.
We could have removed it and painted the area with non-slip paint to match the boat’s decks, or could have replaced the Treadmaster.
But we fancied a change – and having recently seen synthetic teak seats on another boat, we chose to go with Wilks, a Tollesbury-based manufacturer of rubbing strakes, fendering and decking.
Their Dek-King 2G product, which is offered in nine different colour choices from stock, claims to be 32% lighter, 30% cooler underfoot than earlier products and 100% recyclable, as well as being Reach (EU chemical regulation) compliant and relatively maintenance-free.
Removing the old Treadmaster
A Google search reveals scores of doom-mongers who say that removing Treadmaster is an awful experience.
Don’t be put off, more than anything it’s just a bit time-consuming.
An oscillating multi-tool such as a Fein Multimaster comes well recommended, but we found that a simple, sharp 25mm (1in) chisel was far quicker and much less noisy.
Continues below…

10 Teak Cleaners tested
We get scrubbing to find out what effect a variety of teak cleaners have on the woodwork of a Sigma…

The truth about teak decks
Shipwright Robin Benjamin says modern, thin teak decks need lots of regular care, and so it’s vital to follow his…
Teak alternatives: How to make your decks look as good as the real thing
However, according to a recent report by the Environment Investigation Agency, there are grave questions over the sustainability and sourcing…

How to re-caulk teak decks: Vagabond 47 owners explain how they did it
First, they removed the old caulking between the planks using a Bosch Palm Router and pinned a guide into the…

Boat wood: a complete guide for yacht owners
Boatbuilder and finisher Lyndon March explains which types of wood work best for different repairs and modifications on board
The material itself is cork and quite soft, but it’s the adhesive – usually epoxy – that’s the problem.
This can be a challenge to remove, but we found that keeping the chisel sharp was key, and after a couple of hours the job was done.
There were some inevitable scratches left in the gelcoat, but these would be under the new covering.
We filled them and sanded everything back, which removed the remains of the epoxy and left a nicely keyed surface.
Fitting synthetic teak: step by step
Templating
You can pay for someone else to come and measure, template and fit your new decks, or you can save cash by doing it yourself and sending off templates for custom panels to be manufactured for you – which is what we chose to do.
It goes without saying that without accurate templates your panels are unlikely to fit properly.

Strips of heavy-duty double-sided tape were stuck to the cockpit seats to hold the templating material firm while we marked up
Wilks recommend using a templating material that won’t stretch – we used a semi-transparent tarpaulin-type material sold by Kayospruce specifically for the purpose: an advantage of a material like this is that you can see the underlying surface through it.
First, we stuck strips of heavy-duty double-sided tape to the deck to hold the templating material firm while we marked up.
We then used a straight edge to carefully mark the edges of our seat, and used an appropriately-sized jam-jar lid to mark a good radius on each corner.

Templating material was then placed on top and stuck down
The mainsheet traveller divides Polly’s cockpit seats, so four panels would be required, two larger ones forward and smaller ones aft.
You then need to draw how you want your planks to look, and mark the edges with their characteristics.
We wanted outer margins so we marked these on, as well as instructions to radius the edges to make them more comfortable to sit on.
We used a straight edge to carefully mark the edges of our seats, and found a jam-jar lid marked a good radius on each corner
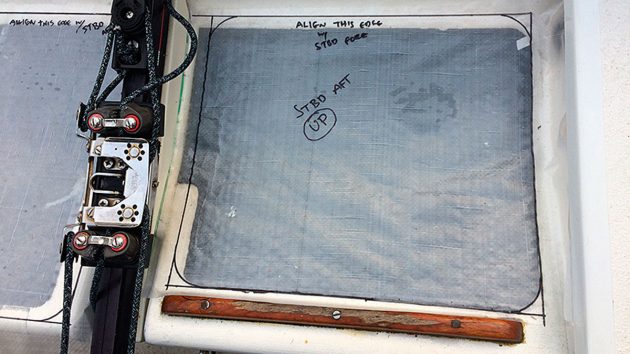
Finally, you must mark any alignment points.
We wanted the plank widths to match on our two panels per side, so we marked instructions on the outside edges to show this.
We could then unpeel the templates, roll them up and post them to Essex. That’s another advantage of a flexible templating material – the postage costs are much less than for a rigid board!
Making the synthetic teak panels
As soon as Wilks received our templates, they set to work.

1. The templates are first laid out, aligned, checked and taped down on a work surface.

2. Reels of the individual Dek-King planking are rolled out and cut roughly to length to form a continuous panel.

3. Lengths are weighted down and solvent-welded together to create a panel the right width.

4. Already caulked, the panel is now marked up so the individual pieces can be cut to size.

5. Mitres are cut for the end border pieces, and these are then fixed with Stelmax solvent weld glue (below).

6. The mitred joins are routed to form channels for the caulking (below), then the caulking is welded in place using a hot caulking gun to give that traditional-look black line. Excess is trimmed off with a sharp tool.

7. Finally the radii are cut on the corners and 40-grit paper on a sanding block (below) used to round them over and provide a realistic, slightly rough teak-grain effect on the smooth cut surfaces.

Fitting the new synthetic teak panels
As soon as the panels were delivered we were ready to start work back on the boat.
Our cockpit seats have a raised inner edge, and the panels must therefore take up the angle.
To make sure this happened, we waited for a hot day and erected our cockpit tent as a precaution against unexpected rain.
In the event, it was stifling inside the tent, but at least that made the panels nicely flexible to take up the curve happily.
The first step was to clean the deck with acetone to remove any contaminants– be careful not to get acetone or any other solvent on the panels as it can react and leave nasty marks.
1. We placed the panels accurately before drawing round them with a pencil so we could mask up to this line.

2. Careful masking is now required so you can keep the very black, very sticky adhesive off areas that are to remain clean.

3. Next we masked the edge of the panel to keep that clean too, ensuring the tape didn’t roll underneath the panel.

4. Now it was time to apply the black goop. Wilks supply Henkel adhesives. I squeezed out a reasonable bead, covering the seat in rows before using a 4mm notched spreader to even out the adhesive – it’s important to finish off with the peaks at right angles to the grooves in the underside of the panels.

5. We then carefully placed the panels onto the adhesive, making sure the edges were perfectly aligned with the edges of the masking tape.

6. Next, use a rolling pin (I used an old dinghy spar cut down to size) to expel any air bubbles trapped underneath.

7. This done, the panel can be weighted down while the adhesive sets. You could use jerrycans full of water or heavy weights – I borrowed some large packs of clay from my mum, a keen potter, which were very heavy and could be moulded to shape. Additionally, I used some diving weights along the exposed edge – it’s really important this can’t lift. Before leaving well alone, I finally ran a palette knife along the wet edge to remove any excess sealant.

Great result
Twenty-four hours later, I returned with some trepidation: the thought of cleaning up the adhesive if all had gone wrong was a worrying one.
But all had gone well. On removing the clay, the panel proved well stuck down. Peeling off the masking tape left a pretty good edge.
To make all look perfect and to remove the occasional blob of sealant that had escaped the tape, I wrapped a piece of hardwood in sandpaper and ran this along the sealant edge to leave a neat, even join.
There were a couple of areas where, despite our best efforts, I’d accidentally got some adhesive on the surface of the Dek-King, but a block of 40-grit sandpaper soon cleared these away, restoring the grain effect well.
Verdict on synthetic teak decking
So, no more tatty old Treadmaster – the new Dek-King panels have transformed the cockpit. not only do they look great, but they also have outstanding non-slip properties and are comfortable to sit on. You can’t ask for more!
What does it cost
The cost for a job this size is around £350-£500 for manufactured Dek-King panels and adhesive.
Wilks (www.wilks.co.uk) also offer a range of fitting tools such as rollers, cutters, knives, spreaders, applicator guns and masking tape, along with technical support if required.
Enjoy reading Fitting synthetic teak to a cockpit?

A subscription to Practical Boat Owner magazine costs around 40% less than the cover price.
Print and digital editions are available through Magazines Direct – where you can also find the latest deals.
PBO is packed with information to help you get the most from boat ownership – whether sail or power.
-
-
-
- Take your DIY skills to the next level with trusted advice on boat maintenance and repairs
- Impartial in-depth gear reviews
- Practical cruising tips for making the most of your time afloat
-
-
Follow us on Facebook, Instagram, TikTok and Twitter