




Practical Boat Owner reader Dean Hope seeks the help of engine expert Stu Davies to discover how his propshaft is set up
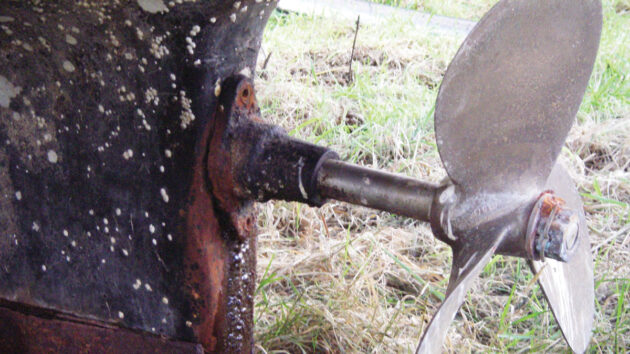
I read with interest the article by Stu Davies’ on cutless bearing replacement and would appreciate it if you could give me some insight into the set-up fitted to my motorboat. It’s an elderly vessel and the make/model is unknown to me, though it looks similar to an early Trusty 21 motorboat.
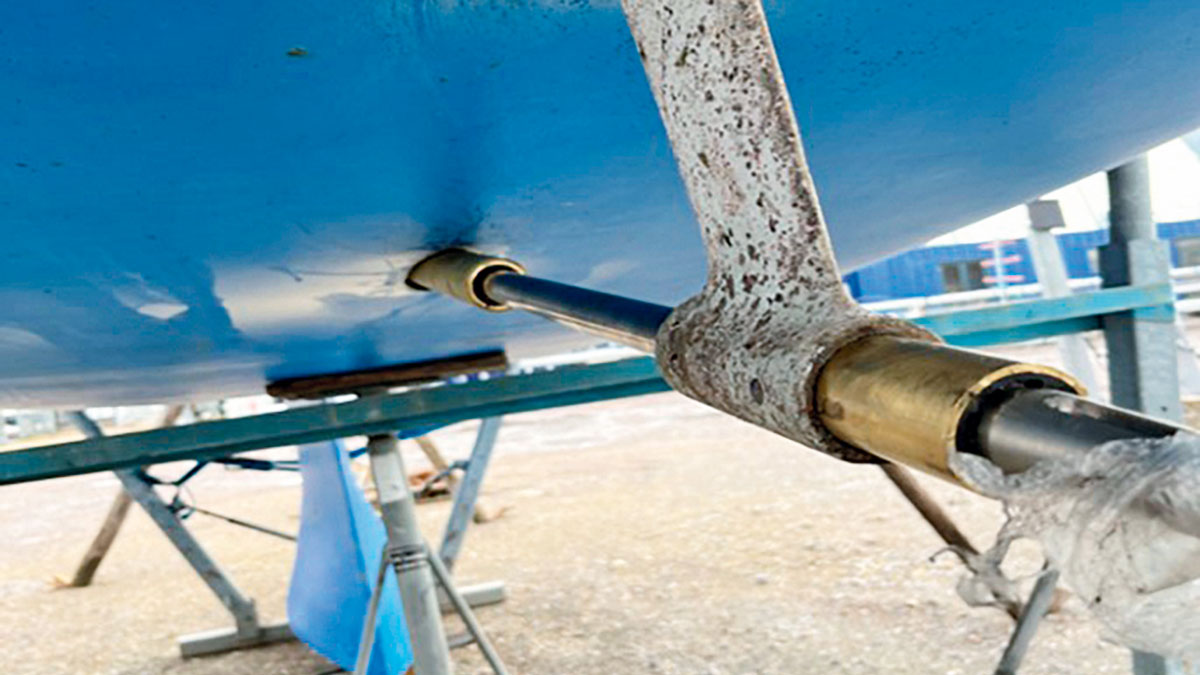
Fitted externally to the rear of the keel is a cast metal item (bearing housing?) through which the propshaft passes. This casting is attached to the keel with what could have been two bolts or studs, but unfortunately a previous owner has sheared them off.
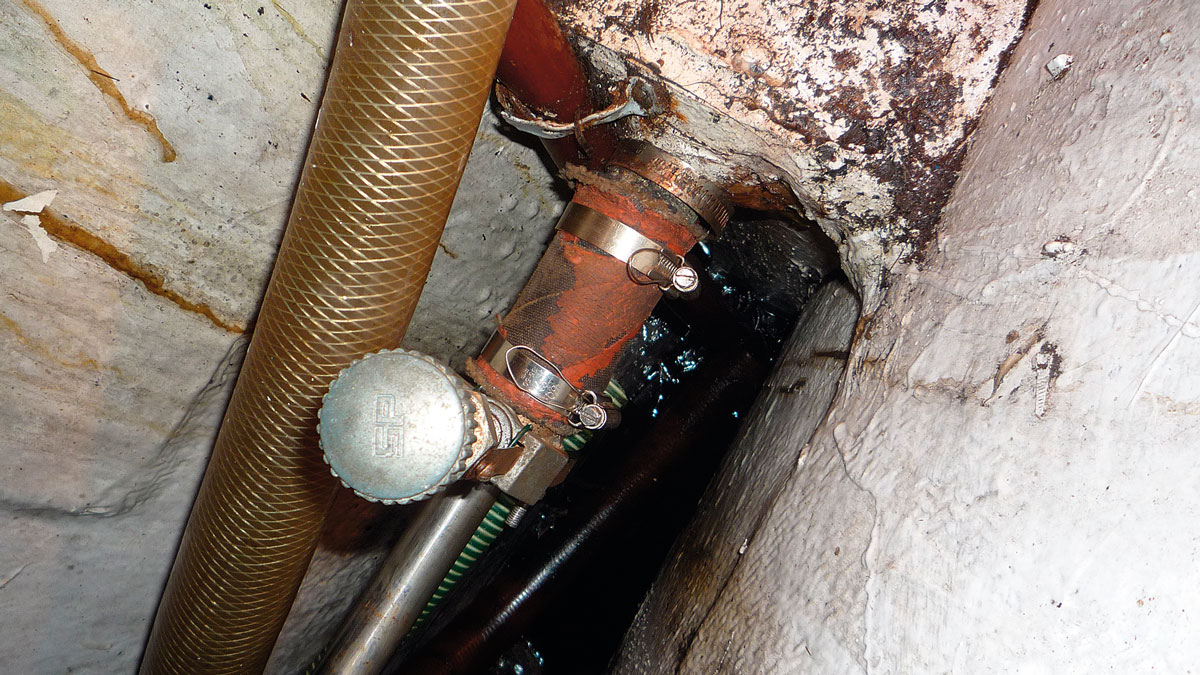
On the inside of the boat I found a bolt head which looked like it was something to do with the top external fixing. I put a socket on it and it came away with a short stub of a very corroded threaded bolt. I was then able to confirm that this was the top fixing for the bearing housing.
The stern tube appears to have been glassed in during manufacture and there is no space below it to access a bottom fixing bolt to make the lower attachment. At the other end of the stern tube there is a stuffing box, with a lone grease nipple.
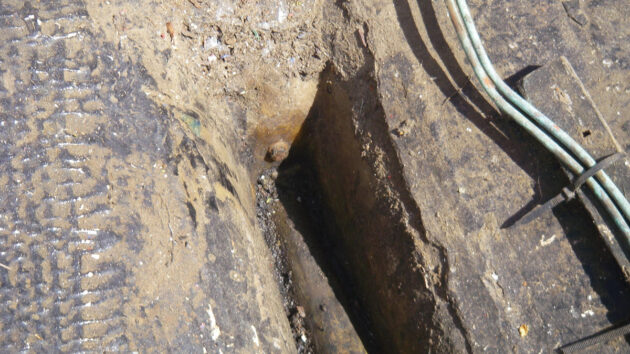
Head of the upper stern bearing securing bolt – the bottom bolt is buried somewhere beneath the stern tube. The bolt sheared off during attempted removal. Credit: Dean Hope
So my question: is the casting a separate item to the stern tube assembly and, if so, how are they coupled?
I’m hesitant to proceed with the removal of the housing until I can understand how the set up works.
I can’t see any sign of a bush or fluted bearing (as depicted in Stu’s article). I’ve looked at and felt all around the block but have been unable to locate any form of screw/bolt, or other type of bearing securing device or second greasing point. There is no external P-bracket fitted to the boat.
I noted that there seems to be a white greasy substance around the grease nipple (inboard close to stuffing box) with a texture similar to candle wax/tallow?
I read in one of the chandlery catalogues that a sealant (K99), can be used for making a good water seal in stern tubes, possibly meaning that you pump the stern tube full of it to obtain the seal. In principle I could see this working, but the K99 grease I purchased does not have the same consistency as that found at the grease nipple.
Any help or information would be very much appreciated.
Dean Hope
Stu Davies replies:
Normally in stern tubes like this the tube is glassed or sealed in place from the stern with the flange and two holes holding all in place with a pair of bolts.
At the other end is the stuffing box which usually has rings of grease-impregnated packing in it. This is screwed on to the stern tube.
The prop shaft then goes through the stern tube to a P-bracket bearing which has the fluted bearing in it that I refer to.
In your case, from what I can see, it looks like the stern tube is glassed in place through a thrust block behind the packing gland and also the rear of the boat.
I suspect the external ‘bearing’ comes off the end of the external, aft end of the stern tube.
It will either have a replaceable bearing in it or it is a throwaway part that used to be replaceable.
The housing appears to be in reasonable condition so may be able to be reused. I suspect that a replacement bearing is not available, but a good machine shop should be able to bore out the housing so a new bearing can be pressed in.
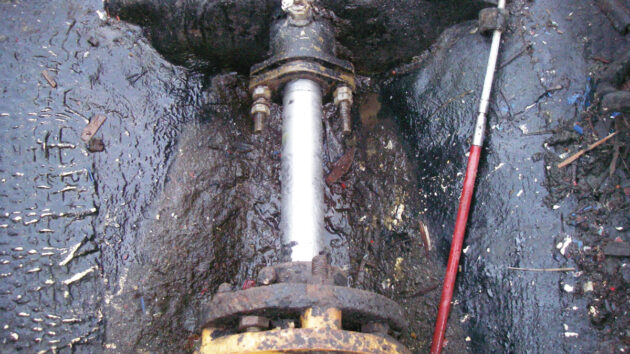
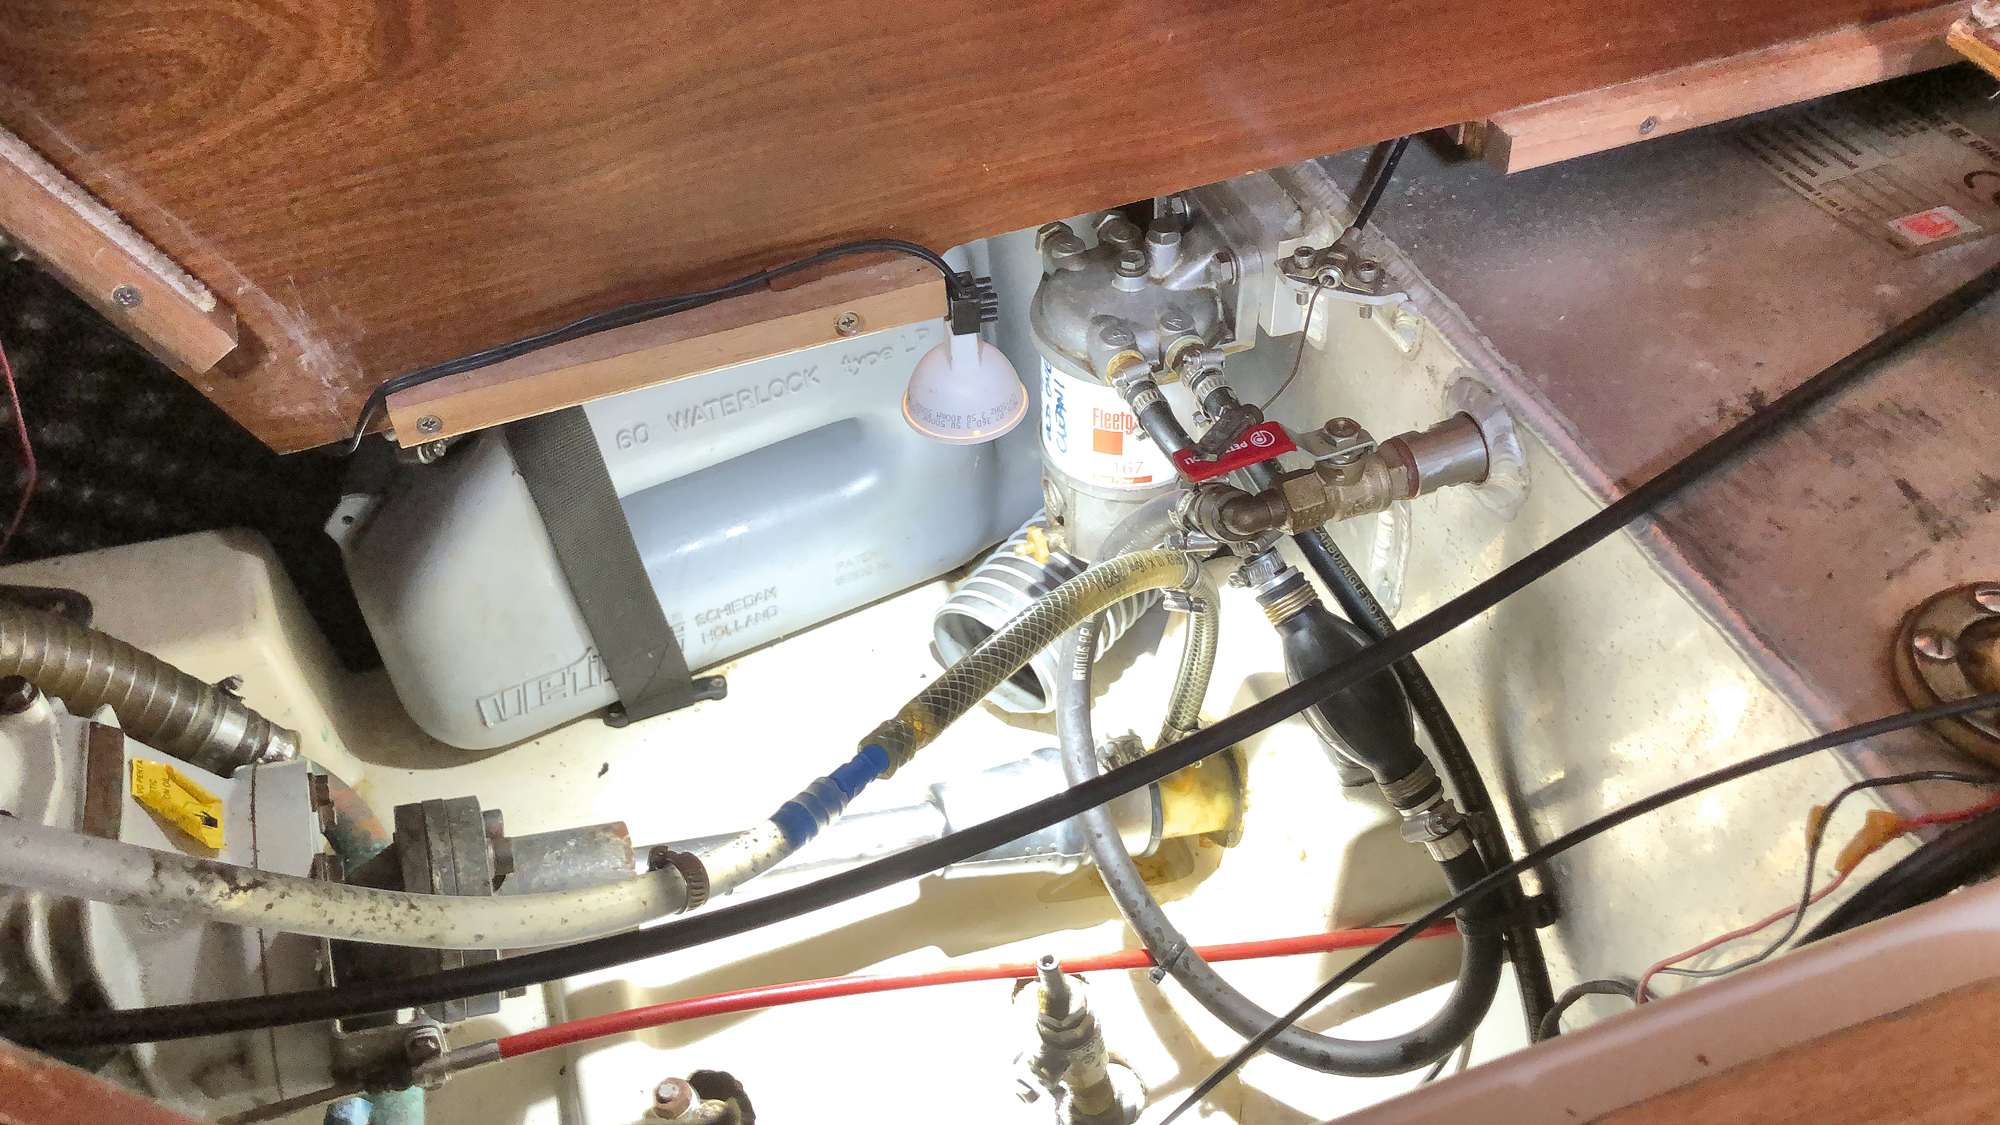
Inboard end of the prop shaft shows stuffing box gland with grease nipple where a Stauffer regreasing fitting would usually be found. Credit: Dean Hope
Sourcing a fluted bearing of a near-enough size and cutting it to length won’t be difficult.
The big issue is going to be fixing the bottom bolt. If it’s the same as the top bolt, then the corroded bits won’t be able to be removed and a normal nut and bolt won’t be able to be used to replace it.
I’d start off by removing the propeller and then attempting to pull off the external casting. I suspect, looking at the bulge in the casting, that it fits over the stern tube. It may even be threaded on!
Some heat and perseverance will be necessary or, if you’re lucky, it may just pull/screw off.
If it does come off, inspect the bottom bolt remnants to see what’s left – if any – and what condition it is in.
There are three ways to fix this: one is slightly bodgy with a coach bolt, the next entails using Araldite or similar to glue a bolt in, and the third involves chopping out major bits of the boat hull. I’m not advocating these fixes, just explaining your options.
The ‘bodge’ route
The remnants of the bottom bolt will first have to be drilled out. A note of caution here: the hole will probably be glassed in on the inside but if it isn’t then the potential for a leak is there!
A normal nut and bolt of suitable length can be used on the top hole with appropriate sealing compound such as Sikaflex 291.
Coach bolts are available with hex heads and if the remnants of the original bolt can be removed by drilling, a suitable coach bolt could be screwed in here, basically acting as a large self-tapper, again well sealed.
The external casting only needs to be held in place to seal and support the prop shaft by acting as an external bearing.
The other way to do it is to use Araldite or JB Weld compound to fix a suitable stud into the glassfibre of the hull. Again not the perfect way to do it, but the other option is to chop out the bits and re-glass the whole area.
A better DIY way
If it were my boat I think I’d go down the route of glueing in a fixing stud.
I’d put the casting back in place if it had been removed and use the bottom hole to run a pilot drill into the rusted remnants. The casting would act as a drill centring device.
Careful drilling and sizing of the hole are needed.
I’d choose a bolt of the same size as the top for the bottom hole and maybe a tad longer.
I’d cut the head off and saw a slit in it longitudinally like a split pin to provide some additional grip to glue it in with epoxy.
The hole must be sized so that the glued in stud is a close fit and must be cleaned internally spotlessly with acetone.
Yard work
As a third alternative you could ask a boatyard to cut out the glassfibre surrounding the bottom of the skeg before replacing the bolt and glassing in the cut out area back to the original shape.
Inside the boat
The stern tube is sealed around the prop shaft internally by the two nuts and flange seen in the third photo.
The flange has a cylindrical protrusion which fits slighly into the stern tube packing gland and pushes on three rings of ‘packing’, a cotton grease-impregnated material which is compressed by the flange to form a seal. The grease nipple is used to lubricate these packings. Usually it has a Stauffer twist fitting that is filled with grease and can be turned periodically to force grease into the packing. Someone has fitted that grease nipple instead of a Stauffer fitting, I suspect.
The K99 grease is a waterproof grease and should be okay for the fitting. Just pump in a small amount occasionally – no need to try to fill the stern tube up!
Nip the gland up until the shaft is still turnable but not too loose. Once in the water adjust as necessary if it drips too much – but not too tight. They are allegedly supposed to drip a little bit!
Cutless bearing replacement: step by step
Stu Davies explains how to fit a cutless bearing on your boat
How to replace a stern tube on a boat
Bruno Brown isn’t fazed by what seems a daunting task
Boat stuffing box access: the tools and techniques to make it easier
Trying to get at the almost-out-of-reach boat stuffing box is the stuff of nightmares, Dr Ieuan Davies has some ideas…
How I learned vinegar is the mystery cure for marine growth
Sometimes life throws us a curveball, and last year it happened to us. Our boat is based in Portugal. We…
Want to read more articles like What is my propshaft set up?

A subscription to Practical Boat Owner magazine costs around 40% less than the cover price.
Print and digital editions are available through Magazines Direct – where you can also find the latest deals.
PBO is packed with information to help you get the most from boat ownership – whether sail or power.
-
-
-
- Take your DIY skills to the next level with trusted advice on boat maintenance and repairs
- Impartial, in-depth gear reviews
- Practical cruising tips for making the most of your time afloat
-
-
Follow us on Facebook, Instagram, TikTok and X