
Stu Davies explains how to fit a cutless bearing on your boat
Before I dive into this article on cutless bearing replacement, a few words on how it got its name wouldn’t go amiss.
It is a cutless bearing, not cutlass!
Cutless bearings are used to support propeller shafts and were originally called stave bearings; think wooden barrel staves fitted longitudinally in a propeller shaft housing to act as a support and bearing for the shaft.
They used to be made of a very hard tropical wood known as lignum vitae, latterly Tufnol was used.
Originally, Cutless was a trademark owned by Duramax Marine. The name refers to a moulded rubber bearing manufactured by them and hence cutless became a generic name.

A cutless bearing can last for 10 years or more; if there is excessive vibration or play under way it must be changed as soon as possible to prevent shaft damage. Credit: Stu Davies
Another explanation of the origin of the name is from their manufacture; originally the bearings were made of cut pieces of material staved together, however, the ones we use nowadays are moulded or machined from solid pieces of material and are therefore cutless.
Beneteau and other modern yachts use a grooved top hat-shaped moulded rubber bearing.
Others use a brass/bronze bush with either rubber or Tufnol as the bearing material.
They all have one thing in common: longitudinal grooves which allow water to lube the entire bearing.
They are submerged and lubricated by copious amounts of water.
Many years ago as an apprentice, I learned that water is an excellent lubricant as long as there is enough of it.
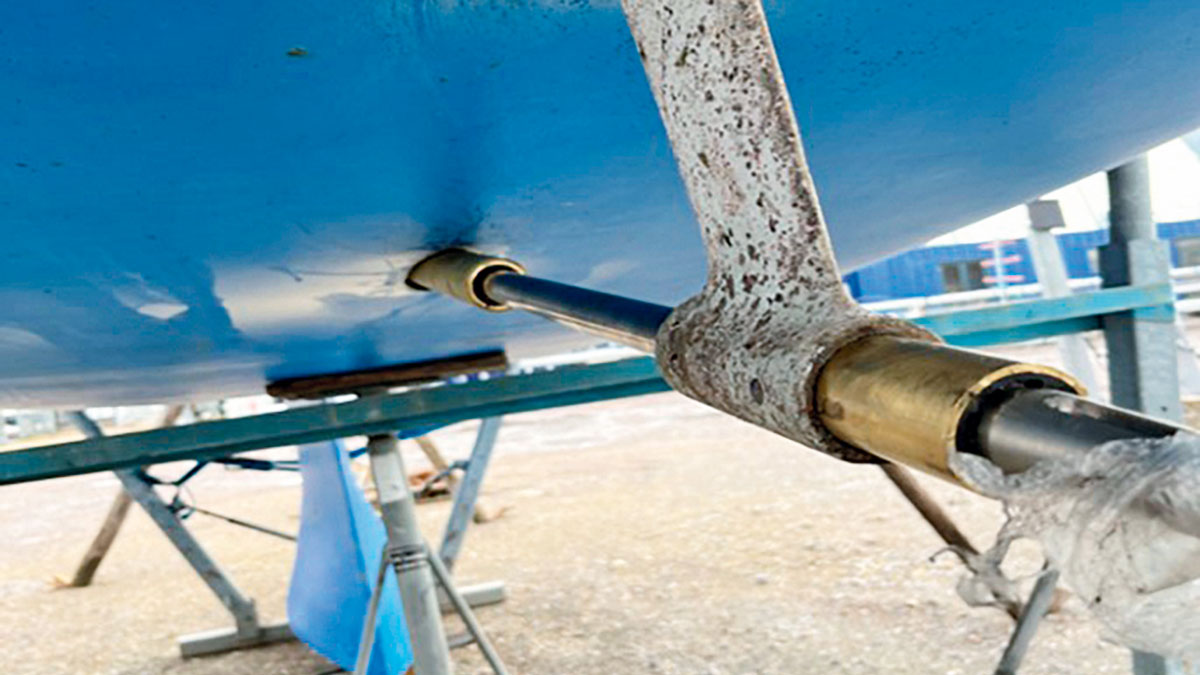
The cutless bearing plays a crucial role in your boat’s smooth operation. This bearing supports the propeller shaft and minimises friction and vibration as it rotates.
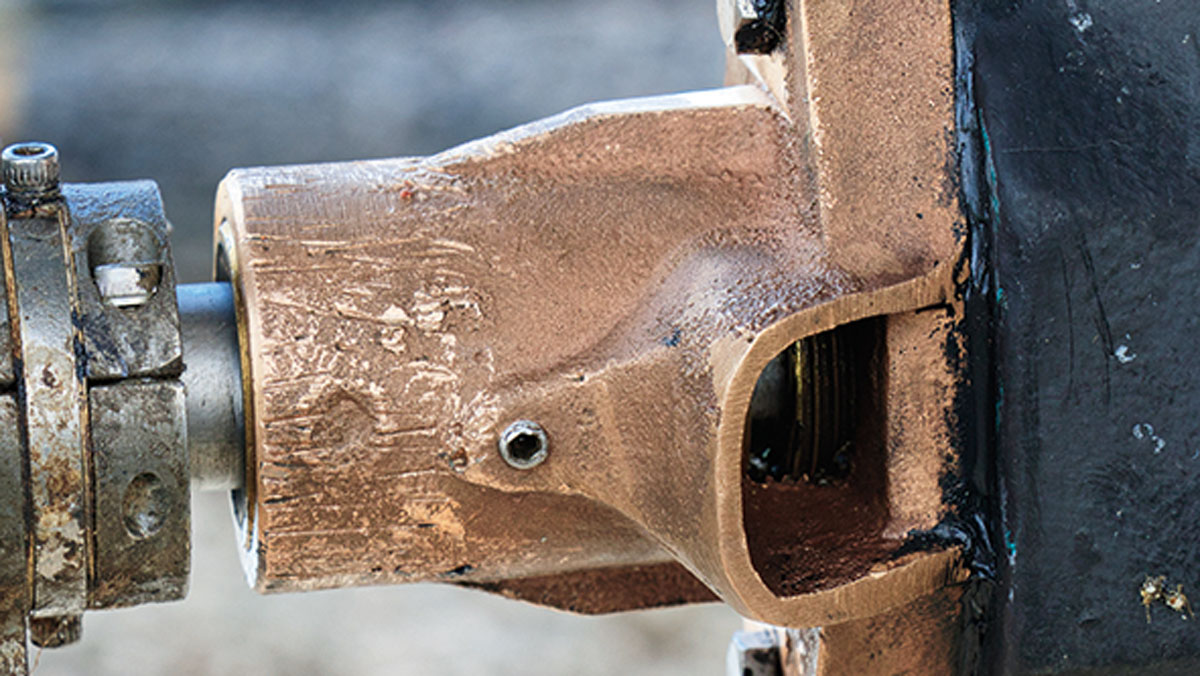
The bearing either fits in a propeller shaft moulding inside the hull itself, like my Beneteau, or in a P-bracket hung from the hull.
Symptoms of a failing cutlass bearing include excessive vibration while underway. Usually, a deep rumbling can be felt and heard through the hull.
Worn-out cutless bearings can also lead to shaft damage so early intervention is important.
Carrying out a cutless bearing replacement is a relatively easy job for most boat owners with some mechanical knowledge.
Brave people can replace the bearings like mine in the water BUT it is best – especially if yours is a P-bracket type – to do it on the hard because the prop shaft will probably have to be removed to gain proper access.
Ensure your new cutless bearing matches the exact size and specifications of your existing one.
Older boats use imperial sizes and sometimes a mixture of metric and imperial, so measure carefully.
Cutless bearing replacement: removing the old bearing
Removing the old cutless bearing is relatively easy on boats such as mine, but a bit more is involved in P-bracket type bearings.
Removing the propeller will be necessary in both types of bearing replacement.

The tab washer and securing nut. Credit: Stu Davies
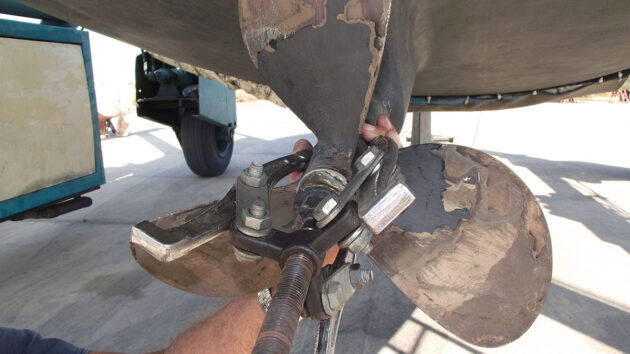
First, remove the nut securing the propeller to the shaft. This will probably entail a split pin or tabbed lock washer which locks the securing nut on.
I use a piece of timber jammed into the prop blades and held against the hull to stop the prop from turning while loosening the nut.
It is normally right-handed so ‘lefty loosey’ applies.
Carefully detach the propeller by using a beefy three-legged puller if you have a three-blade prop, or a two-legged puller on a two-blade prop.
TOP TIP: Be careful here. Leave the nut partially on to catch the prop when the taper fit is released. The prop on my boat has three blades and is usually quite well fitted so a heavy whack with a hammer on the puller thread head is needed, but it makes it come off suddenly! You don’t want that dropping on your foot.
There is also usually a feather key in the prop as part of the securing mechanism; don’t let it fall off into the oggin.
Some cutless bearings have set screws in the bearing housing to prevent them from turning. Locate and remove these screws.

The old bearing; note the scoring yet the shaft is OK. Credit: Stu Davies
Now comes the tricky bit. My type of bearing is rubber and usually slides out by hand before I easily push the new one back in.
I like to put silicone grease on the shaft and the new bearing.
This sounds very easy unless you have experienced prop entanglement, as I did two months ago in Portugal.
Unfortunately, the line wrapped around the prop shaft rope cutter, the prop shaft itself and cutless bearing housing.
This forced the soft rubber cutless bearing flange up into the prop shaft cutless bearing housing, wedging it in.

The prop rope cutter on Stu’s boat. Credit: Stu Davies
Cutless bearing replacement: P-bracket bearing removal
The easiest way to remove the bearing from a P-bracket is to remove the prop shaft.
This involves removing the gearbox flange off the tapered (usually!) propeller shaft and removing the propeller as above.
The shaft can then be slid out; usually, there is enough room for it to slide past the rudder but if it doesn’t then you’ll also need to remove the rudder.
Removing and replacing the bearing with the shaft out
Initially, I try removing the bearing with a hammer and dolly, a round object which fits the outer diameter of the bearing.
Make sure someone is on the opposite side of the P-bracket holding another hammer or heavy object to avoid shocking the P-bracket too much.
If that fails to loosen the bearing, you will need to make and use a bearing puller.

The old bearing after it was forced up the prop shaft housing. Screws and careful leverage were required. Credit: Stu Davies
For this, you’ll need a long threaded rod, 10mm or larger; it needs to be long enough to go through the cutless bearing with some rod left over.
Two tube spacers, one a touch bigger than the outer diameter of the bearing, and one a touch smaller than the inside diameter of the bearing are also needed.
Put the threaded rod through the bearing with the outer diameter spacer at one end and the internal diameter spacer at the other.
Put some heavy gauge washers on each end and the 10mm nuts.
The idea is that as you tighten the nuts the smaller spacer pushes against the bearing and it slides out through the bigger spacer.
Note that some considerable force may be needed. If it fails to budge then more drastic measures are needed.
Heat from a gas gun can be used and if that fails, the final measure is to get a hacksaw on the bearing.
Take the blade out of the hacksaw, feed it through the bearing and fit it back into the frame.
The idea is that you carefully cut a thin slit along the length of the bearing.
Exercise extreme caution to prevent damage to the surrounding P-bracket housing.

The propeller shaft is cleaned and ready for the new bearing. Credit: Stu Davies
Once split, use a chisel and hammer to break the bearing apart and remove the pieces.
Thoroughly inspect and clean the propeller shaft with sandpaper or a wire brush.
Clean the bearing housing as well, removing any remnants of the old bearing and ensuring a smooth surface for the new one.
Cutless bearing replacement: Leaving the prop shaft in place
To get the bearing out without removing the propeller shaft you’ll need to make U-shaped bearing pushers.
This is a piece of tube with the same internal diameter as the shaft’s outer diameter, cut in two longitudinally.
Loosely clamp it to the shaft with a hose clamp so that it butts up against the end of the bearing; this allows pressure to be applied to the bearing to push or pull it out.
Two threaded rods are also needed along with a U-shaped plate and a straight plate.

New bearing location screw holes. Credit: Stu Davies
Drill holes in them to allow the threaded rod to go outside of the P-bracket.
When tightening, the threaded rod will pull the U-shaped plate against the U-shaped bearing pushers to push the bearing out.
The problem with this method is that if the bearing is too tight and won’t come out easily, the hacksaw method to split the bearing cannot be used.
Installing a new bearing
I like to use silicone grease to lubricate everything. Apply a thin layer of silicone grease to the clean propeller shaft and the bearing.
First, you need to prepare the new bearing. Some bearings may require a slight chamfer (bevelled edge) on the leading edge to help with insertion.

The new bearing and securing screws in place. Credit: Stu Davies
Carefully slide the new bearing onto the shaft, or into the P-bracket housing and tap or use the puller/pusher to push it into place.
Some people like to epoxy the bearing into place; I don’t like that idea unless it’s very loose.
Once the bearing is positioned correctly, tighten any set screws to secure it in place. Then refit the propeller back onto the shaft.
I like to slide the prop on first without any key in place and mark where it goes along the shaft.

Make sure you mark where the key goes along the shaft before fitting it. Credit: Stu Davies
Then I fit the key and push the prop on ensuring it reaches the mark. This proves that the prop isn’t riding on top of the key.
The taper provides the drive force connection between the shaft and the prop and not the key.
If it ‘rides’ the key, the taper will not grip properly.

Boat propeller: How to choose the right one for your boat
The correct prop can have a dramatic effect on your boat's performance. Ali Wood learns how you can save fuel,…
Casting a cutless bearing housing
Don Fitzroy Smith turns to the experts when an obsolete fitting can’t be found

DIY cutless bearing extractor
Graham Swetman makes his own heavy-duty bearing extractor
How to replace a stern tube on a boat
Bruno Brown isn’t fazed by what seems a daunting task
Want to read more practical articles like Cutless bearing replacement: step by step?

A subscription to Practical Boat Owner magazine costs around 40% less than the cover price.
Print and digital editions are available through Magazines Direct – where you can also find the latest deals.
PBO is packed with information to help you get the most from boat ownership – whether sail or power.
-
-
-
- Take your DIY skills to the next level with trusted advice on boat maintenance and repairs
- Impartial in-depth gear reviews
- Practical cruising tips for making the most of your time afloat
-
-
Follow us on Facebook, Instagram, TikTok and Twitter