
Nicholas Koligiannis replaced his 1973 Albin Ballad's standing rigging and improved the mast by adding an inner forestay fitting, new backing plates, and mast steps.
When I bought my 1973 Albin Ballad Moments of Clarity many years ago, the first job I did was to replace all of the running and standing rigging.
A few years back, I thought the time had come to replace them once again, as well as to remove and inspect all deck fittings associated with the rigging.
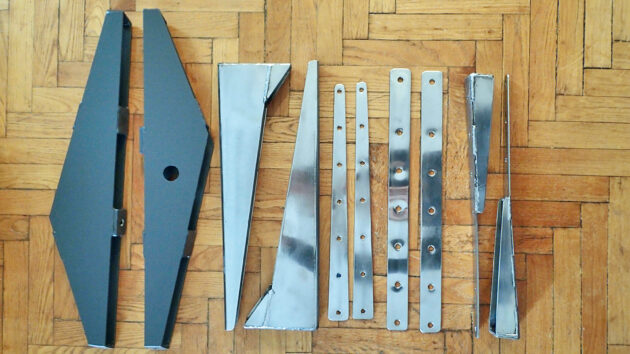
So, with the mast down, and secured on five oil drums, I removed all of the chainplates and backing plates, the galvanised beams and the deck eye bolts.
The cleaned chainplates ready for installation. Photo by Nicholas Koligiannis.
It’s a testament to the original quality of the metal components that they required no attention, other than removing the old caulking material and cleaning.
There were just a couple of spots of surface rust on the galvanised beams, which I tackled by sanding and then applying two coats of an epoxy primer and two coats of one-component paint for use on metals.
Adding an inner forestay fitting to my standing rigging
With the mast lowered, I took the opportunity to install a few extra pieces: an inner forestay fitting, backing plates for checkstays, and mast steps.
Although the Ballad isn’t designed as a cutter rig, I thought it would be a great idea to be able to hoist a staysail when the weather got rough, rather than rely on furling the genoa.
Even with foam luffs, furling genoas don’t work very well when more than three rolls are taken in. For this reason, a few years ago I’d installed a Solent stay which had served me well.
However, I figured that a proper inner forestay, complete with checkstays, would be a good addition to my solo sailing adventures.
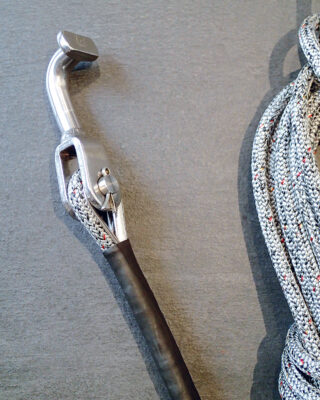
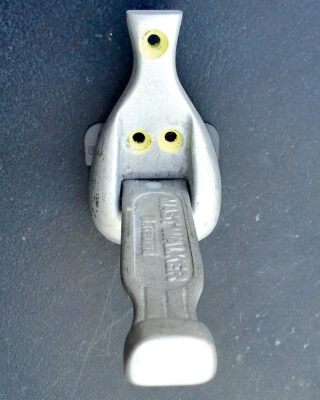
I chose Seldén’s ‘O’ fitting, as it’s not only easy to install but cleverly simple and robust.
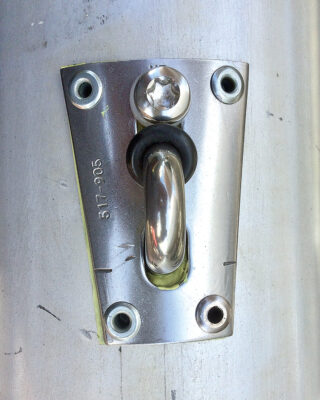
The Seldén O fitting is easy to fit as a DIYer. Photo by Nicholas Koligiannis.
All that’s required is to create a couple of oval openings on the mast using a combination of drill bits, a metal file and Dremel sanding discs, applying Duralac anti-corrosion paste on the back of the fitting and the surface on which it will be mounted, then riveting the fitting in place.
Installing backing plates for checkstays
Next came the backing plates for the checkstays.
Again, I chose Seldén’s backing plates for T-terminals, which can be easily installed by drilling the appropriate hole on the mast, inserting the plate and riveting it in place.
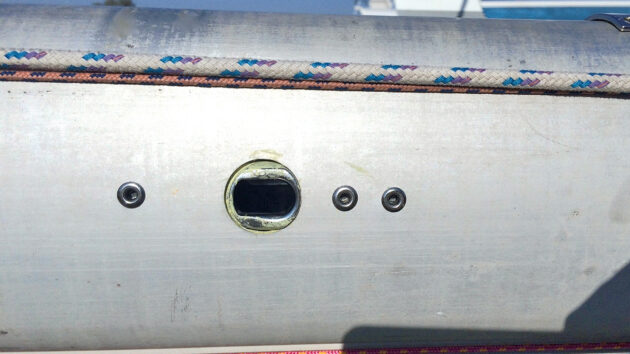
Seldén T-terminal backing plates installed. Photo by Nicholas Koligiannis.
I also opted for T-terminals with fork ends, as they offer a variety of options for checkstay material.
You can go for either 7×7 or 7×19 wire, which are easy to remove and coil when not in use, or rope, such as Dyneema.
I chose the latter, as it’s the lightest and easiest to install and remove, since I don’t plan on leaving the checkstays on throughout the year.
T-terminals and Dyneema checkstays. Photo by Nicholas Koligiannis.
On the deck side, the checkstays are led through 72mm Selden blocks attached to Wichard watertight U-bolts, which are supported underdeck by epoxied plywood pads and stainless steel backing plates.
Then they run through Spinlock XTS clutches – also mounted on deck – and are tightened with the spinnaker winches.
Once tightened, the clutches take over the load, and the spinnaker winches are free to handle the staysail sheets.
Some thought should also be given to the position of the genoa cars.
In older International Offshore Rule (IOR) boats with very long genoa tracks like the Ballad, moving the car all the way forward works well, especially if you have a new staysail cut for this purpose, like I did.
If the genoa tracks aren’t long enough, then blocks on upstands can be installed in the appropriate positions on deck.
Adding mast steps
With the forestay fittings finished and the parcel containing the mast steps finally here, it was time to start drilling the 60 holes required for the mast step installation.
I chose to install aluminium folding steps by Mast Walker, since they combined light weight, strength and aesthetics.
The top two steps are of a fixed, closed-loop design, made out of stainless steel, and provide a very secure foothold when working at the masthead.
The Mast Walker mast steps are lightweight and strong. Photo by Nicholas Koligiannis.
On average, a distance of 40-45cm is recommended between each step. This will vary according to the existing mast fittings, so in some cases you may have to be a little flexible.
As the crosstrees provide a foothold by themselves, I measured the distance from the crosstrees to the main halyard winch (my first ‘step’) and again from the crosstrees to about 140cm from the masthead.
The latter would give me a comfortable position to work on the various masthead fittings, plus VHF aerial, wind indicators, anchor light, etc.
The mast steps can either be riveted or screwed to the mast. I chose to do the latter, which required first drilling with a 5mm bit, then tapping with a tap for 6mm machine screws.
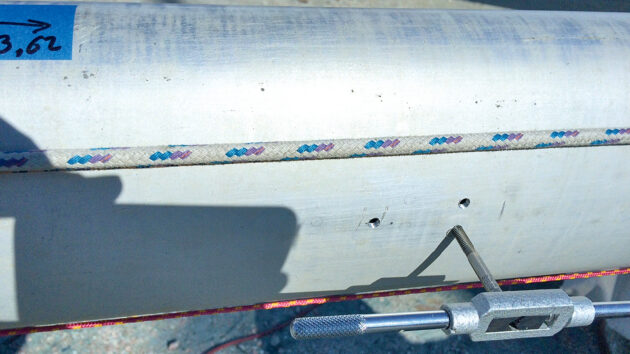
Drilling and tapping for the mast steps. Photo by Nicholas Koligiannis.
The holes on the mast – as well as the ones on the aluminium steps – were coated with Duralac, which also acts as a medium-strength thread locker.
Mast support
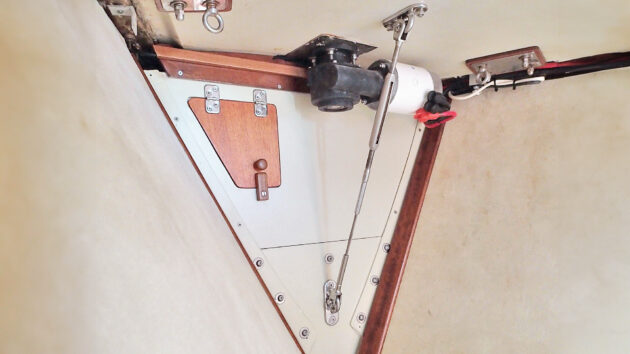
With the mast finally on the boat, it was time to turn my attention to the deck pad-eye and the support it would require below decks.
I’d already decided to install the pad-eye just aft of the windlass, approximately 115cm aft of the headstay (this also determined the position of the tang on the mast, so that the inner forestay would run parallel to the headstay).
To counteract the lifting force of the stay, I installed another, exact same pad-eye below decks, in effect sandwiching the deck between the two. This would accept one end of the supporting strut.
The deck pad-eye to support the inner forestay I added to my standing rigging. Photo by Nicholas Koligiannis.
A word of caution: it’s important to drill oversized holes, remove as much of the core material (balsa or foam) as possible by using a sharpened Allen key on a drill, taping the holes from below and then injecting epoxy resin from above.
When the resin has cured, you drill the holes once again, in the correct size. This epoxy plug method protects the surrounding core material from potential water ingress and prevents delamination.
Finding a secure attachment point for the other end of the supporting strut came next.
Many years ago, I’d looked into converting the separation between the anchor locker and the V-berth into a proper bulkhead. However, this would have meant losing access to the underside of all the bow fittings.
Instead, I divided the bulkhead into two parts, epoxied the lower part to the existing tabbing and simply screwed on the upper part.
The lower part is made of 25mm plywood and is strong enough to form the basis for the strut support. I also through-bolted this to the tabbing with six 8mm machine bolts.
Forestay strut connecting underdeck pad-eye to anchor locker bulkhead. Photo by Nicholas Koligiannis.
The final step involved installing a substantial backing plate for the third pad-eye, which I made from a piece of 3mm 316 stainless steel plate, trimmed to size with my angle grinder.
Finally, I connected the two pad-eyes with the support strut.
Incidentally, the support strut is nothing more than a piece of 1×19 6mm wire swaged to a fork terminal on one side, with a rigging screw and another fork terminal on the other.
I used one of the original stainless steel Hasselfors rigging screws that came with the boat (I’d already replaced those rigging screws with chromed-bronze versions several years ago).
How well have my standing rigging replacements worked?
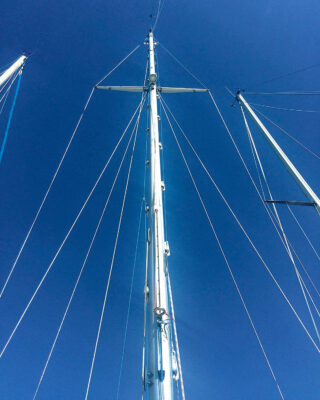
The finished mast after a standing rigging replacement. Photo by Nicholas Koligiannis.
The inner forestay has proven to be a great addition to Moments of Clarity, especially for long-term cruising.
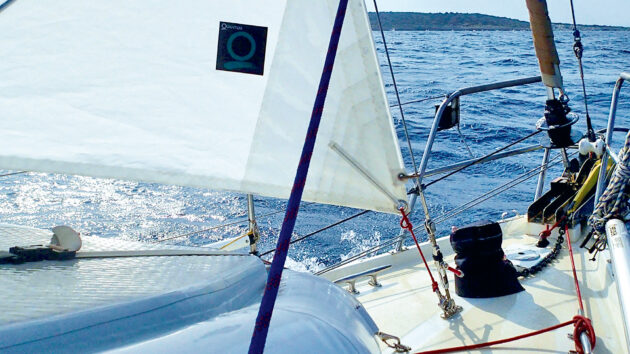
Shortly after I finished the installation, I placed an order for a hanked-on staysail with Quantum Sails. At 11m2, it’s twice the size of the Ballad’s storm jib—incidentally, a good rule of thumb when determining the size of a staysail.
Now, when I head out for a long cruise and anticipate strong winds – rather typical in the central Aegean during the summer – I hoist the mainsail and staysail, and unfurl the genoa.
As the wind picks up, I put a reef or two in the mainsail and a couple of rolls in the genoa.
With winds over 30 knots, I furl the genoa completely and leave the staysail and the reefed mainsail. The boat heels less and enjoys increased average speed, since she doesn’t slam every so often into the Aegean’s typical steep chop.
Nicholas Koligiannis has been sailing since he was a child. His father was the Moody dealer in Greece so Nicholas always had the chance to tinker with family-owned boats. In 2001 he bought Moments of Clarity, a 1973 Albin Ballad. When not sailing, Nicholas advises and assists other yacht owners with their preparations for offshore cruising.
Understanding metal fatigue: What causes rigging and engine failures?
Do you know the difference between a sudden fracture and a fatigue fracture? Understanding the characteristic 'beach marks' is the…
Understanding and mastering boat rigging
Your yacht’s rig remains upright thanks to the right balance of compression and deflection, as Owen Brown explains

Freestanding masts: Why more cruisers should go wireless
You see a yacht with a mast, or masts held up with no rigging and think: ‘What’s going on? Why…

How to check your rigging – video guide
There are plenty of ways that a mast or its rigging can fail, but there are often key telltale signs…
Want to read more articles like How I gave my Albin Ballad’s mast and standing rigging a major upgrade?
A subscription to Practical Boat Owner magazine costs around 40% less than the cover price.
Print and digital editions are available through Magazines Direct – where you can also find the latest deals.
PBO is packed with information to help you get the most from boat ownership – whether sail or power.
-
-
-
- Take your DIY skills to the next level with trusted advice on boat maintenance and repairs
- Impartial, in-depth gear reviews
- Practical cruising tips for making the most of your time afloat
-
-
Follow us on Facebook, Instagram, TikTok and Twitter