
In his most ambitious practical project yet, liveaboard boat owner Owen Moorhouse build his own DIY watermaker
Creating a reverse osmosis (RO) system had long been a pipe dream as a liveaboard yachtie on a swinging mooring, but the cost had always been out of my reach.
However, one day, after topping up my water tanks, a A$25 (£15) water charge was added to my bill following a full fill of fuel.
Until then, the accepted practice had been that the water was free, so a surcharge of 10 cents per litre prompted me to think about sorting out an RO system.
To add to my dilemma, on a windy approach to the fuel and water pontoon a few weeks later, I had an unfortunate brush with another yacht alongside.
Although there was no visible damage, I was quickly presented with an eye-watering bill for A$1,500 (£900) in repairs.

The control panel fitted in the wheelhouse above the rollout fridge
If nothing else, that solidified my decision to make my own fresh water on board and I was determined to make the system myself.
After all, how hard could making a DIY watermaker be?
Reverse osmosis is a highly effective method of desalination that converts seawater to potable fresh water.
The membrane technology is widely used and involves removal of salt and most contaminants by forcing the water under very high pressure through semi-permeable membranes.

Sandpiper in the marina
To celebrate my 90th birthday, friends and family gifted me an RO project fund, further encouraging me to get started.
I watched endless YouTube videos made by boating enthusiasts on the subject, and before long I was sketching ideas for my own system.
I never thought for a moment that the project would take me three years to complete!
Stocking up parts for the DIY watermaker
I spent the first of those winters yacht-less in Turkey at my daughter’s home on the Aegean.
On one excursion, we travelled south to Bodrum where I found a well-stocked hardware store with stainless steel valves at very attractive prices.
Back in Ayvalik, I discovered a small ship-chandler with pipe fittings in both brass and stainless steel. They too were a veritable bargain.
Bit by bit I started amassing the parts I needed, while tinkering in their basement to construct the control panel.
I wasn’t fazed by the idea of carrying components back to Sydney, for I’d already carried an anchor winch in my luggage on a previous trip, and the savings had made that all worthwhile (see PBO October 2018).
With my son-in-law’s online assistance, I ordered additional pieces, and I had three Voltron 2540 membranes and two pressure housings couriered directly to my boat.

Reverse osmosis schematic. Key: 1. Deck washdown pump 2. Deck wash cock and priming pressure adjustment 3. High-pressure pump 4. High-pressure membranes 5. High-pressure adjusting needle valve 6. Domestic supply pump 7. Flush timer control 8. Carbon filter 9. Non-return check valve 10. 25-micron filter 11. 5-micron filter 12. Flow meter 13. Ship’s tank 14. Cock to domestic supply 15.Primer pressure gauge 16. High pressure gauge 17. Three-way valve 18. Total Dissolved Solids (TDS) meter
On my return to Australia, I sourced the 5-micron and 25-micron filters and the high-pressure (HP) pump locally, as these were too bulky for my bags.
By then, I was ready to start assembling the system.
The control panel fitted perfectly under the cockpit seat in the wheelhouse, and above the rollout refrigerator where it is easily accessed.
The two membrane pressure vessels fitted comfortably alongside the pilot berth, without interfering with its original intention as a bed.

Flush cycle schemtic: Reverse osmosis schematic. Key: 1. Deck washdown pump 2. Deck wash cock and priming pressure adjustment 3. High-pressure pump 4. High-pressure membranes 5. High-pressure adjusting needle valve 6. Domestic supply pump 7. Flush timer control 8. Carbon filter 9. Non-return check valve 10. 25-micron filter 11. 5-micron filter 12. Flow meter 13. Ship’s tank 14. Cock to domestic supply 15.Primer pressure gauge 16. High pressure gauge 17. Three-way valve 18. Total Dissolved Solids (TDS) meter
I then mounted the pre-filters under the steps that descend from the cockpit into the wheelhouse.
All these modules sit directly above the engine, to which I mounted the HP pump, controlled by a magnetic clutch-belt drive.
The HP pump required the assistance of a local engineering shop to fabricate an adjustable V-belt bracket and to customise the three-way valves behind the control panel.
Sandpiper has only one through-hull seawater intake to supply water for engine cooling, toilet flush and deck wash-down.
Anticipating an increased demand for seawater, I had a 1½in strainer, seacock and primary strainer fitted during a pre-season slipping to replace the original 1in intake.
Engine setback
But all was not to be! My trusty Vetus engine finally succumbed to long years of excellent service and was officially pronounced dead.
Rebuilding it was not a financially viable proposition, making a full replacement the only option.
In my search of a new diesel engine, I had to put my watermaker project on hold.
Before installing the new engine, I needed to degrease the engine compartment, only to discover that a cleaning service was going to cost almost the same price as a new Kärcher K2 home pressure-washer – so I took the plunge and bought one.
An accumulation of years of grease and dirt soon magically disappeared – and I now also owned a pump capable of 117 bar that was powered by my existing onboard 2.4kW 240V auxiliary generator.
Finally, my new 35hp Kubota VQ 505E engine was fitted. I was then free to finish my DIY watermaker project!

The new Kubota diesel engine being lifted on board from a barge
Without a doubt, sourcing the high-pressure components consumed the largest amount of time, further aggravated by my inexperience with this type of item.
When ordering pump and pressure vessel components from overseas, I specified ¼in British Standard Pipe (BSP) thread, saving me the complication of the differing standards used in North America.
I ordered the fibreglass membrane pressure vessels directly from China, only to find that the 30mm thick stainless-steel end-plugs were recessed into their bores.
I assumed this was to protect the high-pressure connections, but it made access almost impossible.

The new engine in place
They were sealed with O-rings and secured by extremely accurate collets that defied a spanner when I attempted to tighten the adjoining HP fittings.
To provide sufficient spanner room, I needed to cut access out of the fibreglass walls into the end recess of the pressure vessels.
I cursed endlessly, for this was an extremely arduous task, but couldn’t help but admire the clever design to safely retain the collets and secure the end-plugs.
I’d originally intended to refit my new engine with a V-belt drive to a magnetic clutch-driven HP pump, as per the original installation, but soon realised a redesign was required.
This was to be a costly undertaking, and if I’m honest the idea of running a 35hp diesel engine to produce water while at anchor had always been an inefficient part of my plan.
Thinking outside the box
In the end, my radical solution was quite simple. I decided to connect my 2.4kW petrol 240V generator to my new Kärcher pressure washer to supply the 50-bar pressure required to make fresh water.
Although this meant abandoning my newly acquired Italian-made pressure pump, along with the magnetic clutch and mounting, I reasoned I could justify this through efficiency savings and engine hours, to say little of the cost of investing in a new adjustable pump mount.
Although unplanned, the Kärcher K2 fitted neatly under the chart table and within a few metres of the RO membranes.
Continues below…

Boat water tank treatments tested
The ‘tank taste’ you get from a boat’s fresh water tank can be pretty unpalatable, especially if you’re feeling seasick.…

Accidentally started filling your water tank with diesel?
Steam cleaning is the answer

How to service your marine diesel engine
The unique challenges of the marine environment mean regular engine servicing is essential for any boat owner. Winter is the…

5 top causes of boat engine failure – and how to avoid them
Jake Kavanagh talks to Sea Start marine engineer Nick Eales about how to avoid the five major causes of an…
I’d previously installed a 12V, 17lt per minute commercial deck washdown pump to clean the anchor chain, so I fitted this with a diversion valve to the Kärcher.
Powered by the batteries, it now doubles as the priming pump.
The Kärcher K2 is powered by the 240V generator and demands only 1400W.
This leaves me with plenty of spare power to recharge the battery bank, to say nothing of the saving in diesel engine hours.
The only downside is the noise from the pumps and the generator, which I admit can be a little disquieting.
Moment of truth: will my DIY watermaker work?
After years of planning, waiting, redesigning, sourcing, and tinkering, the moment of truth finally arrived when I tested my handiwork.
Yet despite multiple attempts, I couldn’t achieve any pressure at the needle valve where the brine exits the system.
To my dismay, not a drop of fresh water was produced!
I was quick to blame the high-pressure pump, as water was flowing to the brine overboard outlet at the low-pressure outlet.
However, when I reverted the high-pressure pump back to its original washdown function, it worked perfectly. I was completely baffled!
Where was the pressurised potable water going? I consulted various experts, but even they were stumped.

Owen enjoying a glass of water out of his DIY watermaker
In utter frustration, I dismantled everything several more times and came close to abandoning the entire project.
In one last-ditch effort, I reluctantly inspected the outlet end of the second membrane housing plug, when I suddenly found the culprit.
Two O-rings in the connecting sleeve that joined the membrane to the stainless-steel plug were missing!
Their omission allowed the pressurised water to exit through the brine outlet, bypassing the membranes and resulting in the lack of pressure.
With a simple O-ring replacement, I soon had water flowing into the tanks at 120lt per hour.
I was jubilant and watched with immense satisfaction as potable water poured into the tank.
The generator consumed less than 2lt of petrol an hour, with the simultaneous benefit of topping up power to the battery bank.
Maintenance of the DIY watermaker
With abundant fresh water, I then focused my attention on designing a flushing system to maintain health and hygiene of the membranes and filters and preserve their longevity.
I admit, I was daunted by the idea of having to pump and purge a solution of sodium metabisulphite.
I was more attracted to a recommendation to recycle product water from the tanks through an additional carbon filter to effectively achieve the same result.
So, I investigated and designed an automatic flushing system to work via the boat’s conventional automatic-pressure water supply pump.
A simple, programmable garden watering valve provided the desired solution.

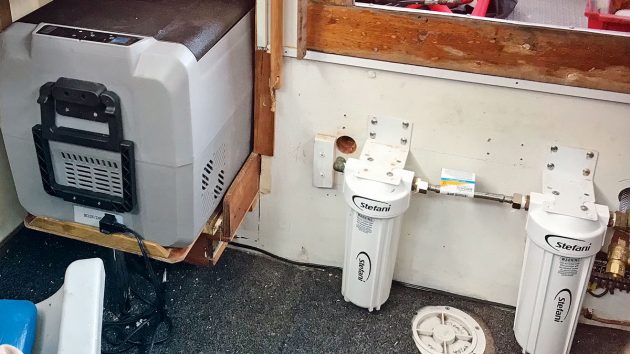
Carbon filter (left), two pressure vessels (below) and timer and regulator for flush cycle (right) all fit comfortably alongside the pilot berth
Operated on a 9V battery, it can run automatically, but I usually operate it in manual mode for about two minutes following each water generation operation.
With the 12V priming/deck washdown pump switched off, I use the domestic pressure pump to prime the high-pressure pump with fresh product water while the cycle is in progress.
The flush-water is then discharged through the existing test-water outlet.
Non-return valves on either side of the carbon filter prevent the possibility of seawater entering the boat’s storage tanks or the new fresh water returning to the sea.
The additional carbon filter also eliminates possible damage to the expensive membranes, should it be necessary to fill water from an onshore supply that may have been treated with chlorine
This additional carbon filter is exclusive to the flush process.
Without a doubt, my DIY watermaker project was one of the more frustrating and complicated installations I have ever undertaken.
With intermittent effort, it took me just over three years to complete.
It’s hard to say where those years went, but the timeline was drawn out by my unexpected need to replace the boat’s engine, which in turn presented me with new design challenges.
Ignoring my advancing age, the other complications and the time taken to source components, I believe the installation could have been achieved with about 40 hours of labour.
Noting that I used an existing washdown pump, 240V generator and domestic water pressure system, the additional components cost me about A$2,500 (£1,500).
I should add that during this time commercially available units have appeared on the market that are cheaper than the ones available when I started.
Was building a DIY watermaker worth the effort?
But all said, the result has been incredibly rewarding and liberating.
I can now indulge in the luxury of unlimited fresh water, and showering has become a guilt-free pleasure.
The water quality is also worthy of a toast. At 13ppm, measured with a total dissolved solids (TDS) meter, the water quality exceeds WHO guidelines.
Ironically Covid-19 was a positive contributor to this tale, as I kept myself gainfully employed during lockdowns and periods of isolation.
In my 94th year, I’m finally revelling in bountiful supplies of quality water and I’m feeling immensely proud of my achievement.
Enjoyed reading DIY watermaker for your own fresh water supply?
A subscription to Practical Boat Owner magazine costs around 40% less than the cover price.
Print and digital editions are available through Magazines Direct – where you can also find the latest deals.
PBO is packed with information to help you get the most from boat ownership – whether sail or power.
-
-
-
- Take your DIY skills to the next level with trusted advice on boat maintenance and repairs
- Impartial in-depth gear reviews
- Practical cruising tips for making the most of your time afloat
-
-