
The unique challenges of the marine environment mean regular engine servicing is essential for any boat owner. Winter is the ideal time to do this, making next spring’s launch much less of a daunting task. Here are the six main areas which need annual checks or attention

1: FUEL SYSTEM

Filters are essential to keep water and foreign particles out of your engine. Most marine systems have two fuel filters: a primary filter placed in the fuel lines between the tank and engine, and a secondary filter between the fuel lift pump and the injection pump.
Checking and replacing the primary fuel filter
The type of primary filter found on most small boat installations comprises a filter element with a glass or metal bowl underneath to catch water and heavy sediment. These are held together with a long bolt running through the centre of the entire system.
You should check regularly throughout the season for water having collected. It will be clearly visible at the bottom of a glass bowl; metal bowls will require occasional draining to check.
To drain the filter bowl, there will be a cock or plug at the bottom. Hold a container underneath and open the cock or loosen the plug. Once any water has passed through you should be rewarded with a stream of clear fuel and can then close the cock or screw the plug shut.

Primary Filter: drain the filter by loosening the plug at the bottom
Replacing the filter is usually recommended at intervals of around 200 hours, although you should check the engine manual. First, remember to close the fuel stopcock to stop fuel draining from the tank. Some systems have stopcocks on both sides of the filter, which minimises loss from the fuel pipes and hence the amount of air a new filter introduces to the system.
Diesel is messy stuff which will get everywhere if not contained, so before touching the filter make sure you have measures in place to catch the fuel which will drain from the filter.
A bowl below allows easy access when working, or if there isn’t space try hanging a plastic bag around the filter. Unscrew the central bolt, allowing the filter and bowl to separate from the bracket and the fuel to drain into the bowl or bag.
If the canister has not come away it may need a slight tug to separate it from the bracket. Check the sealing rings between the bracket, canister and bowl – they don’t need replacing every time, but as new filters usually come supplied with seals you may prefer to do so.
To fit the new filter, simply reverse the process. It’s best to assemble the base plate, bowl and filter as a single stack before offering it up and inserting the bolt. Finally, tighten the bolt firmly with a spanner.
Replacing the secondary fuel filter

Secondary filter bleed: slacken the screw on the filter until bubble-free fuel escapes
The secondary filter is generally one of two types: a spin-on filter similar to car oil filters, or a type similar to the primary filter described in the previous section, without the separator bowl.
To replace a spin-on filter, unscrew the filter with a filter wrench until you can just move it by hand. Place a plastic bag around the filter and continue to unscrew it, allowing the fuel to drain into the bag.
Check the area where the new seals will sit for grime and wipe if necessary. Having first applied a smear of diesel to the sealing ring, screw the new filter in place: hand-tight is sufficient if access is good enough to apply your full force, otherwise use a filter wrench – but only gently!
[Note: Some engines have fuel strainers fitted under the domed top of the lift pump. This should be removed and cleaned in paraffin or diesel]
Top tips
- A smear of diesel on the sealing rings of fuel filters (oil for oil filters) helps them bed in smoothly when tightened
- Filling the primary filter with the lift pump is a tedious task. Even if you have a dip pipe fuel system you can sometimes shortcut the process by opening the filter’s bleed screw and blowing down the fuel tank breather pipe to lightly pressurise the tank and drive fuel into the filter
Bleeding the system
Changing the fuel filters allows air into the pipes. For the engine to run properly this must be ‘bled’ by driving it out under slight pressure from high points in the fuel system. Some engines are self-bleeding and can vent air without assistance, but most require you to carry out a few simple steps.

Lift pump lever: the lift pump pessurises the low pressure system
Firstly, make sure you have plenty of fuel and that all the valves in the fuel lines are fully open. Try to operate the lift pump lever – if it won’t move or is reluctant, hand-turn the engine half a revolution to move the drive cam, and try again.
If your primary filter is below the level of the fuel in the tank, and your fuel is drawn directly from the bottom of the tank rather than via a dip pipe, you can fill the primary filter simply by cracking open the bleed screw on the top. You should see the bowl fill with fuel, and once clean, bubble-free fuel starts to flow from around the bleed screw, close it. There may still be air on the downstream side of the filter which will need to be vented using the method described below, but having already filled the primary filter accelerates the bleeding process.
In either case, the next stage is the secondary filter. Open the bleed screw and operate the lift pump. This may take several minutes, especially if you have to fill the primary filter this way. Fuel should start appearing around the bleed screw; once this is free of bubbles you can close the screw.
If that’s not enough…
For Yanmar GM engines, Perkins, Thornycroft and Kubota-based units you will also need to prime the injection pump. The process is similar to that for the secondary filter – open the injection pump bleed screw and operate the lift pump until clear fuel emerges. Older pumps may have two screws – bleed these in turn, starting with the bottom one.

Injector bleed: take care when bleeding the high-pressure system
That completes the low-pressure part of the system and should be sufficient. Try starting the engine – if it runs smoothly, you’ve finished. If not, switch it off and bleed the high-pressure part of the system. Back off the injection pipe nuts a couple of turns, open the throttle fully in neutral, and crank the engine. Use short bursts to avoid damaging the starter motor.
Once you see spurts of clean fuel coming from around the injection pipes, you can tighten the nuts and start the engine. Keep well away from injection pipe nuts while cranking the engine – the pressure of the fuel is sufficient to pierce your skin.
2: OIL CHANGES
Manufacturers’ recommendations for oil change intervals vary, but for most boat engines an annual oil change is adequate. Carrying this out at the end of the season makes sense, as engine and gearbox oils contain additives which help inhibit corrosion. The old engine oil will also have become contaminated with sulphur from diesel combustion, forming sulphuric acid which can accelerate corrosion through the winter months.

Oil removal: drain the oil or pump it through the dipstick tube
Engine oil
Most engines have a sump plug which can be used to drain the oil, but boats being boats, there’s rarely room to access the plug let alone have a tray in place to catch the oil. Some engines have a pump fitted to remove the oil, or you can buy a pump to allow you to extract it from the dipstick hole.
To change the oil, first run the engine up to its normal operating temperature. This thins the oil and stirs up any sludge from the bottom of the sump so that it can be removed with the oil.
Warming the engine normally takes about 15 minutes, so to avoid waiting it’s worth planning some time at the end of a day on the water when the engine is already hot. Extract the oil using the drain plug, cock or pump.
Use a filter wrench to back off the oil filter until it’s just hand-tight; then place a plastic bag around it and unscrew it. Give the seal on the new filter a smear of oil and screw it into position. Tighten it as firmly as possible by hand – this is usually enough, or for safety nip it up with a filter wrench.
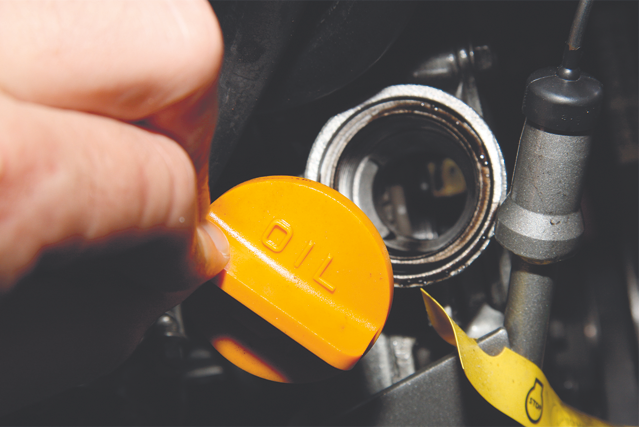
Engine oil filler – add a little less than the suggested quantity of oil
Check the handbook for the grade and quantity of oil required, but don’t be too concerned if the engine takes a little less – you rarely manage to extract all the old oil. To fill, remove the oil filler cap, wiping away any dirt from around the rim, and wrap a rag around it to confine spillage. Pour in the oil, stopping just before the recommended amount to check the level with the dipstick. You may need to top up the level a few times as the oil works its way down into the crankcase.
Gearbox oil

Gearbox Oil: check gearbox oil from the screwthread bottom
Opinions vary on how often you should change the gearbox oil, and it’s certainly less critical than the engine oil as there are no contaminants from combustion. However, it’s still worth changing regularly to renew the corrosion inhibitors and remove any particles that could damage
the gears.
Firstly, check the colour of the old oil. It should look clean: if it’s black you may have an overheating problem, if it’s a milky colour water may be getting into it. In either case, you need to fix the problem before changing the oil.
Assuming all is well, remove the dipstick and use a pump to extract the oil. Replace with the oil recommended in the manual, usually either a standard engine oil or automatic transmission fluid, and check the level with the dipstick. Gearbox dipsticks often screw in place – if yours is of this type, don’t screw it in to take the reading as the stick measures from the bottom of the thread.
Used oil, filters and oily rags all need safe disposal, so find your nearest facility before you start work. Some marinas and boatyards have a disposal service, or you can find your nearest municipal site at: www.oilbankline.org.uk
3: COOLING SYSTEM
Even small diesel engines now usually have indirect cooling, so changing the coolant is a job most boat owners will need to undertake. Like the oil, it’s a good idea to do this at the beginning of winter. Apart from its obvious purpose of stopping the system from freezing, antifreeze also contains corrosion inhibitors which will help your system survive the winter months.

Freshwater drain: locate the freshwater drain points and drain the coolant
Freshwater system
Only change the coolant when the engine is cold – when the engine has been running up to temperature and is hot the filler cap is under pressure and can allow scalding steam and water to escape if released.
First remove the filler cap. Locate the drain cocks – there is often more than one – and drain the coolant into a bowl. Don’t drain it directly into the bilge – most antifreeze contains highly toxic ethylene glycol.
Once the system has drained, close the cocks and replace the coolant. The antifreeze/water mix varies on the lowest temperature you want it to protect against, but will be explained on the antifreeze can. You can either pre-mix the coolant in a bottle, or allow it to mix in the engine – if you choose the latter, pour in the antifreeze first, then top up with water. Run the engine for about 30 minutes and check the coolant level again, topping up as necessary.
Raw water system
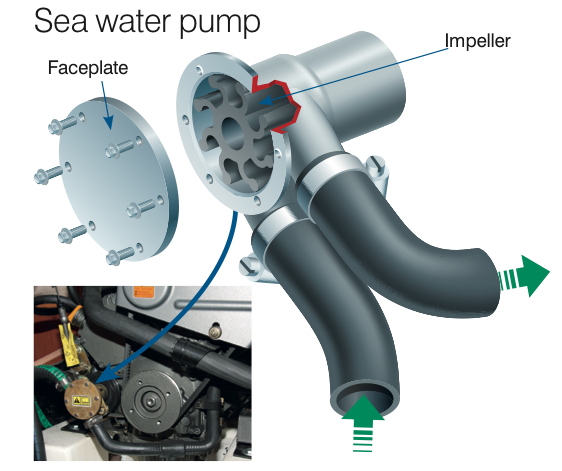
This should be flushed through with fresh water at the end of the season to avoid corrosion. Some boat owners plug the ends of the circuit and fill it with antifreeze for the winter.
Check the inlet strainer and clean if necessary. You should also check the impeller. First remove the faceplate from the pump, then remove the impeller with a pair of needle-nosed pliers, taking note of the vanes’ direction. Examine it carefully for cracks – a favourite place for deterioration is at the roots of the flexible vanes. If a vane is missing you need to find it, as the old vane could be sucked through your new impeller and destroy it.
Clean off all traces of the old paper gasket from the faceplate and housing. Smear the new impeller with washing-up liquid for lubrication and slide it back onto the shaft, making sure the vanes are aligned the same way as they were for the old impeller, and that the pin engages with the slot. Replace the faceplate, using a new gasket, and tighten the screws evenly.
Other checks
- All engines have a thermostat which regulates the flow of water around the cylinder head and hence its temperature. Unfortunately these can fail and cause the engine to overheat dangerously. Run the engine and check that the water on the output side of the thermostat is warm.
- Many engines have sacrificial anodes fitted to guard against electrolytic corrosion. These need to be removed annually and checked for depletion.
- If the engine in your boat is mounted low enough that the point where the cooling water enters the exhaust is below the waterline, there will be an anti-syphon valve to stop water flowing back into the cylinders and wrecking the engine. These valves can become contaminated with salt crystals, so check them and regularly clean them with fresh water.
4: AIR INTAKE AND EXHAUST
Air intake

Synthetic air filters such as this should be rinsed with detergent and dried before refitting
Air filters require regular replacement to ensure the free
flow of air into the engine and optimum performance. There are three main types:
1. Paper elements are disposable, so if it looks clogged simply throw it away and fit a new one.
2. Some filters use a synthetic wadding. Wash this through with some detergent and allow it to dry before refitting.
3. Older engines may have an oil bath, where a coarse metal screen is coated with oil from a bath below. These need cleaning with diesel or paraffin, and the oil will need replacing.
Exhaust
Disconnect the exhaust hose from the engine and clean away any deposits, checking for corrosion – spraying with inhibitor can help guard against future problems. If you are winterising your engine, leave the pipe off for ventilation and seal the engine with a plastic bag – if not, refit the pipe.

Corrosion: clean corroded terminals with baking soda and hot water, then rinse
5: BATTERIES
Even maintenance-free batteries sometimes need maintaining. If you can remove the covers over the cells, check the electrolyte level and top up with de-ionised water if necessary. If you’re winterising the boat, try and keep them trickle-charged through the winter months.

Alternator belt: a correctly tensioned belt can be deflected with your finger by about 12mm
6: ALTERNATOR DRIVE BELT
Although not a candidate for annual replacement, it pays to keep an eye on your alternator belt for wear or cracking.
When servicing the engine, have a good look and take the opportunity to check the tension. V-type belts are correctly tensioned when you can deflect them about 12mm with your fingers; for flat belts it should be just possible to twist them through 90°.
If your engine has a timing belt check the manufacturer’s recommended replacement interval. It’s also worthwhile giving it a visual inspection for wear.