
John Calton builds his own 10in touchscreen DIY chartplotter with GPS and AIS for a fraction of the cost of an off-the-shelf system

How to build a £200 DIY chartplotter
Having had two new knees, my wife decided after 40 years to give up the dubious pleasure of sailing with me.
So, we sold our 10m boat and I bought a little Beneteau Antares 620 to allow me to remain afloat and catch some of the dwindling fish stocks in the Solent.
During all those decades, I appreciated the use of various electronic instruments that assisted my navigational skills.
But I couldn’t justify spending over £1,000 for the latest touchscreen chartplotter because it would be uneconomical for a 20ft boat that only, at most, coastal hops.

John’s DIY chartplotter can be slid out when not in use for charging and security. Credit: John Calton
However, the convenience of instantly knowing where you are and whether a large vessel is bearing down on you when a blanket of fog descends meant that an up-to-date chartplotter was essential for my peace of mind.
My priorities were:
- it should have a 10in sunlight viewable touch screen;
- it should display Admiralty charts, to correspond with my Admiralty paper charts;
- it must display AIS images, as I’d found that over the last 10 years I was using AIS in preference to radar;
- it has to work on a 12Vpower supply and be affordable, and it must have a GPS receiver embedded.
Dead ends
I’ve had the excellent Memory Map program on Windows XP for 10 years, as a backup to the Navionics charts on my last boat.
So I thought I’d just update it. I then encountered my first dead end: Memory Map does not include AIS, unless you buy the ‘Pro’ version costing approximately £150 per annum.
My old notebook was fine for running Windows XP, but the poor screen and battery life let it down, while my old laptop was just too bulky and, again, has a poor screen and battery life.
The latest Navionics program for my old Lowrance Elite 5 fishfinder would cost in the region of £170.

John likes to use Admiralty charts so he can cross reference with his Admiralty paper charts. Credit: John Calton
And on top of all that I’d have to buy an AIS receiver and aerial. I decided it wasn’t worth it for a poor 5in screen.
Now, I had a way forward: buy a good tablet which had a GPS receiver, an AIS receiver that could transmit wi-fi signals to the tablet and a chartplotting program with Admiralty charts included.
All the web experts said that the Navionics app was the way to go and I briefly looked at that option but the cost, for me, led me up another blind alley.
It was then that I discovered the website Visit My Harbour.
After navigating my way around it, I decided to invest £25 for a lifetime’s support.
On further investigation I found that there was an app for Android (not available on Apple), called Marine Navigator by Ronald Koenig (available directly from Visit My Harbour).
This works with the excellent suite of Admiralty charts that Visit My Harbour supplies to members for £8.99.
The right hardware for a DIY chartplotter
The next step for me was to buy a reasonably priced tablet, with GPS, for about £100.
After a lot of research, I came across a British firm which produced a model that included everything I wanted and more.
The tablet is a Neocore E1+ (not the Neocore N1, which does not have the GPS included).
Neocore gives a two year warranty and lifetime support too. More importantly, it has a 10.1in screen, a battery that boasts 13 hours of playing time and its screen can be adjusted for prevailing daytime viewing.
It also has a quad core processor, 2GB of RAM (3GB of RAM is now available), that will run, I’m told, all but the very latest computer games.

The QUARK QK- A024 can be powered from a tablet, and John found it was easy to set up. Credit: John Calton
What more could a busy family man also running a boat want for under £100?
Now for the AIS receiver. I only ever want a receiver, because I don’t want to clutter up the chartplotter screens of other users.
AIS, for me, is an excellent substitute for radar, as it can easily be read and at the moment (on weekdays only) there is limited ‘clutter’ on the screen, although within five years that’ll change when more and more people with lots of money and small boats buy AIS transponders instead of receivers.
Continues below…
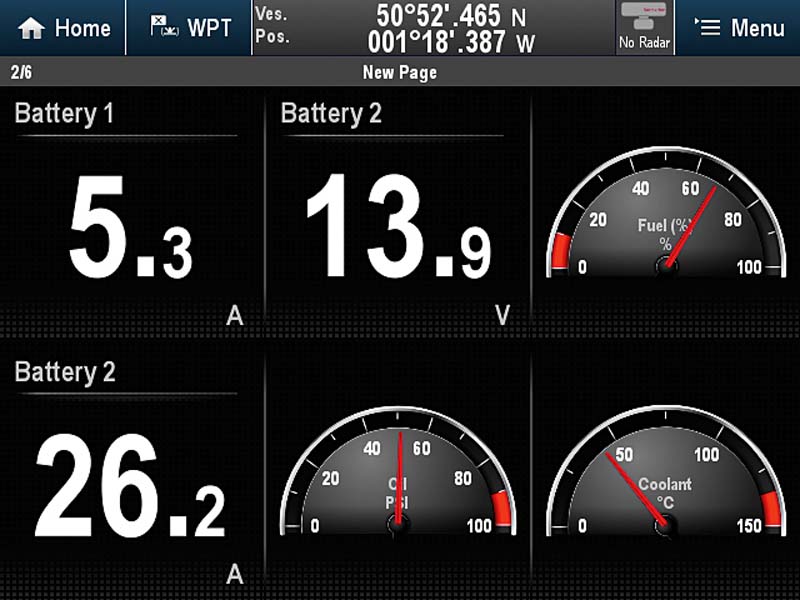
How to convert analogue engine data and battery levels to show on your chartplotter
Just about every engine installed in a yacht or power boat has some degree of instrumentation, ranging from the basic…

Best chartplotters: new MFDs that every boat owner should consider
One of the best ways to choose new marine electronics is to get your hands on kit from a range…
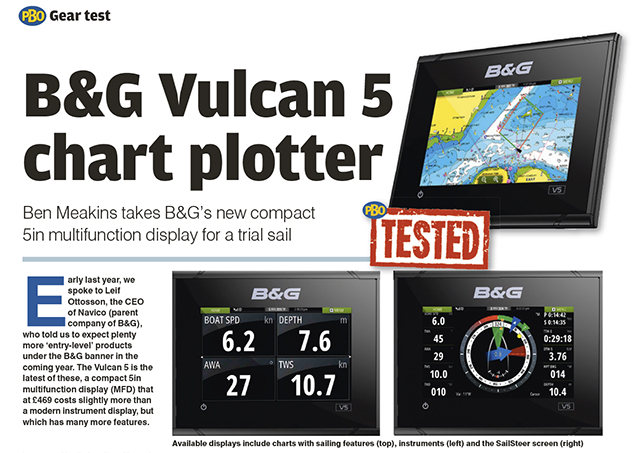
PBO Tested: B&G Vulcan 5 chart plotter
Ben Meakins takes B&G’s new compact 5in multifunction display for a trial sail
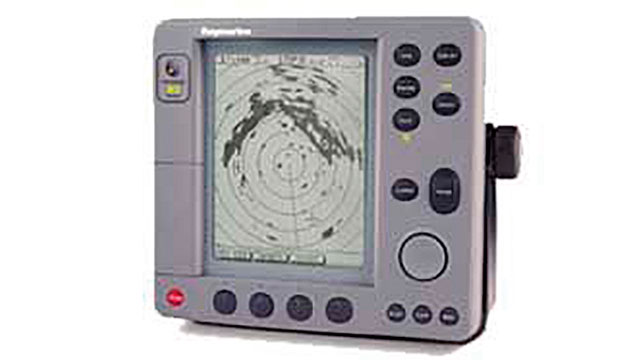
Raymarine RL70C troubleshooting: Our expert solves a range problem
Peter Gaskin writes: “I have a problem with the Raymarine RL70C plotter on the boat – it won’t show below…
Having decided to buy ‘Buy British, to build Britain’, I looked around for a British AIS manufacturer. I’d used a Nasa receiver on my last boat with great success, but this time I looked around and found a QUARK QK- A024 from PRS Communications, which satisfied all my criteria.
It was easy to set up and good value. Don’t buy the cheaper QK-A22, as it can only be powered from a laptop or USB socket; a tablet won’t power it.
The QK-A024 fitted perfectly into a space near a USB socket on my dashboard and its wifi signal only has to transmit 2½ft to the tablet.
Mounting the plotter
Now for the awkward bit: where and how to mount the hardware? Previously I’d tried to mount the laptop on the top of the hatch into the forecabin, as the cabin’s dashboard was full with the echo sounder, VHF radio etc.
I found that the large windows of the cabin let in so much light that it was almost impossible to read anything on the laptop screen, unless I covered it and my head with a black cloth, like the photographers used in the 19th century.
This was fine on a mooring, but not conducive to keeping a constant look-out at sea!

By mounting the chartplotter on the cabin deckhead and making deep edges for the mounting, John reduced glare to a minimum. Credit: John Calton
On looking skywards in despair at having encountered yet another blind alley to navigate, I saw the uncluttered deckhead of the boat’s cabin above me.
The problem of too much light and a crowded dashboard was solved! Well, half solved!
Off I went to look online for tablet holders, but none seemed strong enough to hold my tablet safely for when I encounter any choppy seas. (If you own a boat with space on your bulkhead/dashboard which is out of direct sunlight, then ebay/Amazon have hundreds of tablet mounts from £5 upwards)
Recycling materials
My next trip was to the waste wood bin in my workshop.
Two pieces of waste exterior ply (see if you can distinguish it from teak-faced marine ply when they’re both painted the requisite matt black) and a quarter of a 1940’s drawer base from my mother-in-law’s house clearance and I had the main parts of my tablet holder.
The mounting plate was cut to the size of the deckhead moulding.

John made two L-shaped brackets which secured the chartplotter mounting to the mounting plate. Credit: John Calton
I cut an L-shaped bracket from what was left of the ply and found a 1in x 1in offcut of mahogany from the first boat I built in 1967!
The other piece of exterior ply was cut to the dimensions of the tablet and another smaller L- shaped bracket was produced.
The 1½in wide strips of the 1/8in-thick drawer base ply were glued and screwed to three of the edges of the ply to form a hood around the tablet to shield its screen from sunlight.

L-shaped brackets mounted to the mounting plate. Credit: John Calton
Four ½in quadrant shaped mouldings were glued and screwed to the inside corners of the now open, topless box.
A small offcut was glued and screwed to the back of the tablet holder and a brass bolt glued through it, to act as a fixing for the fourth side of the ‘hood’.
Then a fourth, larger strip of ply was attached to the fourth edge of the box by means of the brass bolt and wing nut.

The mounting for the chartplotter was lined in green baize and a hole was cut in the housing for the on/off switch. Credit: John Calton
A slot along the side of the tablet holder, where the on/off switch of the tablet is situated, was then cut.
Next, I lined the box with green baize that my grandad had given me in 1960, when he cleared out his workshop (along with the brass screws, bolt and wing nut).
I did try using a pan and tilt head from an old camera tripod but, although it looked smarter, I found it was not as secure and stable as my rustic alternative.
The total cost of the tablet holder was zero, but lots of fun and head scratching was had.
Fitting the aerial
Next was to find and fit an aerial. A rummage in the bottom of my boat grab bag, and I found an emergency VHF aerial.
That was cable tied to the pennant mast on top of the cabin and the cable threaded through.

Emergency VHF aerial was used for the AIS. Credit: John Calton
The emergency aerial could now be used for AIS, or in the case of the main aerial malfunctioning, transferred to the main VHF radio, or my handheld, for its original purpose.
My chartplotter was now complete.
Reflections on the project
Costs broke down as follows:
- Tablet: Neocore E1+ £98.10
- AIS receiver: Quark QK-A024 £79
- Marine Navigator app plus AIS bolt-on £8.51
- Full suite of UK- Ireland charts from Visit My Harbour £15.99
- Materials for mount £0.00
- Total £ 201.60
Could I have got things cheaper?
Only by buying the old Neocore E1 model, using Android 6.
There was also an advantage in choosing a British supplier of the tablet. The help and patience from the Neocore Support Team was superb, as was the support from PRS Communications and Steve Bryant at Visit My Harbour.
The matching of the Visit My Harbour charts and the Marine Navigator program is extremely smooth.
When you switch on the tablet and it acquires satellite contact, it will automatically display the relevant chart.

John initially used a pan and tilt head from an old camera tripod but it wasn’t secure enough to hold the chartplotter in place. Credit: John Calton
This means you don’t need a chart index for the 800 or so charts supplied.
The program allows you to move onto the next chart, when required, and you can also zoom in or out.
I followed the instructions printed in the Quark user manual and the wifi connected easily and rapidly.
The size of the ship icons on your chart can be adjusted using the menu icon at the bottom right hand corner of all the chart pages.
The tablet is easy to mount in place and is easy to view. The screen has little glare (even in full sunlight).
Operating the system is much easier than if it had been mounted alongside the fish finder, because it is so near to your eyes, (like the rear view mirror of your car).
You can see and adjust the chart’s features very easily, without having to move off your seat and bend over a tiny dedicated chartplotter screen.
This means your watch keeping is greatly improved.
Price comparisons
Touchscreen chartplotters are available for under £1,000, but don’t forget the cost of the AIS and GPS receivers and the suite of charts you’ll need on top of that, which will add at least £450 to the outlay.
And has the expensive chart plotter got a full 10.1in screen? You’ll also need to wire them all up.
My system is plug and play. When I’ve finished with it at the end of the day, it can be taken home or the tablet can be charged directly from the USB socket, used previously by the AIS unit.
If on a cruise with the family, the tablet can be used by the children to play games when at anchor.
I’m 76 and did not have the benefit of a tech savvy child or even grandchild, so if I can do it, anyone can.

The chartplotter has good zoom capability, although it can be frustrating when boats leave their AIS transceiver on while on the hard. Credit: John Calton
The only drawback of this system was illustrated when I first fired it up.
Sitting safely on my marina berth, I started the system and was immediately shocked to find, on the screen, a large ship bearing down within 250 yards of my position!
Fortunately, I was able to zoom in which showed a member of the Eastney Cruising Association had left his AIS transponder on while his boat was laid up in the club’s compound.
Did he really need to transmit an AIS signal while antifouling his boat? In fact, did he need to transmit any AIS signal unless he was a ship constrained by its draught or manoeuvrability?
But that’s another topic for another time.
Editor’s note: while some sailors may be happy with only an AIS receiver on board, many marine electronics experts recommend having an AIS transceiver (for transmit and receive) as well, so other vessel skippers can see you too.
Enjoyed reading DIY chartplotter for £200? 
A subscription to Practical Boat Owner magazine costs around 40% less than the cover price.
Print and digital editions are available through Magazines Direct – where you can also find the latest deals.
PBO is packed with information to help you get the most from boat ownership – whether sail or power.
-
-
-
- Take your DIY skills to the next level with trusted advice on boat maintenance and repairs
- Impartial in-depth gear reviews
- Practical cruising tips for making the most of your time afloat
-
-