
Nic Compton lends a hand as Jeremy Butler’s home-built Western Skiff hits the water

What a difference five months makes. It was the end of January in Build your own Western Skiff – Part 1 when the revamped Western Skiff kit was delivered by Jordan Boats to Jeremy Butler’s house overlooking the River Dart in Devon.

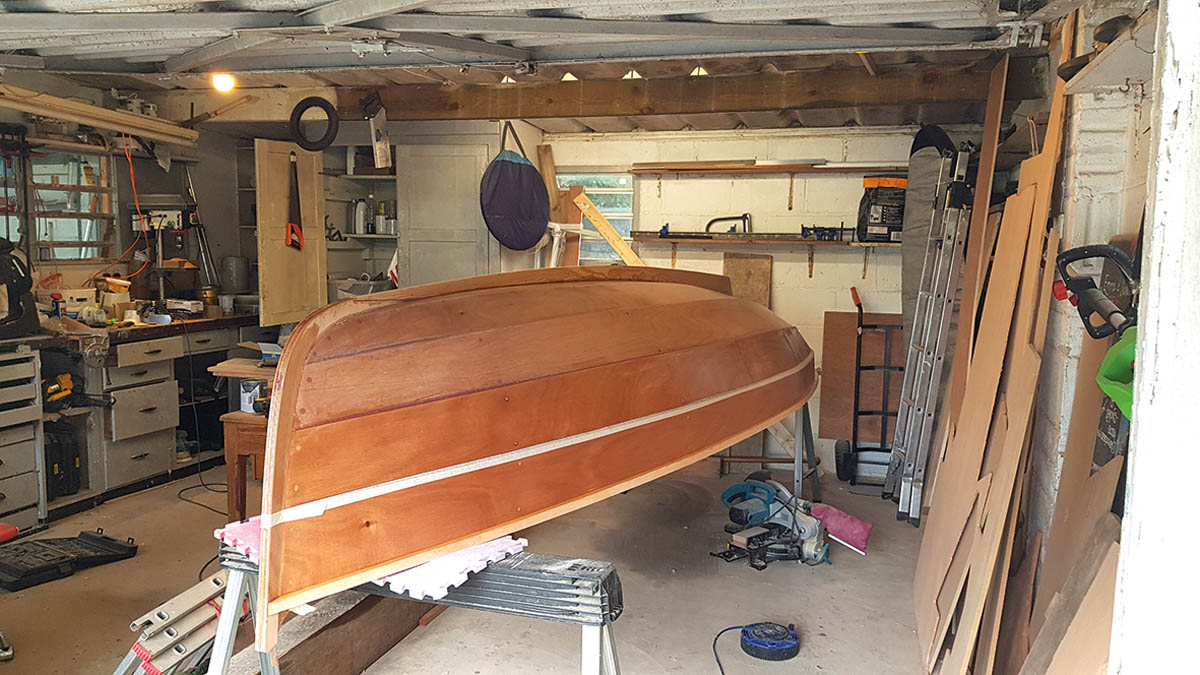
This was the first Nigel Irens-designed Western Skiff kit to be built for 20 years and there was a certain amount of apprehension mixed with excitement as we carried the sheets of ply into Jeremy’s garage.
The pictures show everyone dressed warmly for winter, wearing hats and gloves and with slightly forced smiles. In the background, the trees are bare and the river deserted.
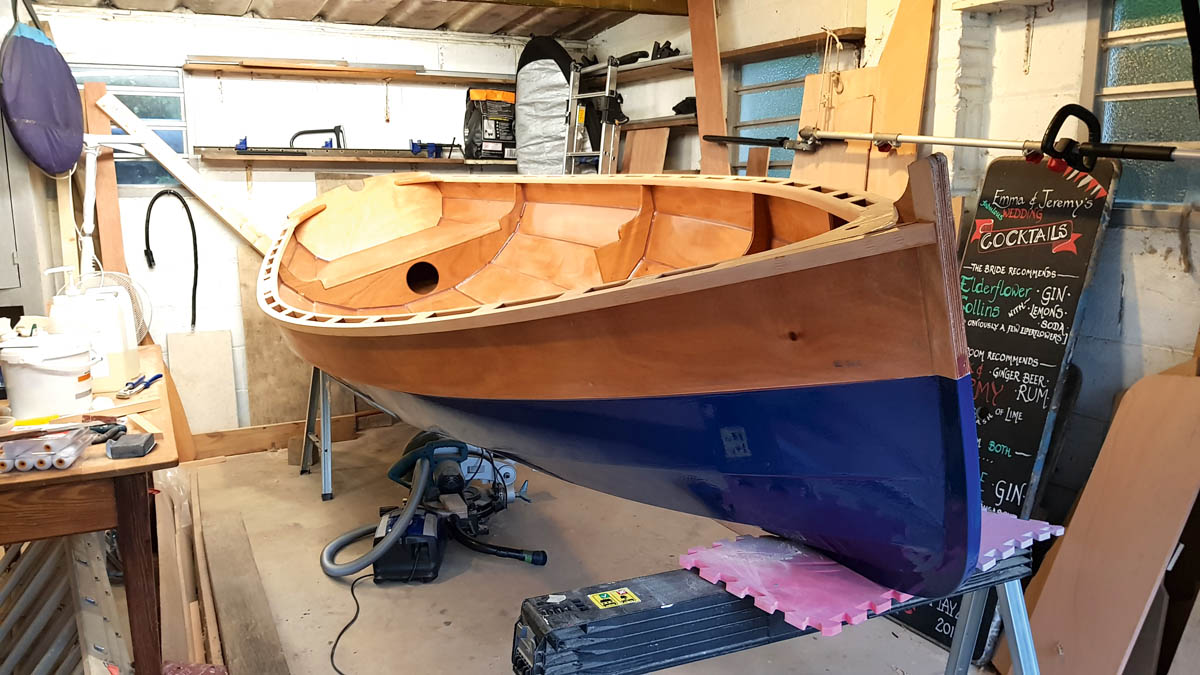
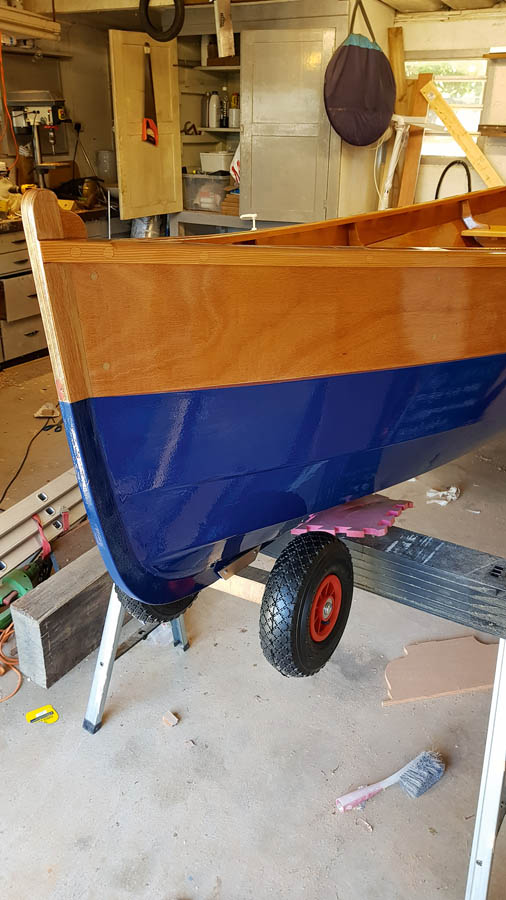
Cut to the beginning of July, and the scene was transformed. Jeremy is in T-shirt and shorts; the sun is sparkling on the water, boats of all kinds are trundling up and down the river, and a line of tourists is crowding the edge of the dam, fishing for crabs. Instead of an awkward pile of plywood we now have an immaculate new boat, complete with removable thwarts, polished brass rowlocks and an interesting pair of wheels fitted on the keel. This time Jeremy’s smile is wide and very real.
In between these two points Jeremy has put in nearly 150 hours of work, in his spare time outside work and caring for his young children. There have been highs and lows – as with any building project.
Download your own set of free plans today: pbo.co.uk/western_skiff
Browse the complete set of articles in this series online
The finished boat got three coats of varnish in Jeremy’s workshop.
A tired mistake
The low point came midway through the project when, as he was sealing the inside of the hull, the epoxy started to go off and, through sheer tiredness, he ploughed on regardless, keen to get another job done before bedtime. It took him nine hours to sand out the resulting runs, along with the rest of the hull. The high point was – well, we’ll get to that very soon.
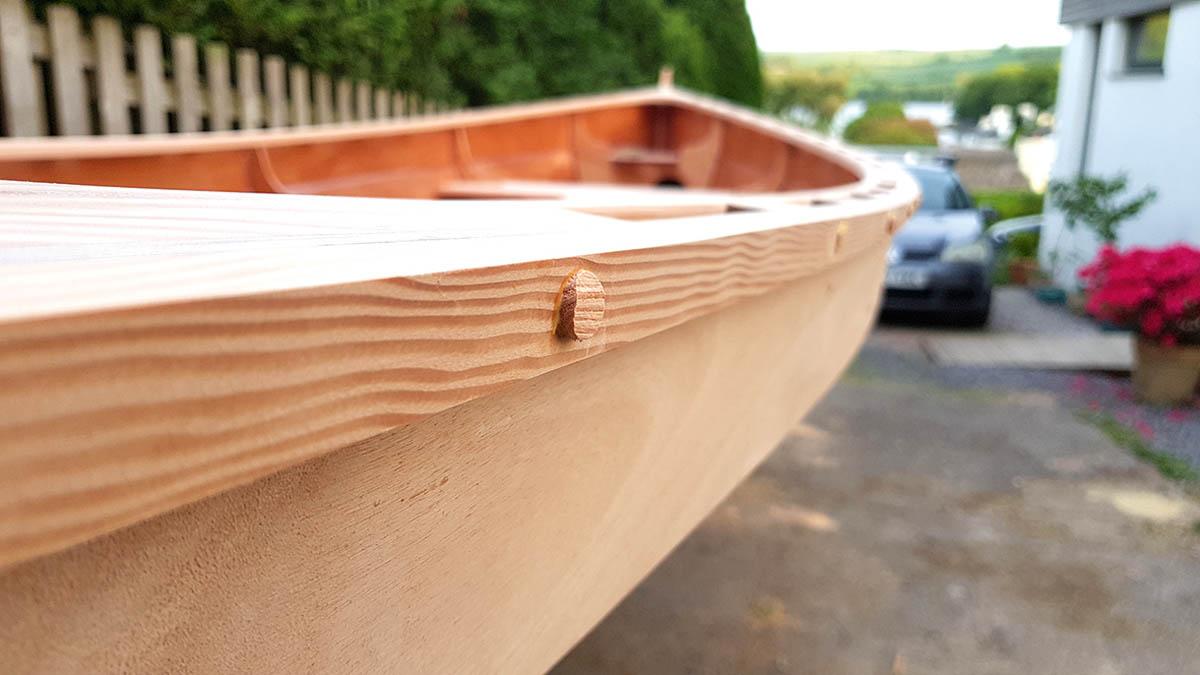
We last met our skiff hero with a router in his hands, radiusing the corners of the boat’s gunwales “as if he didn’t have a care in the world”. In fact, I spoke too soon, as one alarming wobble with the router reminded Jeremy that the screw holes on the outside of the gunwale needed to be filled before the outside edge could be radiused. It didn’t take long for him to cut some plugs out of leftover Douglas fir using a 13mm plug cutter (10mm would have been ideal, but a 13mm cutter was all he had) and a standing drill. The plugs were then popped into the holes with a bit of glue and chiselled and sanded flush, to get a smooth finish. The radiusing work could then continue.
“This was a really satisfying stage,” he says, “because the gunwales looked really blocky and ugly to start with, and I thought I’d totally overbuilt them. But as soon as you put the radius on, it totally lightens the dimensions of the wood.”
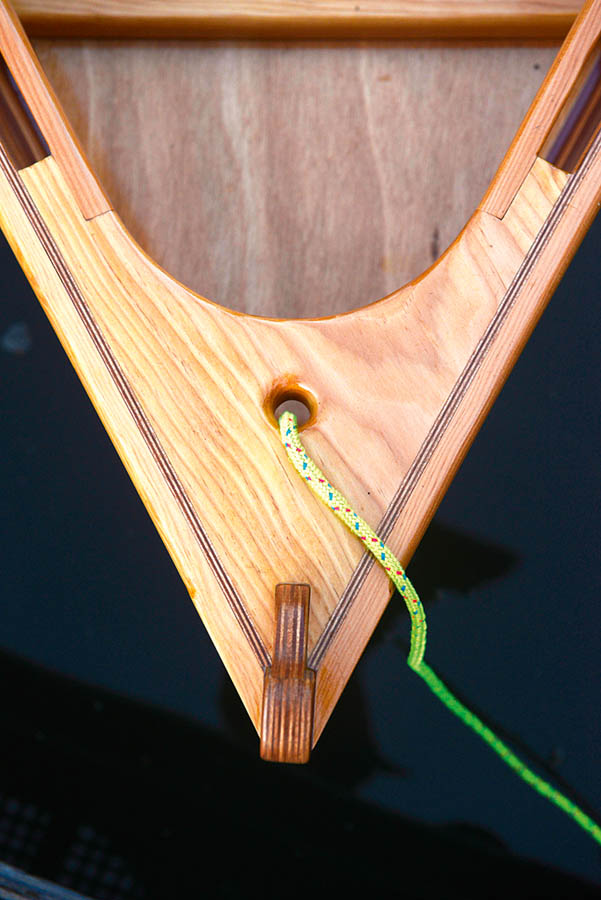
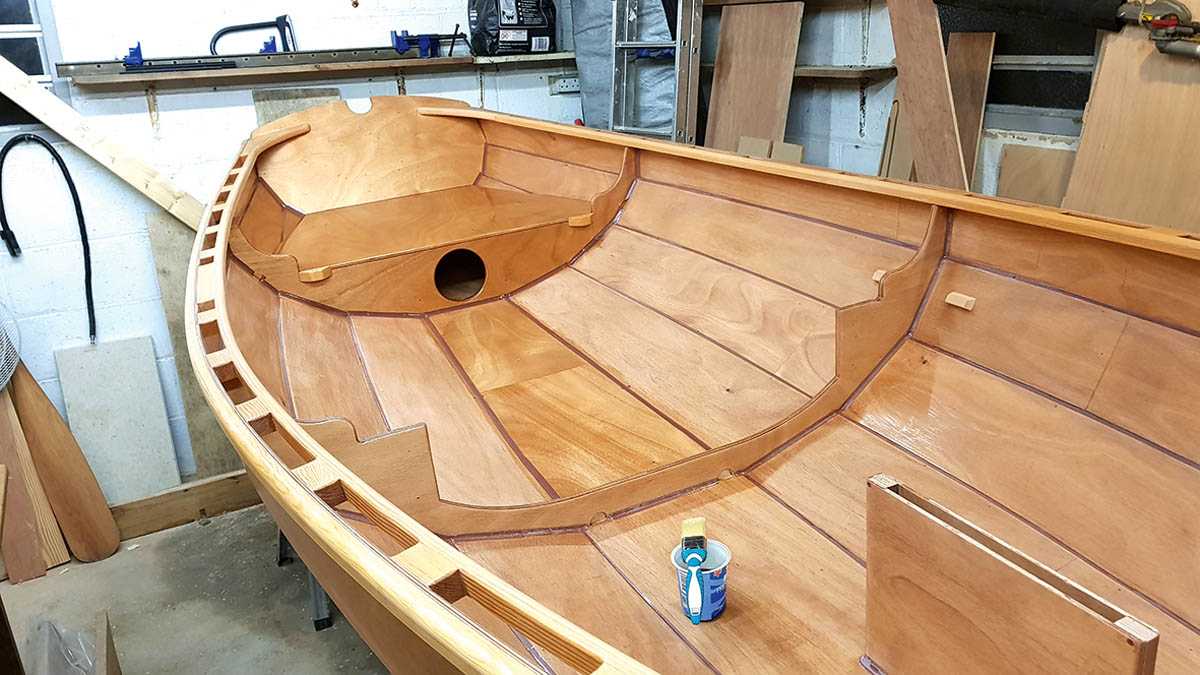
The last piece of woodwork was fitting the bearers for the removable thwarts. Having decided that his original idea of small ‘buttons’ of wood glued to the inside of the hull wouldn’t be strong enough, Jeremy cut some short lengths of Douglas fir, bevelled them to shape and epoxied them into place, using the usual mix of colloidal silica and microballoons to thicken the epoxy.
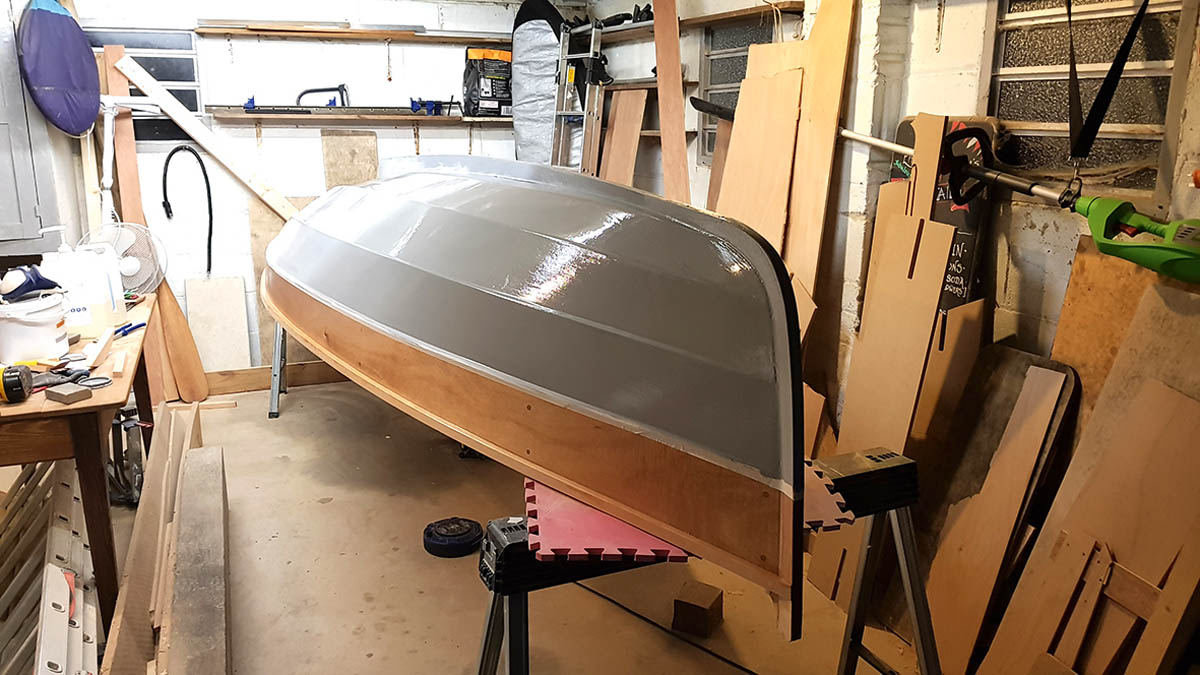
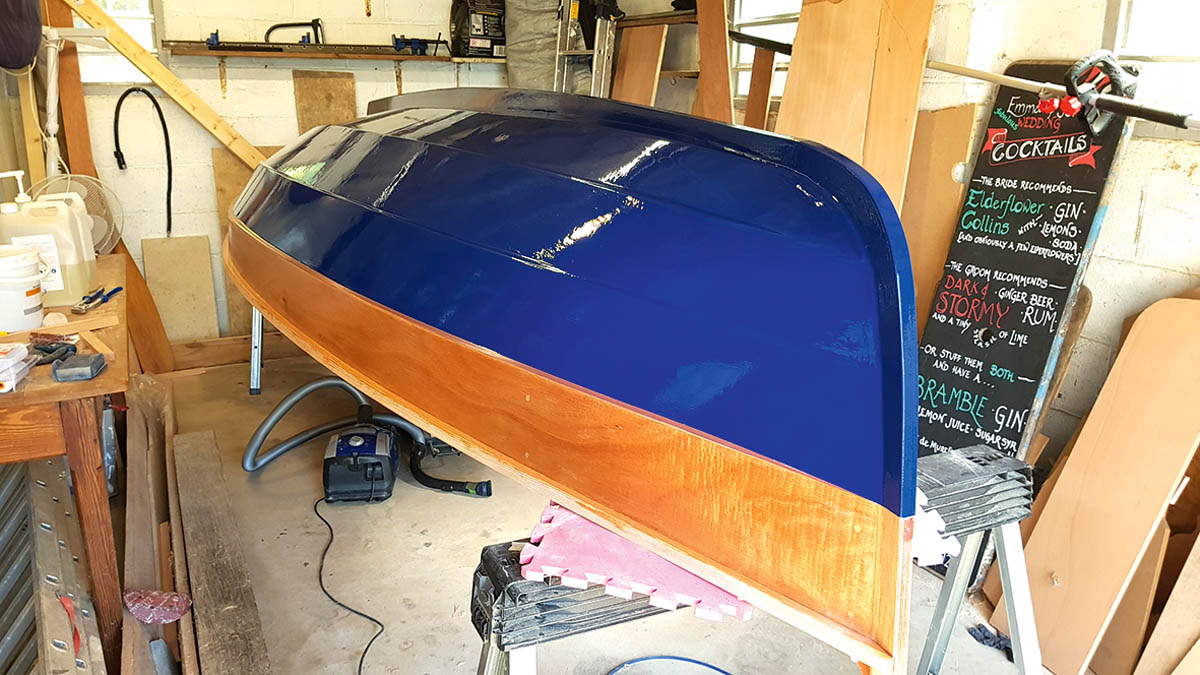
It was then time to turn the boat upside down to paint the outside of the hull. Jeremy applied two coats of neat epoxy to the upper two strakes – the lower strake and bottom board having already been sheathed in epoxy and glass. He then masked off the top strake and the transom and applied three coats of grey undercoat (“standard cheap and cheerful paint”) to the rest of the hull, filling as necessary in between coats. This was followed by two coats of Hempel’s Brilliant Gloss Cobalt Blue, applied with a small roller, which Jeremy found gave excellent coverage and a very nice finish.
Jeremy had a harder time getting hold of his chosen varnish: Le Tonkinois, an “environmentally friendly natural oil based yacht varnish” based on a Chinese recipe.
At the time, the company was apparently relocating its factory from France to Poland, and as a result the UK supplier was out of stock. Jeremy eventually tracked down a pot in Germany, through the giant online chandlery www.svb24.com. Once he had got hold of the varnish, he found it a delight to use and applied three coats to the top strake and transom (two coats wet-on-wet followed by a light sand and the final coat), before turning the boat over and doing the same on the inside. The gunwales had already been sealed with two coats of neat epoxy, which quickly builds ‘depth’, and only the thwarts needed priming with a coat of varnish tinned 50/50 with white spirit.


Best to take your time
“Each full coat took three hours to put on, which was longer than I expected,” he says. “It’s so fiddly around the gunwales, you’re just asking to have runs, especially on a surface that’s already sealed with epoxy. But it’s one of those things that, if you rush it, you’ll regret it later.”
With the hull complete, it was time to fit a few bits of hardware. From the outset, Jeremy was determined to make the boat as light as possible to allow him to transport the boat easily, if necessary on his own, and without the extra expense and clutter of a trailer. To that end, he made all the thwarts removable, so the boat could more easily be lifted onto the roofrack of his car. He also devised an ingenious system whereby a pair of wheels could be temporarily attached under the stem and the whole boat then pushed, wheelbarrow fashion, to a slipway just 100 yards down the road. (It will come as no surprise to learn that Jeremy once worked for the Barrow Boat Company, which has built its whole business around this idea.)
To make the carrying wheels, he used a length of oak, about 2in by 2in and 18in long. He drilled holes into each end of the oak for the wheel bolts to slide into, and cut two holes on the side of the wood to allow him to thread a pair of nuts to the end of the bolts – just like a piece of Ikea furniture. He cut a short length of aluminium U-section (left over from making his dining room table) which he attached to the middle of the piece of oak and offered it up to the keel. He then drilled a pair of holes through the keel and both sides of the aluminium, and popped a pair of drop-nosed pins through them to lock the wheels in place. Job done!
Wheely good idea
The original Barrow Boats have holes cut on either side of the transom, which the oars poke out of to create a pair of handles. Jeremy was understandably reluctant to drill such large holes through the hull of his brand new boat, so decided to simply lift the stern by the quarter knees while he devised a pair of handles that could be bolted through the transom.
The final job before launching was to fit the rowlock plates, which happily turned into a father-and-son bonding session.
“I wanted the main rowlocks to have three positions, because I’m planning to make it possible to move the thwart forward or backwards for trimming purposes. So I bought a brass strip which my dad cut to length, radiused the corners, drilled the holes for the three rowlock positions, drilled and countersunk the screw holes, and then polished the whole thing up. It was really nice to do this with him, and he obviously really enjoyed it. My plan had been to router a rebate in the gunwale and drop them in like most people do, but when I put them on top of the gunwale, I really liked the way they sat proud. So I left them like that, because it celebrates the bit my dad did and it’s a nice way to remember it.”
 Finally, exactly five months and a day after the kit was delivered, Jeremy launched the boat into the River Dart, and he and his father-in-law David took turns rowing it around the creek, with Jeremy’s wife Emma and their children Thea and Louis on board. A few days later, Jeremy and I rowed our respective skiffs – mine built 22 years ago and his brand new – up the estuary to the Maltsters Arms at nearby Tuckenhay (a popular gastro pub once owned by the ‘original celebrity chef’ Keith Floyd). It was an idyllic early summer’s evening, and the two boats glided over the glassy calm water in almost perfect unison.
“Rowing the boat on my own up to Tuckenhay that evening was amazing,” says Jeremy. “The evening light on the timber was beautiful, and to actually row something of your own that you’ve built yourself is really satisfying.”
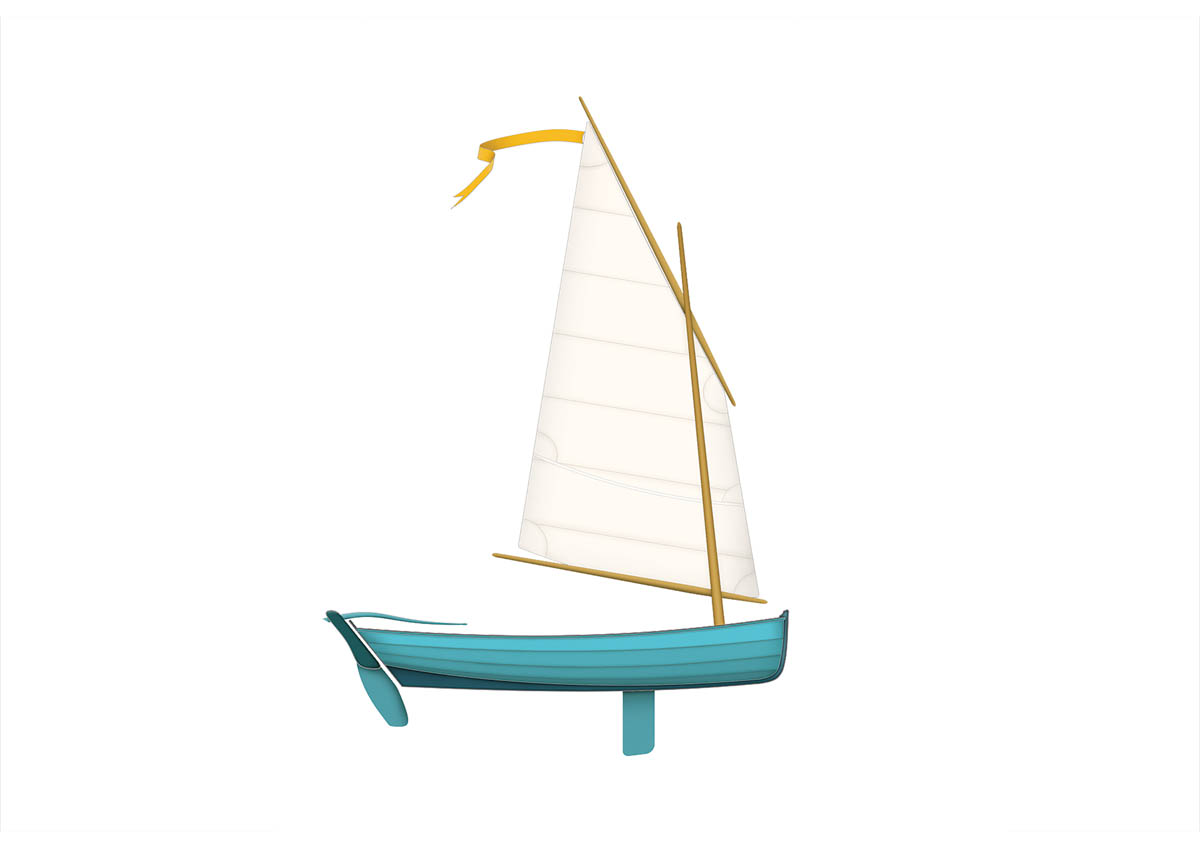
Jeremy is planning to fit a rig in due course, as well as outriggers for the oars and an electric outboard. First though, he might just need a rest.
Sense of achievement
“Looking back, my estimate of the time I could spend working on the boat was roughly right, but it took longer than I thought, partly because I was doing it in lots of little bits after the kids had gone to bed.
“It’s hard to get home from work, put the kids to bed, then go out to the garage and think right, now I’m building a boat. You’re not in the right head space, so you don’t do things as efficiently, you don’t do things as well, and you make mistakes, which you then have to rectify.”
And the high point of the project? Anyone who knows Jeremy won’t be surprised to learn that it involves one of his children.
“The best moment of all was on launch day, when I was putting the buoyancy compartment covers in, just before going down the hill. Thea came bounding up, stopped dead and said, ‘Wow daddy, that’s really beautiful!’ She must have seen me working on the boat for the past few months, but hadn’t taken an interest in the process because it moves so slowly. But that came straight from the heart, and it just floored me.”
Cost of build
Previous months £1,525.27
This month
Brass rowlocks £42.42
Brass for plates £22.50
Wheels £17.95
Drop nosed pins £8.62
Total this month £91.49
Total £1,616.76
Time to build (hours)
Previous months 119¼
This month
Gunwales & plug holes 4½
Sanding & painting outside 14
Sanding & painting inside 8
Rowlocks 2
Total this month 28½
Total 147¾
In pictures: Finishing touches to PBO Western Skiff
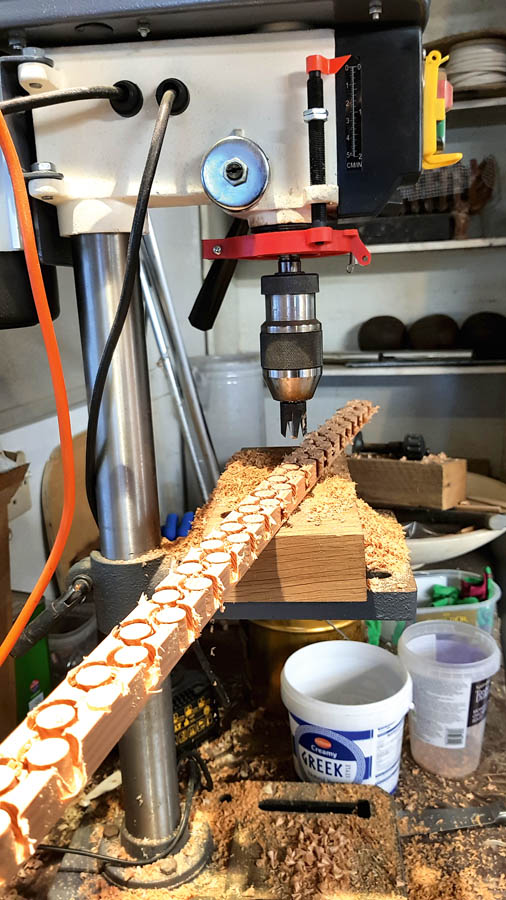
1. The first job this month was to cut a quantity of wooden plugs from an offcut of Douglas fir to fill the screw holes in the gunwales.
2. The plugs were glued into place making sure the grain lined up with the grain of the gunwale timber. They were later cut and sanded flush.
3. Back in the garage for painting and varnishing, the top strake is taped off with masking tape ready for the lower strakes to be painted.
4. Jeremy used household undercoat on the epoxy sealed hull. Posh yacht paint on the top coat would provide the necessary external protection.
5. The paint in question was Hempel Brilliant Gloss Cobalt Blue which Jeremy applied with a small gloss roller. Easily applied, it gave excellent coverage.
6. The hull could then be turned and the varnishing could begin. Jeremy used the Le Tonkinois brand, and took three hours to apply each coat.

7. The finished boat is positively gleaming, even after just two coats of varnish. Another coat will follow. Gunwales were previously epoxied.
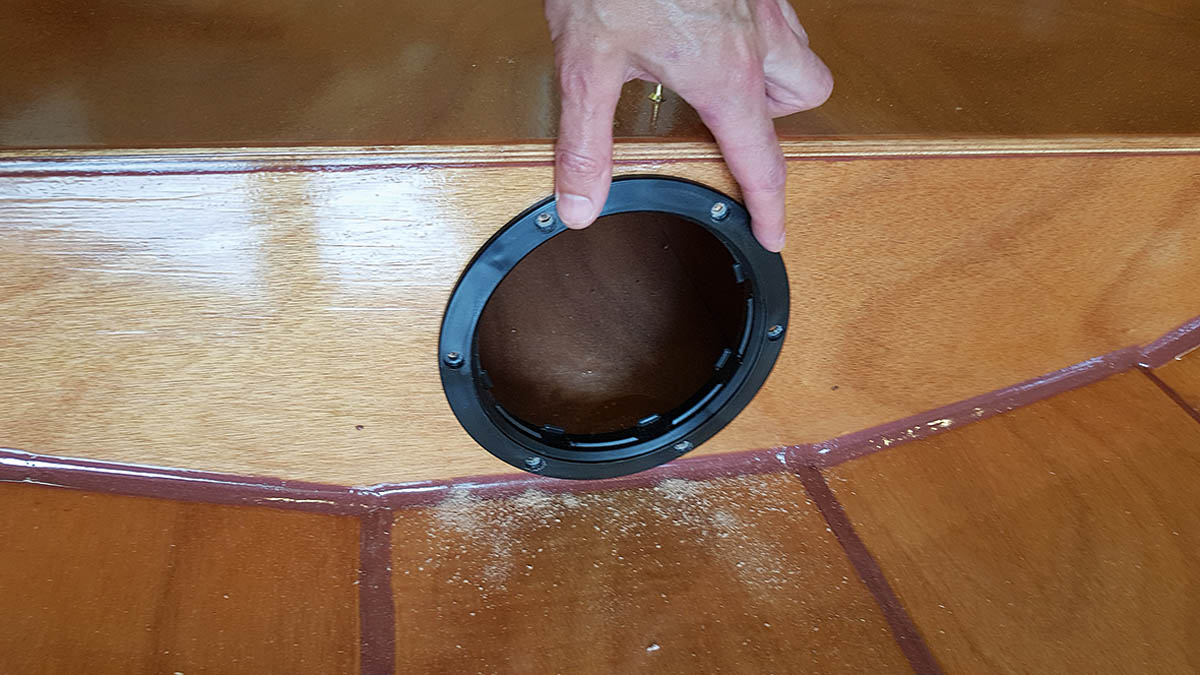
8. Buoyancy tank Inspection hatches were fitted next. There was no sign of the proposed ping pong balls to fill the void when the author visited…
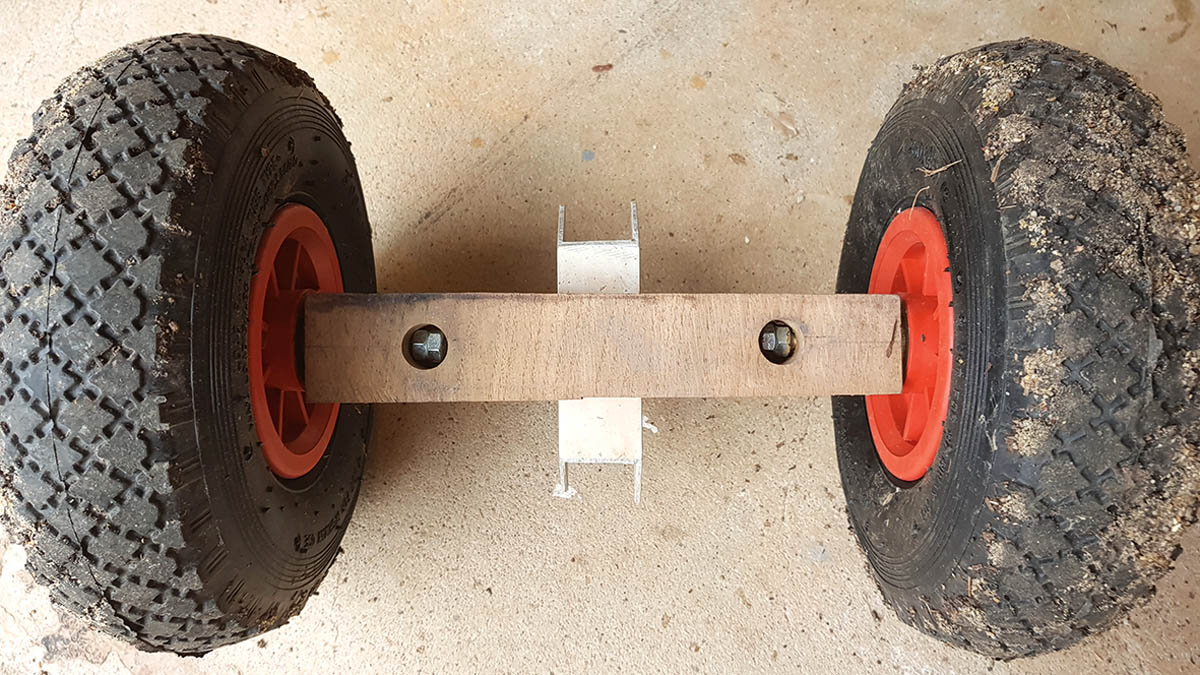
9. Jeremy made an ingenious wheel attachment by bolting a pair of wheels on either end of a lump of oak. Recessed nuts lock wheel bolts in place.
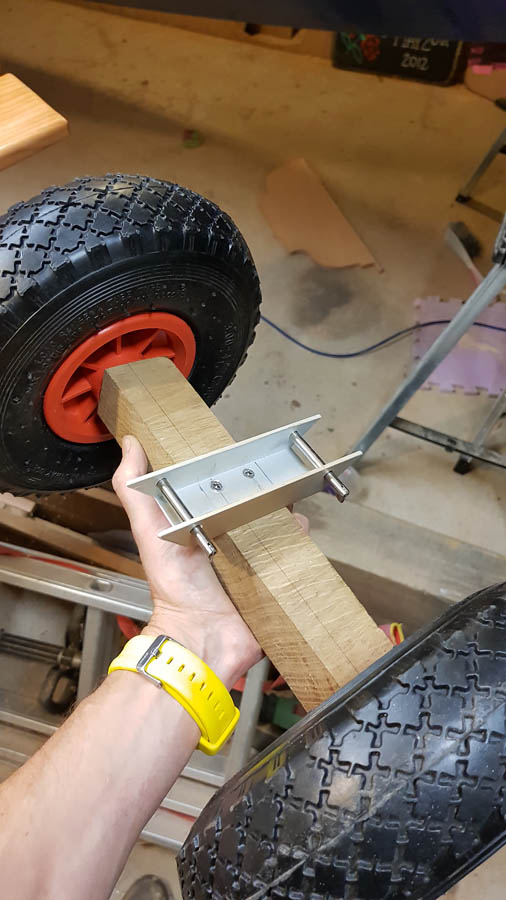
10. On the other side he attached a short length of aluminium U-section. Some rubber padding with protect the keel and make a better fit.
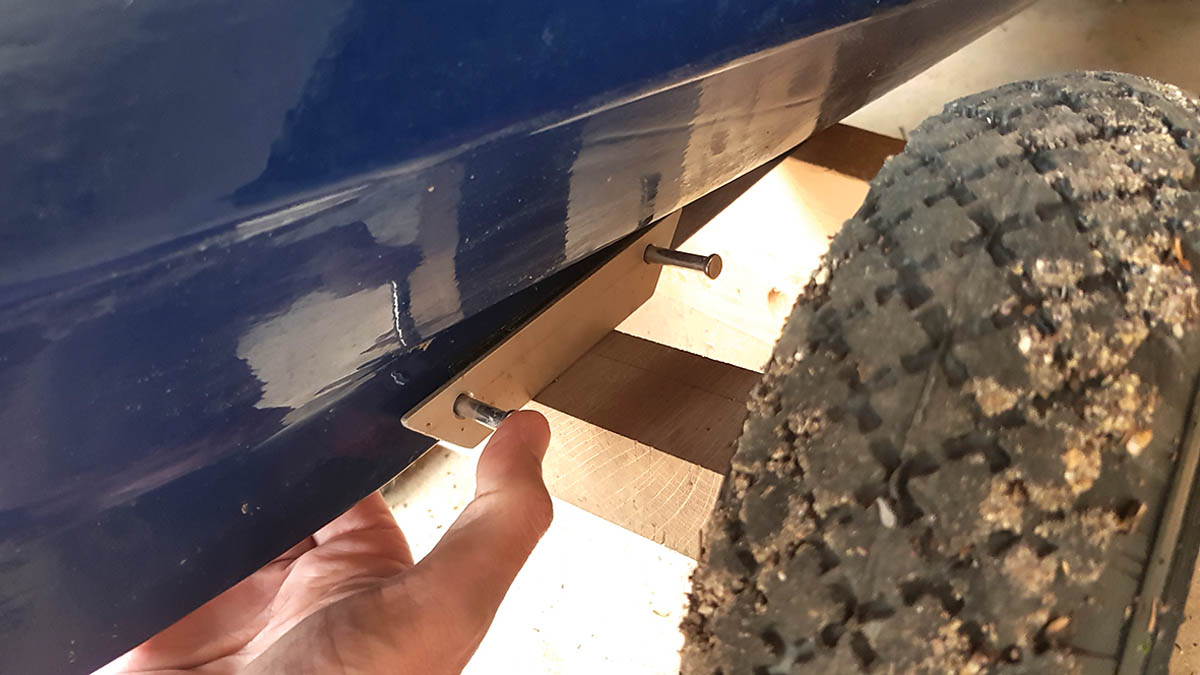
11. Two holes were then drilled through the bracket and the keel, and a pair of drop-nosed pins used to attach the wheels to the underside of the boat.
12. Hey presto, an amphibious boat! Jeremy plans to fit handles to the stern of the boat to make it more easy to manoeuvre, wheelbarrow style.
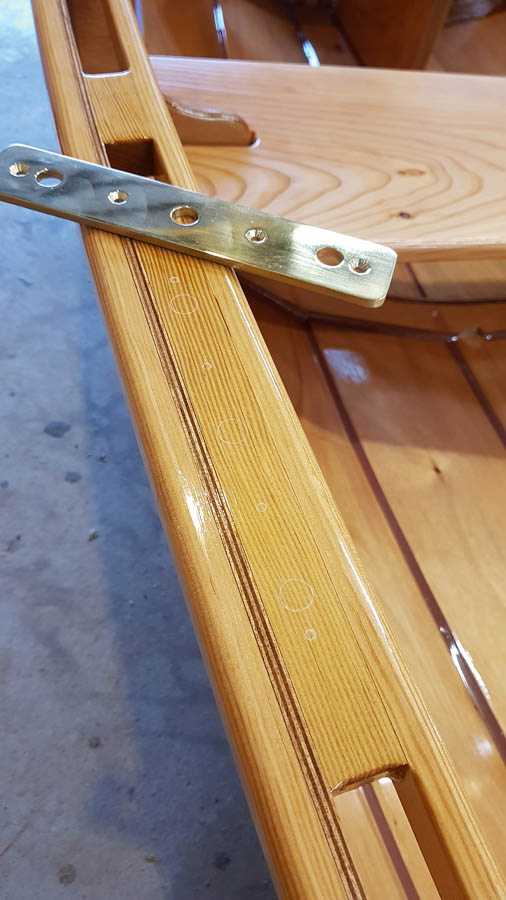
13. The rowlock plates were made by Jeremy’s father, and offer three rowing positions. Thwarts will also be made movable to adjust the boat’s trim.
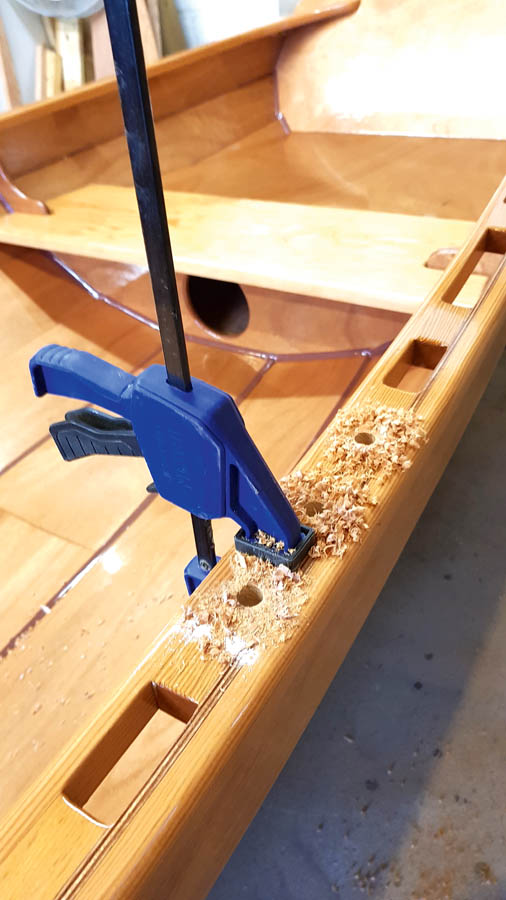
14. Holes are now drilled to accept the rowlock pin. Scrap timber clamped to the underside prevents the base of the hole splitting away while drilling.
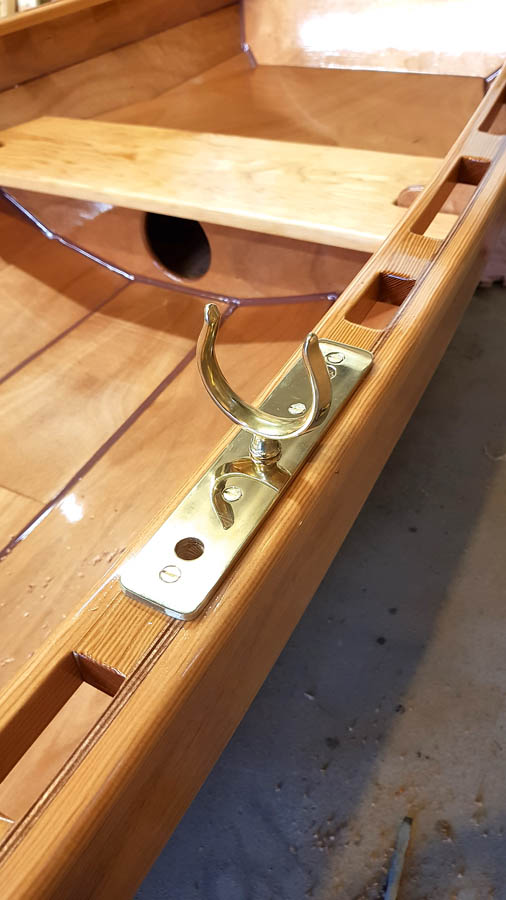
15. Jeremy decided to leave the plates proud because they look so good. Brass rowlocks may eventually be replaced with stronger bronze ones.
 How to get free plans
How to turn free plans into plywood parts and templates
- A set of PDF plans (excluding the sail plan and outboard conversion) for personal use only is available free of charge, but please, please don’t forget a small donation to the Ed Burnett memorial fund: justgiving.com/fundraising/bill-burnett1
- The 39 pages of plans (size ‘A zero’) should be printed (black & white is fine; printing firms are available online).
-
Once printed, join together individual sheets by matching the corresponding numbers in each corner and aligning the target marks.
-
Affix the templates directly onto plywood sheets (2440mm x 1220mm / 8ft x 4ft), aligning the edges and you are ready to cut the parts. We estimate
- 4 1/2 sheets 6mm ply
- 1 sheet 9mm ply
- 1 sheet 15mm ply
- 1/4 sheet 12mm ply
- 2 sheets 12mm MDF
- Solid timber (eg. 1in Douglas Fir) for thwarts, etc
Instructions for free Western Skiff plans – click here to download
Overview pdf of Western Skiff plans (10 pages of A4) – click here to download
Full set of pdf plans of Western Skiff (39 pages of A0) – click here to download
Rig dimensions & sail plan – click here to download
Building an outboard well during skiff restoration in 2015, by Nic Compton
Browse the complete set of articles in this series online