
For clean fuel you need a clean tank, Tony Davies tries out the Diesel Dipper from Marine 16, which promises to provide a solution...

Diesel Dipper review: Can this fuel tank cleaner help avoid breakdowns?
Fuel problems are the most common cause of breakdowns when at sea. The blame for this can often be placed directly at the boatbuilder’s feet. Fuel tanks are installed somewhere barely accessible and many have no drain cock, while inspection hatches to allow proper cleaning are even rarer.
I’ve always firmly believed in keeping my fuel tank clean and free from water in the bottom of the tank as the first and most important part of engine reliability.
Until now the only way to keep the tank, and therefore the fuel, clean was via an inspection hatch to allow sediment to be cleaned out; I performed this task every three years using a fine sieve drawn across the bottom of the tank to collect any muck, and water was drained from the service tank every few months into a bucket. This was an ideal tank set-up that I installed myself and would be a rarity on any production boat.
For the 1978 American Reinell Sports Cruiser I am currently rebuilding, it was not possible to include a service tank so I took a different route and installed a Diesel Dipper tank cleaning system from Marine 16, which are well known for fuel additives, bug removers and preventers.
Although called the Diesel Dipper, it will work equally well with petrol and is particularly effective at removing water from the tank while also dealing with general sludge.
How it works
As we know, diesel bug can only thrive when water is present in the tank, usually from condensation but occasionally from contaminated yard or marina fuel storage tanks. The Dipper removes both water and sediment from the tank by using a pump that runs constantly whenever the engine is running.
This means that when caught out in a blow and the fuel is being sloshed violently around the tank, stirring up sediment to block the engine filters, the Dipper is running to remove the sediment from the fuel before it is drawn into the filters. Sediment and water is collected in a specially designed separator/collector tank before the fuel is returned to the tank.
Obviously, if the tank has not been cleaned for years then the amount of sediment and water being removed may require the collector tank to be drained several times before the fuel tank is clean. However, where the tank is new, as in my case, then the Dipper should ensure that the problem of dirty, watery fuel will never occur.
Having a clean tank also means that the fuel should never need ‘polishing’, which is basically another name for straining the microscopic particles and absorbed water out of fuel.
However, Marine 16 understands that many owners like the additional security of scrupulously clean fuel and to this end it now offers an additional ‘polishing’ spin-on filter that ensures even the most ultra-microscopic particles and absorbed water are removed. This can be supplied with the Dipper or as a retrofit.
Improved filter life
An additional point worth mentioning is that keeping the tank clean will greatly improve fuel filter life! The Dipper itself costs about the same as the cost of professional polishing of a couple of tanks of fuel, but even with polished fuel there is no guarantee that the tank is fully cleaned as sludge will cling behind baffles. The Dipper however, running constantly, will eventually clear all sludge from the tank.
Considering that the Dipper is probably the biggest step forward in fuel cleanliness and, therefore, engine reliability since the introduction of the fuel filter, it is a very simple concept: The heart of the unit is the patented ‘tank separator’ that allows water and sludge to separate from the fuel and drop to the bottom of the tank for later draining, while the clean fuel passes out of the top of the tank and, after being further filtered, is returned to the fuel tank.
Due to the efficiency of the separator, the final filter should very rarely need cleaning unless the separator becomes overwhelmed with sludge due to not being drained. The filter itself is a washable stainless steel mesh and should never need replacing. A further optional enhancement is now offered in the form of an inspection chamber which collects sludge beneath the separator and provides an instantly visible view of the amount of muck that has been collected, and whether it needs draining.
Installation requirements
Installation is well within the capabilities of the average DIY boat owner and will vary slightly depending on the location chosen for fitting and the position of the fuel tank in the boat. Ideally, the Dipper wants to be in a convenient location to make draining easy but it doesn’t need to be in the engine compartment, so if there is accessible space near to the main fuel tank then that will be the ideal position.
On this boat, the tank is directly behind the engine compartment bulkhead beneath the mid-cabin bed so in this case I chose a position in the engine compartment on the bulkhead itself. The Dipper is quite a compact package at 37cm(H) x 15cm(W) x 18cm(D). The plumbing is straightforward requiring either a fitting into the fuel drain valve on the bottom of the tank or, if there is no drain, a suction tube can be installed that carries right down to the bottom of the tank to suck up the sludge and water.
A return line to the tank is also required and this can be teed into the engine return line. I added a T-valve into the return to the tank so that I can also use the Dipper to drain the tank.
The details
- Installation time: 5 hours in total. (not including curing time for epoxy)
- Tools required: basic plumbing and electrical
- UK cost: standard Dipper price £1,074
Note: We may earn a commission when you buy through links on our site, at no extra cost to you. This doesn’t affect our editorial independence.
Step by step guide: Diesel Dipper installation
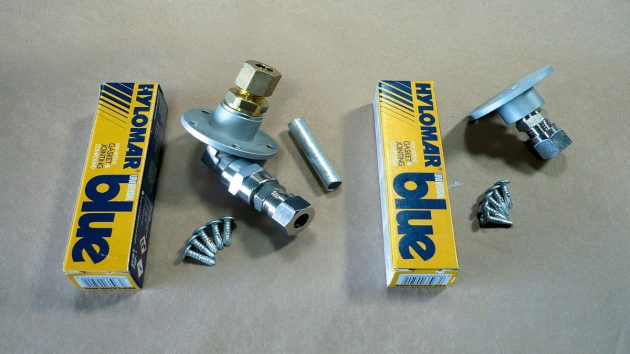
1) The fittings required can be standard compression, if there is access to the inside of the tank. If not, Marine 16 can supply a ‘Dip Tube’ fitting for top or side fitting. I used a standard compression tank fitting for the suction and a compression tee into the engine fuel return line.

2) For this installation I used a standard compression tank fitting for the suction and a compression tee into the engine fuel return line.
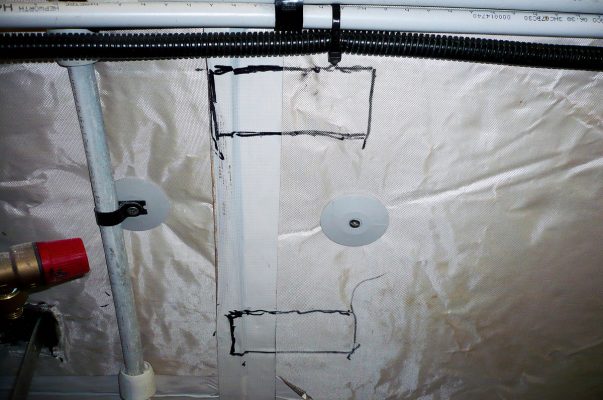
3) Installing the Dipper was complicated by the 60mm-thick sound-proofing on my boat’s engine bulkhead, so I began by marking out two rectangular sections of sound-proofing to cut away to allow me to bond and screw mounting pads onto the bulkhead.

4) The two rectangular sections of sound-proofing material were then cut out with a multi-saw.
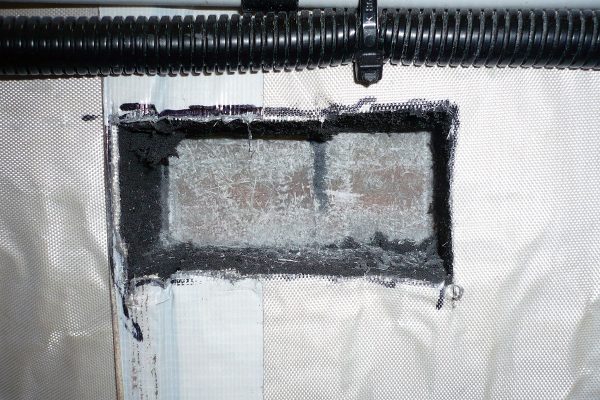
5) Using the leading edge of the multi-saw blade, I also scored the surface of the bulkhead in order to give a key for bonding the mounting pads on with epoxy.

6) The mounting pads were made from scrap teak with a pair of bolts bonded into position using thickened epoxy. The pads were also coated with clear epoxy.

7) I made up a ply template to match the position of the bolt holes on the Dipper, and bolted the pads to this. The base of each pad was then epoxy glued and screwed onto the bulkhead through counter-bored holes in each pad.
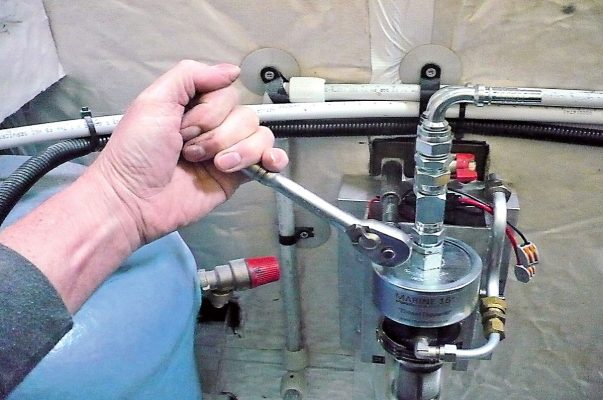
8) Once the epoxy had cured, I removed the ply template and bolted the Dipper into place on the two pads. Note the quick connect electrical fittings and inline fuse.

9) The Dipper comes with straight hose connectors (left). I changed them for 90º elbows for a neater installation. They’re standard hydraulic fittings and available from hydraulic suppliers or from Marine 16 on request.
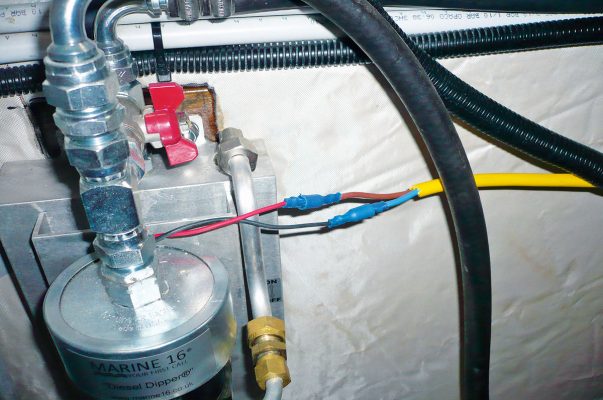
10) As this is a new build, I decided not to use the inline fuse and quick connectors as there is a spare breaker in the main box, and it was sensible to use crimp terminals to keep everything uniform.
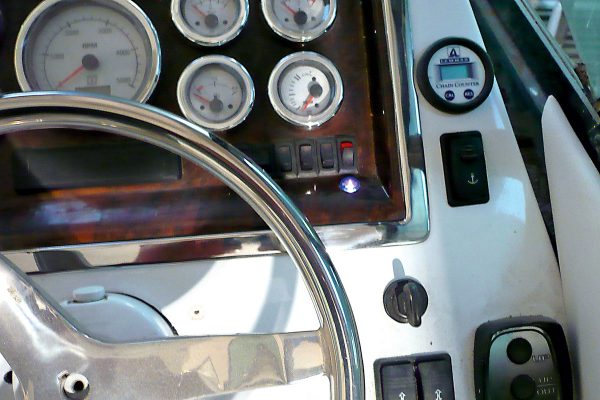
11) The Dipper connects to the ignition switch so the pump runs when the engine is running. I switched it directly from the helm position with a running warning light, so I can also run the Dipper when the engine is stopped.
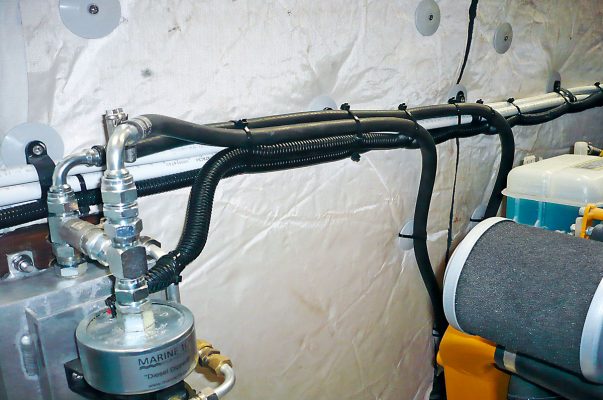
12) The pipe-work was run next using the same Vetus fuel hose as used for the engine feed and return. The hoses run from the Dipper down the bulkhead and through into the aft cabin. The hoses connect using hose tails screwed into the compression fittings. Two clips on each connector ensures a reliable connection.
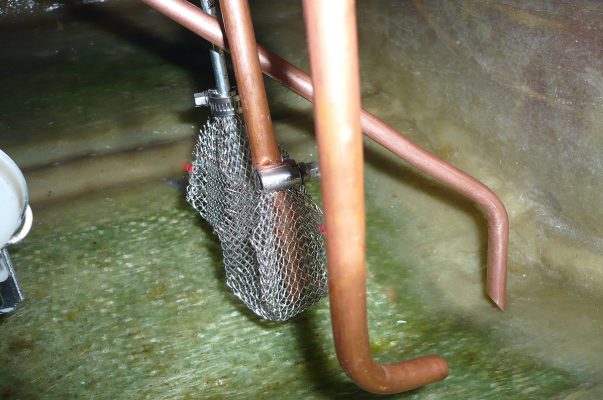
13) Inside the tank, note the Dipper pick-up tube, tight against the bottom of the tank and with an angle cut on the end, below the engine and Eberspächer diesel heater fuel pick-ups.

14) If the filter becomes blocked by excessive sludge: Switch off the Dipper, unscrew the clear case, remove the element and wash it in clean diesel. Also use this switch to turn off the Dipper when draining the collector tank.
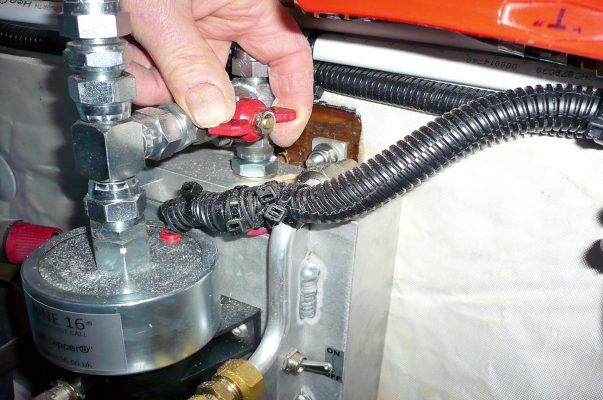
15) The bypass valve mounted at the top of the unit needs to be opened prior to draining to allow the system to vent, so the collector can drain freely.

16) Draining then only requires the drain valve to be opened once a receptacle has been placed beneath. The collector holds about a litre of fuel so a large jar is ideal.
Does it work?


I cold-bloodedly poured in half a glass of water to the 30 gallons of diesel in my tank. The Dipper works! See below the water drained in the jar.

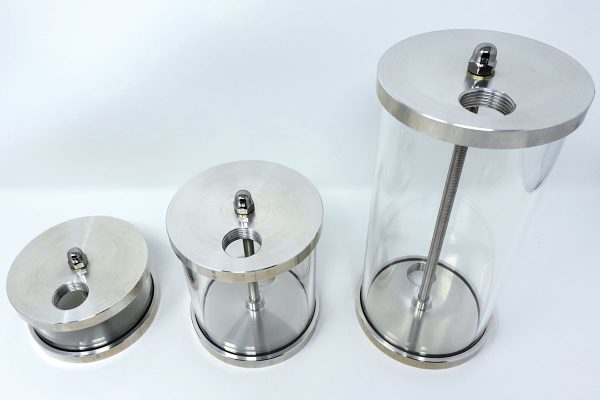
The facility for fuel polishing is provided by the spin-on filter unit that is available for retrofitting, and should be changed annually. The inspection chamber is made from high temperature toughened glass and is available in three sizes.

The Dipper used for this installation has now been superseded by a new, enhanced model with a stainless steel body replacing the aluminium model. The lower drain valve is now much bigger at ¾in BSP to better handle sludge, and there is an integral fuse holder and slots in the casing to take an optional stainless steel pump protection cover.
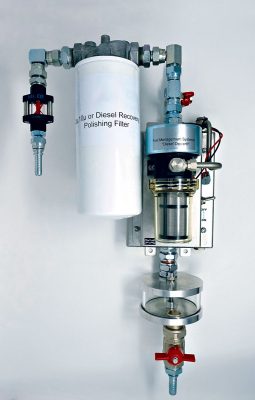
The optimal Dipper tank cleaning system with fuel polishing filter unit and inspection chamber.
Since this Diesel Dipper was installed on Tony’s boat, Marine 16 has launched a newer model with a stainless steel body replacing this aluminium-bodied one.
Enjoyed reading Diesel Dipper review: Can this fuel tank cleaner help avoid breakdowns??

A subscription to Practical Boat Owner magazine costs around 40% less than the cover price.
Print and digital editions are available through Magazines Direct – where you can also find the latest deals.
PBO is packed with information to help you get the most from boat ownership – whether sail or power.
-
-
-
- Take your DIY skills to the next level with trusted advice on boat maintenance and repairs
- Impartial in-depth gear reviews
- Practical cruising tips for making the most of your time afloat
-
-