


After finding a 35-year old 6ft kit dinghy in an attic, Paul Scott sets upon building the Barrow Boat in memory of an old friend

Through my wife Alison’s work as an environmental health officer, we met our friends Dawn and Simon and found that we all liked sailing.
We spent time sailing together on Simon’s family boat, a UFO34, on the East Coast and also shared a flotilla sailing holiday in the south of France aboard a Catalac catamaran.
Later we had a boat share with them, a Hunter Channel 27 which we kept in Westwick Marina at North Fambridge in Essex.
Alison and I eventually stopped sailing, but Dawn and Simon carried on with a smaller boat and charter holidays in exotic places.
In 2020 Simon was unfortunately diagnosed with blood cancer. He went through two years of treatment, remission, and then treatment again, until he very sadly passed away in early 2023.
A year or so later, when Dawn was sorting through their loft, she came across a 6ft marine ply sailing-rowing-tender kit dinghy that Simon had bought many years ago from the London Boat Show.
The Barrow Boat kit dinghy was made by Greenway Marine at Loddon on the Norfolk Broads. It had been in the loft for about 35 years!
As following retirement I’d developed a keen woodworking hobby, Dawn offered me the kit dinghy as a project.
In addition to the enjoyment of the challenge, we both thought it would be nice to complete it in Simon’s memory.
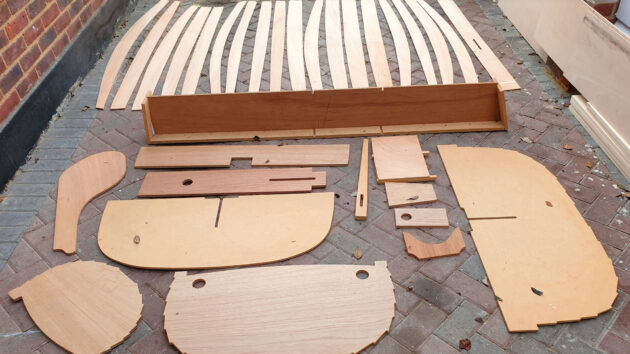
The kit dinghy from the makers when it first arrived from Dawn. Photo by Paul Scott
Dawn dropped off the parts (approximately 32 pieces of timber) including fittings, sail and mast, along with a box which included the original bottles and packets of epoxy, hardener, filleting blend mix and varnish (which, of course, had expired and needed replacing).
The ‘How to make the Barrow Boat’ instructions featured hand drawn sketches and notes of construction plans.
I took recommendations of the Barrow Boat Company to source the gear from the marine supplies company that originally supplied the kits.
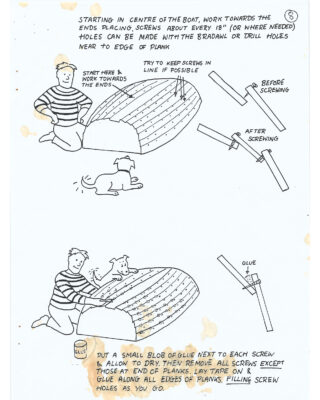
Extract from kit build instructions. Photo by Barrowboat.com
Solving the kit dinghy’s puzzle
My sons live in Norwich so we went to Marine & Industrial at North Walsham which were very helpful.
I picked up the various stuff needed including mixing pots, two different syringes, one for the epoxy and one for the hardener, and tongue depressors for pushing the mix into the joints and smoothing it off.
I set to work out the puzzle.
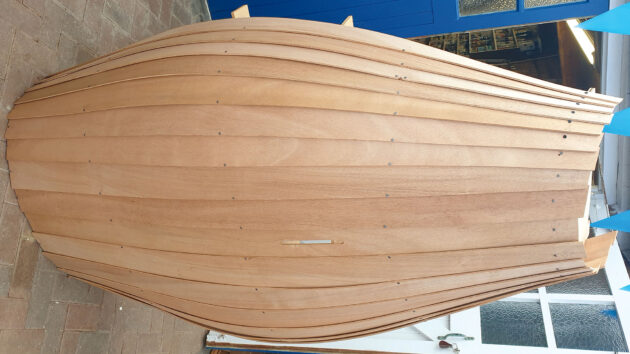
The kit dinghy’s hull takes shape as strip planks are screwed to the transoms and hull jig. Photo by Paul Scott
The first job was to assemble the jig, including the MDF formers fitted onto the spine for the marine ply planks to bend over, clinker style.
I had to overlap the planks and then screw them together at four places along their length and to the stem and transom.
Once this stage was done, I was to put an epoxy blob where the screws were and, once cured, remove the screws.
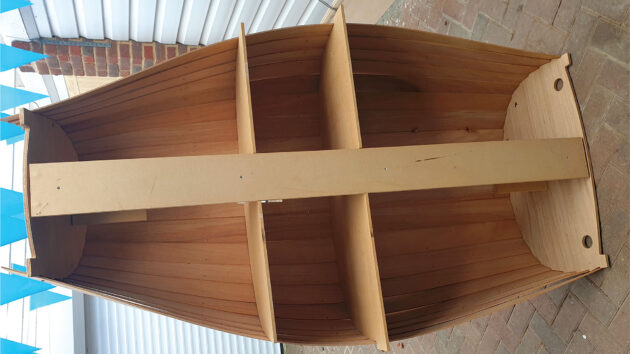
All planks and strips screwed to stem and transom and MDF jig hull formers. Photo by Paul Scott
I was a bit sceptical about whether these series of epoxy blobs would hold the strips together but, having competed the boat, and surmounted the steep learning curve of epoxying, I now know the considerable strength and power of epoxy resin.
So far so good.
The next job was to run epoxy fillets along all of the overlaps outside and inside the hull to connect each plank to the next one and fill any gaps.
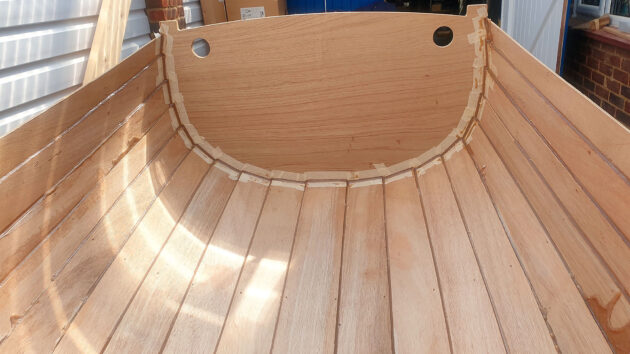
Transom, inside, just epoxied and awaiting brief cure (about an hour) before masking tape removal. Photo by Paul Scott
Technique improvement
The instructions said to do the underside of the hull first.
This was good advice, as my technique and how the epoxying came out was better when I did the inside of the hull, which is of course the most visible.
The instructions said to put the epoxy in, but didn’t really say quite how.
I guess they imagined using the tongue depressors or the like, but I saw a YouTube video with a guy putting the epoxy into a freezer bag and squeezing it down to a corner, cutting a small bit of the corner off, and squeezing it out into the joint or overlap – just like piping icing in cake making.
Of course, you had to mask off each side of where you wanted the mix so it didn’t go everywhere, then smooth it off with the tongue depressors to make it look like a neat fillet (as far as possible!).
Once mixed with the hardener, the epoxy got really quite warm in my hands as I squeezed it out.
By trial and error, I found the optimum time to remove the masking tape was about an hour, but even then, some of the tape got stuck under the epoxy and wouldn’t release, so I had to let it go off fully and deal with it later.
Mostly, the epoxy application on the underside and the inside of the hull was okay but there were some areas of what I called ‘snots’ (as in bricklaying snots), ie overspill that ran through the gaps in between the planks.
With hindsight, I should have put more screws where the planks were not a tight fit or did not overlap to avoid a gap and prevent the epoxy from seeping.
I’d hardly used epoxy before, but now I have great respect for it. It’s amazing just how hard it goes off, and especially to get rid of it where you don’t want it!
I tried the old flappy sanding wheels, and they made an effort but didn’t really abrade it sufficiently.
Next, I tried my Dremel Stylo with carbide steel rotary burrs tips in it but the Stylo is like a light craft tool – not really powerful enough to really get stuck into it.
So, I took the advice of my watch repairer friend who had several Dremels; he recommended a Dremel ‘copy’ from B&Q for just £32.
It had a flexible drive, which was really quite robust and did the trick. I used the rotary burrs I had for the Stylo and they remained quite sharp, notwithstanding the amount of hardened epoxy they had to grind.
The snots, and the masking tape parts which I had mistakenly epoxied in yielded in the end, and the hull cleaned up and came out not too bad at all.
Neat features
One of the clever parts of the kit dinghy is to use the central rib or jig former piece for the rear seat and dagger board, for me to cut out, as that part was marine ply, with the rest of the formers all being MDF.
So, next to fit was, in order:
- Inner keel. This was mentioned in the instructions and a picture of it therein, but not included within the original kit, so I made one out of the 6mm ply I already had.
- Central athwartships seat with a hole in it for daggerboard and bumboard. I added a ply support under the middle of the seat as that seemed to deflect a bit much, and I knew if I got in it and sat there it might have caused a catastrophic seat failure! Front bumboard support at transom and mast step.
- Fit and epoxy in daggerboard housing.
- Rear seat and mid support under.
- Then the hardwood gunwales. The instructions said screws but the inner and outer gunwales didn’t bend easily, so I decided to substitute stainless steel hex button bolts to pull them together once clamped.
- The 6 x knees, brass screwed in, masked up with a gap for the epoxy, filleting mix applied, then remove masking tape.
Varnishing the kit dinghy
Next, sand everything, by hand and with machine tools, down to 120 grit.
Meanwhile, the mast, yard, daggerboard, rudder and tiller were lightly sanded and varnished.
Putting the first diluted coat of varnish on the boat was a joy as it is with all my woodworking projects (although I generally use hard wax oil for them), as it immediately shows the grain and starts to become a rich colour.
On the recommendation of the suppliers of the kit dinghy, I used Epiphanes varnish and thinners.
First coat was thinned 20% varnish, second coat 50/50, then third coat was first full coat, then another three coats after that, so six in all.
She looked great.
Finishing touches
Now getting towards the finishing stage of rudder, tiller, mast, yard sail and rigging, and the rowlocks of course as she’s a rower too, as well as a sailer.
The kit was very comprehensive and included all the stainless steel rudder fittings, brass screws, front wheel bolts etc.
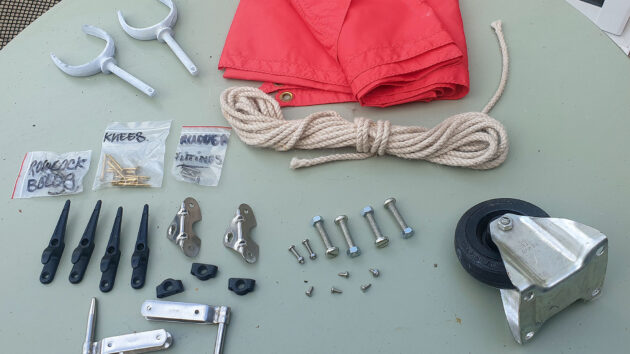
Sail, halyard, sheets, bow wheel and other fittings. Photo by Paul Scott
But while I had two galvanised rowlocks, and the rowlock support fitting bolts, I didn’t have the rowlock support fittings themselves that fix to the hull.
So where do you get some nicely designed stainless steel rowlock support brackets that can be fixed down into the hull or inner and outer gunwales’ top edge, and through the gunwales? Amazon of course!
I bolted these in, again with the stainless steel button bolts.
Next, the wheel which is held on by four bolts. The bolts were part of the kit and went through the mast step which provided suitable reinforcement.
Then, I had to fit the gudgeons to the transom, the pintles to the rudder and the tiller to the rudder with a bolt so it would lift up a bit out of the way.
I made a hole in the stem for the painter and a couple of holes in the knees connecting the transom to the hull sides for the rope ‘horse’ for the main sheet traveller and block.
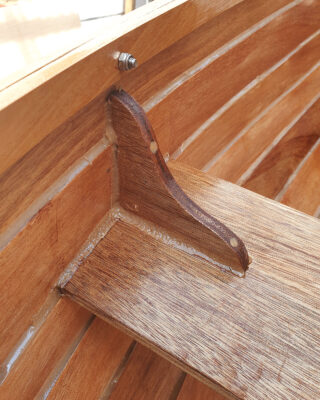
Detail of one of six knees, screwed and epoxy filleted. Photo by Paul Scott
Then it was the rigging.
That was a bit of a puzzle, but a New Zealand guy in the Philippines on YouTube helped with advice about how to lace the sail to the yard, the boat being a lug sail rig with an unstayed mast and a loose foot of sail, ie no boom.
Launch day for our kit dinghy
So, in September 2025, I wheeled her out of the carport and onto the drive and fully rigged her for the first time.
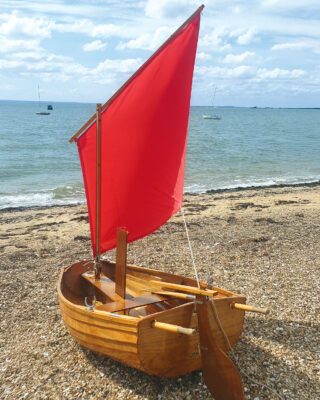
The finished kit dinghy on the beach at Thorpe Bay, Southend-on-Sea, Essex after launch day. Photo by Paul Scott
From her 35 years in a dark, sometimes hot, and sometimes very cold loft, she felt the sunshine on her brightly shining varnished hull, and I put the mainsheet through the block on the rope horse and sheeted her in and she happily rocked from side to side in the light gusty breeze.
Launch day was set to be on the beach at Southend-on-Sea.
Will she leak? Will she get swamped when I sit in her!?
We arranged a gathering of friends and my two neighbour helpers (Captain) Melvyn and (First Officer) Ed. The guest of honour, of course, was Dawn.
I had to discourage people from wanting to smash a bottle of champagne on the bow as that probably would have broken her and not the bottle!
Unfortunately, it was a bit rough on the day on the lower Thames, but we got her in the water and I sat in her and she didn’t leak or sink.
I managed a few rows with the oars, but the waves lifted the oars out of the rowlocks and I had to abort. No Lower Thames Crossing that day.
I didn’t get the chance to sail her, but she got her bottom wet and seemed to like it!
The project has been, overall, a joy to complete and I was satisfied with the outcome and pleased to have been able to make such a pretty small dinghy.
The Barrow Boat Specifications
Model: 6ft Barrow Boat
Length: 1.83m (6ft)
Depth: 48cm (19in)
Beam: 1.08m (3ft 6½in)
Weight: 20.5kg (45lb)
Daggerboard
Lugsail: 2.3m2 (25ft2)
Capacity: 2 adults and gear
Price: start from £2,995
Company: Greenway
Marine Ltd
Website: barrowboat.com
Sweetie’s further adventures
It was time to sell Sweetie.
Based on her Norfolk Broads origins, I advertised her on a couple of Norfolk Boats-type Facebook groups, but no interest.
I thought she would have been ideal on the Broads and rivers, where there is less wave action than the sea.
She’d have made a great tender to tow or store on deck, as she is so light, or, for the kids to potter about and row and sail once the main boat was moored up.
Sweetie was listed on eBay as well, and, eventually, found a purchaser called Mark.
Mark was involved with the flowers and displays at Leeds Castle in Kent with Louise Roots.
He explained Sweetie would be part of an upcoming Peter Pan themed event called Neverland, which was bring organised in partnership with Great Ormond Street Hospital (GOSH) – the hospital having been left all the rights to J M Barrie’s writings and works, including Peter Pan.

Sweetie as part of the Leeds Castle Peter Pan Neverland themed event, in Mermaid Lagoon. Photo by Paul Scott
Part of the revenue from the Neverland event at Leeds Castle was going to GOSH.
So Sweetie’s destiny, which, when building her I could never have imagined, was to give enjoyment to the many people visiting the castle’s Neverland event, and to raise money for the care of sick children.
Although there were additional costs to completing Sweetie, Dawn and I agreed that we would donate the whole £450 proceeds from the sale of Simon’s boat, Sweetie, to the Lymphoma Research Trust.
Sweetie was featured on a Channel 5 documentary and a Leeds Castle YouTube promotional video and I like to think that she helped to raise more funds for GOSH than I could have done.
All’s well that ends well then.
Paul Scott is a retired chartered building surveyor and building engineer, having run his own private practice for 40 years. Since retirement, he now enjoys woodworking hobbies, so the Sweetie build opportunity came along at just the right time. Paul learnt to sail on a Hurley 22 at Thorpe Bay Yacht Club in the mid 1980s. He is also a big Wishbone Ash fan.
Want to read more articles about building a kit dinghy?

A subscription to Practical Boat Owner magazine costs around 40% less than the cover price.
Print and digital editions are available through Magazines Direct – where you can also find the latest deals.
PBO is packed with information to help you get the most from boat ownership – whether sail or power.
-
-
-
- Take your DIY skills to the next level with trusted advice on boat maintenance and repairs
- Impartial, in-depth gear reviews
- Practical cruising tips for making the most of your time afloat
-
-
Follow us on Facebook, Instagram, TikTok and Twitter
PBO web categories