


Isaac Adam-Azikri explains why and how he fabricated a monster 84kg storm anchor for his 12m/40ft steel cutter
In the late 1970s I had a painful lesson as a bosun aboard an old Baltic trader, my first employment after serving in the navy and it is this experience that made me want to build my own storm anchor. While at anchor in the Gulf of Eilat in the Red Sea there was a southerly gale; the three-masted schooner was engineless, which sealed her fate: the boat’s anchor quickly dragged, and we couldn’t make it to deeper water under sail. Despite our best efforts we grounded, which resulted in the loss of the boat.
The sad irony was that a few months earlier her two heavy fisherman’s anchors were substituted for a much lighter, stockless, Halls-type anchor. I always felt that she would have survived the ordeal if her original fisherman’s anchors had been in use during that gale. Some of the anchors we inherited in the purchase of my 12m (40ft) steel cutter Rhythm were far too small and tired for her size: I chucked two of them in the skip, and wasn’t surprised when no one was tempted to adopt them or give them a good home.
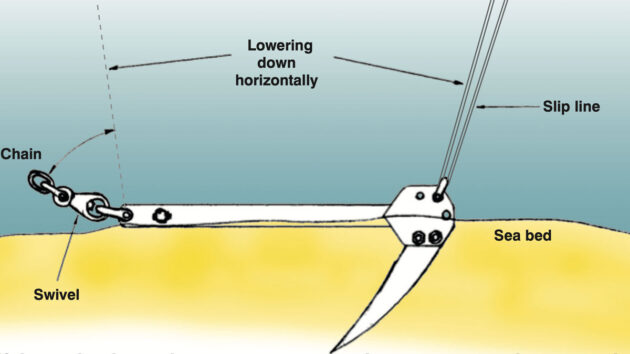
If the anchor is used as a permanent mooring, one arm can be removed and the anchor can then be lowered horizontally by its chain and a second line doubled up through a shackle on the vacant bolt-holes. The second line can be slipped out once on the seabed. Credit: Future PLC
We relocated the windlass from the chain locker to the deck, which allowed easy maintenance, room for more chain and space for a heavier working anchor. It meant that we could now self-stow our new 60lb CQR and the spare 60lb Danforth on the bow roller. But with a long circumnavigation looming ahead of us, I was eager to add a much heavier, last-resort, fisherman’s-type storm anchor for serious conditions.
I was after a storm anchor that could be taken apart, stowed neatly and which, above all, would possess great holding power in a variety of seabeds. Yes, there are a few lightweight alloy anchors on the market which are claimed to have great holding power: I have seen them work well in soft sand and mud, but their main drawback is that they are not particularly strong and are too light to bury themselves in hard sand or a kelp-covered seabed.
I was quite keen on the ‘Luke’ take-apart fisherman’s-type anchor, but the price and import cost from Maine in the USA were forbidding. I mentioned this to Ian Nicolson, a long-serving marine surveyor I knew, and he kindly sent me the drawings for a 45kg Belfast pattern, suggesting that I would need a larger 80-100kg anchor for my boat.
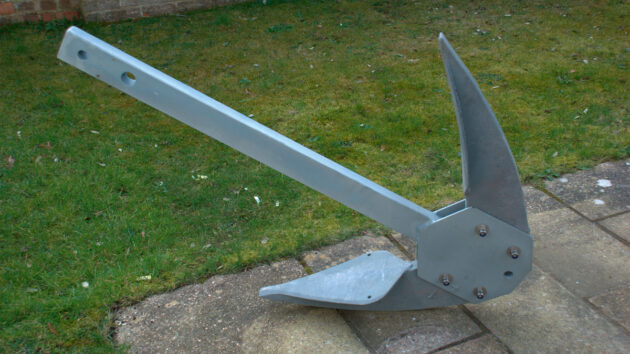
Note the chisel-shaped palm tip on the storm anchor. Credit: Isaac Adam-Azikri
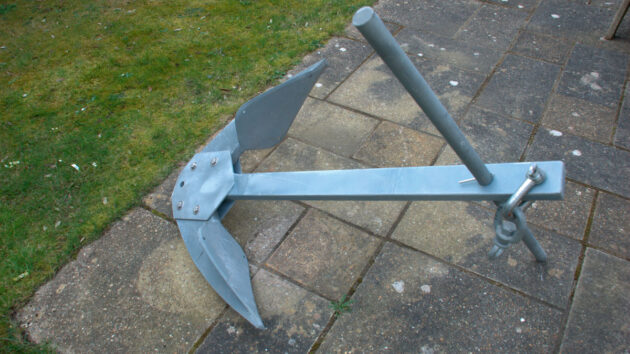
This anchor was originally developed by the Belfast Rope Company: it breaks down into four sections, making it easier to handle, stow and deploy. It can be fabricated at home with some assistance from an engineering workshop at a fraction of the price of a big off-the-shelf anchor. Also, the palm size can be increased for greater holding in soft mud. It is a versatile, heavy-duty beast with great penetrating and holding ability, and can be deployed as a permanent mooring.
A common problem with fisherman’s anchors occurs when the boat is left to swing on her mooring: the chain wraps or fouls itself around the redundant arm or fluke, which either shortens the chain scope or trips the anchor. With the Belfast anchor, this problem is eliminated by removing one arm before deployment as a permanent mooring.
This kind of anchor was exactly what I was looking for, so I hatched a plan to fabricate one weighing over 80kg. My boatyard friends Chris and Andy saw the drawings and became infected with the ‘Belfast bug’, so we decided to fabricate three identical anchors and save on production costs.
Deployment of the storm anchor
With the shank laid on the bow roller and connected to the chain, one arm is bolted to the shank on the outboard side of the bow roller then swung down around its axis so the second arm can be fitted on the opposite side. The anchor is then lowered until it hangs down, but the stock-hole needs to be just below the roller in order to insert the stock and lock it by its bolt. Alternatively, the arms and stock can be fitted when the shank hangs below the bow roller by using the dinghy – weather permitting.
Ideally, you need to prepare and set an anchor like this well in advance, before conditions worsen. All you can do thereafter is have a coffee, sit down and wait…
Tip: The shank (which is the heaviest part) and arms can be easily transferred to the bow by placing them inside a length of carpet and dragging them on deck, one at a time: this is safer than carrying them, and avoids them being dropped on the deck.
Recovery of the storm anchor
The anchor will have to be released from the seabed by taking in as much chain as possible then transferring the weight to the chain hook or bridle, so the weight is on the boat and not on the windlass. With the aid of some swell – and patience – the anchor should break out of the seabed and can then be heaved up by the windlass to just below the bow roller (our windlass was a 90A unit).
The dinghy can then be deployed to take it apart. My personal view was that in the worst-case scenario I would perhaps have to abandon my anchor or return later, dive and retrieve it in sections. And if I was forced to lose or abandon it altogether then at least it would have paid for itself handsomely by saving the boat and our home.
Constructing the storm anchor
Dimensions in mm
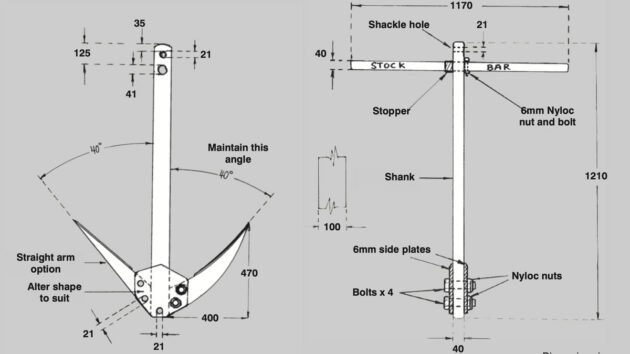
1. Decide what size anchor you want to construct to suit your vessel’s size and weight. I match my anchors to suit the weight of my boat rather than her length overall: a 12m GRP keelboat weighs less than a 12m steel equivalent. I chose to construct the largest storm anchor we could manageably handle, and increased the original size by 10% which achieved a total weight of 84kg (185lb).
2. Start by drawing the outline of the storm anchor (shank and arms) full size on a piece of plywood or hardboard. To make life easier, I suggest lofting out straight-sided arms first and then, using a thin 1m-long wood batten, bend it between the arm tip and the inner point of the arm where it meets the shank, applying pressure at either end of the batten until a reasonable curve is obtained. If it looks right, then it’s okay. Reproduce this same curve on the second arm. It’s important to maintain the angle between the arm and shank – which is around 40° – and also to maintain the arm-to-shank length ratio.
Dimensions in mm
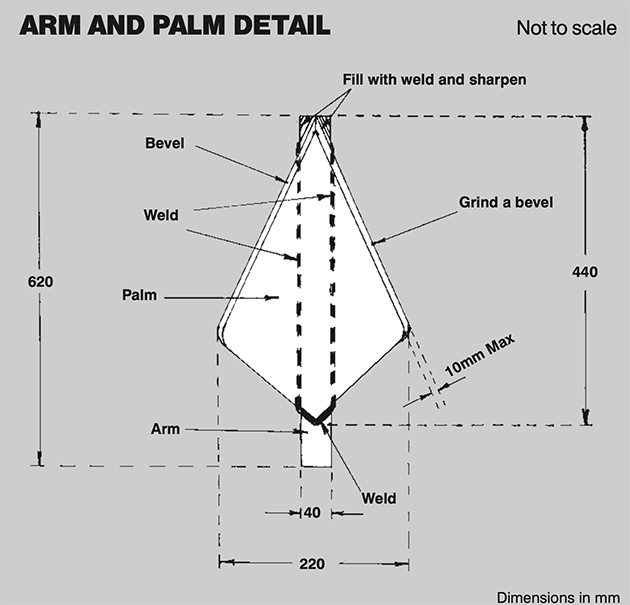
3. Do the same for the palms: play with the palm size to suit the size of the arm. The larger the palm area, the greater holding power the anchor will have – but remember that an oversized palm may need to be made from thicker plates. One template made from either thin ply or hardboard will suffice for both palms.
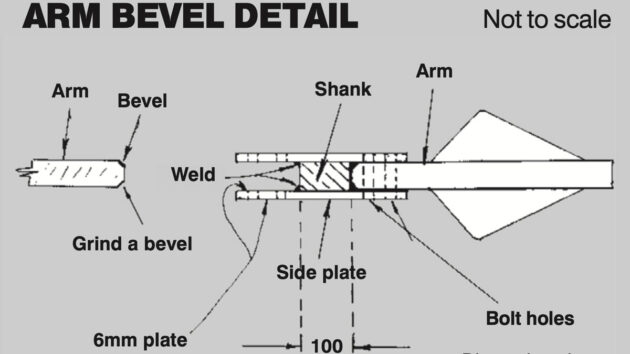
4. Draw a template for the side plates: make sure the side plates have a generous overlap over the arms, which will allow plenty of ‘meat’ for the securing bolts to pull against. Again, one template will suffice for the two side plates.
5. Cut all the template sections using a jigsaw and assemble together loosely on an even floor. Use a broomstick or similar as a guide for the stock. From this mock-up you should have a good idea what the final product will look like.
6. Once you’re happy with the sizes you can disassemble the mock-up ready to use the templates for cutting the steel components.
Dimensions in mm
7. Transfer and draw the outline of the arms onto a 40mm-thick steel plate, and cut to size (see Fabrication tips below). It’s worth noting that arms can be fabricated as straight rather than curved – it’ll make the construction process much easier when you get to the next step.
8. The palm plates will have to be pressed against curved arms using a hydraulic or mechanical press/large vice. I didn’t have a press, so I used a two-ton trolley jack on the ground then jammed the arm and palm plate under a 20-ton boat and cradle (with the boat owner’s permission, I should add).
Dimensions in mm
9. The jack is then pumped up until the palm plate is fully pressed against the curvature of the arm. Tack-weld the plate to the arm in the middle and then at either end, using up to 1in weld runs at the 3, 6, 9 and 12 o’clock positions. Once the tack-welding is complete, the arm and palm can be removed by releasing the jack pressure and taking the jack away. The process is repeated for the second arm/fluke.
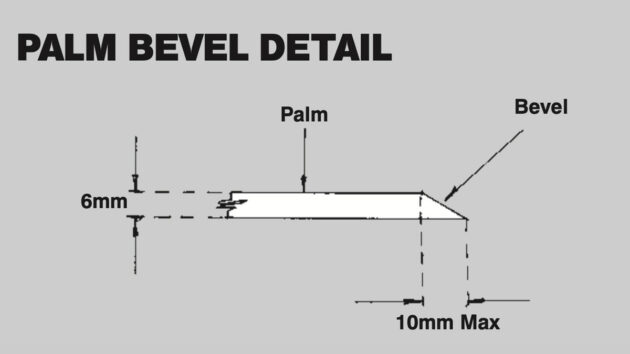
10. Fully weld the arms to the palms. The triangular tips are filled by weld material and then ground down to form a chisel-shaped tip. An angle grinder is used to pare down the concave side of the palms to achieve a maximum of a 10mm bevel.
11. All sharp edges and the top of the shank are rounded off for ease of handling. Remember that the thickness of the shank and arms has to be identical. The holes for the stock, chain shackle and retrieval shackle hole can be drilled at this stage or later. Note: The stock-hole can be drilled by a bench drill (which is very slow) or burned out by gas cutting. We had them bored out by our friendly foundry where we sourced out steel, thereby saving a lot of time.
12. Position the side plates on their relevant sides and clamp them in position. Tack-weld the plates to the shank and insert the arms for a test fit.
13. With the arms loosely fitted, check that everything looks properly aligned. Once happy, remove the arms and fully weld the side plates to the shank. (Welding the inner section between the side plates and shank is tight, but achievable.)
14. The arms are now inserted into their sockets. Making sure that they touch and butt against the shank, grind their inner edges where they foul the new side plate welds on the inside.
15. The bolt-holes for the side plates and arms can be drilled next, including the recovery hole at the bottom. Mark and centre-punch the bolt-hole locations on one side plate only. Insert one arm (fluke) in its socket, making sure it is in position, and then clamp it within the side plates. Temporarily tack-weld them together at two spots – this will ensure the two are well secured while drilling – then clamp them to the workbench. Start by drilling two 6mm pilot holes straight through the two side plates and arm. Use a bench press drill, not a hand power drill which tends to wander and jam, creating an inaccurate hole. Using the pilot holes as a guide, drill in stages and increase the drill bit sizes gradually to the final size. Use plenty of cooling fluid, ensuring the anchor remains square to the bench drill.
16. Due to possible slight discrepancies while marking or drilling, the chances are the location holes through side plates and arms will not be identical. It’s therefore advisable to identify each arm for each relevant side by marking with a centre punch or some weld runs: this ensures the arms are fitted to the correct way round during assembly. Check that the relevant bolts fit in the holes before grinding and removing the temporary tack-welds holding the two together. Remove the drilled arm and repeat the process with the second arm on the opposite side. The recovery hole can be welded to seal the gap between the side plate and shank on either side.
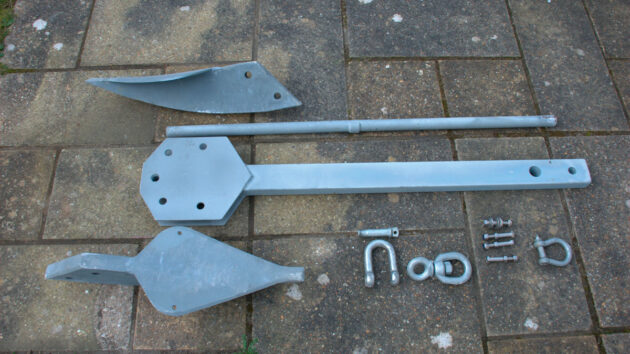
Once disassembled the anchor is much easier to handle and store. Credit: Isaac Adam-Azikri
17. Insert the stock bar in its aperture and mark the bar-stop position. A piece of scaffolding tube is cut to size then welded to the bar flush with the mark to create the bar-stop. Re-insert the stock into the shank until it is halted by the new bar stop, then mark out the position of the stock’s securing bolt on the opposite side of the shank. Punch-mark the spot, allowing space for the bolt head, then drill the hole in the stock for the securing bolt. Use a galvanised bolt with a Nyloc nut for the securing bolt: a Nyloc nut does away with having to use mousing wire to stop an ordinary nut from working its way loose. It’s wise to keep a few spare nuts and bolts for all components of the anchor on board.
18. I drilled a small 8mm single hole at the corner of each palm cheek for fitting a shackle: this facilitates a lashing point for stowage on board or for recovery.
19. I finally ground off all sharp edges for safer handling.
20. The storm anchor is now ready for galvanising. The quote we received for hot-dip galvanising proved to be prohibitively costly however (they charge according to weight), so instead we had our anchors grit-blasted and aluminium-arc-sprayed for a fraction of the cost. Another alternative is to have them zinc-arc-sprayed, but aluminium is more flexible and tenacious: some on my boat is still intact after 25 years.
Fabrication tips
1. Use mild steel for all components. If you can find it, scrap or reclaimed steel is far cheaper than buying from a steel merchant. We had a tight schedule, so bought ours from a foundry. They cut all the steel to shape accurately using the templates we provided.
2. Play with the palm size to suit your anchoring needs: their size can be increased for a permanent mooring on soft mud. I drafted a moderate-size palm to suit most conditions.
3. The three anchors were constructed in Universal Marina by the River Hamble, Southampton. I used scaffold boards clamped to our boat cradle to provide a bench.
4. A series of holes can be drilled into the shank to make it lighter for handling: they should be drilled at least 13mm (½in) apart so as to not weaken the shank. We used a solid steel shank and stock to maintain strength and achieve the final weight.
5. Alternatively, the shank can be made of rectangular box section steel (4mm minimum wall thickness) to ease handling. Lead ingots can then be inserted into the shank from either end to increase weight before deployment. A bolt or a shackle can be inserted in the bottom recovery hole to contain the ingots. The stock can be made out of a steel scaffolding pole rather than a solid bar. With a hollow shank and the lead inserts omitted, the anchor should weigh between 45kg to 50kg if using a scaffold bar as a stock.
6. I drilled the bolt and shackle holes 1mm larger than necessary to allow for galvanising and a small amount of play for easier assembly.
7. The fastest and most accurate way to cut the very thick shank and arm plates to size and shape is to have the work carried out by a foundry, so shop around for the best price. The thinner palms and side plates, meanwhile, can be a DIY job cut using a disc grinder. Oxyacetylene cutting is also a possible alternative, but gives a rough cut which then needs to be dressed with a large disc grinder (a slow process).
8. Galvanised steel bolts, washers and Nyloc nuts were used for all components. Refrain from using other metals – don’t be tempted to use stainless steel which will lead to bimetallic (galvanic) corrosion.
9. Regarding anchor size, my boat weighed 16 tons and had a 12.5m LOA. The 84kg storm anchor is so heavy and effective that it will cover a range of boats, but the decision as to what size to go for is really up to you.
10. Some components may be difficult to obtain in metric sizes, in which case just use imperial sizes instead. As long as the ratio between the arm’s length and the angle to the shank is maintained, then all will be okay. If in doubt, err on the side of caution and go up a size – an anchor that’s too small or light won’t do the job intended for it.
11. As long as the 40° angle and arm-to-shank ratio is maintained, you can scale up or down to produce a different size anchor: I used ratios to upscale my anchor from the original size.
12. Fabrication time. Each of us had a few other projects on the go at the same time so construction of the anchors took us a few days to complete, stretched over a period of around two weeks. We personalised our anchors by grinding, welding marks and bevelling the various parts.
13. Chain. I used 10mm calibrated chain for my storm anchor – well tested during Hurricane Felix in 2007 while sheltering at Hog Island, Grenada with winds of up to 60 knots. (My friend Chris used a 12mm chain for his 22-ton yacht.)
14. Stowage. The various anchor sections are padded with thick scrap carpet then lashed by cargo straps to frames in the lazarette.
The project attracted plenty of attention and some strange looks from fellow sailors, especially when the little monster was heaved up to the bow roller. An old and usually silent boatbuilder who was caulking a boat nearby mumbled something, spat out his cigarette and came over for a closer look!
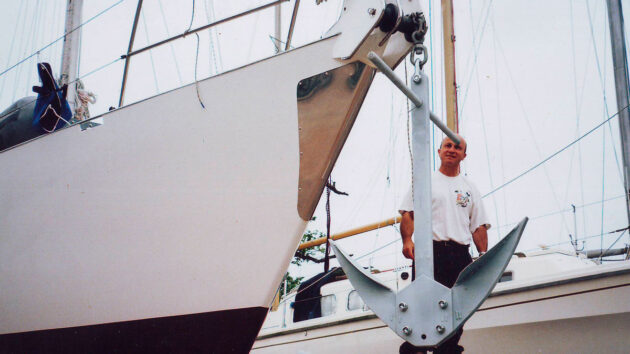
Isaac’s monster anchor hanging from his yacht’s bow roller. Credit: Isaac Adam-Azikri
So far I have not come across any other production-line anchor of this type which can match the ability or versatility of this DIY storm anchor – certainly not for the price – and I would recommend anyone who feels they are likely to need it to have a go at building one.
The best boat anchor types for different types of cruising & their pros and cons
Rupert Holmes looks at the different anchor designs and how to choose the right one for your type of cruising
Forgotten seamanship: How to use anchors to manoeuvre without an engine
Dick Everitt passes on a few tips about alternative ways of using your anchor
Estimating anchor scope: how to get it right
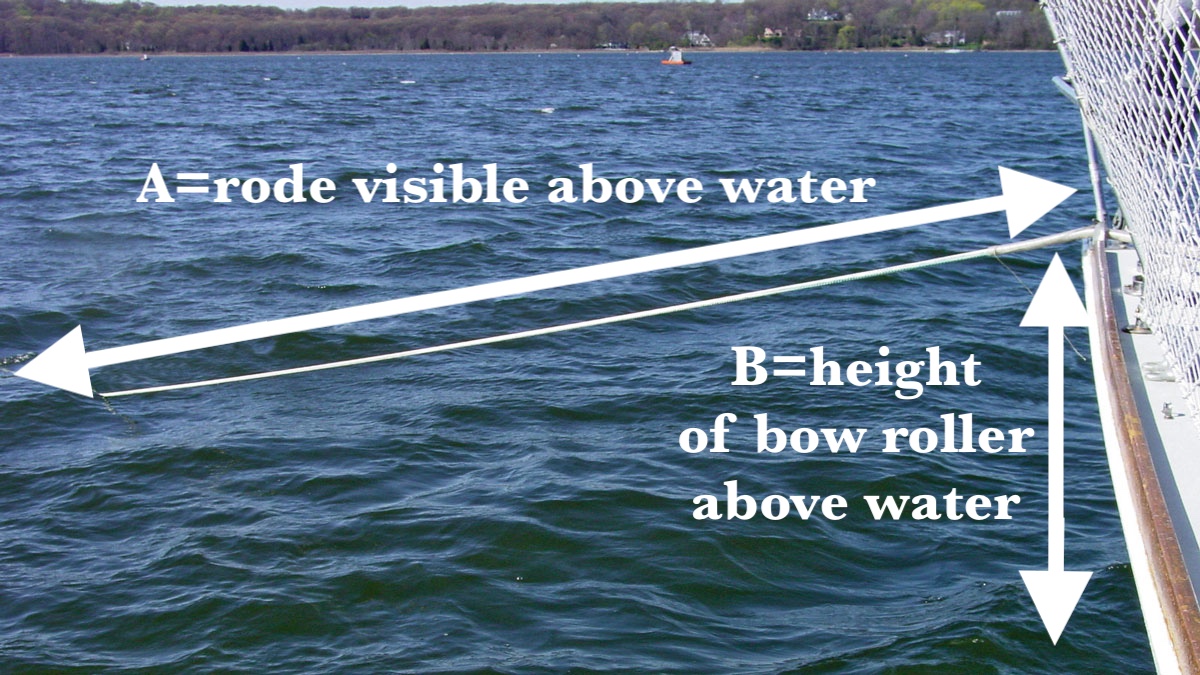
Alex and Daria Blackwell reveal a simple way to check anchor scope when determining the correct amount of rode to…

14 tips for single handed anchoring
Ben Meakins tries out some methods for dropping and recovering the anchor for singlehanded sailors in crowded anchorages
Want to read more practical articles like Why I built a 84kg monster storm anchor to survive any gale?
A subscription to Practical Boat Owner magazine costs around 40% less than the cover price.
Print and digital editions are available through Magazines Direct – where you can also find the latest deals.
PBO is packed with information to help you get the most from boat ownership – whether sail or power.
-
-
-
- Take your DIY skills to the next level with trusted advice on boat maintenance and repairs
- Impartial, in-depth gear reviews
- Practical cruising tips for making the most of your time afloat
-
-
Follow us on Facebook, Instagram, TikTok and X