



Charles Beddingfield designs and constructs a 2m pram dinghy from plywood and epoxy to use as a DIY tender for his motorboat Tudor Rose
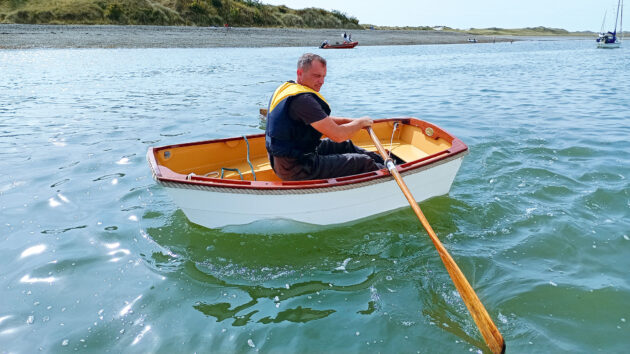
After years of dragging a heavy GRP stem dinghy up the steep shingle beach at Gallows Point, Beaumaris on south-east Anglesey, I was beginning to weary of the struggle.
I decided to build a lighter pram dinghy as a DIY tender for my motorboat, the Tudor Rose.
It was to be a knockabout beach boat that would be left unattended between cruises at the top of the beach, so I meant to give it a rough-and-ready finish to ward off covetous eyes.
In this, I was only partially successful.
I made no attempt to fair or disguise the stitch and tape chine joints… but show me a nice bit of sapele and I just cannot resist the call of the varnish brush.
A few dead flies in the paint might have helped too, but they were in short supply that time of year.
Heavyweight replacement
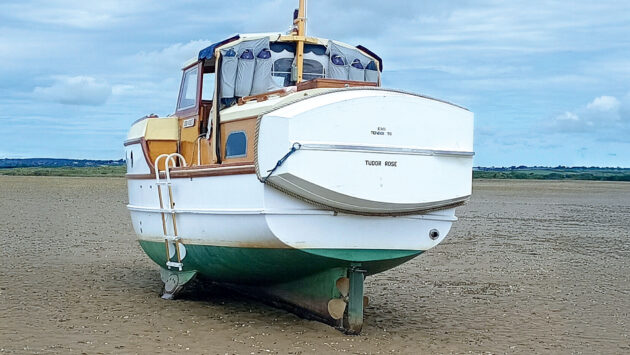
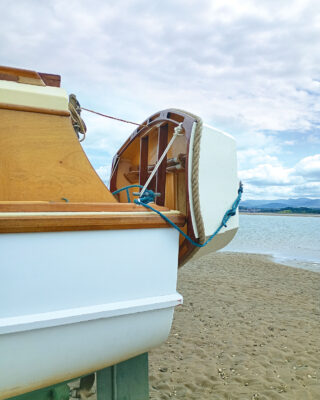
The DIY tender stowed on Tudor Rose’s transom. Photo by Charles Beddingfield
The old dinghy weighed 41kg (90lb).
The Tudor Rose has towed it all around Anglesey, even through industrial-strength overfalls off South Stack and Carmel Head.
It never shipped any water, but I mainly used our 50-year-old Avon inflatable (about 27kg/60lb) for longer coastal cruises, being more of a lifeboat than the GRP dink.
However, I never liked leaving the inflatable unattended anywhere, so the new pram had to be both lightweight and take over the inflatable’s lifeboat duty.
Getting started
For workspace I evicted the lawnmower from the garden shed, recommissioned my old workbench and purloined a spare convector heater from the house.
I drew up a design for something like a miniature Mirror dinghy, stitch-and-glue construction, but flat-bottomed for stability.
The side benches form buoyancy chambers so that even if swamped the little boat would easily support its crew.
Like any un-ballasted wooden boat in the final analysis it is unsinkable even if broken up, which is more than can be said for an inflatable.
Opting for cheaper materials
Construction is epoxy-coated 4mm plywood.
I would have paid twice the price for good marine ply but baulked at the £170 delivery charge for three sheets, so I used cheaper Indonesian 3-ply from a local timber merchant.
It was marked ‘Marine: BS1088’, half the price, only £10 delivery and plainly inferior, but had a good glue line.
I boiled a sample to test it. Despite the anonymous timber species I found no voids anywhere in the three sheets I bought, so I judged it good enough for a knockabout dinghy to use as a DIY tender.
Enclosed, unventilated spaces like buoyancy chambers would be anathema in traditional wooden boatbuilding, an invitation to galloping rot, but I worked out an assembly sequence that ensured the enclosed spaces are fully epoxied inside as well as out for a long service life.
Small circular plastic hatches can be unscrewed to mop out any water that does get in (none has), or allow dry stowage of small items such as emergency kit or a lunch box.
The dinghy bears more than a passing resemblance to Ken Endean’s version, featured in a PBO article from September 2011, but whereas Ken made his topsides of canvas to fold down, my boat is all plywood.
You can adopt whichever scheme best suits.
The result
At 6ft 7in (2m) long with 15in (38cm) depth and two rowing positions, my DIY tender easily carries one crew plus kit, or two provided they are disciplined.
It rows better than any inflatable I have tried, but it is not as stable as an inflatable.
The difference compared with the 8ft GRP boat is noticeable, but I soon got used to it and now feel perfectly confident in its abilities.
The finished weight is 24kg/54lb which is much more manageable, though it might have been several pounds less with a lighter timber for the gunwales than the beautiful but very dense sapele I chose.
The bottom is sheathed with one layer of glass cloth for scuff resistance and I can easily drag the little boat up the beach or pick it up wholesale and wear it like a hat.
Since I don’t use an outboard, my priority was rowing quality, but you might be tempted to sacrifice the rowing qualities in favour of stability by reducing the rocker to almost zero and having a full-width transom, more like the shape of an inflatable, though that would not be nearly so pretty.
A small improvement made later was to extend the skeg forward so that it blends into the keel in a smooth line.
This avoids a shoulder that offers resistance when dragging the boat up a shingle or sandy beach.
The hefty rope fender is a practical and traditional touch that suits the Tudor Rose’s style.
I also made a davit that looks somewhat like a boom gallows hinged on Tudor Rose’s transom just above the dinghy’s floating gunwale level, mainly to lift the dinghy clear of the water across Tudor Rose’s transom to stop that pesky nudging during the 3am change of tide, but most of the time the dinghy travels on the davit rather than towing behind.
All in all I’m quite pleased with my little pram dinghy, which one ignorant antagonist called a ‘silly little boat’.
It does the job and should allow me to keep boating for another year or two yet!
Materials, sources, and costs for a DIY tender
- Plywood and sapele from local merchant Beers Timber: £200
- Epoxy (4kg) and accessories from ASAP and Midland Chandlers: £365
- Plastic hatches and fastenings via Amazon: £42
- Polyurethane wood glue from B&Q: £5
- Paint (International Toplac) from Midland Chandlers: £56
- Hempels Classic varnish from ABC Powermarine, Beaumaris: £28
- Rope fender via Amazon: £17
- Buff paint for the interior was a mix of leftovers from my shelves
- GRAND TOTAL: £713
Building my DIY tender step by step
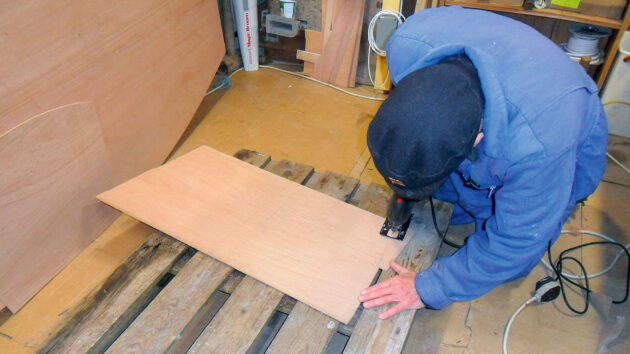
1. Cutting out plywood parts with a jigsaw.
I found an old pallet handy for this as there’s good clearance for the saw, but the ply is also well supported.
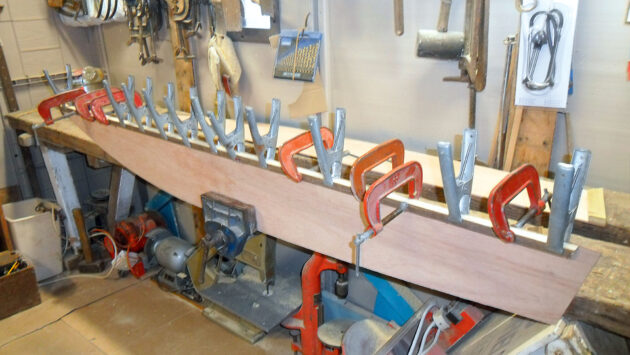
2. Edge cleats sawn from pine planks saved from an old garden shed were glued onto the side bench front and top panels. You need plenty of clamps.
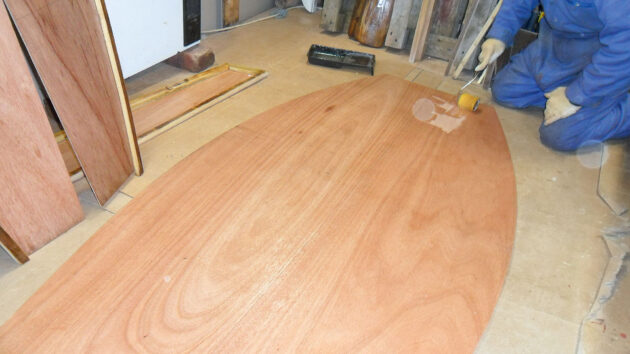
3. The interior surfaces of all panels were epoxy-coated to ensure that when assembled, the insides of buoyancy chambers would be protected.
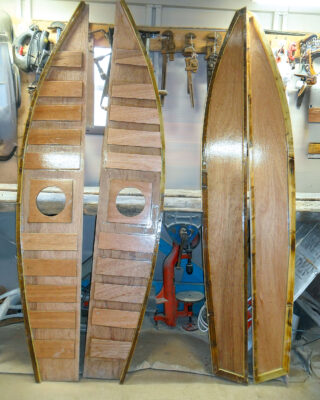
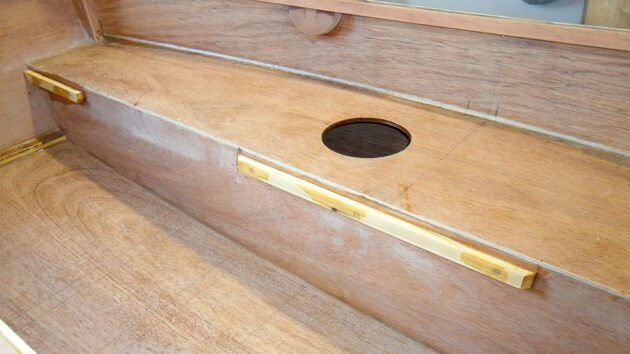
4. Doublings were added to reinforce the side benches (left), as these are likely to get foot traffic which 4mm ply would not bear.
The edge cleats on the bench fronts (right) were sawn in sections to fit the curve of the ply.
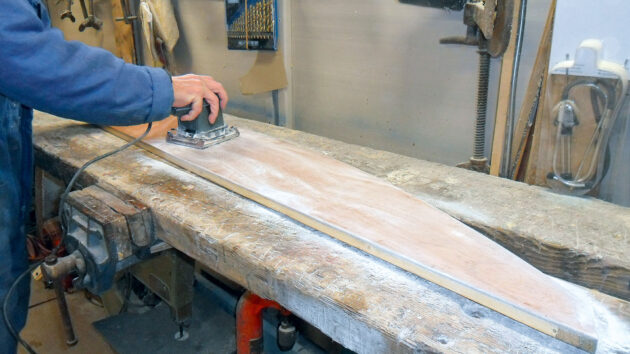
5. Sand the epoxied inside panels before assembly. This is much easier to do on the bench than later.
Wash the epoxy surface with rags and plain water before sanding to prevent clogging.
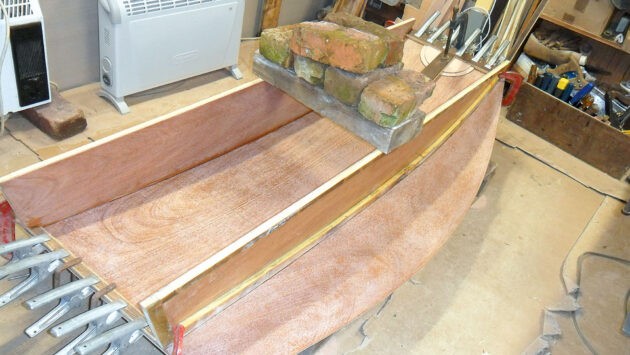
6. The bench fronts set the rocker curve in the bottom panel – no frames or moulds are needed.
I raised the pallet on a few beer crates for a more convenient working height.
Note brick weights while the glue sets.
7. Bow and stern transoms erected and glued in place.
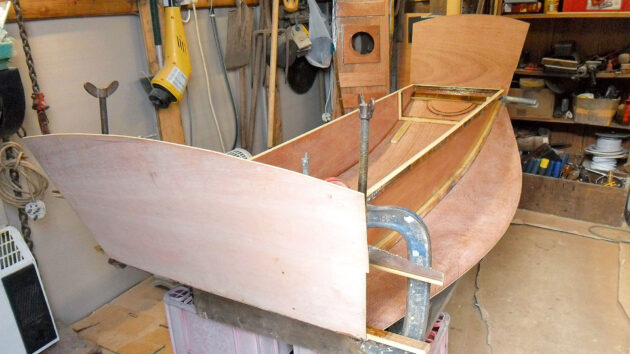
8. Bench tops pegged in place with dowels but not yet glued.
These set the curve of the side panels, but must later be removed to allow access for taping up the chine joint.
This avoids the bother of bending or sawing chine stringers to a difficult curve.
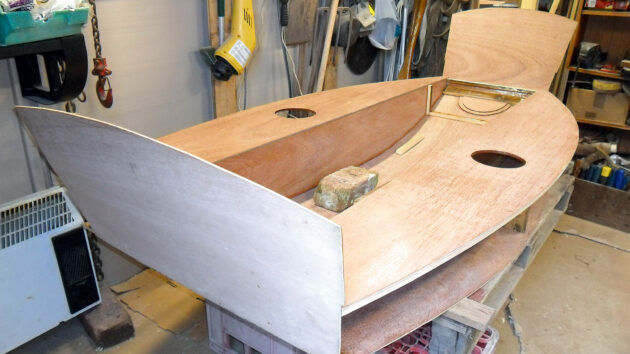
9. Packaging tape prevents glue from sticking to the bench tops while fitting the side panels.
Note locating dowels.
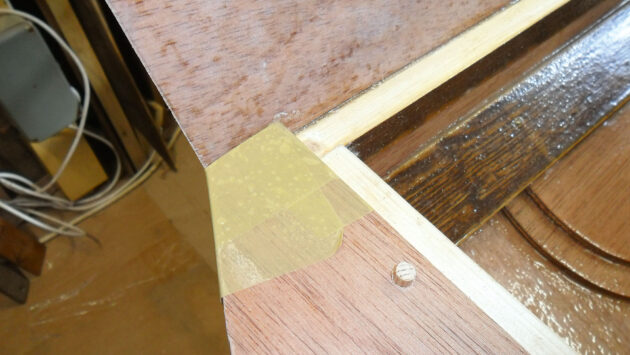
10. Lower side panels being fitted. I made my side panels in two parts so they overlap like clinker planks, just because I liked the look of it.
Be sure the boat is not warped by sighting across the top edges of the bow and stern transoms or using plumb bobs before securing the side panels.
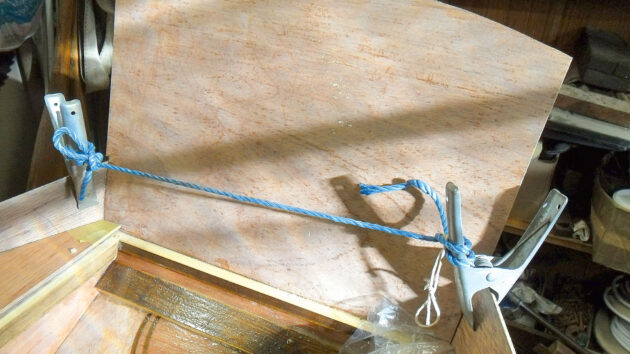
11. A fillet of thickened epoxy joins the side panel to the bottom inside the buoyancy chamber.
The bench top must be removed for access to do this.
I used a few copper wire stitches to stabilise the joint for filleting.
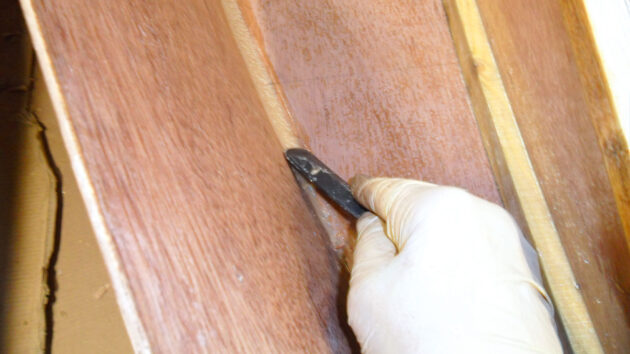
12. The chine joint was then taped with 4in and 2in glass tape.
Note the semi-circular doublings on the bottom panel at the bow, to take the towing eye.
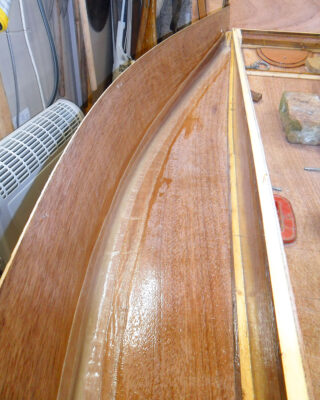
13. Bench tops and upper side panels are now permanently fitted, and work has begun on the gunwale structure.
I used bevelled cleats to join side panels to transoms, but these joints could equally be stitch-and-taped.
I made the transom beams and quarter knees of sapele, but it’s heavy.
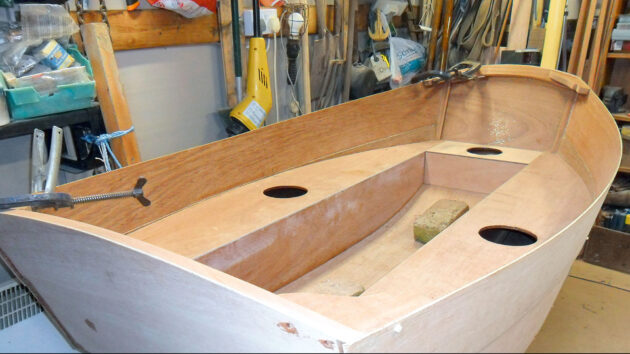
14. The rubbing strakes or outer wales are glued on. Allow their natural curve to give a nice sweep to the sheer line.
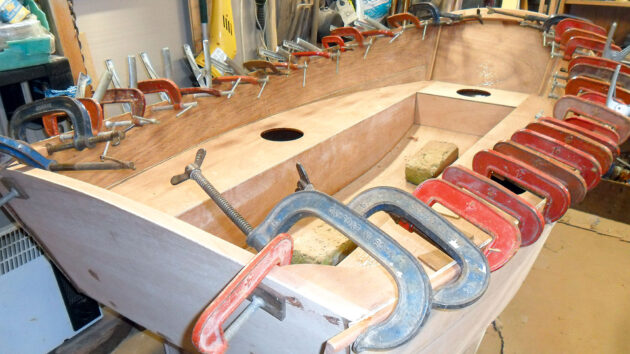
15. Inner wale or carlin fitted with rowlock blocks, intermediate spacers and quarter knees.
This construction forms a strong girder at the gunwale and somewhat mimics the appearance of a traditional clinker dinghy.
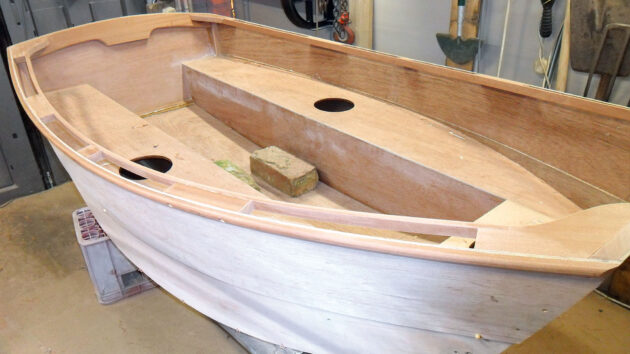
16. Risers added for stern and midships thwarts.
Note the stout rowlock block and filleted side bench joint which is backed up by the edging timber beneath, acting as a stringer.
17. Chine joints rounded over and taped, keel added, bottom sheathed with a layer of glass cloth for scuff resistance, skeg affixed and the whole exterior epoxy coated.
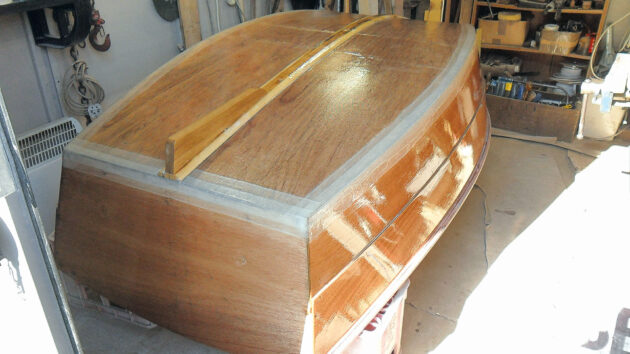
18. Varnishing and painting completed. Doublers reinforce the bottom to take foot traffic.
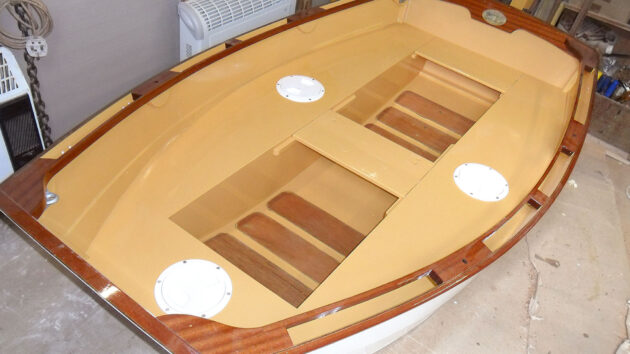
19. A light keel band made of aluminium takes some of the scuff on the beach.
I later added bilge runners for extra scuff resistance.
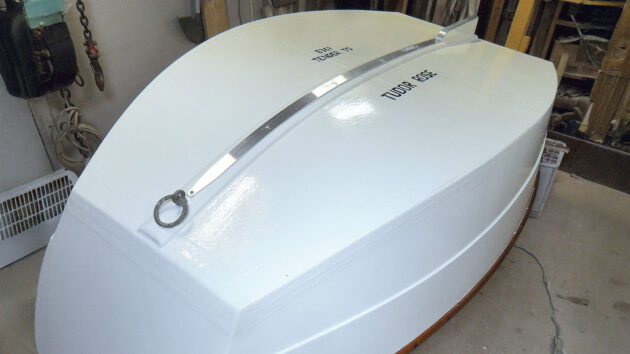
20. A hinged gallows-style davit lifts the dinghy across Tudor Rose’s transom. Oars stow inside.
Searching for the best electric outboard for your tender? We put the 6.7kg ePropulsion eLite through a full week of cruising tests
David Harding tests the quiet and light ePropulsion eLite electric outboard
How to secure and tow an inflatable tender
Kerry Pears and husband John have rescued many an errant tender in their years afloat, so Kerry has advice to…
Aircat 285: does this inflatable tender offer a stable, high-performance alternative to traditional designs?
Choosing the best inflatable can be tricky, but the catamaran-style Aircat 285 promises to offer a stable, high-performance alternative to…
Boat towing and berthing by tender
If your engine fails to start, being able to berth your boat using the tender is an extremely useful skill,…
Want to read more articles about projects like this DIY tender?
A subscription to Practical Boat Owner magazine costs around 40% less than the cover price.
Print and digital editions are available through Magazines Direct – where you can also find the latest deals.
PBO is packed with information to help you get the most from boat ownership – whether sail or power.
-
-
-
- Take your DIY skills to the next level with trusted advice on boat maintenance and repairs
- Impartial, in-depth gear reviews
- Practical cruising tips for making the most of your time afloat
-
-
Follow us on Facebook, Instagram, TikTok and Twitter