
PBO’s engine expert, Stu Davies, explains how to troubleshoot common problems in your outboard engine to get it running again.
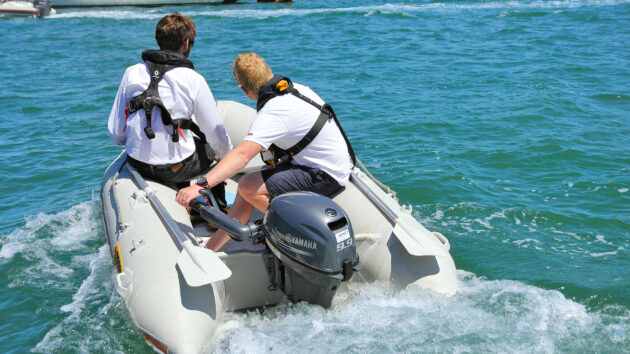
Whether it be a small outboard engine to drive our dinghy or a bigger one to drive our fast ‘toys’, we all have one.
But before we look at how to troubleshoot and fix problems, some history wouldn’t go amiss.
History of the outboard engine
The first outboard engine was an electric one invented by Gustave Trouvé in 1881, however it was Ole Evinrude who developed the first commercially successful, petrol-powered outboard in 1907.
While Trouvé’s electric model was a novelty, and American Motors Co produced some gasoline outboards in 1896, it was Evinrude’s simple, reliable, and relatively powerful 2-stroke design that revolutionised recreational boating and became the industry standard.
The British Seagull was largely the forerunner outboard engine for us in the UK. A simple, robust and indestructible bit of kit, it ran on 16:1 (16 parts petrol; 1 part 2-stroke oil) 2-stroke mix that was smoky. Drop it in the sea, and the Seagull would come up for more after a quick swill with fresh water.
There were no fancy electronic ignitions on these engines, just an old-fashioned brass flywheel with magnets embedded in it, robust coils and a set of points to produce a spark. The carburettor was simple, easy to dismantle and clean.
However, the Seagull could be cantankerous, with much winding of bits of rope on the start pulley and pulling to try to start it.
Much like the motorcycle industry, it was overtaken by Japanese/American outboards and their derivatives. They were lighter and more reliable. They were bulletproof; advanced aluminium casting techniques and superior coils and magnets made them so.
Back then, most outboards used a 2-stroke engine power head, driving through a shaft to a gearbox in the bottom half of the ‘leg’; simple, powerful and easy to work on.
Nowadays, it’s a 4-stroke engine with more complexity and weight and the growth of electric outboards.
2-stroke vs 4-stroke outboard engines
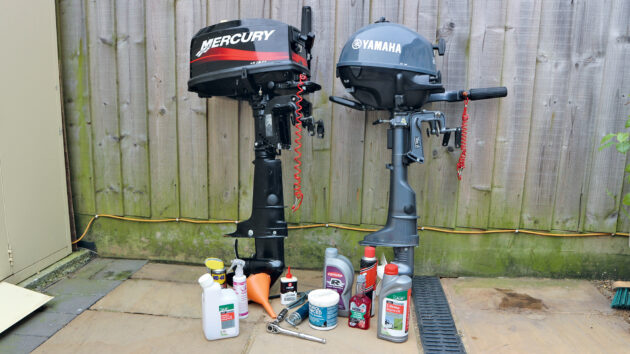
A selection of oils, lubricants and greases to keep an outboard engine running sweetly. Photo: Hugo Andreae.
Two-stroke outboard engines, unfortunately, are ‘dirty’ in terms of their exhaust emissions, although I’d argue that in the grand scheme of things, their contribution of exhaust fumes to our world is not that great.
Still, 4-stroke outboards with a clean exhaust and power heads are now the norm; in fact, these are the only outboard engines that boat owners can buy in the UK.
Two-strokes are a lot lighter, a big plus when transferring them from the mother boat to the dinghy.
They originally had ignition contact breaker points to fire the spark plugs, but the superior electronic trigger and coil technology used later overcame some of the shortcomings of those.
This change to magnet-triggered electronic ignition systems, which did away with points, increased reliability and ease of servicing.
The 2-stroke carburettors were cleverly designed so that instead of having internal passageways to address low throttle settings, they used the throttle slide needle to control fuel flow at idle, avoiding the problems we have today with idle jets and their orifices becoming clogged due to ethanol-related issues.
Fire it up
To start, turn the ignition and choke on, and make sure there is petrol in the tank. For bigger engines with a separate fuel tank, squeeze the primer bulb; for smaller engines, pull the cord or use the electric starter.
It should start, shouldn’t it! Most of the time it does, but what if it doesn’t?
I’ve used my 2.5hp Mercury as the example for this article, but the Tohatsu, Mariner and older Yamahas are near enough the same, and for other makes and models, like Honda and Suzuki, the same general principles apply.
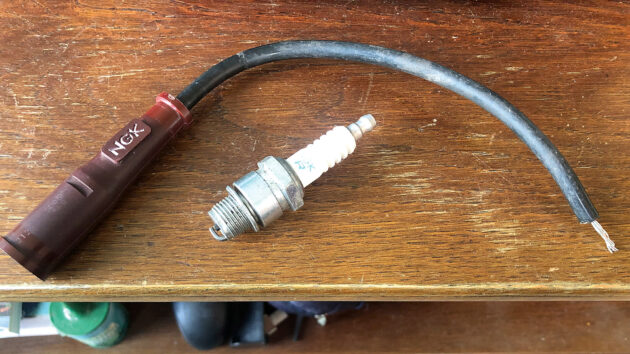
A spark plug with its lead and plug cap. Photo: Stu Davies.
Basically, an outboard motor has a power head with a spark plug, a flywheel with a powerful trigger magnet and a ‘black box’ which produces an impulse to fire the ignition coil. The carburettor is a simple device as described above. Some of the bigger, later engines do have fuel injection, but I’ll not be covering them in this article.
The transmission is driven by a shaft from the engine power head to a right-angle gearbox, which drives the raw seawater cooling pump and propeller.
Usually, the raw water cooling pump is behind the propeller, but on some bigger engines, it is above the lower gearbox housing. It is still driven by the shaft from the engine.
All outboards are a version of the original simple ones, but are now of 4-stroke design and have advanced features derived from automotive engines.
Later 4-stroke outboards are a bit more complicated and will need some specialised tools to maintain them.
Diagnosing outboard engine problems

All outboards follow the original, simple design though modern 4-strokes like this have more advanced features. Photo: William Payne/Future.
Troubleshooting can be a very basic task: Does it start? If not, why not? To start with, a simple pull on the starter cord will be good enough.
Ask yourself: Does it have compression? Can you feel that ‘bump’ as the piston goes over the top dead centre? If so, does it have a spark? Is fuel getting to the engine?
How to check your spark plug
Access the spark plug by dropping the inspection hatch as shown in the photo (top right). On other engines, access is via a purpose-made spark plug socket, which has a rubber insert to grip and protect the ceramic insulator.
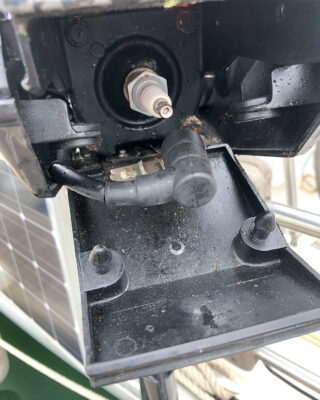
Once you drop the inspection hatch, you can access the spark plug. Photo: Stu Davies.
Undo the plug socket and remove it.
Holding the plug against the engine with the spark plug lead attached, turn the engine over with the ignition on.
You should see a fat blue spark across the terminals.
The picture of my NGK spark plug (below) is a perfect example of a good plug, a clean burn and no oily deposits. I run my engine with a 50:1 mix, although manufacturers used to recommend a 100:1 mix.
That recommendation disappeared, I suspect as a result of some customer problems.
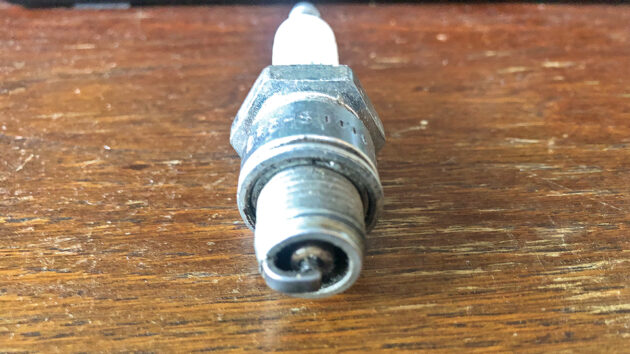
An NGK plug showing that the oil mix is correct and giving a clean burn. Photo: Stu Davies.
If your plug is oily or has carbon deposits, it can be cleaned with a wire brush. Some people argue against using a wire brush to clean them, but I’ve done just that for 60-plus years and have never had an issue.
Spark plug gaps and types have varied slightly through the years. The plug I use at the moment is an NGK BR5HS, which suits my set-up perfectly.
Gapping the spark plug is part of the service and consists of checking and adjusting the space between its electrodes to the manufacturer’s specification using a gap gauge, also known as a feeler gauge.
You need to use the correct size of gauge, in my case 24 thousandths of an inch; I place it between the electrodes and gently tap the bent electrode until it just grips the feeler gauge so the gauge can slide back and forth with a little resistance.
The cylinder head is aluminium, the plug is steel. Be careful tightening it up so as not to strip the threads. And remember, righty tighty, lefty loosy!
If it is sparking okay and the plug is clean, then refit the plug and move on to checking the fuel/mixture supply.
Checking the fuel system
Is there any fuel in the tank? It’s a simple check, but many people forget to fill up!
Next, check that the mixture is getting from the carburettor to the cylinder. This entails squirting some Easy Start or brake cleaner into the carburettor intake and then pulling the starter cord.
If it fires, this proves that there is not enough fuel getting to the engine. The engine is using the Easy Start or brake cleaner as a fuel. This is one of the easiest checks; it proves definitively whether the non-start is caused by a fuel shortage or a lack of sparks. If it is a fuel shortage, then checking the supply from the tank is the next step.
Pull the fuel pipe off the carburettor and see if fuel flows freely from that. If it doesn’t, take off the fuel pipe at the tank end.
Does it then flow from the fuel tap? If not, there is usually a gauze filter fitted to the tap into the tank. Remove the tap and inspect the gauze filter, and clean it if necessary.
If fuel is not flowing to the engine, remove the fuel pipe from the carburettor to see if fuel is running freely. Photo: Stu Davies.
If it does flow, then the carburettor needs to be removed and the float bowl taken off to check that the jets are clean and that the float valve moves to allow fuel into the carburettor.
If it isn’t attempting to start on the petrol supply, then the float valve needle is the usual culprit. Take the float valve out and check for debris in the orifice. To check it is clear, I put the straw from a can of WD-40 into the intake of the valve and blow it through to check it is clear.
Unfortunately, the E10 petrol we use nowadays is causing serious issues with our engines; E10 contains up to 10% ethanol, a biofuel made from plants like grains and wood.
Ethanol is hygroscopic, which means it absorbs water. If you run the carburettor dry, it leaves a small amount of fuel in the float bowl. This then evaporates, leaving a drop of water in the bowl.
This then reacts with the carburettor metals and causes the blocking of orifices and jets.
Cleaning is best done manually with a piece of wire through the orifices, followed by a blast of WD-40 or similar. I’m not a fan of wafting a spray can of carburettor cleaner over the carburettor. Manual cleaning is the gold standard.
I have found that using Shell V-Power petrol or similar from one of the major fuel suppliers helps, as they have less biofuel.
The carburettor needs to be drained after use, and especially if the outboard engine is to be stored for an extended time. Due to biofuels in petrol, the old way of turning the fuel tap off and running it dry is no longer the answer. The carburettor must be drained.
Common outboard engine problems: Overheating
Our engines are cooled by raw seawater being pumped around them by a vaned centrifugal pump. This then is directed to exit through the exhaust outlet, down the middle of the engine leg and then through the centre of the propeller underwater. If the cooling water ceases to flow, not only does the power head overheat, but so does the engine leg.
All engines have a ‘piddle’ tube where part of the waste cooling water is dumped overboard as a telltale jet to indicate the outboard engine is cooling properly. Ignore the lack of water exiting here at your peril!
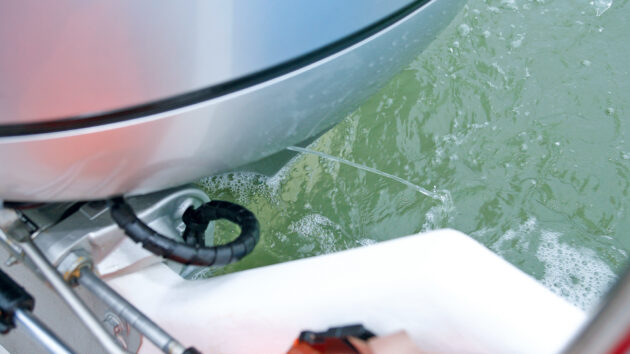
Check the telltale jet! Make sure the waste cooling water is leaving the outboard engine. Photo: PhotoEdit/Alamy.
Most blockages occur at the exit of this tube, and simply poking the hole with a piece of wire or such will unblock it.
We can also see if the water is flowing because, in addition to the ‘piddle’ tube, there is usually a small outlet halfway down the leg where exhaust gases and waste cooling water can be seen exiting in small amounts.
Water pumps are simple but very effective, and they are usually bulletproof. They take lots of abuse and come up for more. Issues arising from pumps going wrong or engines overheating are usually a result of poor maintenance.
Ideally, when you’ve finished using your outboard engine, put it in a bucket of fresh water and wash it down with freshwater, making sure you rinse the internal passages.
Many do not bother to do this simple maintenance step, but if it is missed, the seawater evaporates and leaves salt residue in the outboard’s internal passages, blocking water flow, which leads to overheating.
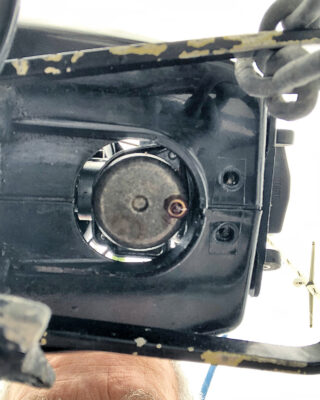
The vast majority of engines have a multi-vaned impeller which spins in a housing and pumps water through the cooling system.
The water pump on my engine is behind a plate, behind the propeller.
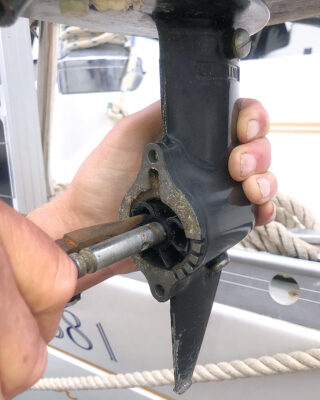
To access the impeller, the propeller is first removed by pulling out the split pin and gently sliding it off the drive shaft. The drive is provided by a shear pin through the shaft, which engages with a slot in the prop.
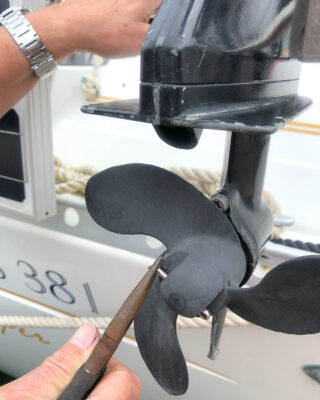
You’ll first need to pull out the split pin to remove the propeller. Photos: Stu Davies.
Remove that pin, and then use 10mm spanner heads to remove two 6mm bolts; the plate will then slide off to reveal the impeller. A thin-nosed set of pliers can be used to gently tug the impeller out.
Remove the impeller with needle-nosed pliers, then check it for cracks or missing vanes. Photos: Stu Davies.
There is also another pin through the drive shaft to drive the impeller. That is also a loose fit, so take care not to lose it.
The water pump impeller can then be checked for missing vanes and cracks.
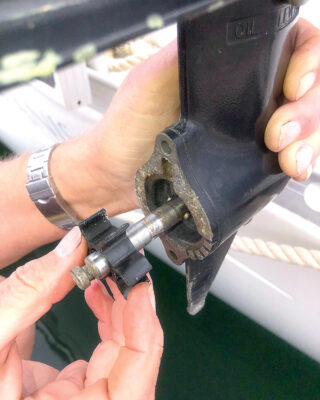
Be careful not to lose the pin that holds the impeller in place – it can be a loose fit. Photos: Stu Davies.
People used to change the impellers in both the outboard and inboard engines every year. I used to do that, but after ending up with a pile of hardly used impellers in my spares, I decided to check the impeller thoroughly and replace it when necessary.
I check by robustly bending the vanes and inspecting the roots for cracks or wear, as well as the edges of the vanes where they rub the water pump faces.
The metal bonding between the drive shaft and the rubber vanes is also carefully checked to make sure it hasn’t come adrift.
A top tip with water pumps is to clean the seal area at the back of the impeller, including where the seal spring is and fill it with silicone grease; this helps lubricate it on a dry start.
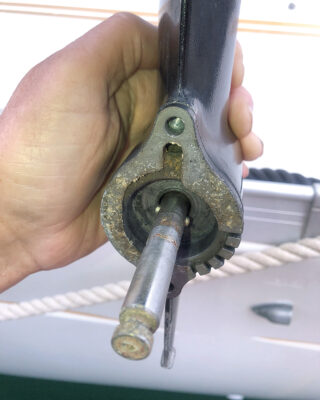
Clean the seal area at the back of the impeller and pack it with waterproof grease. Photos: Stu Davies.
The impeller blades can be put back in any orientation; at the first turn of the engine, they spring into position. Be careful when reassembling; the two bolts only need nipping up as they break easily!
Common outboard engine problems: Propeller issues
The propellers on our outboard engines are either held in place by shear pins or split pins and mounted on parallel shafts.
Some are mounted on splined shafts and have bonded rubber bushes in them that mate to the splines on the drive shaft. The bond can and does shear; sometimes it is not noticeable, and the propeller spins on the bond, causing similar symptoms as a slipping clutch in a car. The revolutions rise, but the boat doesn’t speed up.
When I first came across this, the local repair shop in Abersoch would send them away for a new bush to be bonded in; nowadays, it’s a new propeller.
If vibration is noted from the engine, this can be a sign that the propeller is unbalanced due to a failed bond or chips in the propeller edges.
This is, perhaps, not a big deal on our little outboards for our dinghies, but on a bigger engine on a planning boat, the vibration can cause issues. The cure is again a new propeller if you can’t find a specialist to repair it.
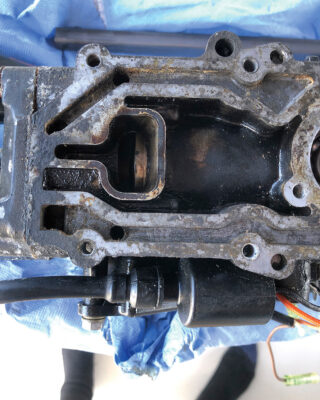
Lower leg gearboxes
All of our engines have a lower leg gearbox of some kind where the vertical rotary motion is converted to horizontal motion by bevel gears. Our small outboards are direct drive, but bigger ones do have a forward and reverse gear.
Both types have lip seals, keeping the engine oil in and the seawater out. If they get damaged, the usual symptom is milky oil, a good reason to check the oil level every season.
Luckily for us, outboard manufacturers use a steel that, short term, does not seem to be affected by seawater when it gets into the oil.
Electrical issues
Nowadays, with encapsulated electronic components, electrical issues in smaller, simpler engines seem to have gone away. If the ignition spark plug sparks, then all is good; no nasty ignition points to get corroded or need adjustment.
I have seen people changing electronic components on the slightly larger engines, but normally if original equipment manufacturer (OEM) components are in place, they seem to work. Often, with troubleshooting electrical problems, parts are changed in a ‘suck it and see’ approach to solving the problem.
The plug leads used today have carbon-coated fibre as the conductor instead of copper wire; the plug caps can also have a resistor in them to prevent radio-type interference. Check these are working before splashing out on expensive electronic bits!
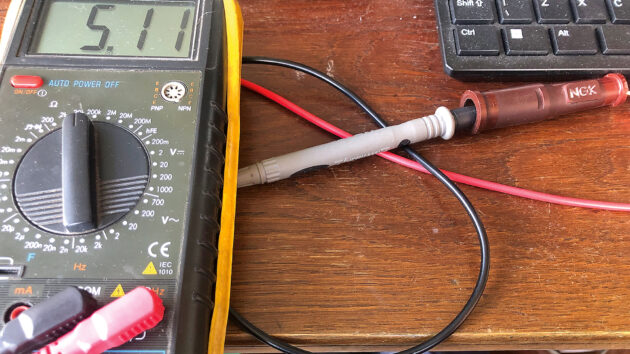
An NGK plug cap showing its resistance of 5k Ohms. Photo: Stu Davies.
To test the spark plug lead and cap, use a multimeter.
NGK spark plug caps, like the one in the picture (above) normally have a resistance of 5K Ohms, which can be seen on the multimeter.
The spark plug lead in the picture below is tinned copper wire coated, bulletproof; if you can see the ends are not corroded, like in my picture, then all is good.
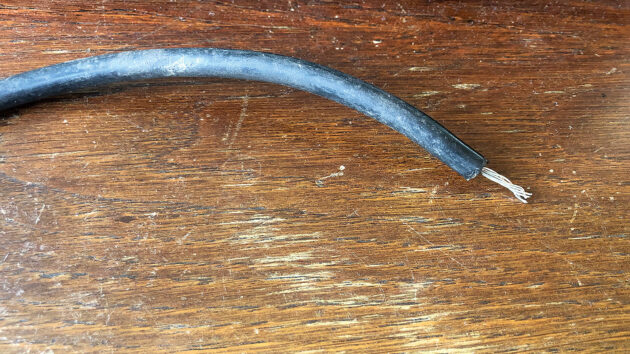
A copper-wired plug lead; these are more reliable and easier to troubleshoot. Photo: Stu Davies.
A carbon fibre core spark plug lead can break down, so check for continuity end-to-end with a multimeter.
To finish off, a light spray all over with WD-40 or similar lubricating oil and a wipe with an oily rag will make it look good and help to protect the components.
Storing your outboard engine for the winter
If you are storing an outboard engine over winter or for long periods of time, you need to take some simple steps.
I follow this regime for my outboard, which is a direct drive engine, so it has no neutral gear, which means the propeller spins when it is running. The bigger 3.5hp engines have a gear shift and can be placed in neutral.
I remove the propeller, as discussed above, and place the engine leg in a bucket of fresh water. The engine can then be started and run for a few minutes; this allows fresh water to circulate throughout the engine cooling passages.
Coolant passages in the outboard engine. Photo: Stu Davies.
A small amount of old-fashioned glycol-based antifreeze can be added to the bucket; this contains anti-corrosion products and will help to preserve the internals of the cooling system.
Bigger engines need a set of ‘ears’, often called flushing muffs, to clamp around the leg where the coolant water enters. In smaller engines, the water enters just behind the propeller.
The flushing muffs have a connection where a hose pipe can be clamped. Be careful here; turning the water on when the engine isn’t running can allow it to build up inside the engine and enter the cylinders through the exhaust valves.
Base of the carburettor looking up; use the drain screw to empty the float bowl. Photo: Stu Davies.
Once flushed through the fuel tap can then be switched off, and the majority of fuel in the carburettor will burn off as the engine keeps running. Once it has stopped, remove the drain screw in the carburettor float bowl so it can drain completely.
In the old days, ‘fogging oils’ were available to lubricate the engine for winter storage, but my personal view is that today’s hi-tech 2-stroke oils are so good that this isn’t necessary. The engine stays lubricated for prolonged periods of time.
4-stroke outboards
Four-stroke outboard engines are now mandated because they produce less pollution than 2-stroke engines. Servicing the spark plugs, gearbox transmission, and the ignition system is the same as already described.
However, the carburettors are a different kettle of fish with internal pilot jet orifices and jets. These are so fine that they can be easily blocked if care is not taken over fuel quality and supply.
I recommend using more expensive fuels to keep the engine scrupulously clean.
Four-stroke engines are heavier than 2-strokes, a factor that needs to be taken into account when older owners, such as myself, are transferring outboards from a boat to a tender.
They have mechanical air intake and exhaust valves, which have to be checked on a maintenance basis, and of course, they have an oil sump, which you need to pay attention to when transporting them on their side.
Lay them on their wrong side at your peril; the sump soon lets oil trickle into the cylinder.
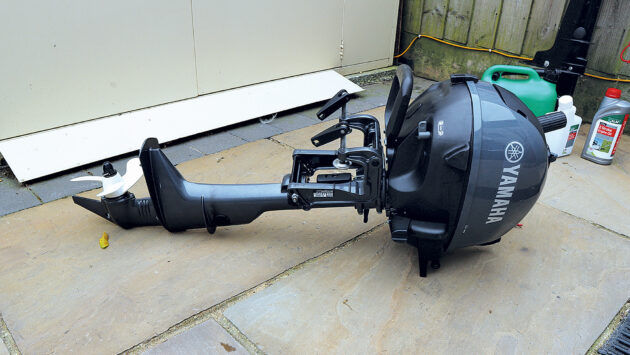
Four-stroke engines need to be laid down on one specific side or it will leak oil; this Yamaha needs to be stored on its back. Photo: Stu Davies.
This is because the crankcase breather allows the oil to trickle into the inlet manifold and then to the cylinder. Hydro locking then occurs, and the spark plug has to be removed to expel the oil.
They can also be vicious if the pull start isn’t pulled correctly; the tee piece can easily give a nasty rap on the knuckles!
Troubleshooting problems with 4-strokes is essentially the same as 2-strokes, except valve clearances should be checked now and again; too tight tappet clearances on the valve rocker components can cause a lack of compression.
The gearbox oil is a standard automotive hypoid gear oil. To check it, remove the top screw in the leg; the oil should be the same level as this top screw.
To drain it, undo the bottom screw and drain before pumping in the new oil.
My caveats for all of the above are that most small outboards are very similar and easy to troubleshoot by an average outboard engine owner. For any differences in a servicing regime, refer to your engine manufacturer’s handbook.
Tools and spares to keep onboard
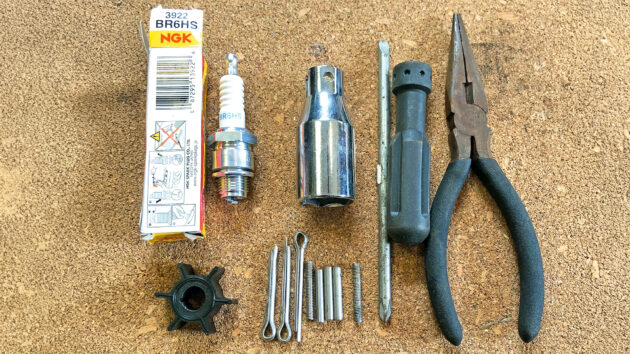
A basic set of tools is all you need on board to solve most outboard engine problems. Photo: Stu Davies.
All that is needed to fix outboard issues is a basic set of hand tools including a set of metric combination spanners, a ⅜in drive simple metric socket set, a set of pliers and a set of various screwdrivers.
Take care undoing the small 6mm shank bolts found on these engines; they break easily! Top tip: As most people know, a can of WD-40 is invaluable on board, good for blasting carburettor passages, drying out wet components and lubricating parts.
On board, keep a spare water pump impeller, spark plug, propeller shear pins and cotter pins if necessary, and some transmission oil.
Stu Davies has worked for most of his life as an oil field maintenance engineer in Africa and the Middle East. He has fixed a wide range of mechanical parts from the smallest of engines to enormous 4,000hp gas turbines. He and his wife, Laura, currently own a Beneteau 381 which is based in Portugal.
Want to read more articles like troubleshooting common outboard engine problems?

A subscription to Practical Boat Owner magazine costs around 40% less than the cover price.
Print and digital editions are available through Magazines Direct – where you can also find the latest deals.
PBO is packed with information to help you get the most from boat ownership – whether sail or power.
-
-
-
- Take your DIY skills to the next level with trusted advice on boat maintenance and repairs
- Impartial, in-depth gear reviews
- Practical cruising tips for making the most of your time afloat
-
-
Follow us on Facebook, Instagram, TikTok and Twitter