
PBO assesses the effectiveness of the ‘one size fits all’ Oceansteer emergency rudder with a trial run on the PBO Project Boat
Oceansteer emergency rudder tested
Losing your rudder can seriously spoil your day. That’s why two sailors have developed a ‘one size fits all’ solution that can be quickly and easily fitted to any boat between 20ft and 80ft long and which should, they say, enable you to keep control of your boat should she lose her rudder.
Surveyor Nick Vass and his colleague Roger Powell of Silky cleaning products have developed the Oceansteer emergency rudder as an easy-to-fit way to maintain steerage after the loss of a rudder.
Rudder loss is a major cause of abandonment and damage to yachts sailing offshore – a German yacht had to be rescued in the Fastnet race this year after losing her rudder, and barely a year goes by in the ARC without yachts having some sort of steering issue. Most of these are resolved, but there have been a few cases recently where yachts have been abandoned, only to be discovered – still afloat – months later.
RORC regulations state that racing yachts must have a tried-and-tested method of steering should a boat suffer rudder loss, and most RORC racing boats carry a small drogue for this purpose. We tried out five methods of lashing up makeshift steering oars, skegs and drogues in PBO’s August 2011 issue.
The best was the ‘Viking oar’, a spinnaker pole with a blade (made from a locker lid) lashed to the end, but it was time-consuming to set up and hard to steer with for any great distance. A drogue was another good way to steer the boat, but slowed us significantly and made precision steering tricky. Would the Oceansteer make it any easier?
Deploying the Oceansteer
The Oceansteer comes packed in two fabric bags, one containing two thick pieces of HDPE plastic and the other the system of brackets that will fix the Oceansteer to your transom.

Oceansteer’s Nick Vass assembles the two parts of the rudder
The brackets consist of two U-shaped steel channels with nesting inserts which can be used to extend the bracket if necessary. The whole thing is attached to the pushpit using a set of clamps of the type normally used for lighting rigs in the theatre industry. At the other end of the bracket, the two arms are joined by an eye bolt and nut, to which the rudder is shackled. These brackets come packed in tape with the rudder lines coiled inside, ready to be deployed.
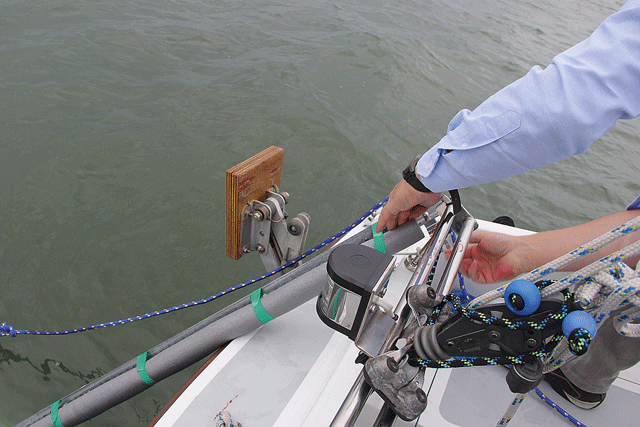
The bracket was clamped to the traveller and deployed over the stern
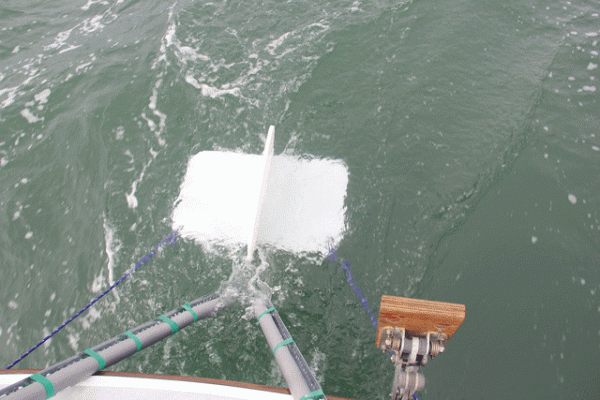
The rudder itself consists of two pieces of HDPE plastic which slot together in the same way that you assemble an anchor ball. This done, they shackle to the apex of the bracket so that one piece is in the vertical plane and the other is horizontal. The horizontal piece has two holes drilled to take the control lines. The horizontal plane is designed to act like a paravane, as used to catch mackerel. The faster the boat goes, the more the Oceansteer sinks, the geometry of which moves the bracket as far forward and snugly against the transom as possible.
That’s the principle, but how well does it work in practice? We tried out the Oceansteer on Hantu Biru, the PBO Project Boat. Motoring out from a marina berth onto a vacant swinging mooring, we removed her rudder and stowed it down below. This done, Nick Vass, one of the product’s designers, hauled the two bags out of the cabin and set to work.
We don’t have an aft pushpit on Hantu Biru but a hefty main traveller horse runs across the aft cockpit coaming, so we bolted the two legs of the bracket to this. The brackets, secured with wing nuts, were effective and easy to use, even with the boat moving around. A spanner is included in the kit, and we used this to bolt the extensions to the legs of the bracket with the included fixings. We used some pipe lagging to protect Hantu Biru’s rubbing strake from damage, although in an emergency you’d likely be less precious in order to save your boat – nonetheless, keeping some lagging in the bag is not a bad idea.
With the bracket ready to go, we attached the rudder part of the design to the apex of the bracket and handed the whole thing over the transom. With the bracket secured to the traveller, we led the two control lines forward from the rudder to Hantu Biru’s cockpit winches. This done, we were good to go, so we hoisted the main and cast off the mooring.
Under sail

It’s a simple idea: here, we are pulling on the starboard control line, which turns the rudder and the boat steers
to starboard

It was important to keep both lines tight when altering course, easing one and pulling the other in unison to stop the Oceansteer ‘capsizing’ like this

We used the cockpit sheet winches for the control lines, which made it intuitive to use – pull port to go to port!
It was intuitive to steer with, using a line on each side of the boat: simply pull the port line to go to port and the starboard line to go to starboard. Hantu Biru tracked nicely, sailing down a narrow channel with ease under mainsail alone. The rudder became more effective once the boat’s speed exceeded 2 knots, as the ‘hydroplane’ effect took hold and the rudder sank more deeply in the water, increasing its ‘bite’.
What quickly became evident was that you needed to keep tension in both lines at the same time when altering course, or else the rudder would ‘capsize’ and become less effective. This meant pulling the relevant line (in this case, starboard) tight initially, before gently easing the port line and pulling on the starboard line constantly to ensure the rudder was kept in its correct orientation. Keeping tension on the lines also meant that the rudder stayed submerged, which was important.
Beating
We managed to beat up a narrow channel under main and jib, surrounded by moored yachts. The Oceansteer, as its name suggests, isn’t designed for this level of accuracy, but we wanted to see just how controllable it was in comparison to the boat’s real, now-removed rudder.
What became clear was that the rudder was fine when everything was in equilibrium, but once it began to load up in the gusts and the boat tried to round up, it became hard to maintain enough pressure on the leeward line to counteract this without the rudder capsizing. Judicious trimming of the mainsheet, and indeed early reefing, would keep this in check, and once we had furled away the jib she became much more manageable. Tacks were not a problem, but it is wise to keep as much speed through them as possible – the rudder isn’t designed to work in astern, and while it did work with the boat in irons, more speed was the key to easier steering.
Reaching
On a reach, the boat felt very controllable. The only issue arose when the wash from the Condor ferry came from the quarter, and the lines weren’t tight enough to keep the rudder tight into the hull. Here it slopped around a little in the waves. Slowing down and tightening the lines regained control.
Running
Running presented few problems. The only setback occurred when the boat powered up between a run and a broad reach, when the loads on the rudder increased to the point where it was hard to adjust. But reducing sail and speed to a point where it was easy to control was simple enough.
Verdict
This represented a good, easily-stowed solution to emergency steering that required much less experimentation than setting up a Viking oar as we tried back in 2011.
It’s not designed for the sort of close-quarters manoeuvring we put it through – instead it’s intended for open-water sailing where there’s plenty of sea room. However, it’s good to know that it will enable you to have enough control to make some ground to windward, for instance off a lee shore, if required.
The key to stopping the Oceansteer loading up was in selecting a slightly under-canvased and balanced sail plan. With a suitable sail selection we found it gave us better than expected control. Deployment was easy, but it’s worth owners spending a little time in a dry fitting before it’s needed in anger to ensure the brackets are the correct length and to work out a fitting solution that works on their boat.
It’s not quite perfect – the interface between bracket and rudder is a shackle which allows some articulation and thus lets the rudder capsize, but this is a better alternative to a fixed pivot, which would transfer the loads up the bracket’s arms and risk damaging the pushpit. Using two winches meant that the loads weren’t too bad and could be easily adjusted. On a long passage you should be able to cleat off both lines and balance the rig to let the boat sail herself.
Hantu Biru’s diminutive 23ft length worked well with the Oceansteer. The makers claim that it will work on boats up to 80ft – and it would be interesting to try on a larger rudderless boat to see if the ‘one size fits all’ design works in that context.
On Hantu Biru we became so confident using the system that we managed to beat up to and pick up a mooring buoy under sail – not bad for an emergency system.
Verdict
A useful as a 'one size fits all' solution to rudder loss