
Ali Wood gets to grip with scrapers, grinding tools and Fertan when removing antifouling and smoothing the surface of the keel ready for primer
In our Maxi 84 boat survey, Ben Sutcliffe-Davies concluded that the antifouling needed to come off and whilst the keel joint was nice and tight there was a lot of corrosion that needed cleaning back.
As we were in the process of removing antifouling from the hull, we decided to tackle the keel at the same time.
Unlike the hull, which required a lot of effort to remove the antifouling, the keel was more straightforward, and the Bahco scraper easily removed the layers of antifouling, leaving behind a very rusty looking keel! Unfortunately, this was only the beginning of the work that lay ahead.

Scraping off the last bits of blue antifouling from the keel of our Maxi 84. Look at all that rust!
Loosening the rust
We started by loosening the rust at the joint with a palette knife and wire brush until it looked a lot cleaner. Under the joint, the first layers of antifoul came off easily, but a stubborn blue layer remained that wouldn’t be removed with any hand tool.
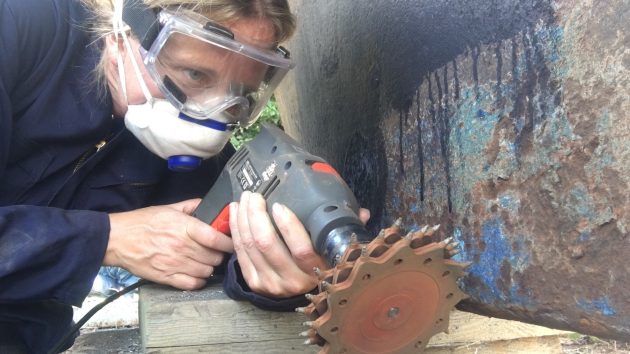
It wasn’t until the third visit to Maximus, where I was joined by boating journalist James Turner, that we managed to get the final paint off. James gave me a tool called the Tercoo rotary blaster, which fitted onto the drill and ground away the last stubborn bits (or at least, what I thought were the ‘last bits’).
He also gave me a can of Fertan, a rust converter.
“A keel is notoriously rough cast so the surface is covered in small cracks and fissures that even a sandblaster can’t clean out,” explained James.
“That’s where the Fertan comes in. It’s a rust converter that converts tiny hidden rust particles into inert material, so they won’t cause bubbling under the paint layer.”
Please not we may earn a small commission if you click on a link and buy a product but this doesn’t affect our editorial independence
Strong mastic
One thing I wasn’t sure about was the mastic. There was quite a thick layer on the hull-to-keel joint. Should I remove it or paint over it? I called David Johnson of West System Epoxy, whose hotline had been busy ever since lockdown, with a new wave of boat owners teaching themselves repairs.
David also advised to wire-brush the joint, recommending a two-handed wire brush, “similar to those posh chopping knives you get in a kitchen”. That way you can put pressure on either end and rake out the loose debris.
When to replace keel joint mastic
“Next, pick away at a small point and pull to see if it will come away in one piece. If it does it needs replacing,” he advised. He suggested a product called G-flex, which can be forced into the joint with a plastic squeegee.

The tacky blue ‘chewing gum’ at the keel joint is mastic. Ours was pretty secure, so rather than remove it we lfeft it on
“Mask off the hull and keel first, let it cure, then remove the masking tape and wash with warm soapy water and sand it ready to take away the antifoul.”
I picked away at the mastic – it wasn’t budging. Not even the Tercoo drill had removed it, rather it had simply ‘bobbled’ up. I was relieved to be honest, because already we’d spent days working the keel and I wasn’t sure that I could face any more time on it.
How keels are fitted to boats
David explained that builders make the keel flat and adjust the moulding in the boat to accept it. Sometimes this is a shallow moulded route into the keel – other times it’s a deeper route, or even the keel is bedded into a rebate into the hull with a depth of 25mm, which is where it’s sealed.
“You’ve then got to make flush the top of the keel with the seal,” he said. “It can be deceiving because you get a large band of mastic on the keel, but it isn’t anything to worry about.”
The importance of keelbolts
The important thing, David made clear, is the fixings; the keelbolts. They’re what’s holding the keel onto the boat, not the mastic. It’s so important to check your boat’s keelbolts.
“You’d be surprised, though,” he added. “I’ve seen keels that have stayed stuck when lifted even when the keelbolts have been removed!”
I sent David a picture and he said the mastic looked tight and sound.
“To be on the safe side, you can get the yard to take a look,” he advised. I did this, and was relieved to hear that they thought it would be fine to just paint over it.
Time for Stage B grinding
David looked at the photos of the keel, which James and I had separately spent hours grinding. He announced we’d done a ‘Stage A’ grind. Now it was time to do a Stage B! I nearly cried.
“You’ve got all the loose rubbish off there, now you need to get it ready for coating up.”
He advised us to grind it all over one more time and try to get it back to bright cast iron.
“Divide the keel into two. Concentrate on the forward bit, and soon after you’ve finished, get the primer on there as it starts to rust within 30 minutes.”

Nearly there. I was proud of the few patches of silver but this was as good as it gets
The irony is, the better prepared it is, the quicker it will rust. Talk about making a rod for your own back!
“The keel is the most difficult and dustiest job,” he conceded. “Bear in mind that when you grind away, there will be rust and dust everywhere. If it lands on the car or the topsides it’s going to leave an iron stain.”
David also said another option would simply have been to pay to have it shotblasted. It would cost around £400 to £600 for the hull and keel.
I totted up the hours of toil and misery so far, for our ‘Stage A grind’ plus the three days spent scraping the bottom. There’s nothing quite like doing it yourself to realise you should have paid someone.
Rust converters
A couple of days later I returned to Maximus, ready to do a last grind on the keel and apply the Fertan. Alas, I had not managed to get the keel to bright cast iron, but a quick check with the boatyard staff, confirmed it was good to go.

With the keel ground back as far as I could go I applied Fertan rust converter
Fertan isn’t just used for marine applications. It’s used in everything from garden fences to classic cars and large-scale industrial buildings.
The Fertan was quite thin and went on easily with a paintbrush. I left it for a couple of days then washed it off with a sponge and bucket of water.

After washing off the Fertan the keel remained mostly black, but the rust was converted and it was time for primer
Perhaps naively, I hoped to see a gleaming silver keel – a bit like the picture of the fence on the Fertan tin – but of course it wouldn’t be that simple. It doesn’t remove the rust, I reminded myself, it makes it harmless.
Removing – or converting – rust isn’t just something you do for cosmetic reasons. If left unchecked on a boat out of the water it leads to pitting and structural damage and can weaken the metal.
Interestingly, there were patches of silver keel where I assume we must have done a sterling job of grinding.
However, mostly the keel remained black, which must mean, despite our best efforts, there was a fair amount of rust that just got converted.
Now that we had a hull scraped back to gelcoat and a keel scraped back to metal, it was time to apply the primer.