
This month, the Secret’s structure is finished off with the addition of bottom stringers, bevelled chine battens and forefoot cheek pieces. Ben Meakins reports
Having performed the heart-in-mouth process of turning all 400kg of the boat over last month, and having completely reassembled our garage, we could get stuck in to finishing off the structure.
See the full set of articles: Building the Secret 20 kit boat with PBO.
This consists of battens to house the inner edge of the bottom panels against the keel, bottom stringers to support the panels and a set of bevelled chine battens, as well as forefoot cheek pieces.
But before we added any more structure, we realised that the compartments formed by the fore-and-aft and transverse frames would soon be inaccessible.
And while we’d hope they never get wet, it was worth sealing them up with epoxy to waterproof them, just in case they aren’t accessible once the bottom panels are installed.

We coated the inside of each compartment with epoxy to seal them up
This was a quick job, with two of us working. We started off brushing the epoxy on but soon realised that this was not only too slow, but that it was putting far too much epoxy on the plywood.
Things weren’t helped by the fact that we chose to do this on the hottest day of the year, with the mercury approaching 30° – meaning that the epoxy was threatening to go off in the pot!
A foam roller proved a much better applicator and applied a good, thin and even coat of epoxy.
The watertight compartments are now sealed and ready to be enclosed – and we plan to paint out any that become lockers or useful spaces with bilge paint at a later date.
For now, though, we could move on to the rest of the structure.

The forefoot cheeks were epoxied…

…and screwed and clamped in place, making sure they were even on each side
Forefoot cheeks
First up came the forefoot cheeks. These curved pieces of ply have a bevel on their lower edge, to which the forward hull panels will be attached.
As such, they will set the shape of the bow section – of vital hydrodynamic importance – so careful shaping was necessary.
Once we’d made sure that they matched the curve of the stem and that each side would be identical, they could be installed with epoxy and temporary screws.
These done, we could move back to the bevelled battens that run along the keel.
To house these, we had to cut out a little of each frame where it met the keel before screwing the battens in, using a piece of scrap timber to ensure that they aligned properly with the frame edges.
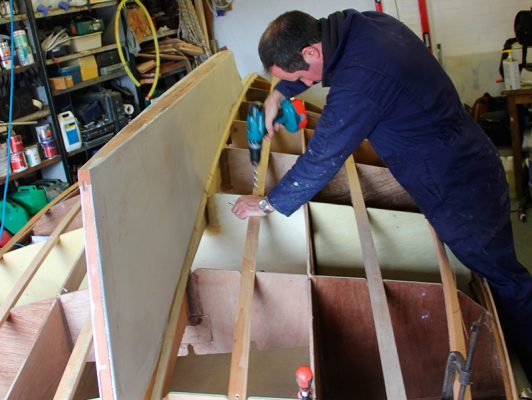
The battens had warped over the hot summer, stored in our garage roof, so to make sure that the horrendous warping didn’t cause bulges in the hull shape, we temporarily clamped a straight but flexible batten to them to ensure that they took up a smooth curve.
We used extra screws in the problem areas before removing the straightening batten – and a final Mk1 eyeball, looking along the batten, showed up any further irregularities that could be taken out with extra screws.
Once all was epoxied on, we didn’t need to worry about this any further – but it was worth spending the extra time on it to avoid swearing and painstaking chiselling at a later stage!

We temporarily clamped a straight but flexible batten to them to ensure that they took up a smooth curve..

…and a final Mk1 eyeball showed up any further irregularities along the batten
Bottom stringers
The bottom stringers were simple to install – one of them went between frames 4 and 9 so could it be housed in easily enough, with no tricky bevels to cut.
The other was trickier, requiring a complicated compound bevel where it met with the raked, curved transom.
This we measured with a sliding bevel at both ends, cutting the angle in square before using a sharp block plane to cut the bevels in the timber.
This done, the stringer could be clamped to the transom and housed into all the slots in the frames.
There was a significant amount of twist required at the bow, where the angle changed by around 45°, so for this we used a G-clamp as a lever to apply the necessary torque while one of us fixed it with temporary screws – extra-long for security!

On the chine stringers we spaced the kerfs equally, using screws to pull the stringers into the frame

These needed a compound bevel cutting on the end where they met the transom
Chine battens
The chines on the Secret 20 are initially installed as a flat panel running 2⁄3 the length of the boat, before being built up to give a rounded turn to the bilge.
The stringers for these are bevelled to the shape of a right-angled triangle – but the wood used, a lightweight antipodean alternative to Douglas fir, is splintery and prone to cracking – especially when it takes up the curve of the boat hull.
The way around this was to cut numerous kerfs in the back of the stringer, allowing it to take up the curve of the hull without splitting.
We spaced these equally, around 2cm apart on the greatest curve, to ensure a good, even bend in the wood, before using screws and penny washers to pull the stringers right into the frame.
Like the bottom stringers, these needed a compound bevel cutting on the end where they met the transom – and care was needed to line the chine edges up with those already set by the shape of the transom.

Rounding off the inside edges with a router helped the stringers fit the slots

A sharp block plane proved ideal to cut the compound bevel on the stringers

We used a G-clamp as a lever to twist the stringers at the bow
The grand epoxy job
With everything dry-fitted, another major epoxy job dawned.
The keel battens needed removing and gluing on, and each of the stringers needed filleting to the frames and transom.
This done, the boat is even more solid than she was before – and you can really see the shape emerging.
Next month comes a lot of fairing, with longboards and long planes, to ensure that when the bottom panels go on there are no hard points or lumps. The stringers are proud in places, and the bevelled battens will need fine-tuning with a bullnose plane to ensure the panels will fit on without any gaps.
As published in the August 2017 issue of Practical Boat Owner magazine.