
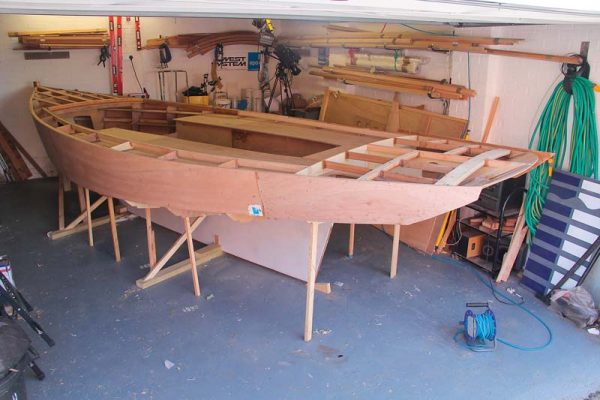
With the addition of her 6mm ply hull panels, PBO’s Secret 20 starts to look less like basketwork and more like a boat. David Pugh reports
In the previous article (Part 9: Deck Beams and chainplates), we concluded our project boat article by fairing the frames and stringers ready to accept the plywood hull sides.
See the full set of articles: Building the Secret 20 kit boat with PBO.
Finally, after six months of slotting panels together, bending stringers and applying countless epoxy fillets, we were just around the corner from starting to make our basket-like structure look like a hull.
It was with some trepidation, then, that we cut out the first hull panels (supplied in 6mm ply) and offered them up.
The kit allows considerable tolerance on the panels to cope with different builders’ interpretations of the correct sheer, but we were gratified to find that the panels matched our deck stringers to within a couple of millimetres, at least across the forward sections.
Below the upper chine stringer the panels overlap by 50mm or more, which will later be trimmed back to abut the chine panels.

Transferring the stem curve: a mortise gauge worked better!

Copying the stem angle to the edge of the plywood
Initial fitting
To panel a 20ft boat with 8ft sheets, there are going to be joins. The first panel joint falls neatly on the chainplate reinforcement fitted in the previous article (Part 9: Deck Beams and chainplates), while the second join is about 4ft forward of the transom.
We started off by fitting the forward panel. This is the most complex of the three as it needs to neatly join the stem, requiring a long bevel to be planed into the forward edge.
The bevel is also curved owing to the camber of the panel as the curved plywood meets the straight stem.
To mark the bevel we temporarily fitted the panel with clamps.
It’s a much-repeated truth that you can never have too many clamps when boatbuilding – just before starting this stage of the project we took advantage of a well-timed offer from an online retailer to buy 40 spring clamps for less than £1 each, and used every one of them.

The first panel. Clamps helped with positioning, but we used screws and washers to pull the plywood into shape
These allowed us to place the panel with the forward edge butted against the stem and the correct curve in place.
We could then transfer the line of the stem to the plywood with a block.
The curve is gentle at this point, so we trimmed the end of the plywood to shape with a block plane before offering it up to the stem once again.
When we were happy with the fit, we used a small piece of plywood to transfer the line of the stem to the edge of the plywood.
Using a sliding bevel to shift the marked angle to the end of the ply to minimise waste, we then used a mortise gauge to copy the length of the bevel across the plywood before planing it to a feather edge.
This method worked well, giving a snug fit to the stem.
With the forward panels ready to fit, we clamped them in place and offered up the midships and aft panels.
However, apart from the most basic fitting it was clear that it would be much easier to ensure a good fit if we epoxied the forward panels in place first.

Marking the length of the stem bevel with a mortise gauge

A block plane used diagonally helps minimise break-out
Getting sticky
With the forward panels temporarily in place we marked the positions of the frames and stringers from the inside.
We then removed them ready for priming, and to drill the holes for our clamping screws.
Clamping the panels tightly to the stringers is vital to ensure the boat is both strong and the right shape, and it’s impossible to use conventional clamps except along the top edge – their reach is either too short, or you can’t fit them in.
We therefore chose to use screws into the stringers at intervals of around 8 inches, with penny washers under the heads to stop them pulling into the wood and making our filling job more difficult.
By pre-drilling slightly oversized holes in the ply we removed the need to guess the fixing positions and ensured that the plywood pulled in snugly against the stringers.
The hull sides provide much of the cross-bracing to what is otherwise a construction of boxes, so it’s important that the joints are strong.
The good news is that there are plenty of bonding areas, with three stringers, the frame edges, the stem and the bunk edges and shelves.

A thick epoxy layer helps take up the curve in the chainplate area
We carefully primed both the framework and the panel with unthickened epoxy before making a thick mix which we spread on all the gluing surfaces.
On the chainplate reinforcement we applied a layer several millimetres thick to ensure that the hull skin was well bonded while still retaining its curve.
The stringers provide a good gluing area so we decided to glue just the faces with epoxy, while the frame edges and bunks we opted to fillet as well.
We also filleted the stringers in the cabin area as the coved lines will look better and be easier to paint, and the lower stringer along its length as the gluing area is compromised by it having been chamfered to allow for the chine panels.
We’ve written pages about filleting in previous articles (Part 4: How to make the perfect epoxy fillet), but we have discovered a new tip – piping bags.
These triangular plastic bags (we bought ours from Asda) cost pence and are much easier to handle than square bags – and they even come with plastic nozzles if it’s really important to be accurate!

Tip of the day: disposable piping bags are much easier than square ones for dispensing epoxy

We primed the frame edges and stringers with unthickened epoxy…
…as well as the panels, which we had previously marked
Midships panels
The midships panels join the forward panels with a simple butt joint, reinforced by the chainplates, so it’s a simple joint to cut – we simply needed to make sure the angle was correct to allow the midships panel to follow the sheerline.
We followed a similar approach to that taken with the forward panels, clamping them in place to scribe the angle of the aft edge of the forward panel onto the leading edge of the midships panel before planing it straight and square.
Once happy with the fit, a second offer-up allowed us to mark the positions of the frames and stringers ready for drilling and gluing.
That done, we drilled the panels and primed the gluing surfaces as before.
As we glued it in place we found we needed to supplement the aft fixings with additional screws and clamps where possible, as the plywood is being forced into a tight curve as it approaches the stern.

The midships panel simply butts to the forward panel at the chainplates

Under a cockpit seat. We filleted all joints bar the middle stringer, which has a broad gluing area
Aft panels
For the last few feet the vertical curve in the panels is quite acute, as the plywood tries to accommodate the curve of the hull and the tumblehome.
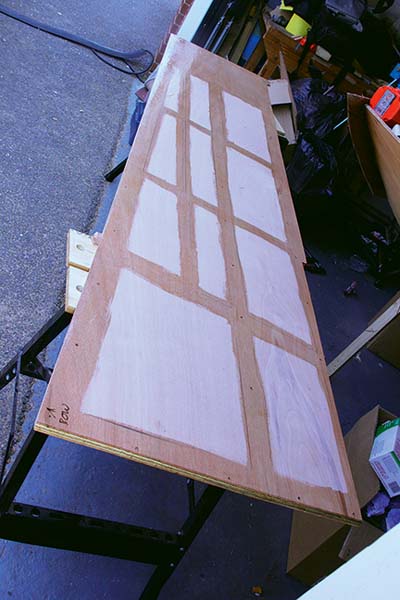
This bend is beyond the natural capacity of the plywood, so it’s necessary to kerf the inner face of the board.
Kerfing is simply achieved using a circular saw set to make half-depth cuts in the plywood.
Multiple parallel cuts are made about 30mm apart, which allows the plywood to bend.
This weakens the panel, but much of the strength can be restored by filling the cuts with epoxy, which has the added benefit of setting the bend permanently.
With the kerfing done, fitting was a similar process to the midships panels, first trimming the join between the panels before clamping the boards in place with plenty of epoxy.
We found it necessary to use screw clamps in addition to the fixing screws to get the board to accept the bend at the top.
The join between the boards is not reinforced by the framework, so we will back it up with glass tape on both sides at a later date.

We filleted all the cabin joints for strength and aesthetics

A small circular saw proved ideal for kerfing the aft panels to increase their flexibility

A kerfed panel. The cuts allow it to take up the aft curves
Next article:
Trimming the sides, taping joints and fitting the gunwales
PBO conclusion
With both sides fitted, the boat looks much more – well, like a boat. Adding the hull skin defines the border between wet and dry environments, and the cabin space starts to look like the living area it will eventually become. I even tried lying down on one of the bunks, which could politely be called ‘cosy’!

The finished result. Note the slight tumblehome as well as the counter
We’re now getting close to the heart-in-mouth moment when we turn her over to panel the underside and sheath her in epoxy. First, we need to carefully plane the hull sides to match the sheer to the deck stringers, and trim the excess plywood back to the chine stringers as well.
We’ll then fit the gunwales and add tape reinforcement to the panel joins and the joints between the frames and keel before finally turning her over. How we turn her is still open to question – we have a few ideas, but all suggestions will be gratefully received!
As published in the June 2017 issue of Practical Boat Owner magazine.