
Zoran Gloznic builds a budget bilge alarm switch
My wooden motor cruiser Marabou was hauled out so I could start repair and renovation work.
Being retired, the budget is fairly tight so I plan to use every opportunity to reduce the cost but without compromising anything.
Due to her size, age and engine power, Marabou must undergo a rigorous inspection every five years and she has to be hauled out for the task.
Among many other requirements, there must be a bilge water alarm installed, and for Marabou that means having two bilge alarm switches (or floats) installed: one in the engine area under the cockpit and another in the bilge under the main cabin.
A quick look at some online chandleries confirmed that bilge floats are not cheap – anything from £20+ to £60 – and that’s for the least expensive floats of questionable quality which come without protective housing around the float itself.

Components required for the alarm switch and control panel. Credit: Zoran Gloznic
This type of float can easily be blocked by debris or whatever in the bilge and it may not activate the alarm when you need it.
So I decided to make the floats myself.
The goal was to have devices costing less than those from chandler but at the same time being reliable and simple to make.
After spending some time searching online for various water level float switches, I purchased floats that could stand the voltage up to 110V and had 10W switch power which was more than enough for a buzzer and LED alarm light.
I paid US$1.45 a piece including free delivery.
The floats are designed to be used in various liquids, among them saltwater aquariums so my guess was they’d be OK for marine applications.

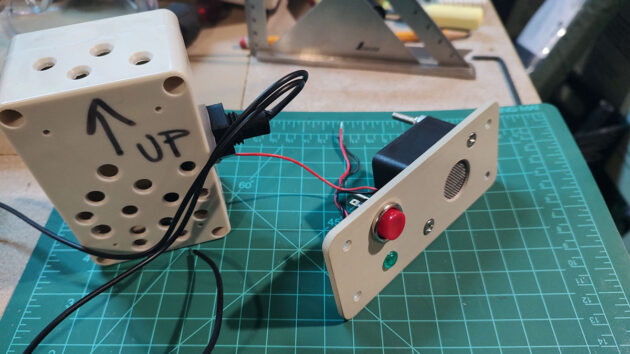
Assembled control panel. Green LED will be replaced with a red one. Credit: Zoran Gloznic
For the float enclosure, I bought plastic boxes for electronic projects.
They came with watertight seals – not necessary for this application – and the cost was about the same for each box as for the floats.
When everything arrived I was happy to find the float wires were well sealed and tinned as specified.
I kept the floats submerged for about a week and could not see any damage – not a very sophisticated test, but it did show that they can live submerged for some time.
In real life, they should never be submerged except if the level of water in the bilges goes up due to bilge pump failure or some more serious problem!
The float is well made, the moving part moves easily and the wires are long enough to keep the connection to the boat wiring high enough so they should never be submerged.

Reverse side of the control panel. Credit: Zoran Gloznic
With the boxes, I was happy to see the encased nuts were made from non-ferrous metal that looked like brass – not exactly a good choice for use in a marine environment – but if, or rather when, they fail it’ll be easy to drill the box through and install longer screws with nuts to keep the cover on.
In my inventory of various electronic components, I located a small, plastic 12V buzzer, a push-button with non-ferrous body and a small 12V LED indicator light.
I used all of this to make a simple control panel for the alarm switch.
The buzzer was mounted behind a round hole covered with very fine stainless steel wire mesh.
I’m planning to replace the green LED with a red one – red seems a more appropriate colour for an alarm light.

How the float is installed inside its protective box. Credit: Zoran Gloznic
When the push-button is pressed it will bypass the float and connect the buzzer and the alarm light directly to the boat’s 12V power source – so the buzzer and the light can be tested from time to time.
As for testing the float itself, the only way to do it is to remove the cover from the float housing and manually lift the moving float part.
After making the control panel, I drilled a series of holes on the sides of the box and also a hole to mount the float.
It’s important to have the box large enough so the float’s moving part can move easily up and down inside it.
And voila! I now have a float switch with a simple control panel, all made in less than two hours with a total cost of about £6.
Time will tell how long it will last, but I’m planning to make one or two more and keep them on the boat as spares.

Installing a Wavestream 1 bilge filter
Dirty, oily bilge water from your boat’s hull can be filtered to protect marine life. We talk to sailors who…

Bilge pump troubleshooting: getting the float activation switch to work
Zoran Glozinic does a bit of bilge pump troubleshooting to try and work out why the float-activated switch on his…

Best bilge pumps: electric pumps, emergency pumps and alarms
Rupert Holmes explains how electric bilge pumps work and why performance doesn't always meet expectations

Best bilge cleaners: how to clean an oily, smelly bilge
Ben Meakins gets down and dirty in the pursuance of the most effective way to clean oily, malodorous bilges
Want to read more practical articles like How to make a DIY bilge alarm switch?

A subscription to Practical Boat Owner magazine costs around 40% less than the cover price.
Print and digital editions are available through Magazines Direct – where you can also find the latest deals.
PBO is packed with information to help you get the most from boat ownership – whether sail or power.
-
-
-
- Take your DIY skills to the next level with trusted advice on boat maintenance and repairs
- Impartial in-depth gear reviews
- Practical cruising tips for making the most of your time afloat
-
-
Follow us on Facebook, Instagram, TikTok and Twitter