
Brian Johnson converts his interior boat lamps to dual intensity LEDs
DIY installation of LED boat lights
Ever been annoyed that your interior reading lights are too bright or too dim? writes Brian Johnson
If so, join the club!
I’ve tried many different bulbs but nothing seems to be the right intensity for doing different things either in harbour or when on passage.
While converting the lights to LED bulbs on our Westerly Centaur it occurred to me that it might be possible to get bulbs that have two light levels built into the circuitry.

Dual brightness BA15D LED bulb. Credit: Brian Johnson
The standard bulbs are BA15D – 15mm diameter bases with two terminals that normally power one filament, one terminal for positive, the other negative.
To my surprise, I found some LED bulbs on ebay (onsolar.co.uk) that had a BA15D base but cleverly had a dim array of LEDs wired through one terminal and a bright array through the other, with the negative being the metal shell of the base.
Not only that, but the bulbs were warm white not the ghastly blue LEDs that harshly illuminate many saloons!
They were offered at the bargain price of two for just over a fiver delivered, so I took a chance and ordered them.

New negative wire soldered to the inner brass shell in the socket. You can just see it to the right of the terminals. The wire comes into the socket via a 3mm hole drilled through the base. Credit: Brian Johnson
When they arrived I was impressed by both the quality and colour, which was almost the same as a tungsten filament bulb.
So far so good, but how to fit them to the lamp base?
My boat still has the 1970s lamps that I really like (they were fitted to almost all 1970s/80s Westerlys), but the sockets, although having a brass outer shell within the plastic base, had no obvious way of attaching a wire to that brass shell.
After a bit of head-scratching I decided that I’d run a wire through the socket base by drilling a 3mm hole from the lamp end to the screw terminal end inside the lamp fitting.
I unscrewed the socket, carefully drilled the hole, threaded a wire through, and soldered just the very tip of it to the base of the brass shell, so that the soldered joint cleared the bulb base.
Continues below…

How to soften LED interior bulbs using a 25p ping-pong ball
We have a 25-year-old Westerly Konsort called Flycatcher, and last year I replaced the conventional 5W bulbs in the six…

Warning not to use LED bulbs in filament bulb navigation lights
Replacing filament bulbs with white LEDs in tricolour navigational lights could result in vessels not being insured, the Cruising Association…

Are my new lights legal?
Practical Boat Owner's experts answer a reader's question about LED navigation lights

Cheap but effective anchor light
John Macdonald makes a low-wattage anchor light from odds and ends – plus an outlay of 99p
That gave me a negative return from the bulb outer shell.
Next job was to buy a couple of on-off-on latching switches from the excellent ebay automotive supplier H. Bowers (bowerspartsonline.co.uk).
These are great quality but slightly larger than the original on-off switches, so I had to file the mounting holes oval to move the switch down a couple of millimetres, but they went in with no additional drama.
The wiring is quite straightforward, with the new negative wire going to the boat loom negative (black) terminal, the common positive feed (red) from the loom going to the centre switch terminal, and the bulb terminals going to each of the outer switch terminals.
It doesn’t matter which of these goes on which terminal as you can just put the bulb in whichever way suits you.
I chose to arrange things so that ‘up’ was dim and ‘down’ was bright.

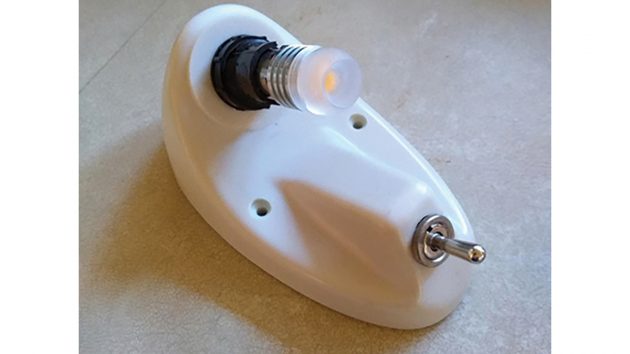
The green negative wire emerges from the hole drilled in the socket. Two red wires on the socket terminals go to the outer switch terminals, the third runs from the loom terminal (marked +) to the centre terminal on the switch. Credit: Brian Johnson
The centre switch position is ‘off’. Test that everything works by connecting a 9V battery to the terminal posts.
I think this modification could be done to almost any lamp that has a switch on the lamp itself.
Even if the bulb holder is not BA15D it should be possible to fit a metal bodied BA15D holder and solder the negative wire to the shell.
On-off-on switches come in various formats, including miniatures and rocker switches.
The total cost of this conversion was just over £5 per lamp. Doing this has really made a difference to the boat at night.
The dim light is perfect for retaining night vision on passage and the bright light is great for reading, eating and washing-up!
Enjoyed reading DIY installation of LED boat lights?
A subscription to Practical Boat Owner magazine costs around 40% less than the cover price.
Print and digital editions are available through Magazines Direct – where you can also find the latest deals.
PBO is packed with information to help you get the most from boat ownership – whether sail or power.
-
-
-
- Take your DIY skills to the next level with trusted advice on boat maintenance and repairs
- Impartial in-depth gear reviews
- Practical cruising tips for making the most of your time afloat
-
-