
Liveaboards Dave and Hazel McCabe spent five years converting a wooden trawler into a motor-sailer.

When my partner, Dave, has a mad idea, he normally finds a way to make it happen. “I’d like to sail across the Atlantic,” he declared one day. “Uh-oh!” I thought.
We were already liveaboards – we had a motor-cruiser that was suitable for winter jaunts down the French Canals and earned us a living as a passenger ferry across the River Exe. But it was hardly suitable for an ocean crossing.
We needed something bigger, sturdier and, most importantly, with sails.

Katie McCabe and Murdoch McGregor complete circumnavigations at opposite ends of Britain
Katie McCabe – youngest sailor ever to circumnavigate Great Britain single-handed and Murdoch McGregor – an octogenarian undertaking a similar feat, completed…

Katie McCabe: “How I restored a wooden yacht at the age of 13”
My name is Katie, but I prefer to be called Sade (pronounced Sayd). I am 13 years old and over…
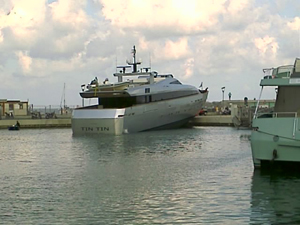
Ouch! Superyacht goes crash
How not to berth a massive motor-cruiser...
I had no experience with boat renovations but Dave had rebuilt several wooden boats, including Sea Dream, the 40ft ferry boat that we now lived and worked on.
We decided to look for an old fishing boat to convert to a motor-sailer. There was a lovely old Scottish trawler in our home port of Topsham but he wanted more money for it than we could afford.
Newlyn was supposed to be full of decommissioned fishing boats so we set off in our little silver Metro to investigate. We drove miles around Cornish country lanes but there was nothing in Newlyn and no new leads. After a seemingly fruitless search, we stopped in a café to regroup.
On the table was a FreeAds magazine and, flicking through, Dave spotted an advert for a 50ft decommissioned fishing boat sitting in Polruan. After a quick phone call we found ourselves on the last ferry of the day, with just time for a quick look on board.
Heads hunched under the deck, we looked around the dark, damp boat. All the running gear had been taken off to go on the owner’s newly built steel fishing boat. There was nothing inside but peeling paint and it certainly didn’t have the headroom Dave had said was essential. But as the ferry pulled away, he gazed back at the boat. “She’s got lovely lines,” he murmured, and I knew the decision was already made!
We put an offer to the seller. He didn’t accept it immediately, but after two weeks with no other interested parties, he took it. Within a day, we’d borrowed a friend’s powerful Lochin motor boat, and were towing our new purchase back to the Exe.
ROS AILITHER SPECIFICATIONS
Built 1954 in Mooneys Yard, Killybegs
Construction larch on oak
Length: 50ft 0in / 15.24m
Beam: 15ft 0in / 4.57m
Draught: 6ft 6in / 1.97m
Weight: 38 tonnes
Engine: Gardner 6LXB, 180hp
Rig: Gaff ketch
Sail area: approx. 1,200sq ft / 111.5sq m

Now the fun began – where to start?
The boat came with huge legs so we bolted them on and put her aground in Hannaford’s Quay, a traditional spot for boat repairs. While Dave started removing all the big steel hatches and metalwork on deck, he set me up with a bottle of gas and a triangular scraper – burning all the paint off the hull. It seemed an impossible task with such a tiny implement, but bit by bit, we got the whole hull down to bare wood, inside and out.
Compared to Sea Dream, the timbers on this boat were massive. The frames were 3in thick, every 15in along the hull. The beam shelf alone was 8in deep. Some of the inside faces of the frames were going a bit ‘fluffy’ but when we sanded them back a little, the wood underneath was surprisingly solid. We doubled up 5 or 6 frames that were looking a bit questionable, but all in all, it seemed like we had ourselves a fairly solid boat!
We liberally dosed everything with a good quality wood treatment then coated the outside with aluminium primer and painted the bottom with antifoul. On went a coat of undercoat then a light blue topcoat. Suddenly, she looked like a real ship again.
We were fitting in the scraping and painting around running our ferry – which ran daily at lunchtimes and evening trips three or four times a week. We could squeeze in an hour or two of work in the mornings and three or more hours in the afternoons. Of course, the tides changed constantly so sometimes we had to row to the boat in a dinghy, other times we had to walk out in wellies through the mud. There were times when I found myself perched up a ladder, only to look down and find the water lapping around the bottom of the ladder!

Safer berth
It wasn’t safe to leave the boat aground on legs forever – it can get extremely rough in Topsham in winter storms – so we needed to organise a mooring for the boat. We tried a drying mooring first but the boat rolled over at an alarming angle – possibly endangering the boat itself and definitely not good for working on. Thankfully, with a little persuasion on Dave’s part, we were given permission for a fore-and-aft mooring off Turf Locks, in the only spot deep enough for her to float at all tides.
Our next job was the engine. Dave had already decided he wanted a Gardner diesel – old-fashioned but reliable workhorses that can go on for years. We heard of a pair that had come out of a pleasure boat in Torbay. One had a broken crank so the owner had simply taken them both out and bought two brand new engines. We got the pair for a fair price, and Dave soon had the good engine turning over. The broken one still had plenty of good bits to keep for spares.
Dave cleaned up the good one, degreased it and sprayed it red. We had it running briefly at the local boatyard, before they craned it into the old engine bay (near the bows of the boat) and it sat there, wrapped up in plastic, until further notice.

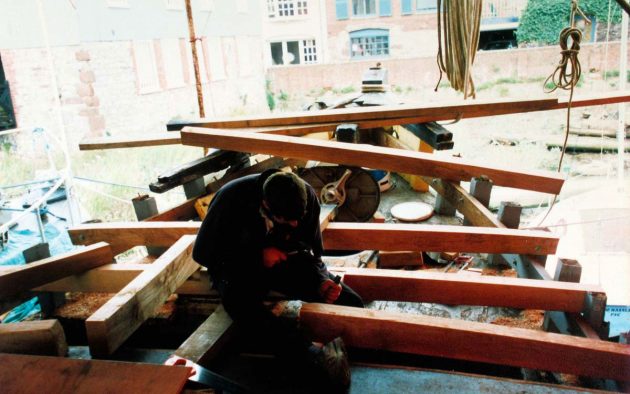
Back on the mooring, we started to rip off the top planks which cladded the bulwarks. Dave decided to raise the decks 18in up to the top of the existing gunwale to give us full head height across the whole boat, and eliminate a common point of rot on boats like this – where the frames go through the decks.
We spent several hot days bent over the gunwales, levering the old planks off with a variety of huge crowbars. Once off, we could put the new beam shelf in place, made from 5in x 2in lengths of oak. With no planks on the outside, we were able to use the frames to clamp to, and let the oak bend round slowly over several days. This is where green oak was a bonus, as it’s more supple and less likely to crack. The stern of the boat was the trickiest, with a surprising bend around its canoe stern.
By this point, we’d done as much as we could on the mooring in the middle of the river, and needed to come alongside to get all the hefty materials on and off. We towed Ros Ailither back up to Topsham Quay, and tied her alongside next to the Lighter Inn. We built a scaffold structure around the boat and lashed on a makeshift tent from old lorry tarps so we could work through the winter months.
The next job was to take off the old deck planking and put in new deck beams. We did this little by little so the boat would keep her shape. Dave prised up sections of the old Douglas Fir deck and left the old deck beams underneath. We cut new beams from 3in oak, placed them on the brand new beam shelf and bolted through the frames. Only then did Dave take out the old beams from underneath.
I’d carefully measured all of the boat’s vital statistics and drawn her to scale. It was fun to draw out all the possibilities for the layout inside.
It all depended where the engine went. Originally, it sat near the bows, with a 25ft long prop shaft, but that took up a lot of room and split the living accommodation, not to mention the cost of a new shaft that size. So putting the engine at the stern would maximise the living space.
Engine enigma
Dave wasn’t yet sure how to mount the running gear and was looking into the possibility of using a hydraulic drive or electric motor. One thing he knew was that he wanted to be able to take the engine out if necessary, having seen a friend have to literally chop a hole in the deck to get a broken engine out. So we designed a big opening in the centre of the boat, slightly smaller than the old fish hold cover. The central part of the engine room bulkhead and the staircase were also made removable in case we needed to get the engine out.
Slowly but surely, one beam at a time, we got all the old deck up and bolted in new deck beams at the top of the bulwarks. We covered the beams with 12mm Robbins elite marine plywood – guaranteed for 15 years. On top of the plywood, we laid 1in planks of iroko, bedded down with bitumen paint. We routered the edges of the planks with a V-shape for caulking and filled the screw holes with wooden plugs, all turned to match the grain. It really was a labour of love, but it looked beautiful.
After the winter, we towed the boat back to her summer mooring and work continued afloat. The difference with the headroom below was incredible. The space looked vast, we couldn’t ever imagine filling it all!
We started with the bulkheads, separating off a big double cabin for ourselves at the bows. Behind our cabin, we made a bathroom on the port side and a spare cabin on the starboard side, with two bunks although it was put into use as a temporary tool store.
We didn’t want to build with cheap pine and end up redoing it all in a couple of years’ time when it had started to rot, so the bulkheads were made with solid 3in x 3in oak uprights and ¾in plywood let in. We channelled all the wires so they’d be hidden but accessible, and we labelled each wire.
One of the first things to go in was a bath. This may sound like the ultimate luxury on a boat but a bathtub is also practical – it makes a perfect shower tray, is ideal for soaking and washing clothes, or for warming up anybody with hypothermia!
Bath water
Then we needed big enough water tanks to fill the bath. We got two stainless steel water tanks made (600lt each) to fit in the bows. Each tank was fully baffled to minimise sloshing at sea, had its own inspection hatch, filler, breather and feed pipe with gate valve. This meant that in case of a problem we could isolate one tank and just use the other. After bolting them in place, we covered them both in expanding foam and built an oak framework for a bed on top.

At the same time as the water tanks, we also had a black water tank made, and plumbed this in with a new Lavac toilet. For hot water, we put a 9.2kW Webasto diesel heater in the engine room, which heated several radiators and a large hot water cylinder in the spare cabin. A big 24V Jabsco water pump under the floor ran the whole system.
Throughout this time, we were slowly putting in the top three planks of the hull, where the bulwarks used to be. We bought seasoned larch for this job. It didn’t seem feasible to steam-bend them on a floating mooring so we tried to bend them round dry. We fitted one end and nailed it in, then over a week or two, slowly brought the other end of the plank in with clamps and tourniquets, nailing as we went.
With winter coming again, we needed to seal the three gaping holes in the deck. The companionway would ultimately be inside a wheelhouse so we made a temporary water-stop around the edge and made a hinged plywood ‘door’. For the two hatches, we bought wide boards of iroko and made chunky dovetail-jointed hatches, rebated into the holes. It took a lot of fine-chiselling to get all four joints to marry up perfectly, but it looked very professional when it was done.
At this point, we felt we were slowly getting there. We had a watertight deck. We had a bedroom and a bathroom, heating and hot running water. We hung a rug at the entrance to the ‘hallway’ to separate the clean cabins forward from the workspace and sawdust in the back of the boat. When the curtain was tied back, we could sit in bed and survey our whole ship. It was a grand feeling!
We celebrated with a little Christmas party on board. We stocked up on beers and put up a small tree. We bought some mince pies and invited a few friends round. With some tinsel wrapped around the deck beams and a table of nibbles on a work-mate, the boat looked quite festive.
Around this time, we got a phone call from a friend to inform us that chandler Sowester Simpson-Lawrence was about to go bust. They were selling off as much as they could at a huge discount so Dave raced up with his chequebook. He came back with a 24V fridge and an electric anchor winch. I’d made a request for a cooker with at least three rings after living aboard with two rings for years. He went one better and came back with two 2-ring cookers!
So the galley was designed around these twin cookers. Dave fabricated a stainless steel casing to house the gimballing cookers. The hard bit was trying to strike a level line along the length of the boat. She was sitting bows up on the mud, and even when floating, probably wasn’t at quite the same level as she would be when fully rigged.
Either side of the cookers, we built a framework for a U-shaped galley. The worktops themselves were made of 2in solid oak. These have subsequently shrunk a little as they have dried out but this all adds to the character!
Jobs large and small
It was my job to make the cupboards and drawers underneath. I thrived making these fiddly, detailed bits, while Dave revelled in putting in the ‘big stuff’. I made a cupboard above the sink with carved rope-effect supports while Dave made a chunky oak staircase to replace the ladder down the hatch. I made a mug and wine-glass holder while Dave made a double thickness, insulated bulkhead to separate off the engine room at the stern.

During the summer we turned our attention to the wheelhouse. We wanted it to be wide enough so the back bunk could be used as a bed to sleep on at sea. We wanted a decent chart table on one side and a large dash for instruments on the other, but we also didn’t want to just make a ‘square box’.
I drew out some designs on paper but wasn’t sure how they’d translate in practice. We bolted down the base shape onto the deck then held up lengths of oak at various angles to see what it looked like from a distance in the dinghy. Once we were happy, we erected the bare oak framework. We cut oak beams for the roof, and covered them with plywood, coated with epoxy and paint. We clad the lower sides of the wheelhouse with plywood and offcuts from the iroko deck, made doors either side, and wooden-framed 10mm toughened windows.
The next job was to give the boat propulsion. In the end, Dave decided to install a V-drive, which meant the engine could sit right out of the way, above the prop shaft. He sourced a V-box from BPM in Italy, and had an intermediary shaft made to join up with the small section left on board, this was a whopping 3.25in thickness. He got an old four-bladed propeller from C&O Marine, which they cut down to size, and had it re-pitched to suit the engine, gearbox and V-drive. It was still an immense 48in diameter.
The old steel fuel tanks were craned out and four new stainless steel tanks made to fit either side of the engine, with a total capacity of 2,200gal. Again, each tank had a big inspection panel on top, sight gauge on the front, and a drain on the bottom to siphon off water and sludge. Dave had encountered many boats that had got in trouble from ‘diesel bug’ bacterial growth in their fuel tanks, so the drains were a must-have.
Once the tanks were installed, Dave manoeuvred the engine to its final position in the stern. He installed bearers to mount the V-box on, and lined it up with the new intermediary prop shaft. Having bolted a heavy-gauge square stainless steel beam to the engine room deck beams, he was able to winch the engine up in the air. Once he was happy that the engine was lined up with the V-box, he welded new steels in position under the engine and bolted the engine down to these new beds.
Steering system
We still had no proper steering system, so to move the boat we had to use our emergency tiller. This slotted over the top of the rudder post through a removable deck fitting. I still remember the look of joy on Dave’s face when we finally got the old boat moving under her own steam.
We headed triumphantly up the river to Topsham and beyond, turning around just past the M5 motorway bridge. The tiller bar worked well (with the Morse control lever lashed to it), but only with very minimal power. If you put on any more power the rudder was pushed straight, and you had to use extreme caution when going astern!
We were given a brass steering wheel by a friend. Dave managed to get a second-hand hydraulic steering pump and bought a new hydraulic ram to match it. The ram was the same size as the original so most of the fixings were still there, even though the original steering had been taken off. This proved to be a much easier way of controlling the boat than the tiller!
Things were taking shape below. Opposite the galley, we made an L-shaped seating area. We got new foam cut to shape, and my mum made us cushion covers. A solid oak table-top was mounted on two stainless steel poles that we could lower to make an extra double berth if needed. Our ‘workshop’ was turning into a homely space to relax.

Next, the mast and spars. We’d originally planned to put the mainmast in a tabernacle on deck. However, everyone we talked to said that the best and strongest solution was a keel-mounted mast, and we slowly came around to that thinking. We cut a hole in our lovely new deck and made shaped oak pieces for a deck collar. We strengthened underneath the deck with a huge piece of oak tied to the beams with box section stainless steel, and made a wooden ‘socket’ to receive the mast.
We sourced some lovely straight Douglas Fir in our local woodlands but had to search further afield for a bigger tree for the main mast – it needed to be a foot wide for the first 40ft all the way up to the hounds. We were put in touch with a landowner in Cheriton Bishop, who had some slow-growing woods of spruce and we found the perfect tree in the centre of his forest.
These tree trunks were delivered by lorry. We rolled them into the river at Topsham and towed them behind the ferry across to the Turf where we hauled them onto the pierhead at high tide, put ropes around one end of each trunk, and literally dragged them up the garden to a quiet spot to do the work.
Round tree, square mast
We began with the smaller, easier spars. Bizarrely, the best way to make a round spar from a round tree is to make it square first. We literally chain-sawed the four edges off square. The rough saw marks are planed off and the taper at the top of the mast above the hounds is marked in and cut on all sides.
You then cut off the four corners, then the eight corners, and finally the last sixteen edges. At this point, you have a fairly round spar, but it still takes another hour or two of sanding – first with a belt sander (carefully) and then by hand to get it lovely and smooth. Finally the finished spar is treated with several applications of a potent mixture of paraffin and boiled linseed oil. Then repeat!
It was a different proposition to cut the biggest tree with a chainsaw – when following the line on top, any difference in the angle of the chainsaw blade could mean several inches difference at the bottom of the cut. Dave could only see the top line so my job was to point one way or the other if the saw blade was moving out of line on the bottom. I clearly remember the bitter east wind as Dave cut down the length of the tree four times. It literally took all day to chop the ‘square’, leaving us with a mountain of sawdust!
Once made, we had to get all the new spars across the river to the crane. Back down the garden they were carried one by one, all except the main mast, which was still too heavy for just a couple of people.
Then one evening, as we waited for our ferry passengers from the evening trip to Turf, I saw Dave’s eyes light up. We had a big group of people here and I knew exactly what he was thinking! Before I could talk them out of it, a group of Morris dancers (average age 60+) merrily picked up the mast between them, carried it down the garden and set it down gently on trestles on the pierhead.
To top it all off, one of them even climbed up and danced a little jig on the top of the mast.

Mast fittings
There was a surprising amount of metalwork to make before getting the masts up – different sized mast bands with two or four eyes, boom ends, gaff jaws and saddle, not to mention the chain plates, bowsprit fittings and mizzen tabernacle on the boat itself. These all had to be fabricated, galvanised and attached in position before hoisting the masts.
Finally, the masts got craned into position, the main fitting snugly through the hole in the deck and the mizzen into its tabernacle. We used temporary rope rigging to hold them in place, until Dave could make proper galvanised rigging.
I’d originally planned to make the sails myself, but Dave got chatting to a sailmaker friend who had a spare mainsail that just might fit. It was a bit on the small side but actually didn’t look too out of place when we tried it for size. He agreed to let us have it cheap and also made us matching mizzen and foresails. Never having sailed a gaff boat before, these all took a bit of getting used to and we had a few fun trips learning to sail locally.
With a pair of carved teak signboards on the bows and her beautiful set of red sails, Ros Ailither was now looking like a proper ocean-going vessel. We had a shakedown trip across the Channel and started preparing for a longer voyage, equipping the boat with all the necessary safety equipment, charts and nav gear.


In May 2005, after five years of hard work, we sold our ferry business and finally set off on our dream trip across the Atlantic.
What happened next?
Dave and I successfully crossed the Atlantic in Ros Ailither. We set off from La Gomera just after Christmas and made landfall in Barbados 24 days later, sailing all the way under square sail (made on the beach in the Canaries).
We cruised the Caribbean down to Trinidad (for the Carnival) and up to Antigua, where we took part in the Classics Week, winning the Spirit of Regatta Cup in 2006.
We then headed north to Bermuda and up the east coast of the US and into Canada, passing through the Reversing Falls on the St John River.
We spent another winter season in the Caribbean, and a summer in Maine, before heading back to England with our new 16-month-old crew member, Katie, in 2008.

How Katie McCabe (above) restored her own wooden yacht aged 13
Why not subscribe today?
This feature appeared in the June 2021 edition of Practical Boat Owner. For more articles like this, including DIY, money-saving advice, great boat projects, expert tips and ways to improve your boat’s performance, take out a magazine subscription to Britain’s best-selling boating magazine.
Subscribe, or make a gift for someone else, and you’ll always save at least 30% compared to newsstand prices.
See the latest PBO subscription deals on magazinesdirect.com