
Engineer Chris Mardon demystifies onboard electrics and explains how you can troubleshoot electrical systems
Having grown up and been educated in an engineering environment, it surprised me how many boat owners have very little knowledge of electricity and the electrical circuits on their boats. Much of the confusion about electricity stems from the fact that it can’t be seen, and I address this later, but let’s start with the basics of boat electrics.
Boat electrics: the basics
Volts (V)
As water needs pressure to move it along a pipe, so electricity needs an electromotive force or pressure to move it along a wire and through electrical and electronic equipment. Volts are the units we use to define the amount of electrical pressure that forces electrical current around an electrically active circuit.
Take a look at the sketch, below. On the left is a simple electrical circuit with a battery powering a light bulb. When the light switch is turned on, the battery’s voltage (pressure) across its terminals causes an electric current to flow and the bulb lights up. In the right-hand sketch is a piped water circuit with a pump and a turbine. When the valve is opened and the pump turned on, it generates water pressure across its inlet and outlet causing the water to flow round the circuit and drive the turbine.
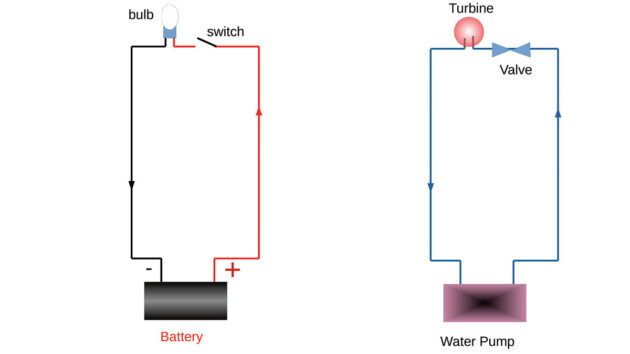
A simple electrical circuit with a battery powering a light bulb (left) and its similarity in principal to a piped water circuit with a pump and turbine (right)
So in this context, a battery is akin to a pump, a switch is akin to a valve and a bulb or electrical load is akin to any load that is driven by water pressure. If the pump pressure were increased, the water flow would increase and the turbine would generate more power.
Similarly, if the electrical pressure (voltage) were increased the flow of current and electrical energy would increase making the light burn brighter, provided the voltage did not exceed the limitation of the light bulb.
Amps (A)
We measure the current flow of electricity in amps (an abbreviation of amperes), the units that quantify the rate of electron flow in any material, but most commonly within electrical and electronic equipment and circuits. This is akin to the flow of water around the pipe circuit already seen.
Ohms (Ω)
We measure electrical resistance in ohms. The Greek letter omega (Ω) is very commonly used in electrical parlance to denote ohms. Conductors (wires etc) and all common electrical equipment put up a certain resistance to the flow of current.
The wires and light bulb in the sketch would all have an inherent resistance to current flow, the bulb having the highest resistance of all the components (wires, switch etc) in this circuit.
If we were to exchange the bulb for one of lower brightness, it would have to have a higher resistance, thus reducing the current flow. Similarly, in the pipe sketch above, if we were to exchange the turbine for one of less power it would have to have a higher resistance, thus reducing the water flow.
Volts, amps and ohms are related
There is a close relationship between volts, amps and ohms, which is shown by this simple equation, known as Ohm’s Law: Volts = Amps x Ohms
This formula can also be changed using simple algebra which can help with understanding boat electrics.
For example, suppose we have a 12V battery in a circuit with a total resistance of 2Ω. If we turned V = A x Ω to A = V ÷ Ω, we could work out the amps (12 ÷ 2 = 6A)
This is significant because if you were installing a 12V battery in a circuit with a total resistance of 2Ω, you’d not want to use 5A rated wire to carry 6A as there is a chance the wire will become hot and maybe catch fire. If you installed a fuse in the circuit to protect the components from excess current, a 5A fuse would probably fail.
You can use the Ohm’s Law equation to find either volts or amps or ohms, provided you know the other two variables.
For example, suppose a 3A current was flowing through a device, like a GPS or autopilot and the voltage supplied to it is 12.5V. We can now determine its resistance using Ohm’s Law. 12.5V = 3A x Ω or Ω = 12.5V ÷ 3A = 4.17Ω resistance
So what’s a watt (W)?
A watt is a unit of energy flow or power. It is usually used as a measure of electrical power in the same way that mechanical power is often expressed in horsepower (hp).
In fact, 736W is approximately equal to one horsepower. So if your car had a 100hp engine it would be equally correct to say it had a 73,600W engine (or 73.6kW).
Electrical equipment on your boat or at home should have a label showing the rated voltage (12V or 240V) and also its rated current in amps (A) and/or its power consumption in watts (W). In the USA, mains electrical appliances at home are marked 110V on their labels.
There is also a direct relationship between watts, volts and amps expressed by this simple formula: Watts = Volts x Amps
For example, if you had an electrical circuit drawing 5A from a 12V battery, we can easily determine the rate of energy flowing from the battery in watts. W = 12V x 5A = 60W
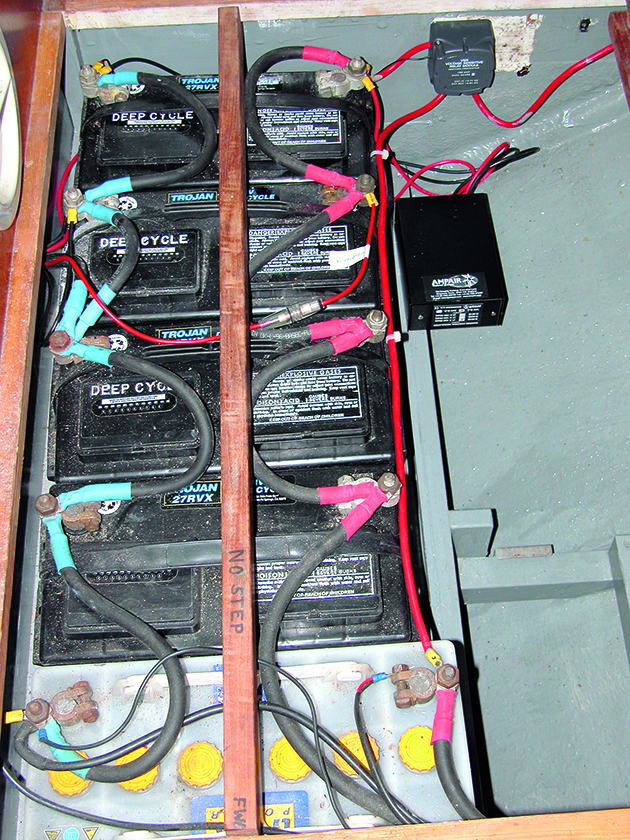
The capacity of lead acid or lithium-ion boat batteries is marked in amp hours (Ah) and/or watt hours (Wh). This shows the number of amps or watts that the battery can discharge in a given number of hours.
For example, if a battery had a total capacity of 240Wh draining at 60W, it would be empty (flat) in 4 hours (4 = 240 ÷ 60).

The capacity of lead-acid and lithium-ion batteries is marked in amp hours or watt hours, as can be seen on this lithium battery. It is important to know this data when working on boat electrics. Credit: Christopher Smith
Real life is a little more complicated because a charged battery’s voltage begins higher than 12V and will gradually reduce as it discharges, eventually dropping to zero volts when it is completely depleted of energy.
Confusingly, a lead-acid battery is considered to be flat when it has discharged only half of its rated capacity (in Wh or Ah), whereas a lithium-ion battery is not considered flat until it has discharged about 90% of its rated capacity.
This is important to know when exchanging lead-acid for lithium batteries; an allowance for the differences in Ah capacities for each type of battery is essential.
Once a lead acid battery has discharged half of its rated capacity, it is considered flat. Credit: Barney Green
Batteries in boats are nominally rated at 12V, so we can easily convert amp hours (Ah) into watt hours (Wh) and vice versa from the equation W = V x A
For example, take a 12V battery with a capacity of 110Ah, equivalent to discharging it at 11A for 10 hours (or any other multipliers which make 110Ah).
From: W = V x A W = 12V x 11A = 132W
If this 132 watts flowed for 10 hours, its capacity would be 1,320Wh (132W x 10 hours).
So multiply a 12V battery’s amp hours capacity by 12 and you’ll get its capacity in watt hours, or you can divide a 12V battery’s watt hours for its amp hours rating.
Take another look at the example above: W = 12V x 11A = 132W.
It follows that if we double the voltage to 24V and halve the current to 5.5A we get the same finding:
24Volts x 5.5A = 132W.
The current carrying capacity of wire depends on its cross-sectional area, so the thicker the wire, the more current it can carry and vice versa. By doubling the voltage (12V x 2 = 24V) and halving the current (11Amps ÷ 2 = 5.5Amps) we can transfer the same power (132W) along a wire of half the cross-sectional area.
This is why larger vessels with heavier electrical power requirements tend to have 24V or 48V electrical systems; it keeps the size, weight and cost of its wiring down. Obviously, the equipment connected to a 24V system would have to be rated for 24V, but the cost uplift for that is usually insignificant.
So what are AC and DC?
AC stands for alternating current, although it could more accurately be called alternating voltage as the voltage alternates irrespective of whether current is flowing or not. What we call ‘mains’ or ‘shorepower’ electricity is AC.
In most parts of the world, the voltage swings from 0V to 240V 50 times every second. In the USA, it’s 110V at 60 times every second. AC is the best way to generate and distribute large amounts of electrical energy over significant distances.
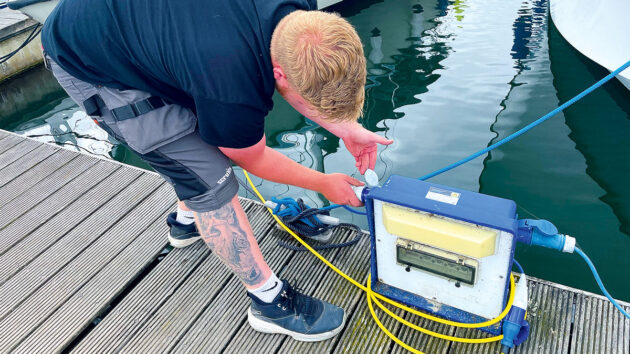
Basic boat electrics: Shore power is AC; it is compatible with a wide range of devices. Credit: Ali Wood
DC stands for direct current and is what all batteries produce. Battery voltage does not change many times every second as with AC, but as the name implies, its current and voltage remain reasonably constant whilst the load it is supplying remains constant.
Boat electrics for beginners: Multimeters
At the beginning of this article, I highlighted that the confusion about electricity is because it is invisible. An answer to this invisibility is an instrument called a multimeter.
A multimeter can help you identify broken circuits, corroded and dirty connections, flat batteries, inoperative alternators, blown light bulbs, blown fuses and many other electrical problems. But it is useless on board unless a crew member knows how to use it.
Priced at under £40, multimeters are excellent value, but please avoid very cheap models which tend to be inaccurate, unreliable and incapable of measuring higher currents.
A typical digital multimeter which is used for diagnosing and troubleshooting boat electrics. Credit: Chris Mardon
The photo (above) shows a typical digital multimeter with a manual selector dial in the middle. Auto range multimeters are also now becoming common and are even easier to use.
The probes on the end of each of the black and red wires are normally sharp pins or crocodile clips.
Multimeters come in many different sizes and colours, but all perform the same basic functions: to measure volts, amps and ohms. The big dial in the centre selects the function you wish to measure. On your multimeter, you will also see three sockets which are for plugging in the red or black probe wires.
The multimeter selector dial
‘DCV’ measures DC voltages. The label indicating the function range on this model is DCV, but other models might have a V with a straight line above. The straight line indicates DC Volts, which this article will focus on. ‘ACV’ or V with a wavy line over it is for measuring AC voltages.
Mains AC voltages on the marina pontoon and at home are 240V, which can kill if you touch any live bare metal parts.
Switching to ACV on your multimeter will not harm you, but you should never put the multimeter’s probes near 240V mains electrical circuits without professional training.
‘Batt’ is for checking small (1.5V & 9V) dry cell batteries of the types you find in torches and portable radios. Common sizes are AAA, AA and PP3, and have their relevant voltages printed on them. Some multimeters do not have a BATT (or BAT) position.
The yellow multimeter shown here also has a 1.5V Button position. All the BATT (or BAT) selections will measure the battery’s voltage with a small load (resistance) in line, giving you a rough indication of its state of charge.
The Ω symbol, as we’ve already learned, is used to denote ohms of resistance.
‘DCA’ or A with a straight line above is for measuring current in DC amps. The extra socket on the black multimeter shown (above right) can measure up to 10A, but the cheaper yellow multimeter has a limit of 200 milliamps (mA), a fifth of an amp. A milliamp is 1/1000th of an amp which is a very small current for measuring some of the circuit loads on a boat.
Remember W = V x A? If you had an electrical item on your boat drawing 10A on a 12V circuit, the power drain would be 120W (12V x 10A = 120W). Look at the label stuck on the back of any electrical item and it will tell you the watts or the amps (or both) it draws when switched on.
The multimeter sockets
- The ‘COM’ socket is the common socket for the black probe.
- The ‘VΩA’ socket is for the red probe when measuring volts, ohms and low-value amps.
- The ‘10A’ socket is for measuring higher currents up to 10A. You plug the red probe into this if you want to measure higher currents.
Some hints on using probes
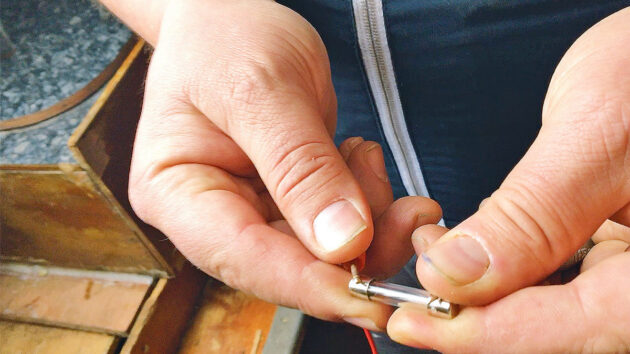
You can only read volts, ohms or amps accurately if you have a good connection between your probes and any bare metal. Before you start, clean bare metal to remove oxidation, corrosion and dirt.
Sharp probes make better connections and help to improve accuracy, whereas crocodile clips can be clipped onto metal parts of circuits, leaving hands free to probe elsewhere.
Aggressive scraping with a sharp metal tool or sandpaper should remove any corrosion or oxidation before connecting a multimeter probe.
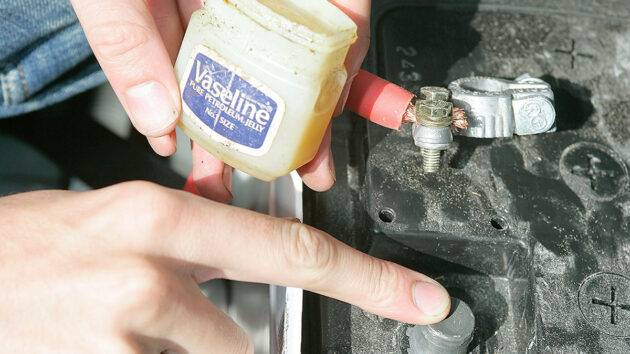
A thin layer of Vaseline will help protect connections from corrosion
Dry cell and lead-acid batteries are notorious for leaking corrosive chemicals over connected terminals, causing undesirable resistance.
After cleaning connections, a thin wipe of Vaseline will help to protect them from further corrosion.
Removing dry cell batteries from torches, clocks and other gear at the end of the season will protect them from irrecoverable leakage damage.
Dry cell batteries can be stored for potential reuse next season. You can use your multimeter to determine if batteries can be reinstalled or disposed of responsibly. I have found that 50% to 70% of my dry cell batteries can be reused.
Boat electrics for beginners: Testing the system
Dry cell battery test
Many people renew the batteries on their remote controls, torches, and clocks when they stop working because they think the batteries are flat; in fact, there may only be some minor oxidation on the contacts.
Keep your fingers off battery contacts, as sweat and grease will attract dirt and corrosion. Give both metal ends of each battery a vigorous wipe on a clean, dry shirt sleeve or jeans before inserting the batteries. If that doesn’t work, it’s time to get your multimeter out.
For checking dry cell batteries, it’s better to use a multimeter with the ‘BATT’ (or BAT) position. Turn the dial to the BATT position relevant to your battery’s voltage (1.5V or 9V), and its type (AAA, AA, PP3 etc) if available.
Hold the red probe on the + pip of the battery and the black probe on the – end.
Battery-powered devices all have varying sensitivities to low voltage, so there is no hard and fast rule as to when a battery is flat; 1.2Vmight be fine for an AA or AAA battery in one gadget and useless for another, so the following is only a general guide.
If the multimeter reads much below 1.4V it may be ready for the recycling bin or okay for a less sensitive gadget. If it reads higher than 1.4V it can continue to be used. If the device has more than one battery you must test each one. If they do not all have the same voltage in one bank, then the lower battery is almost certainly dead. You can use the others if they are all the same and 1.4V or over, but only singularly. It’s unwise to mix part-used batteries of different voltages in one device as it can promote leakage.
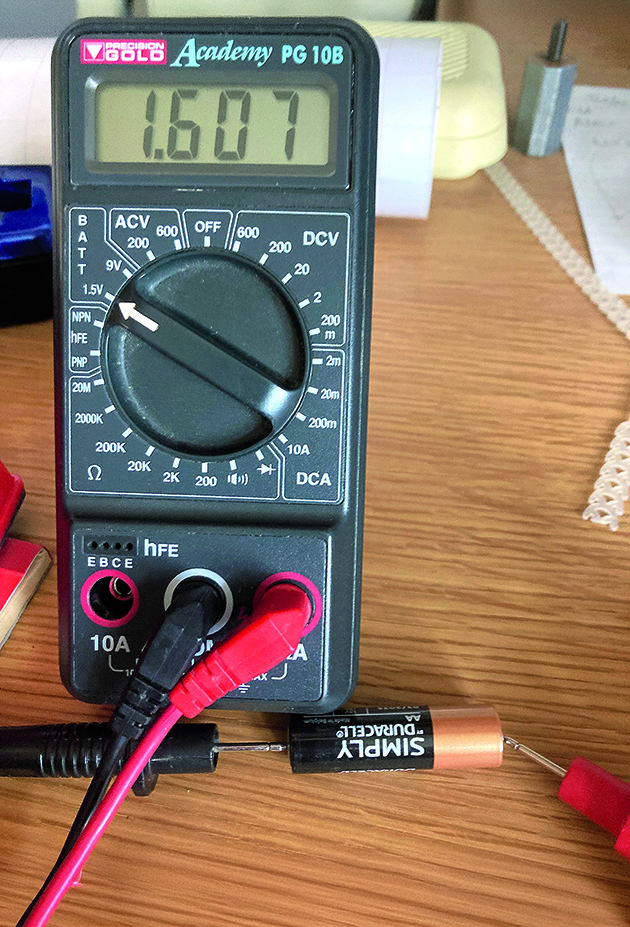
Basic boat electrics: Generally, a battery which reads higher than 1.4 volts is still good for use. Credit: Chris Mardon
The photo (above) shows an AA battery having its voltage checked. Note the red probe is on the positive end of the battery and the selector dial points to BATT 1.5V. At over 1.6V this battery is new and has plenty of life remaining. Connect the probes the wrong way round and see a minus (-) sign in front, but it will still show the correct voltage.
If a set of good batteries does not get the device working, your multimeter is an ideal tool for determining if the battery contacts are dirty or corroded. Open the battery case, remove the batteries and scrape any connectors that are not bright and clean with a knife. Still not working? Add together the voltages for the whole bank.
For instance, if it had four batteries of 1.5V each together they should produce about 6V (4 x 1.5 = 6) across the whole pack. Switch your multimeter to ‘DCV 20’, reinstall the batteries and poke the multimeter probes onto the two metal contacts at either end of the battery bank. If you are not seeing 6V or more on the screen, you still have a dirty contact and more cleaning is required; new batteries will not solve the problem. Remove the batteries and scrape the corroded/dirty contacts clean and then try again.
PP3 batteries will read over 9V when new and lower as they discharge. Their ability to power a device will depend on the device’s sensitivity to low voltages and the battery’s actual voltage. If they read less than 8V consider them scrap.
Many dry cell batteries and devices with dirty contacts can be saved with the simple tests described above.
Fuse and lightbulb tests
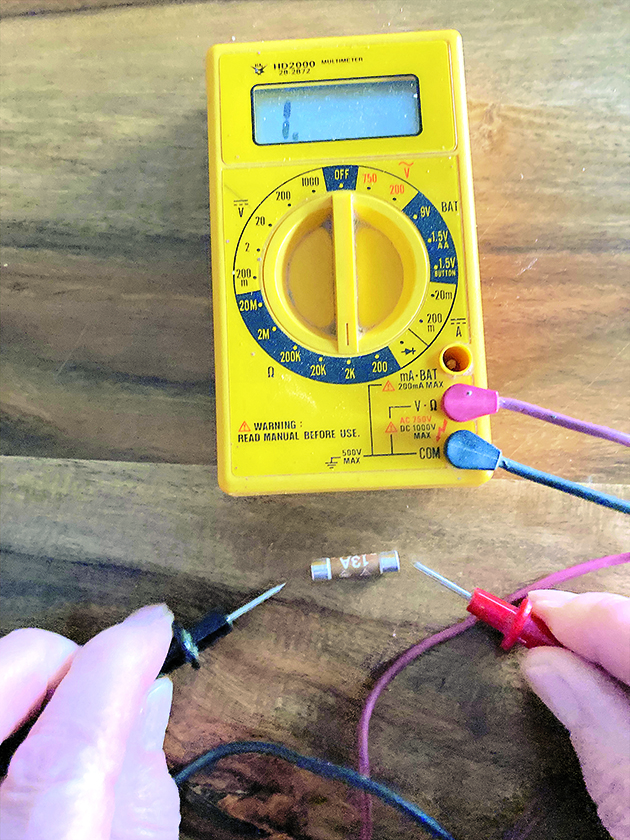
It is easy to find out whether a fuse or light bulb has blown by using a multimeter. If a device connected to the boat’s circuits will not work, the fuse may be the problem. To diagnose, remove the fuse and switch your multimeter selector to the Ω range at a reasonably high value (200k will do).
Basic boat electrics: Using a multimeter to check a fuse is actually working – sometimes, it’s difficult to tell just by looking. Credit: Ali Wood
Before connecting the probes, the screen will typically read 1 to indicate it’s working. Touch the two probes together; it should read 0.00 indicating there is zero ohms resistance between the probes. Now press a probe firmly to either end of the fuse. If it reads 0.00, the fuse is good; if it reads 1, the fuse is blown. If it reads a number higher than 1 it has a dirty end and should be cleaned. This test is suitable for all sizes of fuse, whether for DC or AC.
Providing that the fuse has been removed from its holder, it is absolutely safe to check an AC fuse with a multimeter.
The image (below shows a multimeter being used to test a fuse. Note the selector dial is in the Ω (Ohms) 200k range. The zero reading means the fuse is good and not blown.
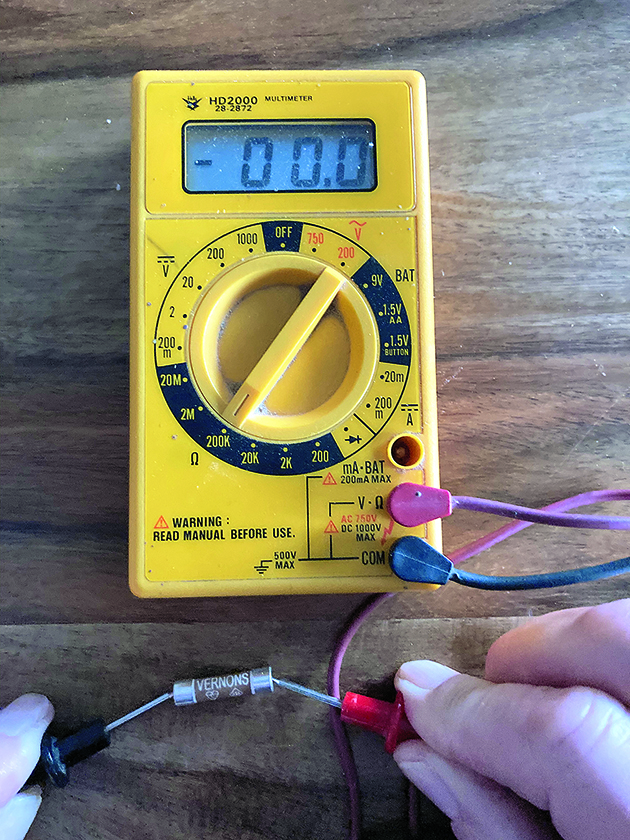
Basic boat electrics: When testing a fuse, a 0 reading indicates the fuse is good to use. Credit: Chris Mardon
You can also use this to test a light bulb (AC or DC), provided that it is the old-fashioned incandescent bulb with a hot wire filament. It won’t work on LED or fluorescent lights. Some multimeters have a helpful sounder position in the Ω range which makes a noise if the fuse, bulb or circuit is good.
Continuity test
Failures of electrical circuits are very common in the hostile environment of a boat. Most are caused by corrosion at the battery terminals or various joints within the circuit. Take care not to short anything metal across exposed metal parts of electrical circuits, and remove all jewellery before you start.
There are two methods for using a multimeter to test the integrity of a circuit: (1) by testing the circuit’s resistance at various points or (2) by a voltage drop test along any part of it while it is live (switched on).
Boat electrics basics: Resistance test
This is a good exercise for those starting to learn about electrics, even if there is nothing wrong with your boat’s electrics. Switch your boat’s main battery selector switch to OFF and your multimeter selector to the Ω range.
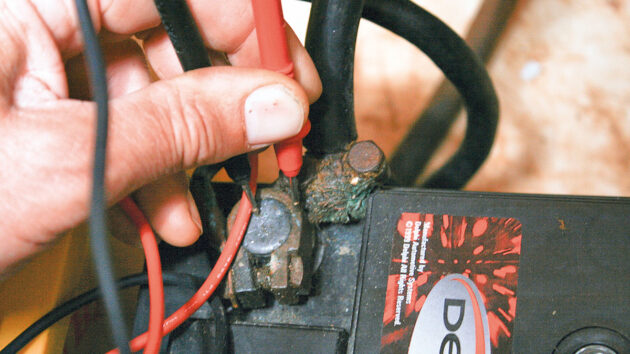
We’re going to start by checking the beginning of the circuit at the boat’s lead-acid batteries. Lead-acid battery terminal posts are normally connected to the boat’s circuits by a clamp which is a common place for corrosion to cause undesirable resistance.
The photo (below) shows a resistance check between the battery post and the clamp below.
To check the circuit on lead acid batteries, use a multimeter to carry out a resistance check. Credit: Chris Mardon
The multimeter selector points at 2KΩ, one probe is on the battery post and the other is on the clamp connector. The screen reads .000Ω, meaning there is no resistance and the connection is good.
If there were resistance, the screen would read higher than 1 indicating that the clamp should be removed and the metal contact area between the clamp and post must be cleaned to bright metal and reinstalled.
You can check the resistance at all visible bare metal connections along any circuit in the same way by prodding the multimeter probes on either side of each connection (fuse to fuse holder, across chock block connectors and so on). Many connections are inside junction boxes so provided that the wires are carrying 12V (not instrument signals), you can open them up to check the connections inside.
When there are no easy-to-access bare metal contacts in a circuit, I have resorted to sticking a pin through the wire’s insulation and measuring to that. Take care not to stab your finger and remove the pin afterwards.
Corrosion on battery terminals is a common cause of electrical circuit failure. Credit: Duncan Kent
For connections on devices like GPS and a VHF radio, remove the device’s power plug and place the multimeter probe onto the plug contacts. Make sure your probe connects to the relevant terminal in the plug (+ or -). After checking the positive part of the circuit, test the negative part from the battery’s negative post to the instrument panel in the same way.
Always take great care not to let your red and black multimeter probes touch each other when connected to the boat’s live circuits as they could short across the negative and positive feeds from the battery. This would cause sparks or even weld the probes together if not removed immediately.
Basic boat electrics: Voltage drop test
If one of your instruments (GPS, radio, light etc) is not working, you can use your multimeter to check if the problem is due to low or zero voltage. Make sure the circuit is live and switch your multimeter to DCV 20 (if you have a 12V circuit).
Put your multimeter probes across the battery posts and note its voltage. Now pull out the plug to the failing device (or disconnect the feed wires). Connect your multimeter probes to the + and – connections in the device’s plug (or to the disconnected ends of the feed wires) and note the voltage. If it’s less than the main battery voltage there is a bad joint somewhere.
To find the bad joint(s), start inside your instrument panel. Leave the red + probe connected to the detached plug and connect the minus – probe to any negative (-) terminal within the panel.
Basic boat electrics: A voltage drop test can help diagnose problems like corrosion, loose connection or incorrect wiring. Credit: Rupert Holmes
Negative wires in a boat are common to all devices and connected to the battery.
If the voltage on your meter now reads nearer to your battery voltage, you have a bad joint somewhere in your negative wire between the panel and the device. If the fault isn’t there, plug the device back in and switch it on. With your multimeter set to DCV 20, place your + red multimeter probe onto the battery + post and your negative – probe onto the nearest exposed metal on the failing + circuit in the same way that I described for checking resistance.
As you progress along the circuit from the battery to the device, there should be zero voltage drop across all connections along the circuit.
If it shows higher than zero volts, there is an undesirable voltage drop along the tested part of the circuit which indicates a dirty or corroded joint in the circuit between the multimeter probes. The normal fix is to separate and clean all metal parts in the joint.
A thin smear of Vaseline on exposed metal before reassembly can work wonders for keeping the circuit reliable.
A slightly oxidised aerial connection caused VHF radio transmission problems on my boat years ago. A quick clean of the oxidised metal and a wipe of Vaseline solved the problem, and it’s still working 10 years later.
Testing charging circuits and lead-acid batteries
Your multimeter must display accurate voltages before starting the following tests. I use two or three fresh AA batteries to check the voltage reading on my multimeters; fresh alkaline batteries should read 1.6V on an accurate multimeter.
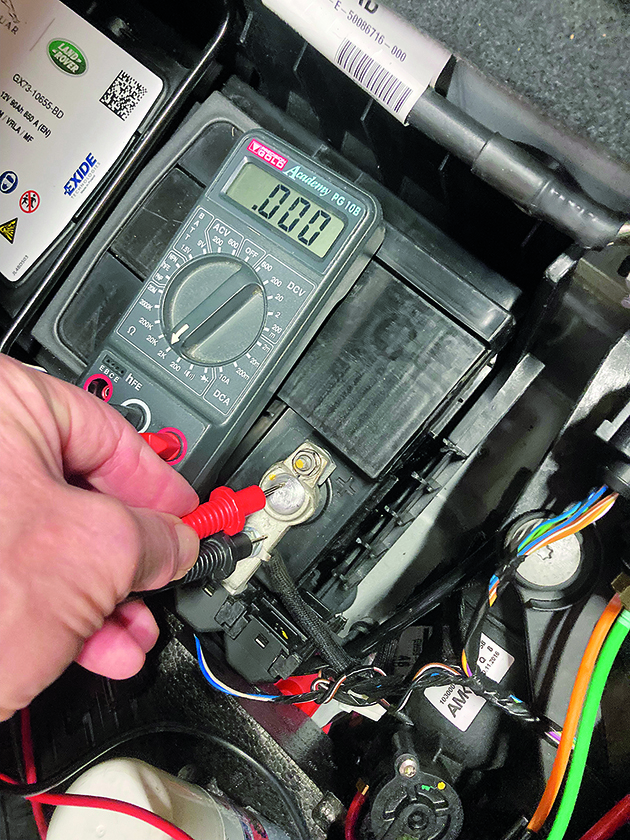
The voltage of a connected lead-acid battery is a poor way of determining its state of charge because its voltage will drop while it is discharging and rise when it’s charging. It needs to be standing disconnected for several hours for the battery’s voltage to give an indication of its state of charge. A fully charged lead-acid battery will have about 12.8V across its terminal posts; a discharged battery will be less than 12.6V, so there is not much difference between charged and flat.
The photo (below) shows a multimeter being used to check the voltage of a lead-acid battery. You might think that 12.28V would indicate the battery is flat, but it is actually in good condition.
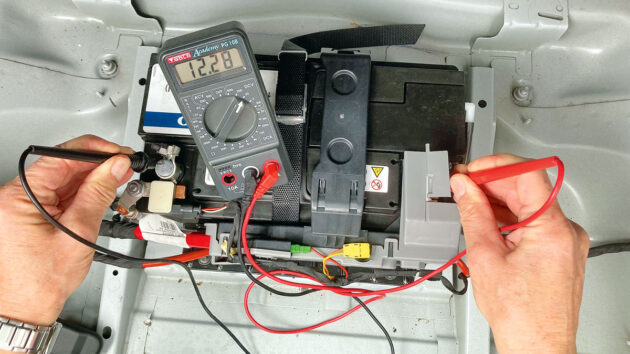
A heavy load on the battery can affect the voltage, as indicated by 12.28V reading on the multimeter. Credit: Chris Mardon
The low voltage was caused by a heavy load on the battery which lifted the tailgate of my wife’s car a few minutes before the photo was taken.
If the lead acid battery is connected to the boat’s circuits, there is still much that can be learnt about your boat’s electrical equipment by reading the battery voltage.
Let’s start with its charging equipment. Switch your multimeter to DCV 20 and place the probes onto the positive + and – negative battery terminals. If your lead-acid batteries are being charged, the multimeter should read around 13.5V to 14V. If the battery voltage is lower than 13.5V, it is likely that your batteries are not being charged properly; below 12.8V and your batteries are not being charged at all.
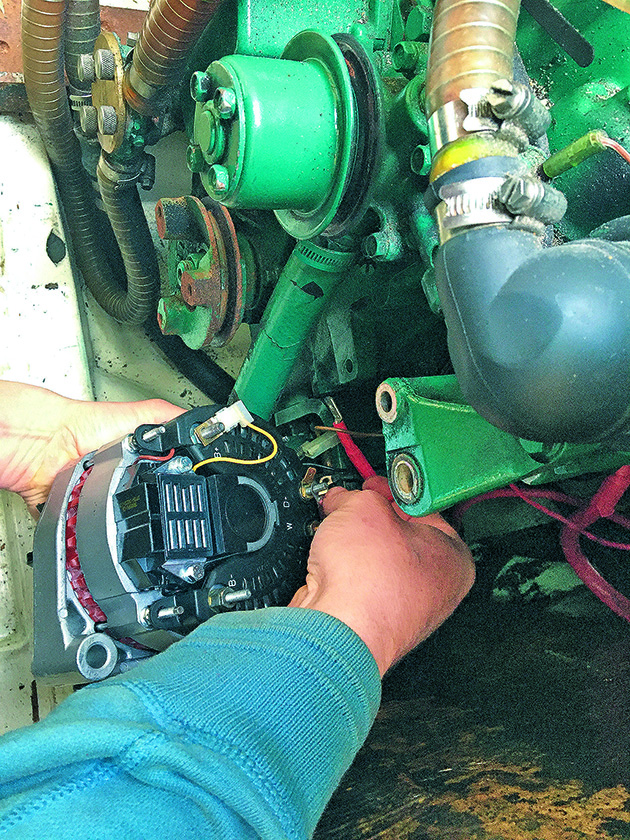
The alternator
Batteries are usually charged by an alternator which is a metal cylinder bolted onto one side of the engine with a pulley on the front driven by a V-belt from the engine’s crankshaft.
Never lean over a running alternator and take great care to keep fingers and clothing well away from running drive belts. Do not disconnect wires from your alternator when the engine is running, or you risk damaging its regulator. Provided you follow these precautions it is now safe to check if your alternator is charging.
Basic boat electrics: The alternator charges your batteries. Credit: Ali Wood
Your engine’s rev counter is normally run off the alternator, so it is a good indicator whether it’s working or not. If the rev counter dial moves steadily up and down with engine revs then your alternator is probably okay, but let’s see if it’s generating a good voltage. Start your engine and increase revs to about 1,500rpm in neutral gear. Select DCV 20V on your multimeter.
At the rear of the alternator are its electrical connections or terminals. Put your multimeter red probe on the BATT+ terminal and the black probe on any clean, bare metal part of the engine.
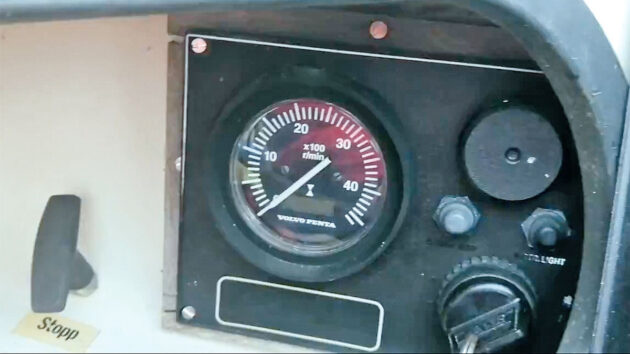
Most engine rev counters run off the alternator. Credit: Ali Wood
Your multimeter should read between 14V and 14.4V. If it’s below 13V, it’s not charging properly – and this could be due to the belt slipping.
Stop the engine and tighten the fan belt if there is more than half an inch play on its longest span between two pulleys.
Failure to charge could also be caused by worn brushes. These are easy to replace and cost a lot less than a new alternator. If the multimeter reading is higher than 14.6V, there is a regulator fault which must be fixed very soon, or you risk cooking your batteries.
240V mains charger
If your boat has a 240V mains charger, you can measure the voltage across its battery output terminals when the charger is switched on. The voltages should be similar to those of the alternator above. If there are outputs for more than one battery, they can all be checked.
Solar panels
Solar panels need bright sunlight to produce a good charge. On an open circuit (not connected), a solar panel can read 20V in bright sunlight. When connected, it will read lower voltages depending on the state of charge of the lead-acid batteries, the amount of light and the loads connected to them.
An easy way to check they are charging is to switch off other chargers and cover the solar panel with cushions or other useful objects, and then measure and note the lead acid battery voltage. Now remove the cover from the solar panel and you should see the battery voltage go up; this indicates that it’s charging.
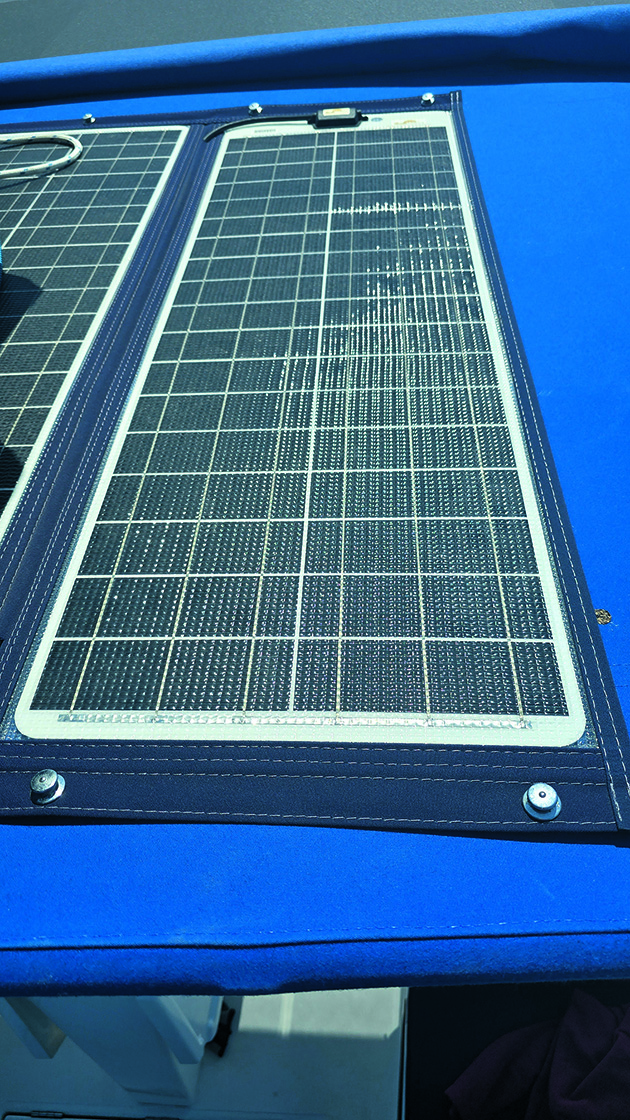
Basic boat electrics: Solar panels can read 20V open circuit in bright sunshine, but often do not deliver their rated watts output. Credit: Katy Stickland
If you’d like to know the rate of charge in watts, you can measure the output from the solar panels in amps.
Plug your red multimeter probe into its 10A socket, turn the selector to DC 10A, disconnect one of the solar panel’s wires and connect your multimeter probes in line so that it bridges the disconnection; one probe to the disconnected wire and the other to the connector block from which you took it.
Apply W = V x A, and you can discover how many watts your solar panel is delivering to your batteries.
For example, the meter recorded 4A from your solar panel and your battery has 13V across its terminals while it is connected and charging. Calculate 13V x 4A = 52W (watts).
When you test your solar panels, you may be disappointed to discover that even in bright sunlight they are not delivering anything near their rated watts output.
If you took your solar panel to the equator at midday on 21 June with the sun exactly overhead and no fine clouds or pollution, they might achieve nearer to their rated output, but at 52° North in the cloudy UK? No, sorry!
Wind powered and towed chargers
You can check the output in amps and/or volts from other charging devices in much the same way as for solar panels. You can stop your wind turbine by turning it 180° off the wind with a lanyard, one end tied to the tail fin and the other around the post.
Basic boat electrics: Battery load test
When an electrical load is across a battery, its voltage will drop; the higher the load, the greater the voltage drop while the load is connected.
Remember my wife’s low car battery reading after it had lifted the tailgate? It slowly recovered to a higher voltage afterwards, as is normal.
You can test your engine start battery in this way, but you’ll need a pal to help.
Switch your multimeter to DCV 20 and put its probes across the engine start battery posts when the engine is stopped. Now get your pal to start the engine while you watch the multimeter screen.
See how the battery’s voltage drops while it is cranking and then increases as the alternator starts to charge. Ask your pal to increase revs above tickover and see how the charge rate (voltage) increases.
Make sure you reach at least 1,500rpm when carrying out a battery load test. Credit: Graham Snook/Future PLCS
Owners often charge their batteries with their engines at tickover. If they had carried out this test, they’d see that by increasing their revs to 1,500rpm they would charge their batteries much faster, saving fuel and engine wear.
If your multimeter reads lower than 10V while it is cranking the engine, the start battery either has a low state of charge, or if it was fully charged, it is near the end of its useful life and should be replaced soon. Charge the battery fully and repeat the test to see if it needs replacement.

Basic boat electrics: A battery load test can be performed using a heavy load, like an electric windlass. Credit: Richard Langdon
This test can be performed on batteries operating other heavy loads, such as the anchor windlass or the bow thruster provided you can operate them without the engine running. A large voltage drop of more than 2V will indicate a weak battery.
Give boat electrics a try
Practice will give you confidence in boat electrics and satisfaction when you have fixed some of the simpler and most common electrical gremlins on your boat, but don’t wait for a fault to get some practice.
You can safely touch the positive and negative terminals of a 12V battery with your bare fingers, but remember to take care not to short anything metal across exposed metal parts of electrical circuits and remove all jewellery before you start.

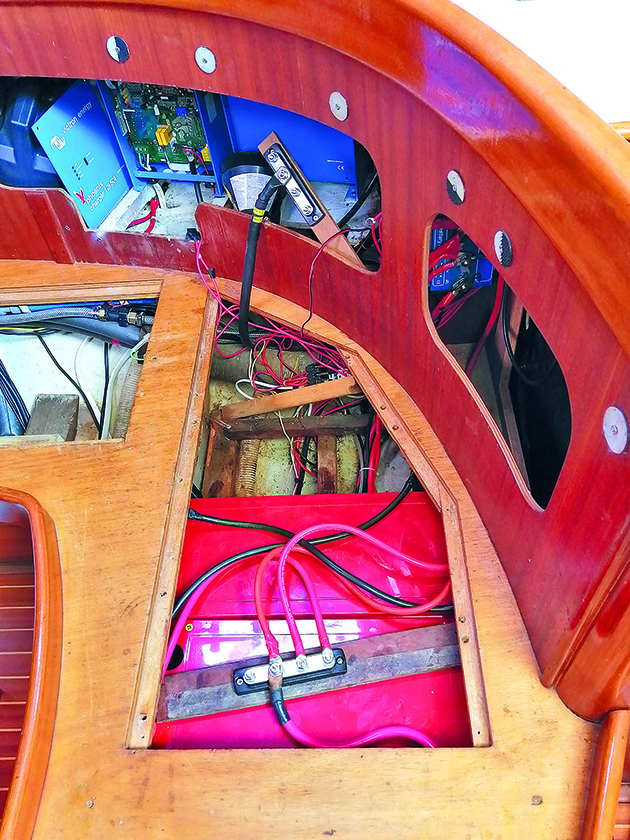
Overhauling the DC boat electrics on a 38ft boat
Richard Thomson explains how he gave his 1983 Trident Marine Voyager 38’s electrical system a complete and cost effective overhaul.

Understanding boat electrics: switches and relays
Pat Manley and Oliver Ballam demystify boat electrics, starting with switches and relays

Understanding electrics: insulating & signal wire connectors
Oliver Ballam and Pat Manley demystify boat electrics and explain various types of electrical connectors and their uses on board

How to tidy up boat electrics? Ask the experts
PBO reader John Anderson writes: “I have the mast out of my 30 year old Malo to solve an in-mast…

What to read more practical articles like Boat electrics for beginners?
A subscription to Practical Boat Owner magazine costs around 40% less than the cover price.
Print and digital editions are available through Magazines Direct – where you can also find the latest deals.
PBO is packed with information to help you get the most from boat ownership – whether sail or power.
-
-
-
- Take your DIY skills to the next level with trusted advice on boat maintenance and repairs
- Impartial, in-depth gear reviews
- Practical cruising tips for making the most of your time afloat
-
-
Follow us on Facebook, Instagram, TikTok and X