
In the first of a series on back-to-basics navigation Dick Everitt explains how to use a few simple lines to keep you safe

Clearing bearings are just what they sound like: bearings that keep you clear of any nearby hazards. Traditionally, you use a prominent mark on the chart that you’ll be able to identify at a reasonable range, writes Dick Everitt.
Draw a line on the chart, from the mark along the safe side of any dangers en route. Convert this line into a magnetic bearing, which you can then monitor with a hand- bearing compass from the cockpit.
You don’t have to sail along this line, it’s just there to act like a safety handrail that you mustn’t cross.
To make sure you don’t go over this line you need to know what the mark’s bearing would be if you did cross it. This ‘dangerous bearing’ might be greater, or less, than the clearing bearing and can be awkward to work out — especially if you’re tired.
I find the easiest way to do it is to imagine a huge change in the bearing. Suppose the clearing bearing is 045°M and the shallows are to the north of it. If we were well and truly aground the bearing to the mark would be, say, 090°M which is greater than the clearing bearing, so in this example I write a big ‘+’ sign on the dangerous side of the bearing line.
And just to be clear, I put a big ‘—’ sign on the safe side. So as long as our clearing bearing reads less than 045°M we’re in safe water: if it reads more than 045°M we’re heading into danger. If this all sounds a bit complicated take a look at the diagram (below left) which should make it more obvious.
When should I tack?
Normally you set up clearing bearing lines when approaching an unfamiliar channel or harbour entrance. If you have to tack towards it, put a clearing bearing line either side to limit the length of each tack. Even if you’re motoring in these lines can be handy in awkward, wiggly channels to check that you’re not being set into the shallows by local tidal eddies.
And to save having the chart on deck, make a rough pilotage sketch of the channel with all the clearing bearings marked on it.
The marks don’t have to be ahead of you, they work equally well astern. With GPS you don’t even need landmarks, just substitute waypoints and monitor the bearing-to-waypoint readout.
Some people use the main GPS for the course and XTE (cross track error) but to save stuffing it full of extra waypoints they use a handheld GPS to monitor any smaller hazards on the way through. Of course all the normal GPS warnings still apply, and with electronic charts, make sure you use maximum zoom all along the bearing line to spot any submerged rocks that might be lurking close by.
Keep it simple
A big paper chart makes it much easier to spot those small rock symbols and drawing a line helps you concentrate on the little blighters. So I reckon if there is some sort of landmark available, the traditional compass method is much simpler than a GPS.
Just make sure the compass reading isn’t affected by bits of metal such as beer cans, cockpit speakers or steel-framed spectacles. And if your eyesight isn’t that hot, try a pair of binoculars that have a built-in compass.
Keeping clear of shoals

In this example I’ve written a big ‘+’ sign on the dangerous side of the bearing line and a big ‘—’ sign on the safe side. As long as my clearing bearing reads less than 045°M I’m in safe water.
Tacking into an entrance
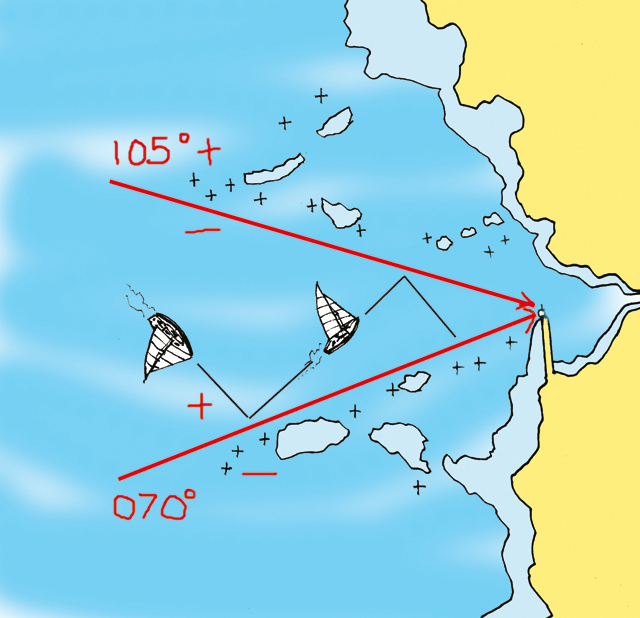
When tacking towards an unfamiliar channel or harbour entrance, draw lines to limit the length of each tack. In this example keep your clearing bearing above 070°M on the port tack and below 105°M on the starboard tack.
This Nav in a Nutshell was published in the March 2011 issue of PBO.