
Ben Meakins welcomes his daughter to the world with a Baby Tender – a miniature clinker boat baby cradle built from a kit

I first saw a cradle boat at a wooden-boat show years ago, and thought to myself: ‘When I have kids, I’ll build one of these’.

Snug as a bug… Ben’s daughter in the boat crib
Fast forward a decade, and the news that we were expecting a baby told me that now was the time to build one of these beautiful objects – and to learn a bit about how to build a boat at the same time. And like all the best projects, a solid and immovable deadline in the form of my daughter’s arrival was a good incentive to get on with the job!
The Baby Tender is a design by American designer Warren Jordan and, to quote, ‘an adaptation of the classic yacht tender carried aboard many of the finest yachts during the time when wooden boatbuilding was truly an art.’
A clinker dinghy in miniature, measuring 45in (115cm) in length, it sits suspended from its own davits.
It’s all there – hardwood keel and stem, clinker planking, copper rivets and steamed hardwood frames, gunwales and inwales – but at a fraction of the normal size. A shaped mattress turns it into a crib, which, hopefully, should gently rock the baby to sleep in style.
Having admired the examples to be found online I was hooked, so I ordered the plans, and shortly afterwards the timber and the copper fastenings and cleared the space in my garage.

Plans are full size so no complicated lofting is required
There was the major advantage that the plans are full size, so no time-consuming lofting is required – you can simply take the shapes and sizing straight from the plans. I made a few photocopies of the plans so I could cut them up and use them as full size templates, using craft adhesive to tack them temporarily to the timber.
Next came the tools. With an immovable deadline and something of a tool addiction to satisfy, I read the instructions. ‘Quickest with a bandsaw’ popped up a few times… which led me to eBay, and three days later, to an address in Studland, Dorset, where I came away with a hobby bandsaw for £20.
A new blade later, it was ready to go – and proved invaluable for shaping the wooden components accurately.
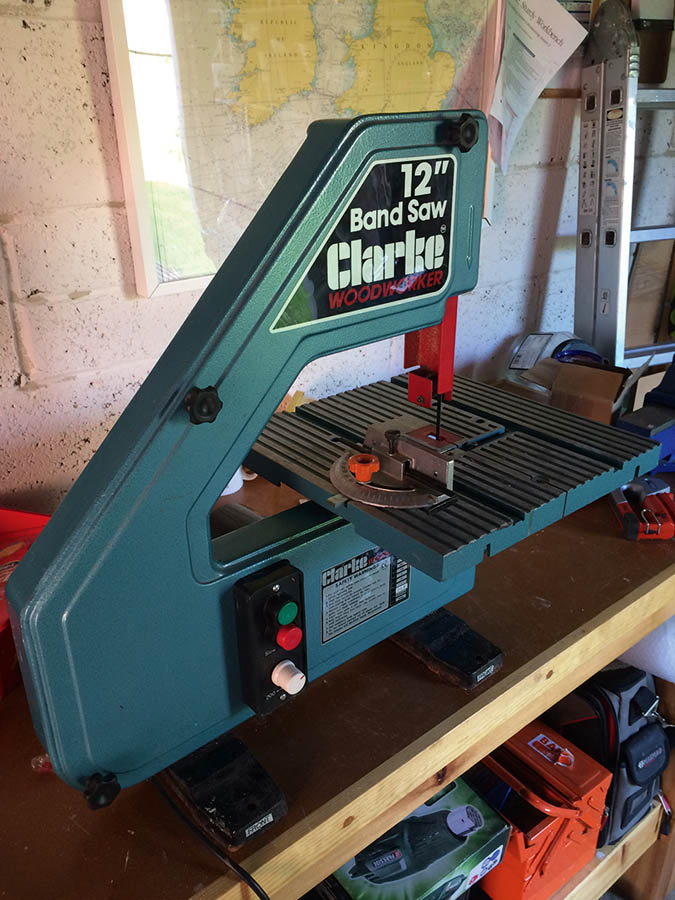
A £20 bandsaw from ebay proved an invaluable tool
I also bought a bench sander with disc and belt for smoothing and fine-tuning bevels and angles.
Lastly, I bought a honing guide to ensure my plane blades were as sharp as possible.
Choosing the right timber
I chose oak for the framing, gunwales and transom, mainly because I like the look of it and knew it to be a solid, attractive and strong choice. Planking, the plans suggest, should be in a softwood like larch or cedar – I chose Western Red Cedar. I ordered the lot from RA Bampton in Southampton.
Davits were made of ash, with a dark Sapele centre strip for contrast.

Pretty as a picture, a clinker boat in miniature
First step was to construct the building frame, cut out on the bandsaw. This was a sheet of 18mm plywood with the three plywood station moulds mounted on it on wooden blocks. These had notches for the keel cut out.
The backbone was next. This comprises the stem, stem knee, keel and stern post, and I cut these out of oak, using the full-size plans as a guide. These were then clamped together and glued with epoxy, placed over the top of the full-size plans to ensure the size and shape was correct – after all, if the backbone is the wrong size, none of the other planks or components will fit.
Backbone duly glued up, it could be installed on the frame with the moulds. Once it was all carefully aligned and screwed down, I fitted the transom to the stern post, screwing and gluing it on, and plugging the screw holes with oak plugs.
The apron and transom start off with square edges, but these need to be bevelled so that the planks have a flat surface to lie on. The designer recommends you do this as planking progresses: by laying the plank across the edge, you can measure the gap at the aft face, which corresponds to the amount of wood that needs to be removed from the front face of the transom with a block plane and rasp.

The first step is to create the building frame, then move on to the backbone, cut out on the second-hand bandsaw.

Take great care to accurately cut and position the backbone on the frame. If anything is wrong here, none of the other planks or components will fit.

The solid oak transom can now be glued and screwed to the stern post. Countersunk screw holes will be filled with oak plugs.
Now, it was time for the planking. I’d opted to use western red cedar as it’s lightweight and easy to shape – but in retrospect it was perhaps a little too brittle and liable to split – larch might be better. I cut each set of planks (port and starboard) to the shape of the plans on the bandsaw, before fine-tuning with a plane and offering up to the backbone.
At this point, the difficulty of building in miniature became apparent. The short length of the boat meant that the twist required in the first few planks – from vertical at stem to horizontal at the keel – needed a lot of force to achieve. The planks needed steaming, so I built a makeshift steam box using a short length of drainpipe and a wallpaper steamer. This made the cedar whippy and much more flexible.
The first plank was screwed into the apron with bronze screws – and I added some epoxy at the bow to help resist the huge bend forces in the planking.
Cut each set of planks before fine-tuning with a plane and offering up to the backbone. I had to steam mine to get them pliable enough to bend.
Before we fitted the next plank, the previous one needed bevelling to ensure the lap between the planks was as tight as possible – while this boat won’t see the water, it would look better and be stronger. With this done along its length the next plank could be added – screwed at bow and stern and riveted in between.

Before fitting the next plank, bevel the previous one to ensure the lap between the planks is as tight as possible.
Ribs would later be added, but we riveted the planks together, leaving space for the frames.
Copper riveting – how to fasten clinker planking
Planks riveted together and frames riveted too
Fastening a clinker boat is a labour-intensive process, even on a small boat like this. It took a lot of practise to get the process perfected, but once we’d got the hang of it we were able to secure the planks together swiftly and easily.
1. Drill pilot hole.
2. Drive rivet in with a punch.
3. Place the rove over the rivet, and knock home with a rove punch, while holding the rivet head with a backing iron (or lump hammer, in my case)
4. Using cutters, nip off the excess length of rivet.
5. Peen over the end of the rivet with a peening hammer. The aim is to smooth the rivet end and secure the rove.

Each plank needed to be bevelled to ensure a good fit, but with the rivets pulling them tightly together, the beautiful shape of the boat began to emerge.
I left the aft end of each plank over-long, to be cut off flush with the transom once the planking was complete.
The final plank, on the sheerline, was important to get right – a wobbly or wrong sheerline can completely spoil the look of a boat. By looking at it from all angles, I used a spokeshave to remove any wobbles.
The final plank in a wooden boat is known as the Whisky Plank, so we toasted its completion with a wee dram – very welcome as by now it was mid-winter and the baby’s arrival date was approaching fast!
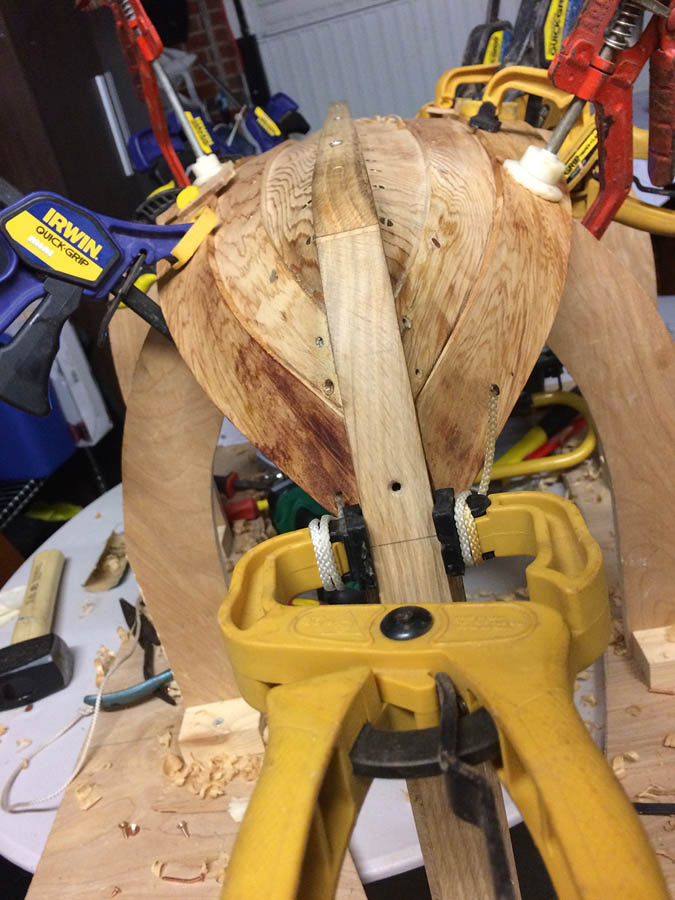
Steaming the frames
The frames were next to be installed. These were 3⁄16in oak – stiff and unyielding until steamed, when they could easily be bent to take up the almost 90° curve needed to match the hull shape. After their spell in the steam pipe, they could be removed, rapidly cooling, with gloved hands, before one end was pushed against the keel and the rest bent quickly to shape. These were clamped at the sheerline, before being riveted at each plank lap.

The frames are clamped at the sheerline, before being riveted at each plank lap.
After the frames, the breasthook and quarter knees could be installed. Here, the bench sander proved its worth, able to quickly and accurately shape any bevel – and I was delighted with the fit. We added a strip of dark Sapele to the middle of the two-piece breasthook for effect – and these were screwed and glued into place.

After the frames, the breasthook can be installed at the bow, followed by the quarter knees.
The final pieces of framing were the gunwales and inwales. The inwales were slender timber, and after steaming could be easily added to notches cut in knees and breasthook, but the gunwales were too chunky for this. In the end we cut the sheerline shape into some wide oak that could then be steamed into place and secured with long rivets through gunwale, frame, planking and inwale.
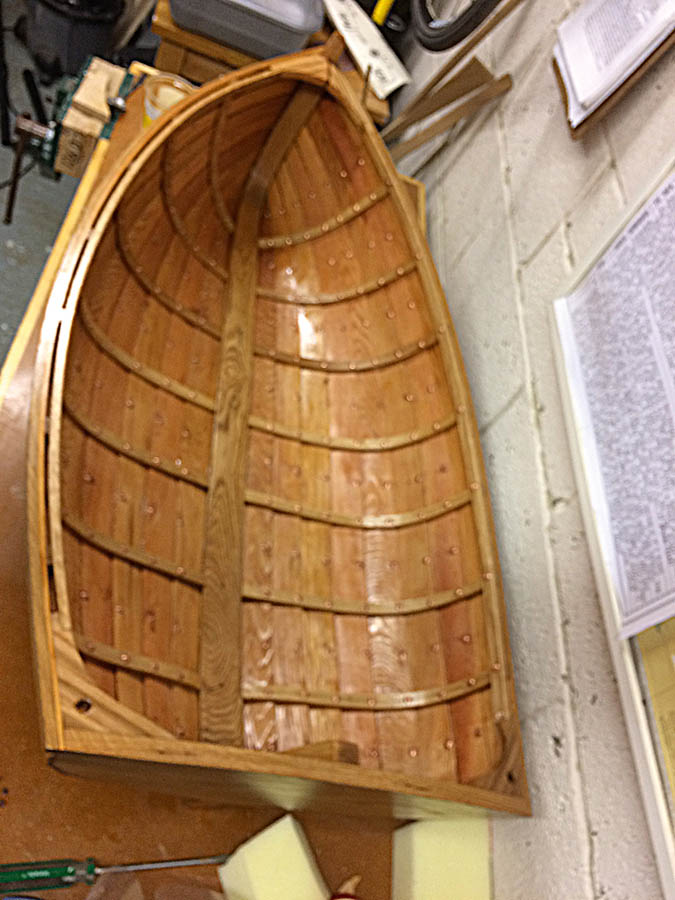
The final pieces of framing are the gunwales and inwales. Now the boat can be varnished.
After this, we moved on to tidying up. The overlong frames and planks could be trimmed to size with a Japanese pull saw, and tidied up with block plane and sanding block.
Everything then needed a good sand, screw holes needed plugging and edges rounding. The peened roves needed some tidying up to remove any sharp edges, and I did this by countersinking a short length of 1⁄4in steel rod which, when put in a drill, polished them up nicely.
The davits

A line is spliced to suspend the tender.
The real finishing touches came with the davits. These, again, had full size plans, and the uprights were made from three layers of wood – ash on the outside and sapele on the inside for contrast.
A sheave is hidden inside the ‘crane’ of each one, with a the uphaul lines running through a hole and terminating on a pair of bronze cleats bought second-hand from a chandlery.
I spliced three-strand line on to the tender – a 2:1 block at the bow and a block with bridle at the stern. A crossbeam held the uprights together, secured with brass pins knocked through.
Finally, two weeks before baby’s due date, I could start varnishing. This was not ideal – it was mid-winter now – but with little choice, I applied five coats of varnish to the boat and davits, moving the whole construction into our living room to dry properly once I’d applied the final coat.
Finishing touches

I cut an IKEA cot mattress on the bandsaw so that it fits perfectly inside the cradle boat.
To make things safe for the baby, we cut down an IKEA cot mattress on the bandsaw so that it fitted perfectly inside the cradle boat. My mum made a set of bumpers – made from mesh covered in cotton – to avoid any bumps but still allow breathing – and the final touch was to add a spliced line from keel to davit crosspiece to limit the swing of the boat and to prevent capsize.
Phew – finished just in time – and a beautiful, if rather large, piece of furniture took up residence in the living room, ready to receive its first occupant.
I thoroughly enjoyed the build process, learned a lot, and was heartily relieved to have completed it in time – especially as my daughter outgrew it after six months…
Originally published in PBO Jul19
