
Mountaineer and sailor Huw Williams shares some top tips for DIY-ers on getting the most out of your humble tarpaulin this summer including how to make your own hammock and a variety of different tents and shelters

You may find yourself in need of one (or all) of the following at some point: a sun awning and maybe something to keep the dew off in the evening (can work in the garden or on the boat); a quick, easy way to set up camp (for adults or children), or you just want to swing in a hammock and relax…

To keep everyone happy, can I suggest you acquire a tarpaulin? Not the kind you cover a skip with, but a lightweight version manufactured from ripstop nylon. One 3m x 3m is a useful size, and it can be configured in many different and surprising ways.
Your children will love using the tarp – it’s a great example of ‘more knowledge equals less gear’. It will get them thinking creatively and will help to encourage problem-solving. Once they’ve rigged an A-frame with paddles, running a spinnaker pole will be a doddle!
Tarps, pegs and anchors
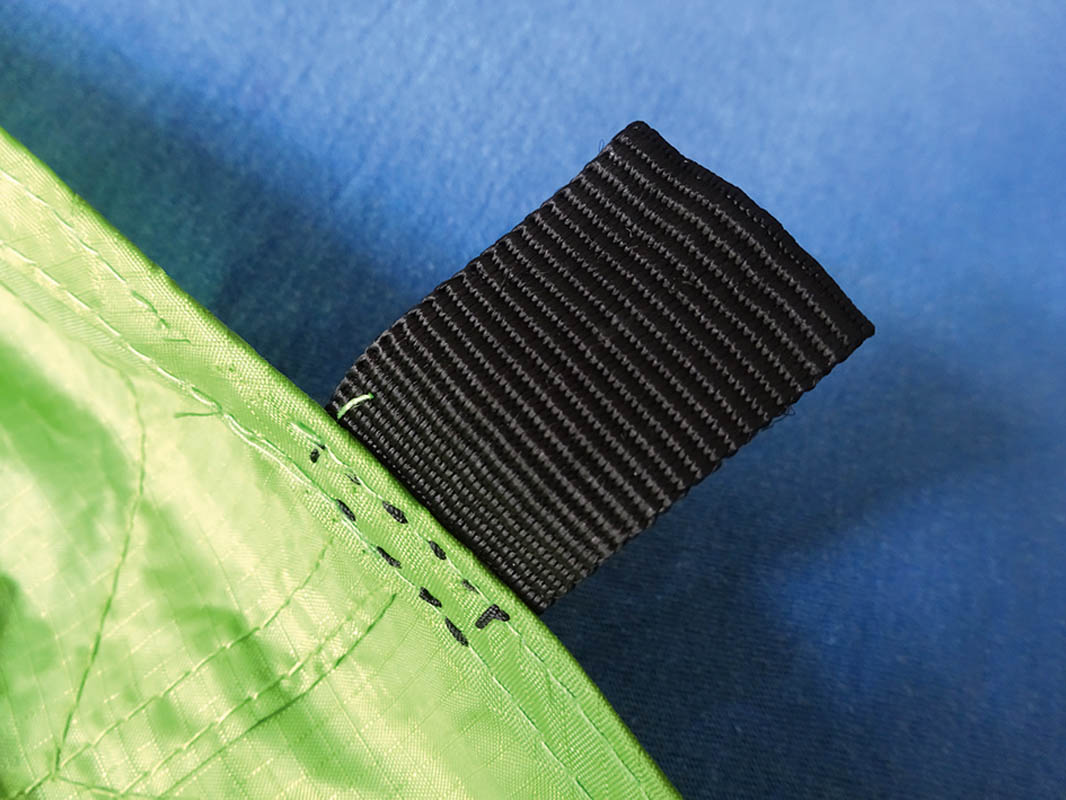
Not all tarps are created equal. Cheap tarps litter the Internet, but often have poor quality stitching, loops that easily pull off and seams that leak, so it’s worth paying a little extra for something that won’t let you down.
- Most tarps are supplied with basic pegs, but they aren’t exactly robust, so replace them with Y-section alloy versions that won’t bend when you have hard summer ground to contend with.
- If you don’t have decent ground for pegs, it’s time to improvise. I put my mountaineering hat on and use the deadman approach. A deadman is an object buried in snow and used as an anchor. On sand or dusty soil you can use pieces of driftwood or, better still, small sandbags. You can make tough and serviceable sandbags from the legs of an old pair of trousers. Just cut off the bottom 40cm and cinch the cut end with a cable tie. Fill the bags with damp sand and tie off with a short loop of cord. Bury the bags in foot-deep holes and stamp down firmly. Attach your guy lines to the protruding loops and tension in the usual way. The combination of weight and surface area provides an incredibly secure anchor.
Just like a sail, quality tarps have well executed stitching and reinforcement in key areas.
Replace splindly pegs (top) with hard-wearing ‘y’ section plastic ones. Bright yellow loops stop you losing them and make removal easy.
The stitching on cheap tarps inevitably fails, resulting in you having to make necessary repairs.


Boom mounted sunshade/tent

Just the job to keep the sun off at lunch time or dew later in the evening and ideal if you have more crew than bunks and someone (let it be the snorer) has chosen the short straw and is sleeping in the cockpit.
Fix one end of the ridge line under (or over) the boom and the other to the backstay. Use the guy lines to stretch out the tarp to the lifelines and use a friction hitch or clove hitch to secure. Depending on the boat, you may find you need to extend the stanchions to give adequate headroom and some creativity is required if you have a split backstay.
Build an A-frame tent with oars and a tarpaulin

This is the classic shelter. You can rig it in two ways:
A. String a ridge line cord between two trees and use the trucker’s hitch to tension.
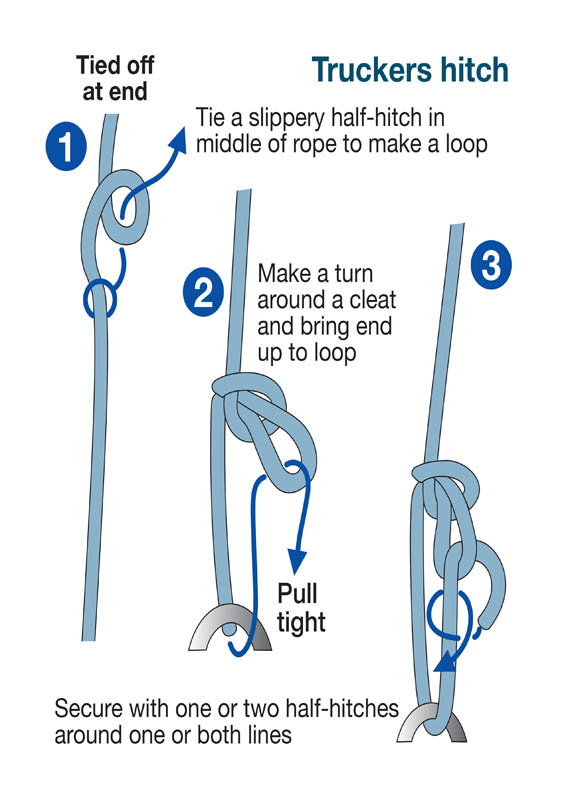
The trucker’s hitch knot is useful for the A-frame
Drape the tarpaulin over it and peg out the edges – either through the tarp’s loops or use guy lines for a more open and elevated structure.
Use the friction hitch to adjust the guy lines and tension the tarp on the ridge line cord using Prusik loops.
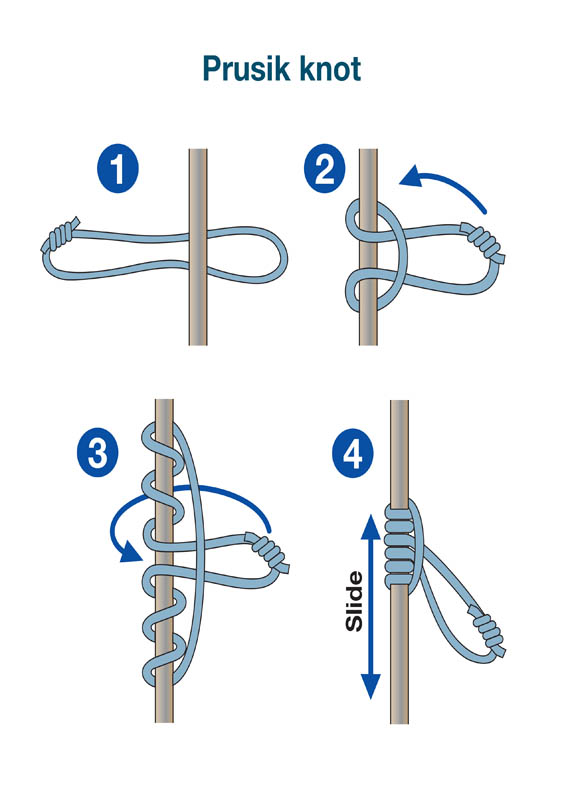
Prusik Knot is useful for tensioning lines and works best if the Prusik is a slightly smaller diameter than the cord. A 3mm Prusik wrapped onto a 4mm cord is ideal.
B. If there are no convenient trees, copy hikers and mountaineers who use trekking poles as supports at each end of the ridge line. You can use the oars from the tender or kayak paddles instead of poles and it’s a lot easier with two people – particularly if there’s a breeze!

1. Use a clove hitch to secure the middle of a length of cord to the paddle and peg out the ends – it should free stand like a tripod.
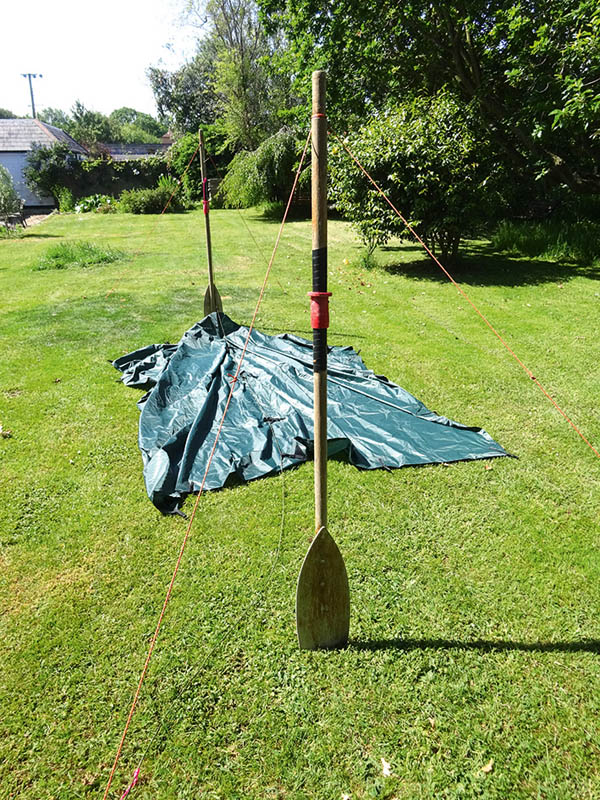
Repeat with another paddle and leave a gap of about 3.5m between the two. Use your ridge line cord to join the tops of the paddles together and adjust the tension in the guy lines – you should now have a taught, freestanding structure.

Use Prusik knots to tension the the tarpaulin on the ridge line
A Frame ‘low’ set-up – simply attach tripod and ridge lines lower down the shaft of the paddles

The wind-cheating plough set-up – only needs one paddle
As the pictures above show: Use a clove hitch to secure the middle of a length of cord to the paddle and peg out the ends – it should free stand like a tripod. Repeat with another paddle and leave a gap of about 3.5m between the two. Use your ridge line cord to join the tops of the paddles together and adjust the tension in the guy lines – you should now have a taught, freestanding structure.
Like method A, drape the tarp over the ridge line cord, peg out the edges and tension the tarpaulin along the ridge line with the Prusiks.
If you’re feeling brave you can rig a hammock in the same way, and a single paddle can be used to rig the wind cheating plough configuration.
How to make a pup tent from a tarpaulin
The first time I saw this set-up was in the Alps and I was impressed. It’s a third of the weight of the two-person tent I was packing and gives more than twice the space. It’s now my go-to shelter when I’m kayaking or in the mountains.
Lay out the tarp and peg out the centre of the back edge and the first two loops on the adjacent edges. Move the front corners in about 50cm and peg out. Push an oar up inside to create a teepee-style shape. Fold back the front flaps and guy down to the rear pegs. Clever stuff.

Viewed from the rear of the tent: peg out either side of the back two corners, then move the front two corners towards each other about 50cm, or far enough to permit the central pole to be inserted – see next image…


…and tie back the loose flaps while also fixing a guy rope from the pole to the front of the tent
How to make a hammock from a tarpaulin
The moment you’ve been waiting for! Fold the tarp so you have a three-layer rectangle of 3m x 1m. Place a small smooth pebble at one end, scrunch the three layers of fabric around it and secure with a lark’s head, which will allow easy removal. Repeat at the other end, and sling under the boom, forestay to mast or between two convenient trees ashore.

Fold tarpaulin into three layers
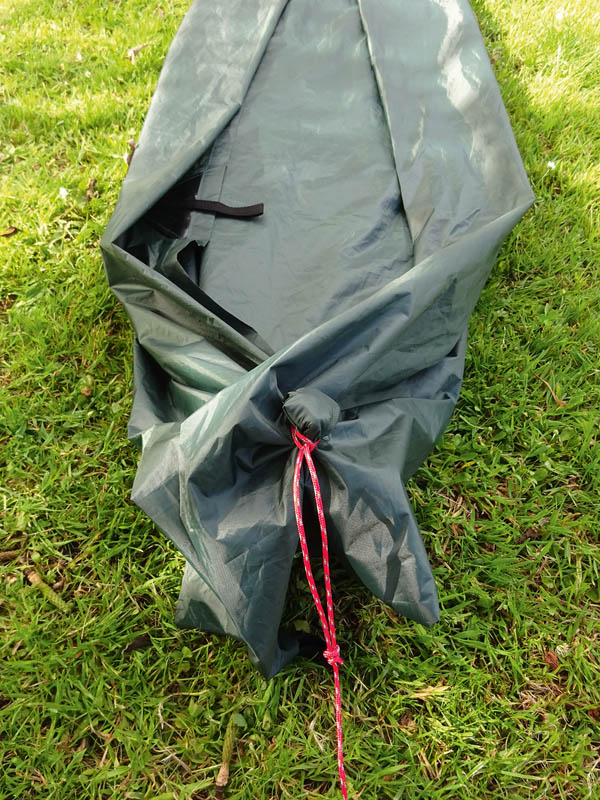
Fasten a Lark’s head knot around a stone wrapped up in the tarp layers…


Originally published in PBO October 2019