
You don't need to spend a lot of money to get an older boat going more efficiently
Six DIY tips to make your boat sail better
One of the great things about small boats is that they don’t have to cost a fortune. You can buy one for a modest sum, do much of the maintenance yourself and keep it at home during the winter.
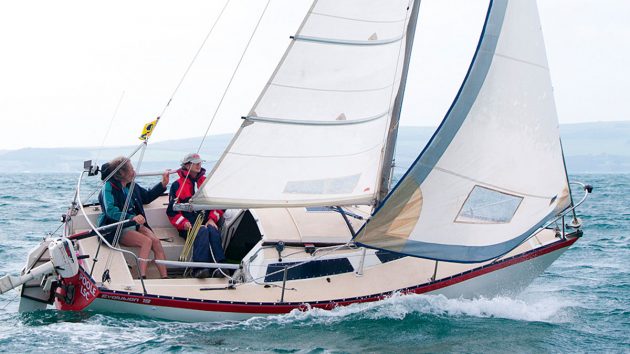
That’s the way it works with Dave Carruthers and his Evolution 19, Scorpion, which he found in Kent and towed home to Poole. It now spends the winter in his drive and the summer on a drying mooring at his local sailing club.
Like many small cruisers more than 25 years old, this Evolution had become what a local sailmaker describes as ‘a bitzer boat’: made up of bits of this and bits of that.
Ever wondered how to make rope? Check out this video of a traditional ropewalk device
The previous owner had acquired sails from various sources, so when Dave put it together and started sailing, it worked after a fashion but left him suspecting that all was not quite as it should be.
Interested to discover what he had taken on, I went for a sail with him to see what was what.
1) Setting up the rig correctly
As on many boats that are used solely or mainly for cruising, the Evolution’s rig was under-tensioned.
This is especially critical with a fractional, swept-spreader rig because the leeward cap shroud plays an important supporting role.
If it goes slack, the mast is effectively hinging around the windward cap and subjected to a rotational force that neither it nor the spreaders are designed to take.
You can use a rig-tension meter on the mooring for accuracy, but the simple check is that if the rigging doesn’t feel tight, it’s too loose!
The other problem here was inverted bend: instead of bowing forward in the middle, the mast was bowing aft. That’s worrying because, in the absence of forward lowers or a babystay to support it, the midsection of a mast can bow progressively further aft until the whole rig collapses.
That’s not unknown, especially on boats with masthead rigs and in-line (non-swept) spreaders when they’re sailed under just the headsail, without the mainsail to help resist the mast’s deflection.
Since many boats with fractional rigs don’t have babystays or forward lowers, it’s crucial to set up the rig with some forward bend in the middle.
Apart from guarding against inversion, this ‘correct’ bend ensures a better sail shape. Mainsails are cut with a slightly rounded luff to accommodate the pre-bend, as it’s known (that’s the bend induced without the help of the backstay), and increasing the bend by tensioning the backstay flattens the sail in stronger winds.
A mast that bends the wrong way adds fullness to the sail, especially towards the luff, so you’ll have a sail that’s encouraging the boat to heel over and go sideways rather than contributing to forward drive. Slack caps also lead to excessive forestay sag and an over-full headsail.
Adjusting Scorpion’s rig was simple enough: I took several turns on the bottlescrews of the cap shrouds and a turn or two off the lowers. That substantially increased the tension in the caps and pulled the
mast into the right shape.

THE PROBLEM: Here
the mast is bending the wrong way – aft in the middle

THE SOLUTION:
Tensioning the caps and slackening the lowers induces the correct bend
2) Headsail-sheeting system modification
Despite the Evolution’s small size, it’s no good trying to use a headsail-sheeting system designed for a dinghy a fraction of her weight. On Scorpion, the sheet was led directly to a plastic fairlead with an integral swivelling cam cleat on a plastic track.
This sort of arrangement simply wasn’t designed to cope with the loads. There was too much friction where the fairlead angled the sheet through 90°, and the weight on the sheet meant that the cam cleat was always pulled to the forward end of its travel.
Trimming the sail with any wind in it was hard work.
Another problem was that the track was mounted too far aft. The fairlead had to be right at the forward end of the track with the sail unreefed, even with the tack raised above the drum by a long tack strop. Reefing the sail would have resulted in excessive twist because it was impossible to move the sheet lead any further forward.
My suggestion was to add a decent length of track (around 1.5m/5ft) each side, extending far enough forward (at least as far as the chainplates) to accommodate a shorter-footed headsail should Dave acquire one in the future. The sheet would run through a car on the track, then aft to a small winch and to a cleat close to the helm.
Since Dave often sails short- handed and sometimes on his own, making sail-handling as easy as possible was a priority.
Over the winter, he shopped around and found a pair of Lewmar No6 winches on eBay for £57. The local chandler had some old-stock Barton track, supplementing it with a new length and some end-caps.
After another eBay session yielded a pair of genoa cars, and a trip up the road the necessary nuts and bolts, he ended up spending a total of just under £190 – less than half what it would all have cost new. Dave then used his engineering skills to separate the cam cleats from the fairleads and mount them directly to the old nylon tracks so they would swivel as necessary.

THE PROBLEM: The headsail sheet was led directly to a dinghy-style fairlead with integral cam cleat on a plastic track, making the sail hard to trim under load

THE SOLUTION: Longer tracks have now been added. The sheet runs aft to the winch and then to the cleat, close to the tiller
3) Avoiding halyard-wrap around the headsail furling drum
The genoa is one of the ‘bitzer’ elements on em>Scorpion, having almost certainly come from another boat.
It’s of very low aspect ratio – long in the foot and short in the hoist – so the head is well below the top of the headfoil.
When the luff is so short, it means that several feet of halyard above the top swivel run parallel to the headfoil. As soon as the headfoil starts to rotate – when the sail is rolled or reefed – there’s a danger that the slightest friction in the swivel will make it turn as well, so the halyard ends up wrapping itself around the headfoil.
Some furling systems, as on Scorpion, have a deflector plate at the top to ensure that the halyard joins the top swivel at an angle to the headfoil, but it’s only effective if the swivel is close below the deflector.
With a short-hoist headsail like Scorpion’s, what’s needed is a strop between the head of the sail and the swivel to place the swivel close to the top of the headfoil. Then the halyard won’t try to wrap itself around the headfoil.
We only had a length of line that was far too long, but it did the job temporarily.

THE PROBLEM: Here the sail is shackled to the top swivel, which is several feet below the top of the headfoil. The white plastic deflector plate, designed to prevent halyard-wrap, won’t help in a situation like this

THE SOLUTION: Add a strop to the head of the sail to minimise the distance between the top swivel and the deflector or halyard sheave
4) Hoisting the mainsail
Something as simple as attaching the halyard to the head of the mainsail might seem so routine as to warrant no thought, but some ways make more sense than others.
On Scorpion, the halyard was bowlined to a captive (and captive-pin) shackle of a size that wouldn’t have been out of place on a 45-footer. It was a waste of heavy and expensive stainless steel.
The other consideration here is that the length of the shackle and the bowline between them came to several inches, meaning that the head of the sail would be well below the masthead sheave.
With a small cruiser like this, it can make sense to dispense with the shackle entirely. You save weight aloft and, especially if the sail is close to the maximum luff length, potentially achieve greater luff tension by gaining an extra inch or so of hoist.
There are various ways of attaching a rope halyard directly to a sail, but here’s one that’s simple and widely used.
First, tie a figure-of-eight in the end to make sure you don’t lose it inside the mast if the worst happens! (some people prefer to use a plastic ball). Then feed a bight through the hole in the headboard, leaving a longenough working end (with the knot/ball) to pass it over the headboard and through the bight.
Take the slack out of the bight from the standing part and you’re done. Among dinghy sailors this is probably the most common method of attaching the halyard.

HOW IT WAS – The halyard tied with a bowline to a large shackle

A SIMPLE ALTERNATIVE WITHOUT THE SHACKLE – Tie a figure-of-eight in the end, then pass a bight through the headboard

Pass the figure-of-eight through the bight, tighten the bight and job done: simple, light and space-saving
5) Trimming the mainsail
The mainsail on Scorpion was another ‘bitzer’ element, the number and angle of the battens suggesting that it had been cut down from the heavily-roached sail of a dinghy catamaran. No mainsail made for an Evolution 19 would have six full-length battens.
It fitted OK and didn’t set too badly, but needed to be flatter in the brisk conditions of our sail. Our problem was that the clew outhaul was a lash-up.
The clew of a loose-footed sail needs to be held down by a strop around the boom or a metal slug in the groove. It also needs an outhaul to pull it directly aft along the boom.
In this instance the metal slug had been replaced by a plastic luff slide, which is not designed to take that sort of load. It wouldn’t slide and might have broken at any time. A lot of space was also wasted between the clew and the block that provided theouthaul’s 2:1 purchase.
As a temporary measure, I used a length of line to provide the downward component in place of the plastic slide, taking it around the boom, then tidied up the outhaul arrangement with the help of a small spare shackle so we could achieve greater tension on the foot.

THE PROBLEM – This clew outhaul arrangement doesn’t work properly

THE SOLUTION – It’s more secure and functional with a strop around the boom
6) Improving the kicking strap
The kicking strap was functional and not in need of urgent attention.
It was, however, attached to the mast-step with two shackles, including one that was not only grossly oversized but that also aligned the bottom block of the purchase so the axes of the sheaves were horizontal.
That led to an unfair exit for the line, to a deck organiser on the port side and then aft over the coachroof.
Bypassing the jammer
We moved the enormous shackle to the spares box and used the second, smaller shackle to attach the block. Removing one shackle also rotated the sheaves to give the line a better exit, though it still wasn’t perfect because the bottom block incorporated a V-jammer between the two sheaves.
Bypassing the jammer meant that the line was chafing across the bottom of it, but not in a way that was likely to be critical. Ideally a block without a jammer would be used in its place.

THE PROBLEM -Two shackles, the lower one both massive and unnecessary, were used to secure the kicking strap to the mast-step

THE SOLUTION – Here we have removed the bigger shackle and used just the smaller one, which has aligned the block more accurately
Verdict
A few simple tweaks can make an appreciable difference to a boat’s safety, performance and ease of handling. Most of what we did cost nothing or next-to- nothing.
In some cases we got rid of unnecessary hardware. In others there was scope to spend a few pounds improving our temporary lash-ups, but the only items that cost a significant amount were for the headsail-sheeting arrangement.
Even then, it was hardly an expensive exercise for a vast improvement.
Enjoy reading Six DIY tips to make your boat sail better?


A subscription to Practical Boat Owner magazine costs around 40% less than the cover price.
Print and digital editions are available through Magazines Direct – where you can also find the latest deals.
PBO is packed with information to help you get the most from boat ownership – whether sail or power.
-
-
-
- Take your DIY skills to the next level with trusted advice on boat maintenance and repairs
- Impartial in-depth gear reviews
- Practical cruising tips for making the most of your time afloat
-
-
Follow us on Facebook, Instagram, TikTok and Twitter