Bob Goode shows how you can increase your accommodation by making a custom boom tent
Many years ago I started sailing with a Hurley 22, quite a small boat. Space was at a premium, especially with Anne and our two small children on board. We got around that problem with a boom tent (see PBO March 1995).
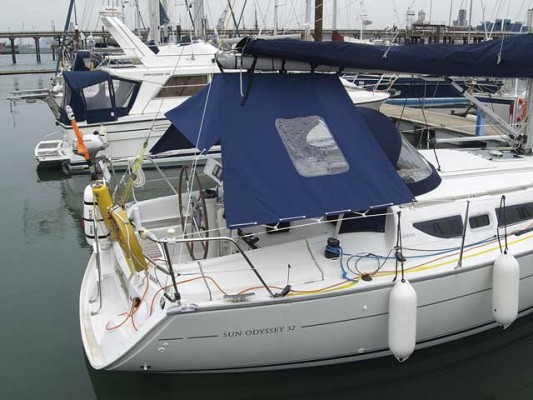
Even though our current boat, a Jeanneau Sun Odyssey, is 9.7m (32ft) long, a period of wet and windy weather seems to shrink that down and make her feel much smaller. I also prefer to be outside in the fresh air where possible so that I can see what is going on around me. However, I don’t like getting wet – it dilutes my whisky too much. Time for another cockpit cover!
Sensible headroom
Many yachts sport cockpit enclosures but these require a lot of fittings into the fibreglass and are very costly: I was quoted a four-figure sum for one but I did not want to spend that much. Besides, there is always the problem of where to stow these types of cover.
Taking some very rough measurements of the cockpit, I cut a large sheet of builder’s polythene down to approximate size, then marked the centreline and fastened it to the boom with some sail ties through the plastic. I lifted the boom to get sensible headroom and ensure the cover would not
rub on the sprayhood. The edges were then stretched out to the guard wires and clothes pegs used to secure them. The position of the edges were marked using a permanent marker, allowing around a four-inch gap for the lacings. I also took photographs for reference later.
I made sure to allow the tent had plenty of overlap with the sprayhood at the front and also the cockpit sides so that no rain would find its way underneath.
When deciding on the windows,
I was careful to position them so that they were usable whether seated or standing. They are also placed such that when the cover is rolled up the window material is not folded, only rolled. This avoids creases in the plastic and will help to stop it splitting over time.
If you have a cockpit mainsheet like I do then this will need to be released before the cover can be fitted. Lewmar supply quick-release shackles to replace the standard shackles on mainsheet blocks. These are quite expensive, but I was lucky in this respect as my mainsheet was already fitted with them. An alternative would be to have a slit in the cover to go around the mainsheet and close it with Velcro.

Trimming the template
The template was then taken home, trimmed to size and notes penned on for reference. At this point there are several ways to proceed. I could have sewn the cover myself but a domestic machine is not really good enough for stitching several layers of heavy acrylic together. I know from bitter experience how much it costs to fix my wife’s sewing machine so I opted to get the work done with a local cover maker, hence the photographs and copious notes. By making the template yourself you will save a lot of his time and your money!
If you are sewing the cover yourself and using PVC, be careful as it can stick to the foot of the sewing machine. A way around this is to place tissue paper either side of the seam and then stitch through it. Tear off when the seam is completed.
Shock cord tension

The triangular insert at the rear of the cover provides some structure and helps stop the cover flapping in a breeze as well as partially enclosing the rear.
A thick piece of webbing is sewn along the centre line on both sides of the cover. Gaps in the stitching allow luggage straps to pass through and hold the cover to the boom. There are loops front and rear which are used to tension the cover along the boom, with the strain taken by the webbing rather than the cover material. On the inside of the boom are stainless steel rings fixed to the webbing to allow a lamp to be suspended or wet gear to be hung to dry.
It takes quite a while to fit the cover for the first time as the parrel beads and tension in the shock cord have to be right, but once this is set it thereafter takes just a few minutes to set up or put away. I found 6mm shock cord better than 5mm as it allows more tension without the need to extend the cord excessively. Access is not a problem since the clips can be quickly released and the cover pulled aside – the shock cord makes this easy.

What the boom tent cost
The sheet polythene for the template cost £6 from Screwfix.
A professional cover maker charged £328 for the finished boom tent in blue acrylic canvas, working from the template I supplied.
I also bought:
8m of 6mm shock cord £5.60
Nylon hooks £6.90
2m of 6mm polyester line £1.60
6 parrel beads £2.40
4 luggage straps £4.80
TOTAL: £356
SAVING MONEY If you are making one yourself, acrylic canvas is around £16/m and is available in 1.5m widths. My cover would have needed 5m. Blue PVC is not quite so nice, but would do the job for around half that price.
Clear window PVC is around £8/m. Allow for 2m. Eyelets can be bought with a punch kit for self-fitting at around £7 for 25. Try to get extra punches as they blunt quickly. A length of webbing is needed to reinforce the centre seam and provide attachment for the luggage straps to hold the cover to the boom. A good source of such materials is Point North, at www.profabrics.co.uk. A home-sewn version would be about £130 using acrylic, or £90 using PVC – a lot cheaper than buying a bigger boat!

Send us your practical projects – we pay at least £30 for each one published!