It’s a wrap: Sarah Norbury goes behind the scenes to examine the process of vinyl wrapping – a new way to rejuvenate your boat’s topsides

When Tim Powell bought a 30-year-old Gib’Sea 28 he knew that one of his first jobs would be getting the topsides looking like new again. If your gel coat is not in good enough condition for sand-and-polish, or if you want to change your hull colour, the usual option is paint: but now there’s another alternative – vinyl wrapping.
This technique is still new for cruising boats, but vinyl on racing yachts and vehicles is everywhere. All those vans with brightly-printed logos, even pictures, are covered in what we used to call sticky back plastic – it’s come a long way since Blue Peter. Formula One cars, Porsches covered in lookalike crocodile skin and the Clipper Round The World boats are all vinyl-wrapped.

This Bavaria 44 turned ‘from white to blue in just two days’
Claims made for vinyl wrapping include that it protects GRP from UV degradation, fading and abrasion while not fading itself, and that it is easier and cheaper to repair than paint or gel coat. Tim didn’t want to use paint because, he says, ‘it’s irreversible. Once you’ve painted you can never go back to gel coat. With vinyl, I have the option of stripping it off.’ Tim had had enough of doing his own painting with his previous boat, a Shrimper. ‘It was really hard to get a good finish. I put plenty of hours into sanding the hull smooth before application but was never happy with the result – it just didn’t look as good as a professional job.’
Investigating prices for a professional high-gloss respray, he discovered that vinyl wrapping by the Wild Group in nearby Hamble was considerably cheaper.
Most of the Wild Group’s jobs for cruisers are boat names and graphics which are printed on vinyl at the company’s workshop, or coloured vinyl cover-ups of faded, chalky hull bands. However, owners are slowly beginning to put their trust in vinyl for the entire hull. Cruising boats that have been fully wrapped in vinyl include a Swan bought new that the owner wanted dark blue, but he knew that the resale value of a white boat was higher – so he ordered a white boat and had it wrapped in navy. In a few years’ time when he comes to sell he’ll take it off to reveal a pristine white hull undamaged by the intervening years.

A Clipper Round The World yacht wrapped in printed vinyl…
The Wild Group’s latest advert features a Bavaria 44 that they turned ‘from white to blue in just two days’. There’s an amazing choice of colours including metallics, two-tones and even a textured carbon-fibre effect, but Tim wanted his boat to remain white – just cleaner and glossier. Friends were sceptical. ‘Won’t it tear, or peel off, or degrade?’ they asked. Undaunted, Tim went ahead and invited PBO to photograph the wrapping process.
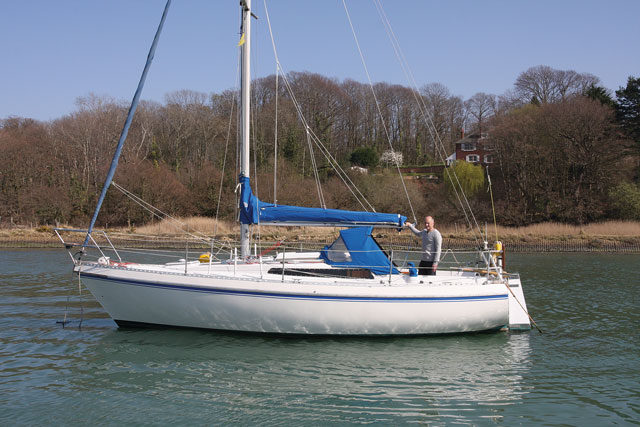
I admit I was also sceptical, but intrigued; so I went along to Universal Marina on the River Hamble, where Tim’s boat Cevema was ashore, to see how it’s done.
If you remember as a child trying to cover your school folders in sticky-back plastic without getting ridges and air bubbles, you’ll appreciate the skill required to apply huge pieces of vinyl to curved surfaces. Firstly, the hull needs to be cleaned, any imperfections sanded off and holes filled. Then the Wild Group team arrives with rolls of vinyl, cutters, a heat gun and plenty of ladders.

If you look very closely you can just about see the seam…
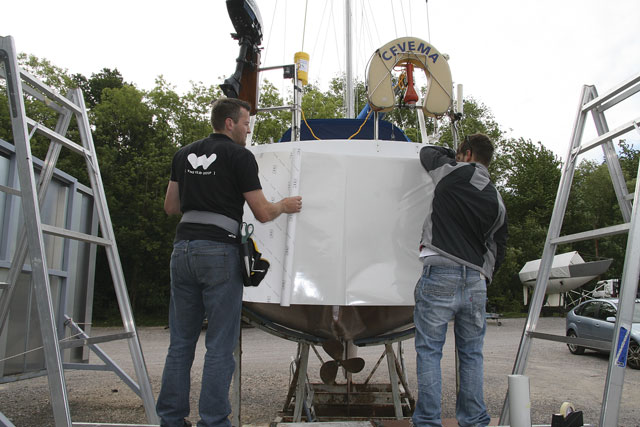
It’s a two-man job, which at its most basic involves one at the top of the roll and the other at the bottom, unrolling and sticking as they go. Olly and Justin started wrapping the port side first. Olly held the roll while Justin went along behind with a squeegee smoothing out any bubbles and creases.
Tiny bubbles are inevitable, and one trick they didn’t show us on Blue Peter is to use the tip of a very fine, sharp knife blade to prick them, then you rub them over to smooth them out.
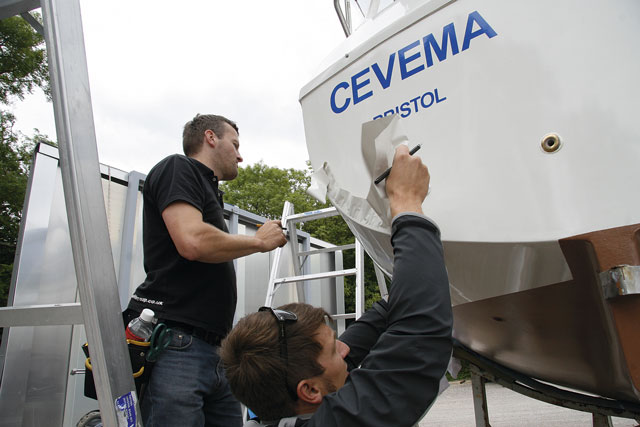
When the duo reached a skin fitting, they vinyled over it then very carefully cut round it. The stern was complicated, requiring them to cut round rudder pintles with patience and precision.
The end result looked like a brand new boat straight out of the mould. In a certain light you can see the vertical join half way along the topsides where two lengths meet but later, when Cevema was back in the water, it was hard to spot.
Tim’s test of whether wrapping is a viable alternative to paint began in April 2011. Cevema survived the lift-in unscathed, and last season and through the winter he sailed around the Solent, to Poole and back, spending nights on many different visitors’ pontoons. Tim says that black marks from mooring against tyres washed off more easily than from GRP with just soapy water. As with your school folders, the vinyl is wipe-clean.
Greg Hoar of the Wild Group says that washing-up liquid in water is recommended for this – avoid using granulated cleaners that can scratch. You can polish the vinyl using standard polish, but not an electrical buffer as these get warm and can melt the vinyl.
Tim says: ‘When alongside a pontoon I used to put bits of cloth under the fenders but now I don’t bother, and I’m careful not to crash into pontoons as that would be bound to tear the vinyl. I chose a similar colour as the gel coat so any small tears wouldn’t show too badly.’
Reflections glint on the shining hull on a sunny spring day, a year after the vinyl was applied
The only damage Tim has had to the vinyl is when the rudder came off in a storm (while on a too-shallow mooring, the rudder bumped on the bottom and twisted off), and the tiller chewed through the vinyl and gel coat. The Wild Group supplies each owner with a repair pack from which you can cut a patch and simply stick it on. Tim made a very professional job of his repairs; much more quickly and easily, he says, than matching and applying gel coat or paint.
How does it look?
Tim is delighted with the glossy finish. ‘It’s great, people come up and say, “Wow how did you get a shine like that?” When we were tied up at Christchurch SC overnight two sets of people asked us about the finish, thinking it was a really expensive spray-paint job. When I said it was vinyl they said they’d never heard of it, and asked questions such as “how does it stick?” The usual reaction is disbelief. Later on, a man and his son came back to ask how much it cost.’
As stated earlier, in a certain light you can just see the join where two panels of vinyl meet: this doesn’t bother Tim but is worth knowing about if you’re considering the treatment for your own boat.
The verdict
Wild Group claim the vinyl will last six to eight years. Tim says: ‘Now I don’t see why it shouldn’t last eight or nine seasons. In fact, I’m struggling to see the downside.’
How much does it cost?
The price for wrapping a 28-footer is around £1,200, and the process took one day. A DIY paint job would cost around £225 for a single pack paint system, or just over £400 for a two-pack system. Quotes for a professional paint-spray ranged from £2,000 (if Tim did all the hull prep himself) to more than £3,000. Besides the cost of paint and labour a pro respray involves the cost of lowering and later re-stepping the rig, as the work has to be done under cover. n Contact www.wildboatwraps.co.uk
BOAT WRAPPING STEP BY STEP

1. Unrolling the vinyl prior to application. A spot sheltered from wind makes life easier.
2: One person starts to smooth the vinyl while the other holds the rest away from the hull.

3: Skin fittings are initially covered over before the vinyl is cut around them.

4: A plastic squeegee is used to smooth out any bubbles or creases.

5: Cutting out the vinyl around skin fittings requires the utmost precision.

6: Any excess vinyl has to be trimmed with great care.

7: The boat’s name has been stuck on top of the new vinyl wrap with a separate sticker.

8: Now its the side’s turn, starting at the bow and ensuring the vinyl is not too stretched.
9: The smoothing process is all the more difficult on large, curved areas.

10: A heat gun helps the vinyl to stretch slightly over the curves for a smooth finish.

11: Finishing off the hullside wrap at the stern approaching the transom.
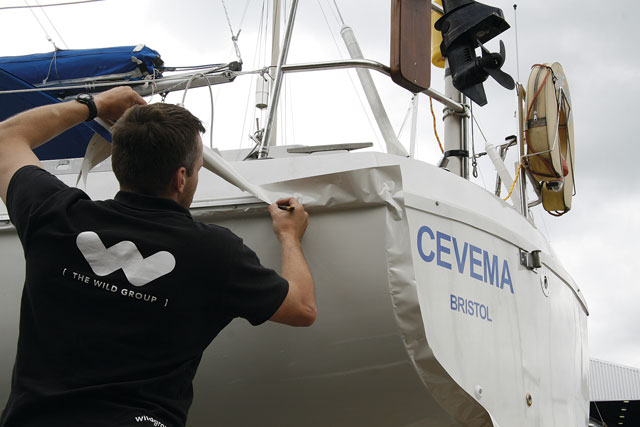
12: Further trimming of the excess vinyl takes place at the top of the hull.

13: Bubbles in the vinyl are popped to let the air escape, then carefully smoothed over.
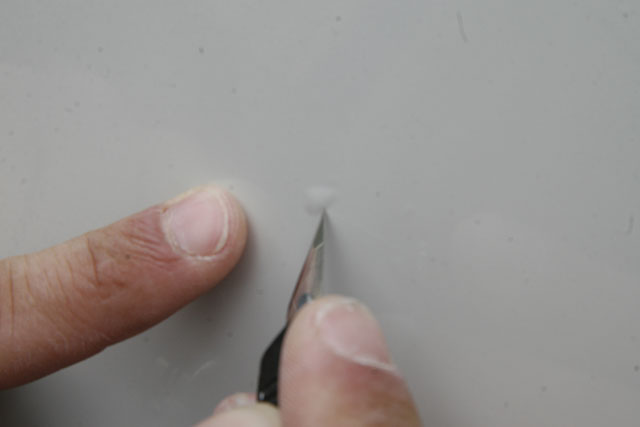
14: To prick the air bubbles a very fine, sharp knife blade is used.
15: Trimming continues at the junction between the hull and the transom.

16: In areas such as this above the rubbing strake, narrower strips of vinyl are applied.

17: For the cove line, a new wrap layer is applied over the top of the hull vinyl.

Careful trimming ensures a neat finish at the tail end of the cove line.