
The exciting new realm of 3D printing offers a means of manufacturing bespoke parts and spares for your boat, as Christopher Roberts explains

Much has recently been made in the papers about 3D printing, which can manufacture replacement bones, blood vessels, buildings and weapons, while NASA are even considering using it to construct a moon base. However, can 3D printing have a use on board your boat? And if so, how would you get started?
In 2011 I attended OggCamp, a free-software and free-culture conference, at which a working RepRap Mendel Prusa 3D printer was attracting a lot of interest. It was particularly fascinating to me that the printer itself was partially printed by a parent machine, making it at least partly self-replicating. A while later I was offered the opportunity to build my own RepRap with the Thames Valley RepRap User Group and jumped at the chance. These were not mere kits being purchased, but a collection of threaded rods, nuts and bolts, motors, wires, printed circuit boards and electrical components. A few weeks later and I not only had my own 3D printer, but I had also made new friends and had learned how to solder! The total cost was less than £500.

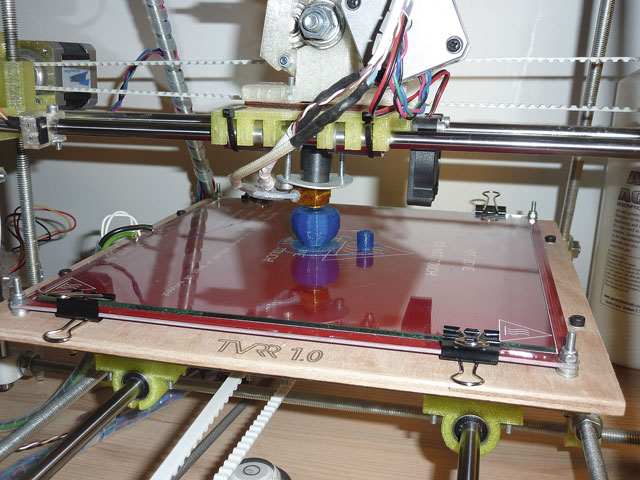
The RepRap printer in action, shown here making a new shore power faceplate for Christopher’s Westerly Merlin 29
What is 3D printing?
Quite simply, 3D printing is the creation of real-world three-dimensional objects through a process of printing. Most low-cost 3D printers manage this by extruding melted PLA or ABS filament onto a flat bed.
Such printers are remarkably simple. There are motors to drive the print head through the three axes – X and Y on the horizontal and Z on the vertical – while a final motor drives the filament into the print head. The filament enters the print head and is then melted and extruded onto the print bed. Once the first layer has been completed, the extruder moves up a fraction of a millimetre and lays down the next layer. If this all seems far too complicated, just think of a 3D printer as being similar to your inkjet printer, except with a vertical axis and squirting out plastic instead of ink.
A further component which deserves mention is the heated bed: this is the surface upon
which you print, and it is heated to ensure that the first layer adheres well. It also makes the bottom surface of your print mirror-smooth, which you can often use to advantage in your designs.
Getting started
The most difficult part of 3D printing is the design of the models themselves, and you don’t need a printer to do that. Once you can create accurate and valid models you can have them printed professionally, which is likely to provide a higher quality than you can achieve in your home – albeit at a much higher unit cost.
Designing your model
Before you set out to design your model, it is worth checking that someone hasn’t done so already and published it on a website such as www.thingiverse.com. Currently there are only a few models for marine applications, but this will undoubtedly increase dramatically as 3D printing becomes mainstream.
Ideally, manufacturers of marine products would make their replacement parts available for download. This would be of enormous help to sailors in far-flung locations, and those wishing to maintain their boats when replacement parts are no longer commercially available.
3D scanners are another option, and affordable versions are at last becoming available. However, they are not without their limitations: they can only scan what they can see, the models created are likely to need some tidying in software before printing, and affordable scanners may not yet have the precision necessary for functionally accurate items.
For the time being, the likelihood is that you will need to design your models yourself using software. While most 3D modelling programs can be used for designing objects, some are better than others. Professional software is extremely expensive, but fortunately there is much open-source software available for free.
My favourite of these is OpenSCAD, which enables you to create accurate and printable designs by typing instructions to combine spheres, cubes and cylinders to make complex objects. Other software is also available and a comprehensive list is maintained on the RepRap website.
Choosing your 3D printer
Once you are confident that you can design your models, having your own printer is undoubtedly
the next step. Before choosing your printer I would suggest joining a local or online 3D printing community and canvassing opinions: you will receive more help if you buy a printer that is popular with that community.
The total cost of Christopher’s 3D printer was less than £500
The main criteria for choosing your printer are:
- Print volume – This fundamentally restricts what you can print.
- Nozzle size – The smaller the better for accuracy, but this generally results in slower print times: I use a 0.4mm nozzle, which gives a balance of speed and accuracy.
- Print heads – Multiple print heads enable printing of multiple colours.
- Filament – I would avoid printers that use proprietary cartridges: stick to printers that use standard diameters of filament.
One of the least expensive options is to make a RepRap, either by yourself or with a RepRap user group. RepRap kits – the RepRapPro, for example – are also now available for around £500. It is fair to say however that the RepRap, while one of the least expensive ways of getting started, does require some practical skill. Print quality depends entirely on how well you assemble the printer and which nozzle you choose, but few low-cost printers can touch a well-calibrated RepRap.
Looking beyond the RepRap, there are now a huge number of kits available as companies rush to feed this newly emerging market, but I will focus my attention on those with an established presence.
Printrbot is probably the cheapest way into 3D printing, with assembled printers costing from around £300 plus shipping and taxes. This is a derivative of the RepRap but without a frame, which will undoubtedly affect rigidity and print quality.
The Velleman K8200 is a derivative of the RepRap, but with an aluminium frame, and costs £699. It hit the headlines recently when Maplin started selling them.
Ultimaker is another established manufacturer, with a choice of a kit for about £800 or an assembled printer for around £1,100 plus shipping and taxes.
MakerGear have a long-standing reputation for producing a high-quality RepRap Prusa, but have now launched their own design M2 printer for around £1,200 plus shipping and taxes.
Makerbot Industries have made the Replicator kit for some years and have now launched the Replicator II – a ready-made printer. Price is about £1,800 from a UK distributor, including VAT.
The filament
Filament is generally supplied on reels and looks very much like insulated electrical wire. It is available in 1.75mm and 3mm diameter, and in many colours – including wood effect! Filament varies considerably in quality and cost, but a popular online supplier is currently charging 30p per
metre. The RepRap website has a comprehensive list of filament suppliers.
The plastic used is generally either PLA or ABS: the latter has the advantage of being relatively resistant to heat and impact. Unfortunately, as with many plastics, ABS is made from fossil fuels which will not biodegrade, making it a significant environmental concern. PLA, on the other hand, is derived from renewable resources, commonly corn, and is often referred to as ‘corn plastic’. PLA can be a little brittle and is not particularly heat-resistant: this makes it easy to print, but unsuitable for locations where temperature is likely to regularly exceed 50˚C.
If you are printing parts for your engine bay, you will certainly need to use ABS filament.
3D printing for my Westerly

Shock cord toggles (23p): This was my first ever 3D design, and being little more than a simple sphere with a hole in the middle was ideal for a novice.
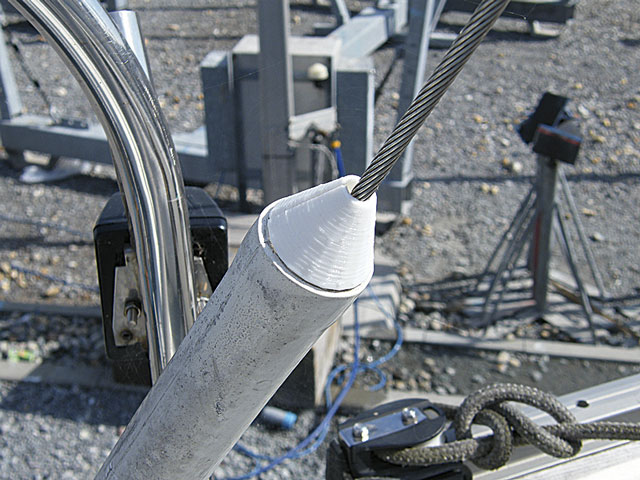
Turnbuckle boot caps (26p): My next design was a replacement for the broken turnbuckle boot caps. In PLA these are a little more brittle than is ideal, but softer plastics are becoming available. Doubtless these may be purchased from a rigger or chandlery, but they do need replacing from time to time: and having designed them, I can now reprint them as and when required.

Avon dinghy pump replacement clamp (£1.23): The classic Avon dinghies are available second-hand on eBay, but the pumps that come with them are often missing any means of clamping the two halves of the pump together to save space on storage. Printing a replacement clamp took less than an hour, including design time, and works brilliantly.
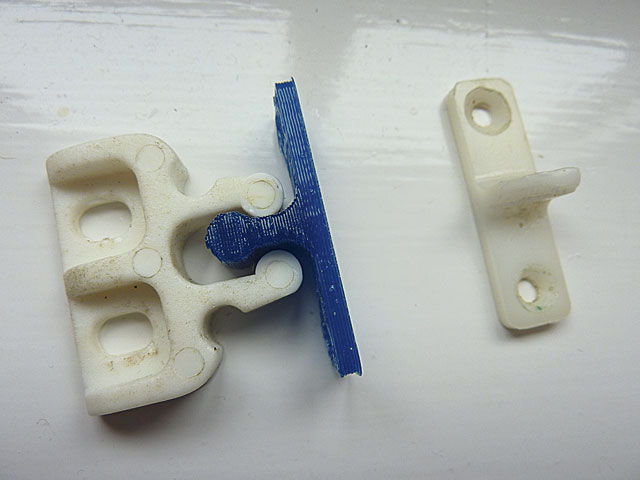
Locker latch (4p):
Yes, I could doubtless have bought a whole new latch from the chandlery for not much money – but I thought to myself, why not just print the half that was broken? As it was exactly the same size as the original, I could use the existing screw holes.

TV bracket (90p): I wanted to mount a small LED TV on the side of the bookcase to keep the children entertained on rainy days. It was important to me that there were no fixings into the wooden fascia. This simple bracket could easily have been constructed from a piece of bent metal if such a piece had been to hand, but this was a quick and easy design – and another opportunity to use my printer.

Shore power faceplate (£1.39): My Westerly has a rectangular shore power socket and the faceplate was broken in half. Given its exposed position in the cockpit this was to be expected, but purchasing a replacement proved very difficult. Fortunately the broken half had been kept by the previous owner, which enabled me to design an exact replica: I have also printed a spare.
Conclusion
3D printing is not yet for everybody: but if you enjoy computers and are a practical boat owner, you will doubtless enjoy this merging of your hobbies!
RepRap
Thames Valley RepRap User Group
3D printers
http://www.3ders.org/pricecompare/3dprinters/
Makergear
Makerbot Industries
RepRapPro
Ultimaker
Velleman
Software
http://reprap.org/wiki/Useful_Software_Packages
OpenSCAD
Filament suppliers
http://reprap.org/wiki/Printing_Material_Suppliers
3D printing communities
Google+
3Ders
Online 3D model stores
Shapeways
Thingiverse
About the author
 Christopher Roberts began sailing at the age of three on his parents’ 9-ton Hillyard. Now married and with two children, in 2012 he and his wife Lin bought a Westerly Merlin 29, which they keep in Chichester Marina.