
It’s time to fit the intermediate and lower stringers to PBO’s Secret 20 kit boat. David Pugh reports
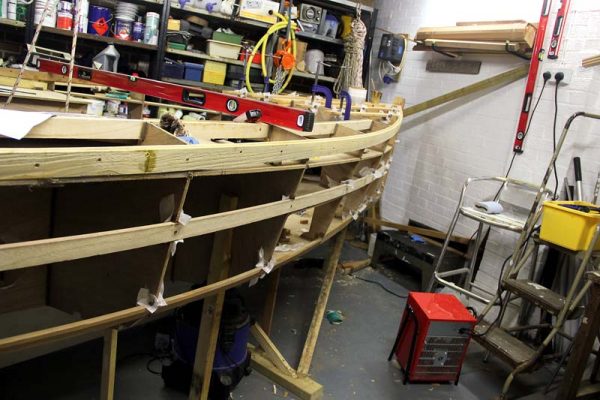
Last month, we left the boat with the deck stringers fitted, looking a lot more like a boat than she had before.
See the full set of articles: Building the Secret 20 kit boat with PBO.
The next stage was to fit the intermediate and lower stringers, and provide some support for the foredeck.
The intermediate stringers sit halfway down the hull sides and were an easier proposition than the deck.
For a start, they have no effect on the sheer, which we set using the deck stringers, so provided the slots in the frames weren’t too far out, these could be simply slotted in without too much fettling.
Also, the transom and stem are now firmly fixed in place, so there’s no argument about where the stringers begin and end.
Like the deck stringers, we opted to scarf the timber provided with the kit so that we could fit the stringer in one length with no visible joins (see PBO March for a guide on scarfing).
Then, because the slots have rounded edges and as the stringers will be visible inside the cabin, we opted to round the edges of the stringer before fitting.
A router was the obvious answer, so we set up my router table with a 6mm rounding bit.

Featherboards help to hold the work tightly to the router table
To hold the timber tightly to the cutter, we used featherboards – if you haven’t used these, they were a revelation to me the first time I tried.
Simply plastic boards with diagonal vanes, constructed in the same way as a bird feather, they apply constant pressure to the workpiece while allowing it to slide.
That’s a great help when you’re trying to machine a 7m length, as are a set of roller stands to support the work as it enters and leaves the table.
Machining complete, we temporarily clamped the stringer in place at the forward end and used a piece of scrap timber to transfer the angle of the stem to the work before cutting it.
We could then bend it into position, screwing it into place at each frame. The transom angle we cut in situ, snugging the stringer into place just above the laminated beam which sets the transom curve.

Filleting the deck supports and intermediate stringer

The intermediate and lower stringers sit above and below the laminated transom beam
Lower stringers
This set of stringers was the last we needed to fit before the hull is rolled, after which the stringers which support the bottom hull panels will be added.
They come in two sections of differing profiles: rectangular between the stem and frame 4, and angled from there aft.
For this reason, we chose to make a simple butt joint at frame 4 rather than attempt scarfing.
This doesn’t present a strength issue, as the stringer sits on top of the bunk boards and is therefore not really setting the shape and certainly not adding much rigidity.
We fitted the aft sections first.
The stringers came machined to shape and with a saw kerf running longitudinally along the inner face: this is because the timber supplied is too stiff to take the curve of the hull without it.
As the stringer forms the top of the chine panel, it needs to be stiff – hence the choice of timber.
The angle in the stringer sets the transition between the hull sides and chine panel.
We started at the forward end, temporarily screwing the stringer to frame 4, then working aft and adding screws as we went.
The stringer twists as it passes over the last couple of frames to the transom, so you need to allow for this in cutting the joint with the transom.
The point at which the stringer should meet the transom is not entirely clear, but after consulting the instructions and build photos we cut it so that it sits in the angle between the bottom of the transom beam and the transom itself, which gives a fair curve running forward along the chine.
With the aft section in place, we set to work on the forward sections, having first machined a round onto the top edge for aesthetics.
The joint with the stem is tricky as the stringer is twisting a lot at this stage.
Measuring is somewhat haphazard, so we found it useful to mark it as best we could before setting the twist by eye.
Imagining fitting a plywood panel to it helps a lot, as with too much twist this would clearly be impossible.
With the joint cut, we screwed it in place and worked aft, frame by frame, to frame 4.
We then set the stringer to butt neatly with the aft section by cutting along the forward face of frame 4 with a backless pull saw to trim both stringers to the correct angle.

The intermediate and lower stringers cut and filleted to the stem

The lower stringer changes from square to angled at frame 4

A piece of scrap timber makes a handy gauge to mark off the angles at the stem
Foredeck supports
The central beam which supports the foredeck went in much earlier in the project (see PBO November 2016), but there are four slimmer longitudinal beams, two each side, to support the plywood and help set the curve.
We encountered two problems with this job.
The first was that the supplied timber was the wrong length.
They should overhang frame 3 by 120mm before meeting a laminated beam, but try as we might with the four lengths supplied, we couldn’t find enough material to cut the angle to meet the deck stringer and project 120mm aft.
We resolved the problem by scarfing the lengths together and recutting them.
The second problem was a knock-on effect of last month’s decision to slightly lower the sheer from that set by the frames at the bow.
When fitting the deck stringers, we found that there was an unsightly hump at frame 2, so we lowered the slots to allow the stringers to settle into a fair curve.
It seems that frame 2 is sitting a little high, so we deepened the foredeck support slots to allow them to sit level from the sheerline aft to frame 3.
We’ll need to plane frame 2 to bring the edges down to meet the deck stringer, but that can wait until later in the project.
Fitting the supports was straightforward once these two problems were resolved as we could place them in position to transfer the angles at the forward end before cutting.
Once cut, we clamped them in place before offering up the curved beam against which they butt and trimming them to length.

The foredeck supports clamped in place. Note the 120mm overhang

Angled joint to the sheer
Filleting
Fitting done, it was time to break out the WEST SYSTEM epoxy again.
We’ve found it’s best to carry out a few jobs, then do the filleting in batches.
We filleted the stringers at each frame and at the stem and transom, and also to the bunk boards.
The deck supports were treated in the same way, after which we applied peel ply to all the joints and left them to cure.
In the winter temperatures we’re having at present it’s worth leaving the joints a few days to fully harden, as epoxy can remain plastic for a period and the tension set by the twist in the stringers could cause it to creep.

The foredeck supports after final fitting

Peel ply on the fillets helps prepare them for future finishing
Next month
Laminated beams for the foredeck and after deck, plus chainplate reinforcement.
As published in the April 2017 issue of Practical Boat Owner magazine.