
10 of the best PBO reader-submitted DIY practical projects to enhance your summer cruise
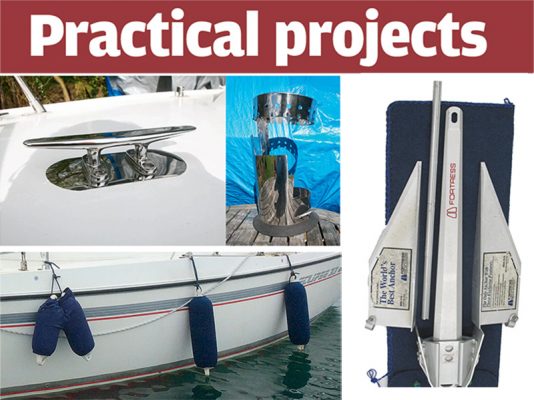
The extra miles of sailing on a summer cruise, or days at anchor can highlight new issues on board or exacerbate existing problems. To aid your voyage this year – be it big or small – here are ten of the best Practical Projects we have published since mid-2017 that could improve your summer cruise.
Enjoy making – and if you come up with anything new email us with a pic and a few words.
How to turn a paper bag into a wasp deterrent
Clive Murray shares this clever free trick
“Wasps can be a problem while at anchor in the Ionian Sea – but less so after my wife Christine and I moored next to a couple on board their 38ft Bavaria in Fiskardo, Kefalonia. I enquired as to the brown paper bag swinging from their bimini and was told it acted as a wasp deterrent because ‘they think it’s a nest and tend to stay away’.

Free wasp deterrent – a brown paper bag supposedly tricks wasps into thinking there is already a nest on board!
“Amazing! This simple idea is certainly very effective, with only the bravest of wasps venturing to check out a glass of the amber nectar.”
Build your own helmsman’s backrests
Singlehander Sam Longley fits creature comforts on his yacht
This might, from a distance, look like Y-fronts drying on the rail, but it’s actually a very comfortable DIY backrest!

Nautical underpants – these are not. This is a DIY helmsman’s adjustable backrest (one on each rail)
The usual way to stop the wires of guardrails cutting into the helmsman’s back when sitting on the side deck is to have horizontal padding on the wires. I found this uncomfortable and, as I actually only needed it in a limited spot, I devised a different support.
I originally used 9mm plywood coated in epoxy resin but this needed annual maintenance. I looked for some polycarbonate but found some very strong Trespa plastic (architectural composite material used for external cladding) as an alternative. Mine is 8mm thick but 6mm thick would work just as well.
Initially, I cut the shape and tied them in place, but that was a mistake – I once found my wife and grandson had nicked them on arriving at a port and were using them like table tennis rackets to play bat and ball. Words were exchanged but as we all know grandmas are not to be reckoned with. I am not sure that I won the exchange!
Next time round, I drilled each one with three sets of two holes at the centre to suit the wires and attached them with strong cable ties. By not tying too tight they can be slid along the wires to the optimum position and give a nice flat surface to rest against. And when coming alongside a pontoon I can slide them clear of the deck cleats.
Make your own wear pads out of a stainless pedal bin
Dismayed by the price of stainless steel and carbon fibre wear pads, Tim Marsden makes his own from a pedal bin
About a year ago, a well-meaning house guest who was in the process of tidying away the dinner plates accidentally broke the lid off our stainless steel pedal bin. It was well beyond repair, and was slung behind the shed ready to be taken to the recycling centre – but I inevitably forgot all about it.

Shiny-looking wear pads all made for free from an old stainless steel pedal bin
Fast-forward 12 months, and while rooting around in the undergrowth I rediscovered the bin. To my surprise, despite having being out in all weathers it was still in superb condition (apart from the broken lid), with no sign of any corrosion at all. I can’t imagine for one minute that it was manufactured from marine-grade 316, but it had certainly fared well against the elements in the garden.
Now, as I am in the process of a long-term restoration on my Mk1 Foxcub 18 I’m always on the look-out for cheap materials for the project. When I purchased the boat, the gelcoat showed the usual marks around the cleats and fairleads where the mooring lines had ground away at the gelcoat, leaving deep groves. During the restoration the gelcoat was duly repaired, and I resolved to use either stainless steel or carbon fibre wear pads on vulnerable areas when replacing the fittings – until I saw the price: £12.50 for a 6in x 2in stainless strip, and even more for the Kevlar version.
A quick survey of the boat revealed that a recycled kitchen pedal bin would be more than sufficient to meet all my wear pad needs. The stainless steel was only about 0.5mm thick: I initially tried cutting the bin with tin snips, but this unfortunately left a wavy, jagged edge, so I ended up using a cutting wheel in a 4.5in grinder and rounding the edges with a smooth file.
Over the next few weeks I manufactured bases for all the fairleads, bringing the pads over the edges of the coamings to protect the gelcoat. I also made wear pads for the bases of the cleats and the opening to the chain locker.
Unlike the commercially-available pads, the pedal bin obviously didn’t have a self-adhesive backing so the deck fittings were bolted through the wear pads and the pads stuck down with a bed of Sikaflex 291i.
The finished job looks really smart and has attracted admiring comments from other boat owners. The cost of the whole job really depends on the availability of the materials or, as in my case, a clumsy but well-meaning house guest.
Make your top-loading fridge more easily accessible by using plastic bins
Tim Peacock on a fridge too far…
I was getting fed up with having to rummage about in the fridge on my Jeanneau 42DS. It always seemed that the thing I wanted was at the bottom, which meant having to reach right in, dig round and pull several smaller items out. Anyone with shorter-than-average arms would be in danger of falling in!

Fridge bins are easy to lift out, making it easier to get to hard-to-reach items stored in a top-loading boat fridge.
The solution to my problem turned out to be ventilated rubbish sorting bins from Ikea. Two of these bins fit perfectly into the lower sections of the fridge, which means that you can pull the whole lot out in one go. No more bruised ribs!
Cockpit locker organisers
Roger Cooke got oar-ganised
“Chaos reigned in my hull-deep deck locker: it was time to make some attempt at organising the contents.
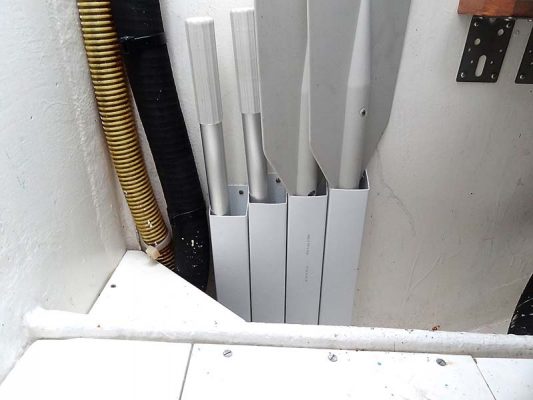
“The sectioned oars for the inflatable tender were particularly prone to vanishing beneath other contents of the locker, so I found a length of leftover square drainpipe and cut it into four sections. A few stainless self-tapping screws later and, hey presto, a modicum of order was restored. The cost? For me, less than £1: perhaps £5 if you need to buy the drainpipe.
Make your own secure vented companionway covers for summer
Edward Sutton optimises his companionway hatch fittings for security and convenience
When we bought our current boat, a Sadler 29, to be kept on a swinging mooring, I was aware that two of our previous three boats had been broken into. Theft is an obvious risk when boats are left unattended in quiet creeks and estuaries, particularly at night. So, with a new and larger boat containing more ‘goodies’, the need to reduce the risk of theft was on my mind from the day we took delivery.
The boat came with a pair of teak-faced ply boards which slotted into coamings each side of the hatch opening and a lock which engaged into a slot under the front edge of the sliding top.
However, as I discovered by accident, it only needed a vigorous push to bend the brass tang holding the hatch top and the boat would be opened up. Fortunately, I saw an advertisement in PBO for a ‘Hatch-latch’, and I was apparently an early customer for this super gadget. The ‘Hatch-latch’ provided a way of securing the boards to the sliding cover, preventing their loss in the event of a knockdown or inversion, but also allowing the hatch to be unfastened by anyone trapped below.
However, the feature that attracted me was the huge Chubb padlock with enclosed hasp which could lock the hatch when the boat was unattended. This whole lock mechanism seemed to say to potential thieves, ‘this is serious protection. Forget bolt cutters and crowbars. Go away and don’t waste your time here’.
To complete the job, I made new boards fronted with sheets of stainless steel and carried the same protection to the teak coamings holding the boards. These were removed for strips of stainless steel to be bolted through under the timber, and as a final touch a steel bar was glassed in under the front of the sliding hatch.

New hatch boards fronted with stainless steel for security at the mooring.
Improving conditions
The steel-fronted boards are, of course, heavy, and only used when the boat is unattended, so they remain stowed in webbing slings within the cockpit locker when under way. However, we soon found that cruising and sleeping aboard required other hatch devices to help improve living conditions.
The need for one of these became apparent when we were caught out by a sudden violent rain squall from astern while under full sail with the hatch wide open and its boards stowed below. In this situation, the priorities were to reduce sail and deal with the dinghy we were towing behind, so by the time we put the boards in place our saloon berths, bedding and other gear were soaked.
The simple remedy for this situation has been found to be a canvas flap, large enough to cover the opening under the sliding hatch, attached with three turnbuckles to its back edge.
The flap has a rigid strip across its middle to rest across the coamings either side and stop the canvas being blown inside.
Tightly rolled and sitting on the top of the hatch, this cover can be deployed in a second, stopping rain and spray getting below. With recent summers, this device has been invaluable.
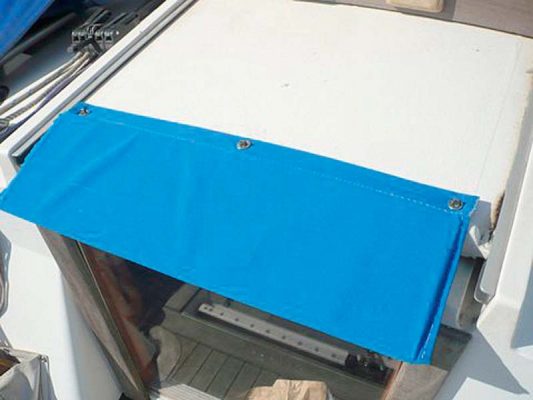
A canvas flap can be fitted in seconds and helps to keep things dry down below if sudden rain or spray arrive.
Twin advantages
Another innovation for us has been a transparent panel to replace the hatch boards when the crew is below. We have seen these as a standard fitting on many boats, and they have the twin advantages of letting in more light while providing greater visibility of activities outside.
Our panel, made from polycarbonate, provides a 3in gap under the sliding hatch for ventilation. We fit this every night aboard, and when overlooked by boats alongside or on pontoons, the bottom wooden hatch board resting against it provides privacy.

A transparent polycarbonate companionway hatch cover increases natural light levels below and improves communication.

This cover allows ventilation in very wet conditions.
However, the air gap can let in rain when the boat is stern-to the weather, and another canvas flap – stiffened with plywood – has fixed this problem. This is attached with turnbuckles to the same points on the hatch cover used for the canvas cover,
and it allows essential ventilation below in the wettest conditions.
Old leggings make great fender socks

Recycle old leggings to make fender socks
Mel and Sue Bush suggest giving your old leggings a second life as fender socks
How to make a handy bag for a fortress anchor
Wil Bailey designed and made his own handy anchor bag
One of the features of the popular Fortress anchor range is that they can be disassembled for stowage, and made ready for use again in a few minutes – provided you can find all the pieces, bolts and tools for the job.
The answer is, of course, a dedicated stowage pouch which keeps everything together and will fit conveniently into a locker.
Mine is made from a cheap rubber-backed acrylic hall carpet runner (£5 for two), some plastic balls for button fasteners and some light cord for the blanket-stitched edges.

Fully assembled anchors are unwieldy objects to stow anywhere except the bow of the boat

The Fortress anchor divides up neatly into several components, all of which will fit into a single, easily stowable bag.
I also changed the anchor’s supplied securing locknuts/bolts for ringnuts/threaded rod, so the anchor can be assembled by hand without having to resort to tools. A couple of cheap nylon cable ties allows the assembly to be moused if wanted.

Securing the parts of the anchor together with bolts requires the use of a spanner. Ringnuts can be finger-tightened, however

Replacing the nuts and bolts with ringnuts that can be tightened without the use of tools
There’s plenty of room to keep spares in the bottom of the bag, together with a light trip-line.
DIY halyard hangers under your sprayhood
David Larner demonstrates an inexpensive method of keeping ropes shipshape on his Bavaria 34
Having lines led back to the cockpit of my Bavaria 34 means I don’t need to leave the cockpit to adjust them, but introduces the problem of stowage.
I tried draping lines down the companionway but didn’t like damp ropes in the cabin.
When left on the coachroof or in the cockpit, without continual vigilance, they become tangled.
I experimented with the traditional answer, a halyard bag, but this tended to hide the problem rather than solve it. Also, ropes remained damp and began to smell.
My preferred solution is to arrange hangers under the cockpit hood, with lines suspended in straps made of webbing with Velcro strips.

Timber rails are fixed to my Bavaria 34 sprayhood support tubes with shock cord. Polyester webbing tape and Velcro provides neat and strong slings.

Shock cord sail ties with plastic ball ends secure and adjust the position of the rails. Note the screws with washers fixing the webbing to the rails.
Lines are now readily accessible, easily distinguished, never tangle and dry out quickly. The hangers have been in use for many years and have solved the perennial problem of tangled lines at minimal cost.
Add permanent buoyancy to your tender or dinghy using builder’s foam in a dry-bag
PBO reader C Rhodes of Wrexham wrote in with the following suggestion
My 14ft wooden dinghy has several buoyancy bags made of rubberised fabric which is failing so they become deflated very quickly.
I have become tired of the routine of having to remove, inflate and replace them and looked for an inexpensive solution.
Inflatable buoyancy bags, such as these, can be replaced with homemade versions containing builder’s foam. Photo credit: Tom Gruitt
I settled on using an aerosol of builders’ expanding foam (used to fill gaps in brickwork and around doorframes) to inflate them, being careful to inject it slowly, allowing the foam time to expand without risk of bursting the bag. This has proved to be a cheap and successful repair.
The hard sell…
Do you know any young boaters or people who dream of owning a boat one day? A recommendation from you to start reading PBO could save them money in the long run and means our experts can continue helping all boat owners with their problems.
Subscribe, or make a gift for someone else, and you’ll always save at least 30% compared to newsstand prices.
See the latest PBO subscription deals on magazinesdirect.com